🔥 My React Handbook - Part I

I am a developer creating open-source projects and writing about web development, side projects, and productivity.
In this comprehensive guide, we delve into the art of writing "clean code" in React.js. Having embarked on my React journey five years ago and continuing to utilize it in my role as a Software Engineer, I've encountered various challenges along the way. Reflecting on past experiences, I strive to approach them in a more refined manner moving forward.
React stands out as one of the most prominent technologies in the realm of JavaScript, often hailed as the preferred choice by many developers. Unlike some frameworks, React grants developers the freedom to structure projects as they see fit. While this fosters creativity, it can also lead to disorder if not managed properly, particularly when collaborating within a team setting. Hence, establishing a clear and comprehensible structure becomes imperative.
React Advanced Concepts
How React’s Render, Effects, and Refs work under the hood
Let’s start with this snippet to get the thoughts rolling:
function ExploringReactRefs() {
  // Why does this ref start as null?
  // When does it get its actual value?
  const divRef = useRef<HTMLDivElement>(null);

  // This feels like it should work... but does it?
  // When exactly does this effect run?
  useEffect(() => {
    console.log("Effect:", divRef.current?.getBoundingClientRect());
  }, []);

  // What's different about this effect?
  // Why might we need this instead of useEffect?
  useLayoutEffect(() => {
    console.log("Layout Effect:", divRef.current?.getBoundingClientRect());
  }, []);

  // What's special about this callback ref approach?
  // When does this function actually get called?
  // See the second div below where handleRef is used.
  const handleRef = (node: HTMLDivElement | null) => {
    if (node) {
      console.log("Callback ref:", node.getBoundingClientRect());
    }
  };

  return (
    <div className="flex gap-4">
      {/* When can we actually access this element via divRef? */}
      <div ref={divRef}>Using useRef</div>

      {/* How is this different from useRef? */}
      <div ref={handleRef}>Using callback ref</div>
    </div>
  );
}
State updates and renders
Whenever your component’s state is updated, React will re-render it. Re-rendering a component renders all of its children(yes, you can optimize this, but it’s not the point here).
And just to be clear, effects only run if their dependencies change. If an array is empty, it will only run once when the component is mounted (created).
Let’s just go over the snippet to be brutally clear about this:
function Component() {
  // 1. No dependency array - runs on EVERY render
  useEffect(() => {
    // Effect runs
    return () => {
      /* Cleanup runs before next effect */
    };
  }); // Missing dependency array

  // 2. Empty array - runs only on mount/unmount
  useEffect(() => {
    // Effect runs once
    return () => {
      /* Cleanup runs on unmount */
    };
  }, []);

  // 3. With dependencies - runs when deps change
  useEffect(() => {
    // Effect runs if count changed
    return () => {
      /* Cleanup runs before next effect if count changed */
    };
  }, [count]);

  // Same rules apply for useLayoutEffect
}
Mount means the component gets created.
Unmount means the component gets destroyed, or in simpler words, removed from the DOM. I used to believe in my younger days that this meant navigating away from the page. But this can also be the case if you are conditionally rendering a component.
When a component is rendered, it goes through two main phases:
Render phase
Commit phase
We are gonna break those down into simpler terms.
For now, understand that every single time a render happens, two phases are executed: Render and commit.
Virtual DOM
Before we dive into the Render phase, let’s talk about the Virtual DOM.
A lot of people who lack understanding instantly rush towards “Virtual DOM is to make React faster“. It’s a bit funny because it’s not really the case. You have UI libraries today, such as Solid.js, that don’t have a Virtual DOM and are faster than React. That statement is very confusing and incorrect.
In actuality, React uses Fiber architecture instead of a simple Virtual DOM. This lets React split into chunks and prioritize it. This is still good for us to understand the basis.
Virtual DOM is just Javascript objects. It’s the representation of the actual DOM.
So here, we noticed the first “cost“ already. We are storing a representation of the DOM in memory. Not that this isn’t a big deal. Millions, if not billions of websites, are using React.
By having a Virtual DOM, React isn’t tied to the browser’s DOM.
This means React can render to different platforms.
That’s why React Native exists and works. Mobile apps do not use the browser’s DOM.
Just pseudo code for our enlightenment:
// React can render to different targets
function render(virtualElement) {
  switch (environment) {
    case "web":
      return renderToDOM(virtualElement);
    case "mobile":
      return renderToNative(virtualElement);
    case "server":
      return renderToString(virtualElement);
  }
}
Batching updates
As we discussed before, React re-renders the entire component (including its children) whenever a state update happens.
This means that when state updates happen, it could result in a lot of DOM changes in the end.
With Virtual DOM, React can batch these updates. It can figure out all the changes that it needs to do and apply them in a single pass when the commit phase is executed.
// Without Virtual DOM
state.change1(); // DOM update
state.change2(); // DOM update
state.change3(); // DOM update

// With Virtual DOM
state.change1(); // Update virtual tree
state.change2(); // Update virtual tree
state.change3(); // Update virtual tree
// One single DOM update at the end!
Render phase
Let’s finally talk about the render phase.
This is the first phase of the render cycle.
One thing that annoys me sometimes when learning is all the terminology people try to use.
We can also call this the first step of going from state change to DOM change.
Let’s look at some pseudo code:
// RENDER PHASE
function renderPhase(newState) {
  // 1. React creates/updates Virtual DOM by calling components
  function handleStateUpdate() {
    // Create new Virtual DOM tree
    const newVirtualDOM = {
      type: "div",
      props: { className: "app" },
      children: [
        {
          type: "span",
          props: { children: newState },
        },
      ],
    };

    // 2. Reconciliation (Diffing)
    // React compares new Virtual DOM with previous one
    // Figures out what needs to change in real DOM
    const changes = diff(previousVirtualDOM, newVirtualDOM);
    // Results in a list of required DOM operations
    // [{type: 'UPDATE', path: 'span/textContent', value: newState}]
  }
}
With the new state, React creates a new Virtual DOM tree.
React uses this new Virtual DOM tree to figure out what changes need to be made to the actual DOM.
It does so by comparing the new Virtual DOM tree with the previous one.
Now React knows exactly the changes that need to be made and we don’t need to update the full DOM every time a state update happens.
Commit phase
Now we know what changes we need to make.
The commit phase is often summarized as “React updates the DOM“. But it’s a bit deeper than that.
If you are not familiar with the event loop. I recommend reading up on it before continuing. Chapters 12, 13, and 14 are relevant if you wanna learn more about the event loop. MDN or YouTube are also good resources.
Let’s look at some pseudo code:
// 1. React's Commit Phase (Synchronous JavaScript)
// This runs on the main thread
function commitToDOM() {
 // React calls DOM APIs
 // Each call gets added to the call stack
 mutateDOM() {
   document.createElement()
   element.setAttribute()
   element.appendChild()
   // ...
 }

 // remember useLayoutEffect?
 // Now we'll run all the layout effects
 // this is synchronous
 // the code in here gets added to the call stack too
 runLayoutEffects()

 // Queue useEffect for later
 queueMicrotask(() => {
   runEffects()
 })
}

// commitToDOM() is done - time for browser to work

// 2. Browser's Work
// - Calculate Layout
// - Paint
// - Composite

// 3. Microtask Queue
// Now useEffect runs
How browsers work is out of the scope of this post. But that is super interesting. It’s on my list of things to learn in 2025. I have done some research on it when I dug into hidden classes and stuff. Let’s go over those points quickly, then get back to the topic:
Calculating layout: The browser calculates exact positions and sizes.
Paint: The browser converts layout results into visual pixels.
Composite: The browser combines layers into a final screen image.
When we run the layout effects, we are running the synchronous Javascript code. The function call and the ones it contains get added to the call stack. Now, if you have been following along closely, you understand that every time the layout’s dependencies change, they will run again. This MEANS more synchronous code to go through before the browser can do its thing (which is why React recommends being careful with useLayoutEffect).
We then run the normal effects. These are queued up with queuedMicrotask() in our example. However, in actuality, React uses its own scheduling system. But I think it helps to review it as a microtask queue to sort of understand the basics.
When the browser does its things, it’s gonna first clear the entire call stack before it’s running anything from the microtask queue. Then, it runs the microtask queue.
Refs
Let’s focus on the refs from the original snippet.
const divRef = useRef<HTMLDivElement>(null);
This ref is created during the render phase. It starts as null because the DOM element doesn’t exist during the first render. It gets its actual value after React commits the changes to the DOM. But you can’t know exactly when this happens just by using useRef alone.
That’s why you always need to check if the ref is null before you use it.
if (divRef.current) {
  console.log(divRef.current.getBoundingClientRect());
}
What happens when you use a callback ref?
const handleRef = (node: HTMLDivElement | null) => {
  if (node) {
    console.log("Callback ref:", node.getBoundingClientRect());
  }
};
Called immediately when the element is attached to the DOM. You can be 100% sure that the callback ref will run at the right time. It’s null when the element is removed in case you need to clean up. It runs before useLayoutEffect. It’s best for immediate DOM measurements or setup.
function Tooltip({ text, targetRef }) {
  const tooltipRef = useRef(null);

  // Wrong: Might cause flicker
  // Why?
  // Because this happens after the DOM is painted
  // You will tooltip in its original position
  // Then it flickers when this runs
  useEffect(() => {
    const targetRect = targetRef.current.getBoundingClientRect();
    tooltipRef.current.style.top = `${targetRect.bottom}px`;
  }, []);

  // Better: No flicker
  // Why?
  // Because this happens before the DOM is painted
  // You will see the tooltip in its final position
  useLayoutEffect(() => {
    const targetRect = targetRef.current.getBoundingClientRect();
    tooltipRef.current.style.top = `${targetRect.bottom}px`;
  }, []);

  // Best: Most direct
  // Why?
  // Because this happens immediately after the DOM is attached (layout effect happens AFTER the DOM is attached)
  const handleRef = (node) => {
    if (node) {
      const targetRect = targetRef.current.getBoundingClientRect();
      node.style.top = `${targetRect.bottom}px`;
    }
  };

  return <div ref={handleRef}>{text}</div>;
}
When do cleanup functions run?
After a render, right BEFORE React runs the effect (useEffect or useLayoutEffect, only if dependencies change), it runs the cleanup functions with the previous values. Then, it runs the new effect with the new values. Or, of course, if the component unmounts.
How React’s Reconciliation Decides What to Re-Render
Ever wondered how React knows exactly which parts of your UI need updating when state changes? It’s not magic — a meticulously designed algorithm called reconciliation that makes thousands of split-second decisions about what to re-render.
After diving deep into the React source code and running countless performance test cases, I’ve discovered that most developers have a completely wrong mental model of how React actually works. Understanding reconciliation isn’t just academic curiosity — it’s a skill for writing React apps that feel blazing fast.
Let me show you how React exactly makes these decisions, and why some innocent-looking code can completely tank your apps’ performance.
The Problem React Hard To Solve
Before we dive into the solution, let’s understand the challenge. When your app’s state changes, React needs to update the UI. The native approach would be to destroy everything and build from scratch.
// The naive approach (thankfully React doesn't do this)
function updateUI() {
  document.body.innerHTML = ''; // Destroy everything
  renderEntireAppFromScratch(); // Rebuild everything
}
This would work, but it would be painfully slow. Rebuilding the entire DOM tree is expensive, and you will lose focus states, scroll positions, and any user input.
The smart approach is to figure out the minimum set of changes needed to update the UI. But here’s the catch: the state-of-the-art algorithms have a complexity in the order of O(n³) where n is the number of elements in the tree. If we used this in React, displaying 1000 elements would require in the order of one billion comparisons.
React’s solution? Build a heuristic O(n) algorithm based on two key assumptions that hold true for almost all real-world applications.
The Two Assumptions That Changed Everything
React’s reconciliation algorithm is built on two simple assumptions:
Assumption 1: Different Element Types = Different Trees
Two elements of different types will produce two different trees. This means if you change a <div> to a <span>, React assumes everything inside has changed and rebuilds the entire subtree.
// Before
<div>
  <UserProfile />
  <UserSettings />
</div>

// After
<span>
  <UserProfile />
  <UserSettings />
</span>
Even though UserProfile and UserSettings haven't changed, React will unmount and remount all components. This might seem wasteful, but in practice, it’s rare to change element types, and this assumption allows React to skip complex assumptions about React-diffing algorithms.
Assumption 2: Keys Provide Stability Hints
The developer can hint which child elements may be stable across different renders with a key prop. This is where keys become crucial for performance.
Here’s a mind-blowing example of how keys affect reconciliation:
// Without keys - performance disaster
<ul>
  <li>Duke</li>
  <li>Villanova</li>
</ul>

// Adding item at the beginning
<ul>
  <li>Connecticut</li>  // React thinks this is "Duke" that changed
  <li>Duke</li>         // React thinks this is "Villanova" that changed
  <li>Villanova</li>    // React thinks this is a new item
</ul>

// With keys - efficient updates
<ul>
  <li key="duke">Duke</li>
  <li key="villanova">Villanova</li>
</ul>

// Adding item at the beginning
<ul>
  <li key="connecticut">Connecticut</li>  // New item
  <li key="duke">Duke</li>                // Unchanged
  <li key="villanova">Villanova</li>      // Unchanged
</ul>
With proper keys, React knows exactly which items are new, moved, or unchanged.
The Three-Step Decision Process
When React needs to update your UI, it follows a precise three-step process:
- Step 1: Element Type Comparison
React first compares the types of elements. Here’s what happens in different scenarios:
// Scenario A: Same type, different props
// Before
<input type="text" value="hello" />

// After
<input type="text" value="world" />
// Decision: Update the value attribute only
// Scenario B: Different types
// Before
<input type="text" value="hello" />

// After
<textarea value="hello" />
// Decision: Unmount input, mount textarea (complete rebuild)
Here is a mind-bending example that shows how reconciliation can surprise you:
function App() {
  const [showFirst, setShowFirst] = useState(true);

  return (
    <div>
      {showFirst ? (
        <input key="first" placeholder="First input" />
      ) : (
        <input key="second" placeholder="Second input" />
      )}
    </div>
  );
}
When you toggle showFirst, React sees different keys and completely unmounts the first input and mounts the second one. Any text you typed gets lost.
But without keys:
function App() {
  const [showFirst, setShowFirst] = useState(true);

  return (
    <div>
      {showFirst ? (
        <input placeholder="First input" />
      ) : (
        <input placeholder="Second input" />
      )}
    </div>
  );
}
React sees the same element type (input) in the same position and just updates the placeholder. Your typed text is preserved! React doesn't treat the email input as an entirely new node, because the type of input element (<input />) is the same, even though it's conditionally rendered.
- Step 2: Props and State Diffing
If the element types match, React moves to comparing props and state:
function UserCard({ name, avatar, isOnline }) {
  // React compares: name, avatar, isOnline
  // Only re-renders if any of these changed
  return (
    <div className={isOnline ? 'online' : 'offline'}>
      <img src={avatar} alt={name} />
      <h3>{name}</h3>
    </div>
  );
}
Here’s where it gets interesting. React does shallow comparison, so:
// This will cause unnecessary re-renders
function App() {
  const [count, setCount] = useState(0);

  return (
    <UserList
      users={users}
      settings={{ theme: 'dark', locale: 'en' }} // New object every render!
    />
  );
}

// Better approach
function App() {
  const [count, setCount] = useState(0);
  const settings = useMemo(() => ({
    theme: 'dark',
    locale: 'en'
  }), []);

  return (
    <UserList
      users={users}
      settings={settings} // Stable reference
    />
  );
}
- Step 3: Children's Reconciliation
For children, React uses keys to match elements between renders:
// React's internal reconciliation logic (simplified)
function reconcileChildren(oldChildren, newChildren) {
  const updates = [];

  // If children have keys, use key-based matching
  if (newChildren.some(child => child.key)) {
    const oldChildrenByKey = mapByKey(oldChildren);
    const newChildrenByKey = mapByKey(newChildren);

    for (const key in newChildrenByKey) {
      if (oldChildrenByKey[key]) {
        // Child exists - check if it needs updates
        updates.push(compareAndUpdate(oldChildrenByKey[key], newChildrenByKey[key]));
      } else {
        // New child - mount it
        updates.push(mount(newChildrenByKey[key]));
      }
    }
  } else {
    // No keys - fall back to index-based matching
    for (let i = 0; i < Math.max(oldChildren.length, newChildren.length); i++) {
      // This is much less efficient for dynamic lists
    }
  }

  return updates;
}
The Fiber Resolution: Making Reconciliation Interuptible
React 16 introduced a complete rewrite of the reconciliation algorithm called Fiber. The old “Stack Reconciler“ had a critical flaw: once it started reconciling, it couldn’t stop until it finished.
// Old Stack Reconciler (pseudo-code)
function reconcileRecursively(element) {
  // This runs to completion - can't be interrupted
  const children = element.children;
  for (let child of children) {
    reconcileRecursively(child); // Blocks the main thread
  }
  updateDOM(element);
}
This could block the main thread for hundreds of milliseconds on complex apps, making animations janky and interactions unresponsive.
Fiber solves this by breaking work into units:
// Fiber Reconciler (simplified)
function workLoop() {
  while (nextUnitOfWork && shouldYieldToMainThread()) {
    nextUnitOfWork = performUnitOfWork(nextUnitOfWork);
  }

  if (nextUnitOfWork) {
    // Yield to main thread, resume later
    scheduleCallback(workLoop);
  } else {
    // All work done, commit changes
    commitRoot();
  }
}
React Fiber divides the update into units of work. It can assign the priority to each unit of work, and has the ability to pause, reuse, or abort the unit of work if not needed.
This enables some incredible features:
Time slicing: React can pause work to handle user interactions
Priority-based updates: Animations get higher priority than data fetching
Concurrent rendering: Multiple updates can be processed simultaneously
Comprehensive Guide on React Re-renders
Original post: React re-render guide: everything, all at once.
When talking about React performance, there are two major stages that we need to care about:
initial render: happens when a component first appears on the screen
re-render: second and consecutive render of a component that is already on the screen
Re-render happens when React needs to update the app with some new data. Usually, this happens as a result of a user interacting with the app or some external data coming through via an asynchronous request or some subscription model.
Non-interactive apps that don’t have any asynchronous data updates will never re-render, and therefore don’t need to care about re-render performance optimization.
Watch “intro to re-renders” on Youtube.
Necessary re-renders: re-render of a component that is the source of the changes, or a component that directly uses the new information. For example, if a user types in an input field, the component that manages its state needs to update itself on every keystroke.
Unnecessary re-renders: re-render of a component that is propagated through the app via different re-render mechanisms due to either mistakes or inefficient app architecture. For example, if a user types in an input field and the entire page re-renders on every keystroke, the page has been re-rendered unnecessarily.
Unnecessary re-renders by themselves are not a problem. React is very fast and able to deal with them without users noticing anything.
However, if re-renders happen too often and/or on very heavy components, this could lead to user experience appearing “laggy”, visible delays on every interaction, or even the app becoming completely unresponsive.
When does a React component re-render itself?
There are four reasons why a component would re-render itself: state changes, parent (or children) re-renders, context changes, and hooks changes. There is also a bug myth: that re-renders happen when the component’s props change. By itself, it’s not true.
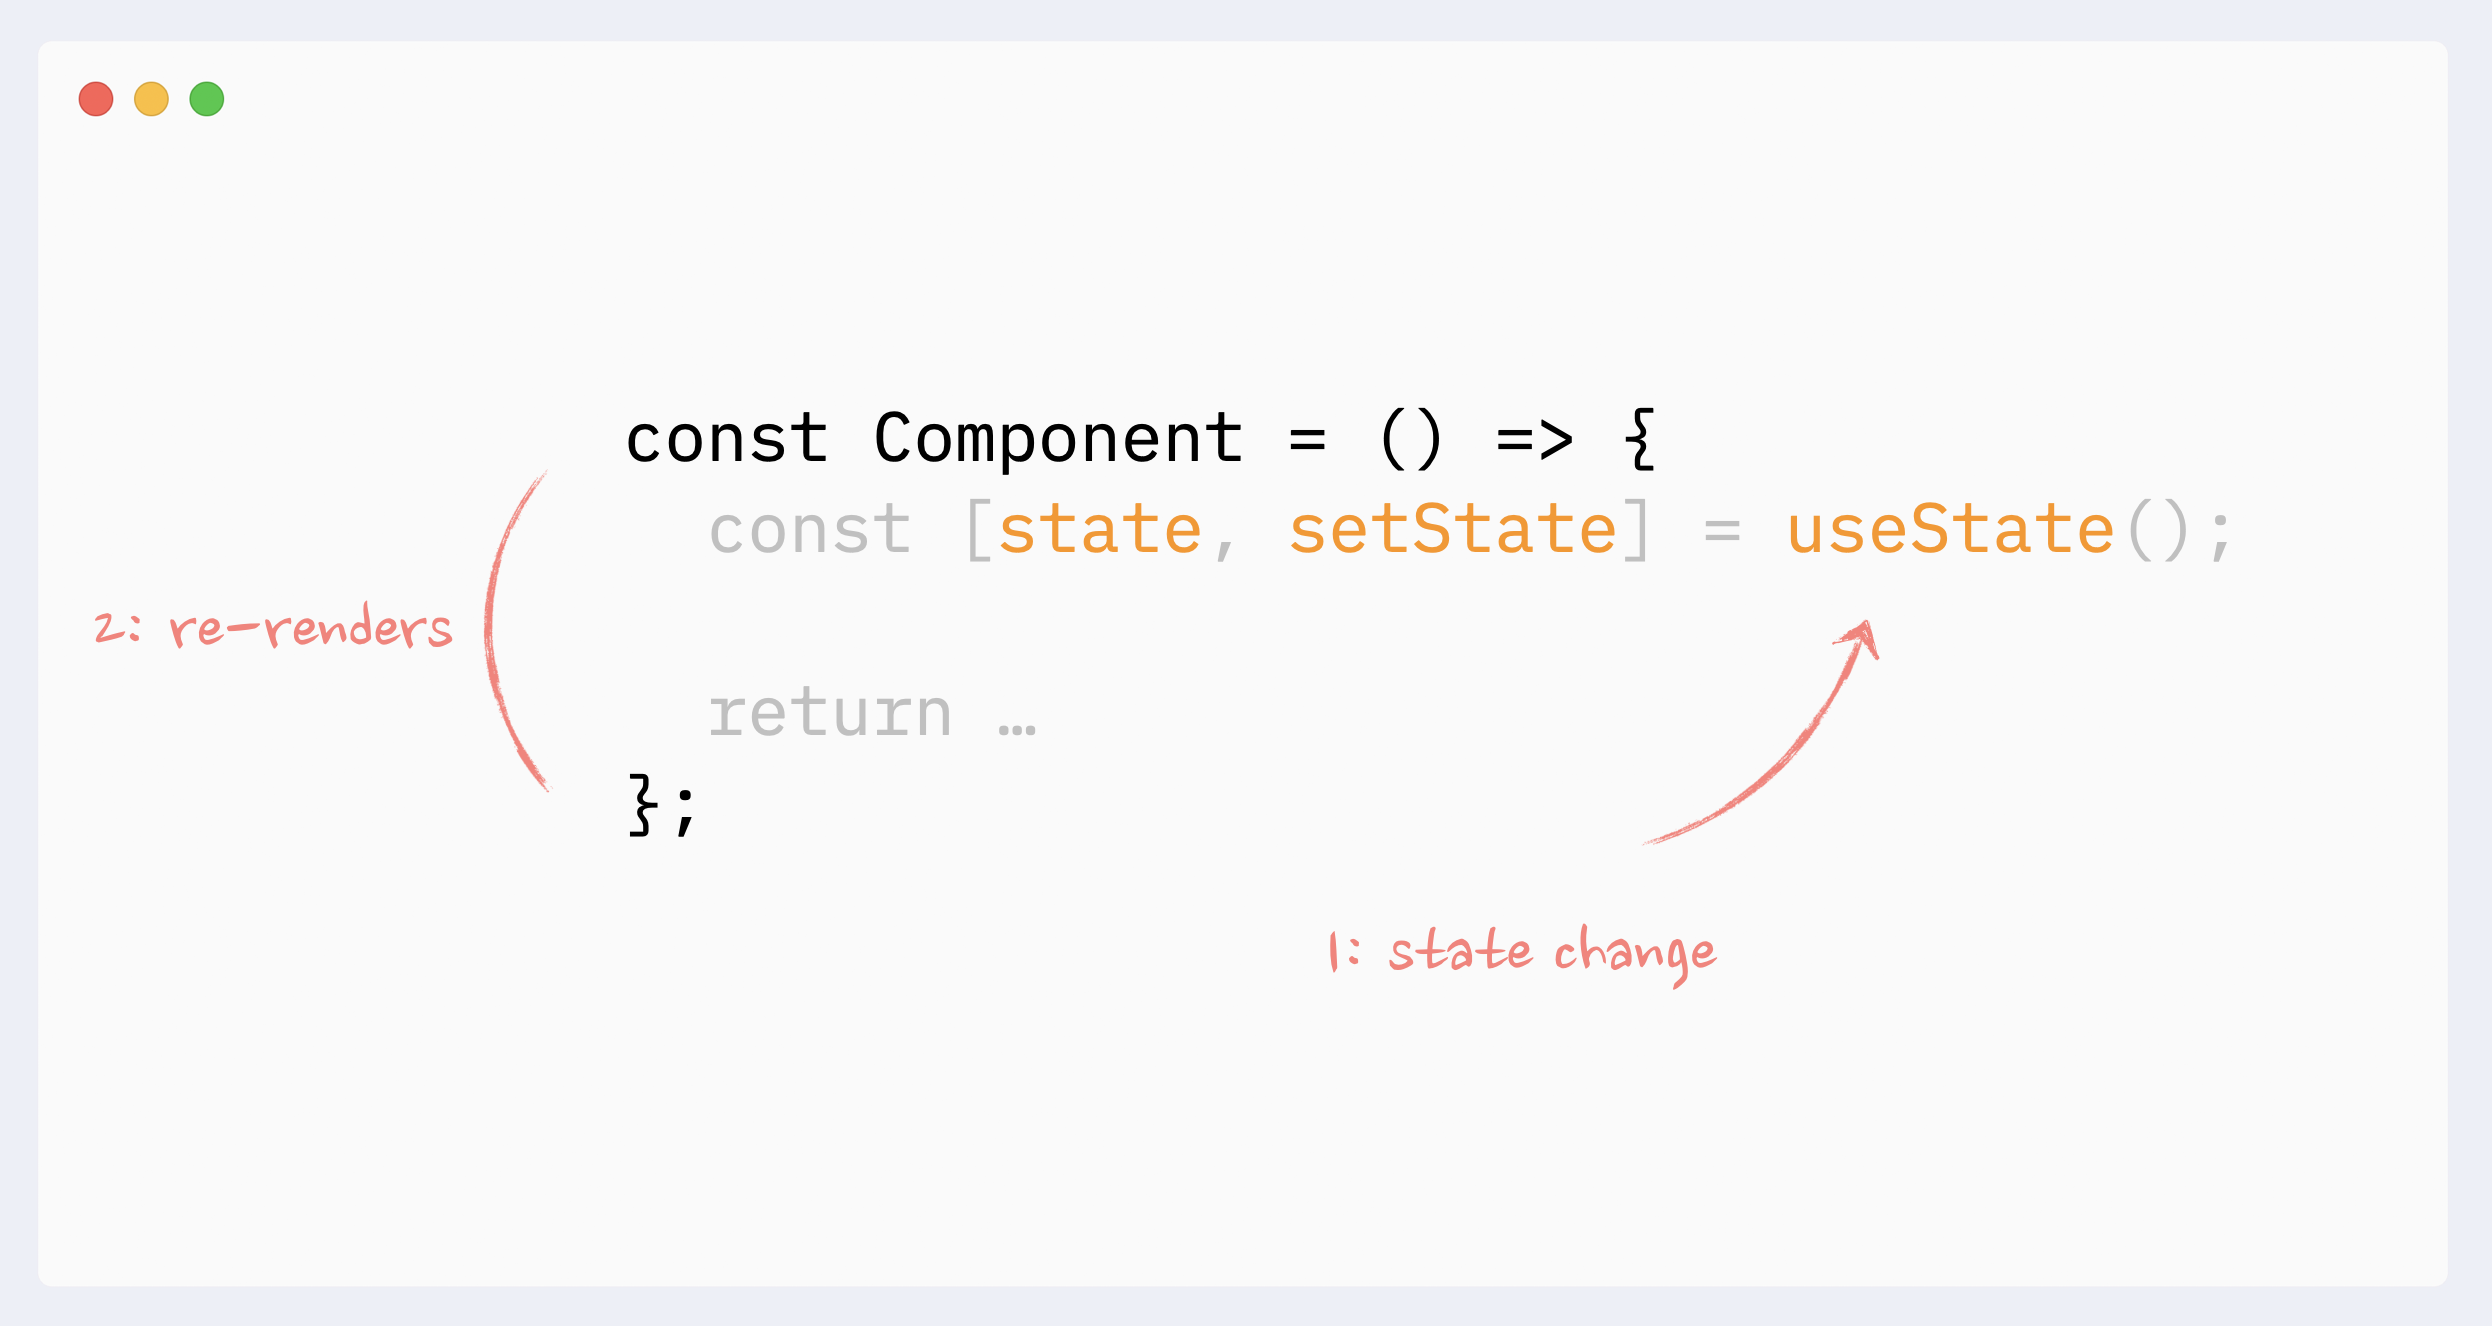
- Re-renders reason: state changes
When a component’s state changes, it will re-render itself. Usually, it happens either in a callback or in useEffect hook.
State changes are the “root” source of all re-renders.
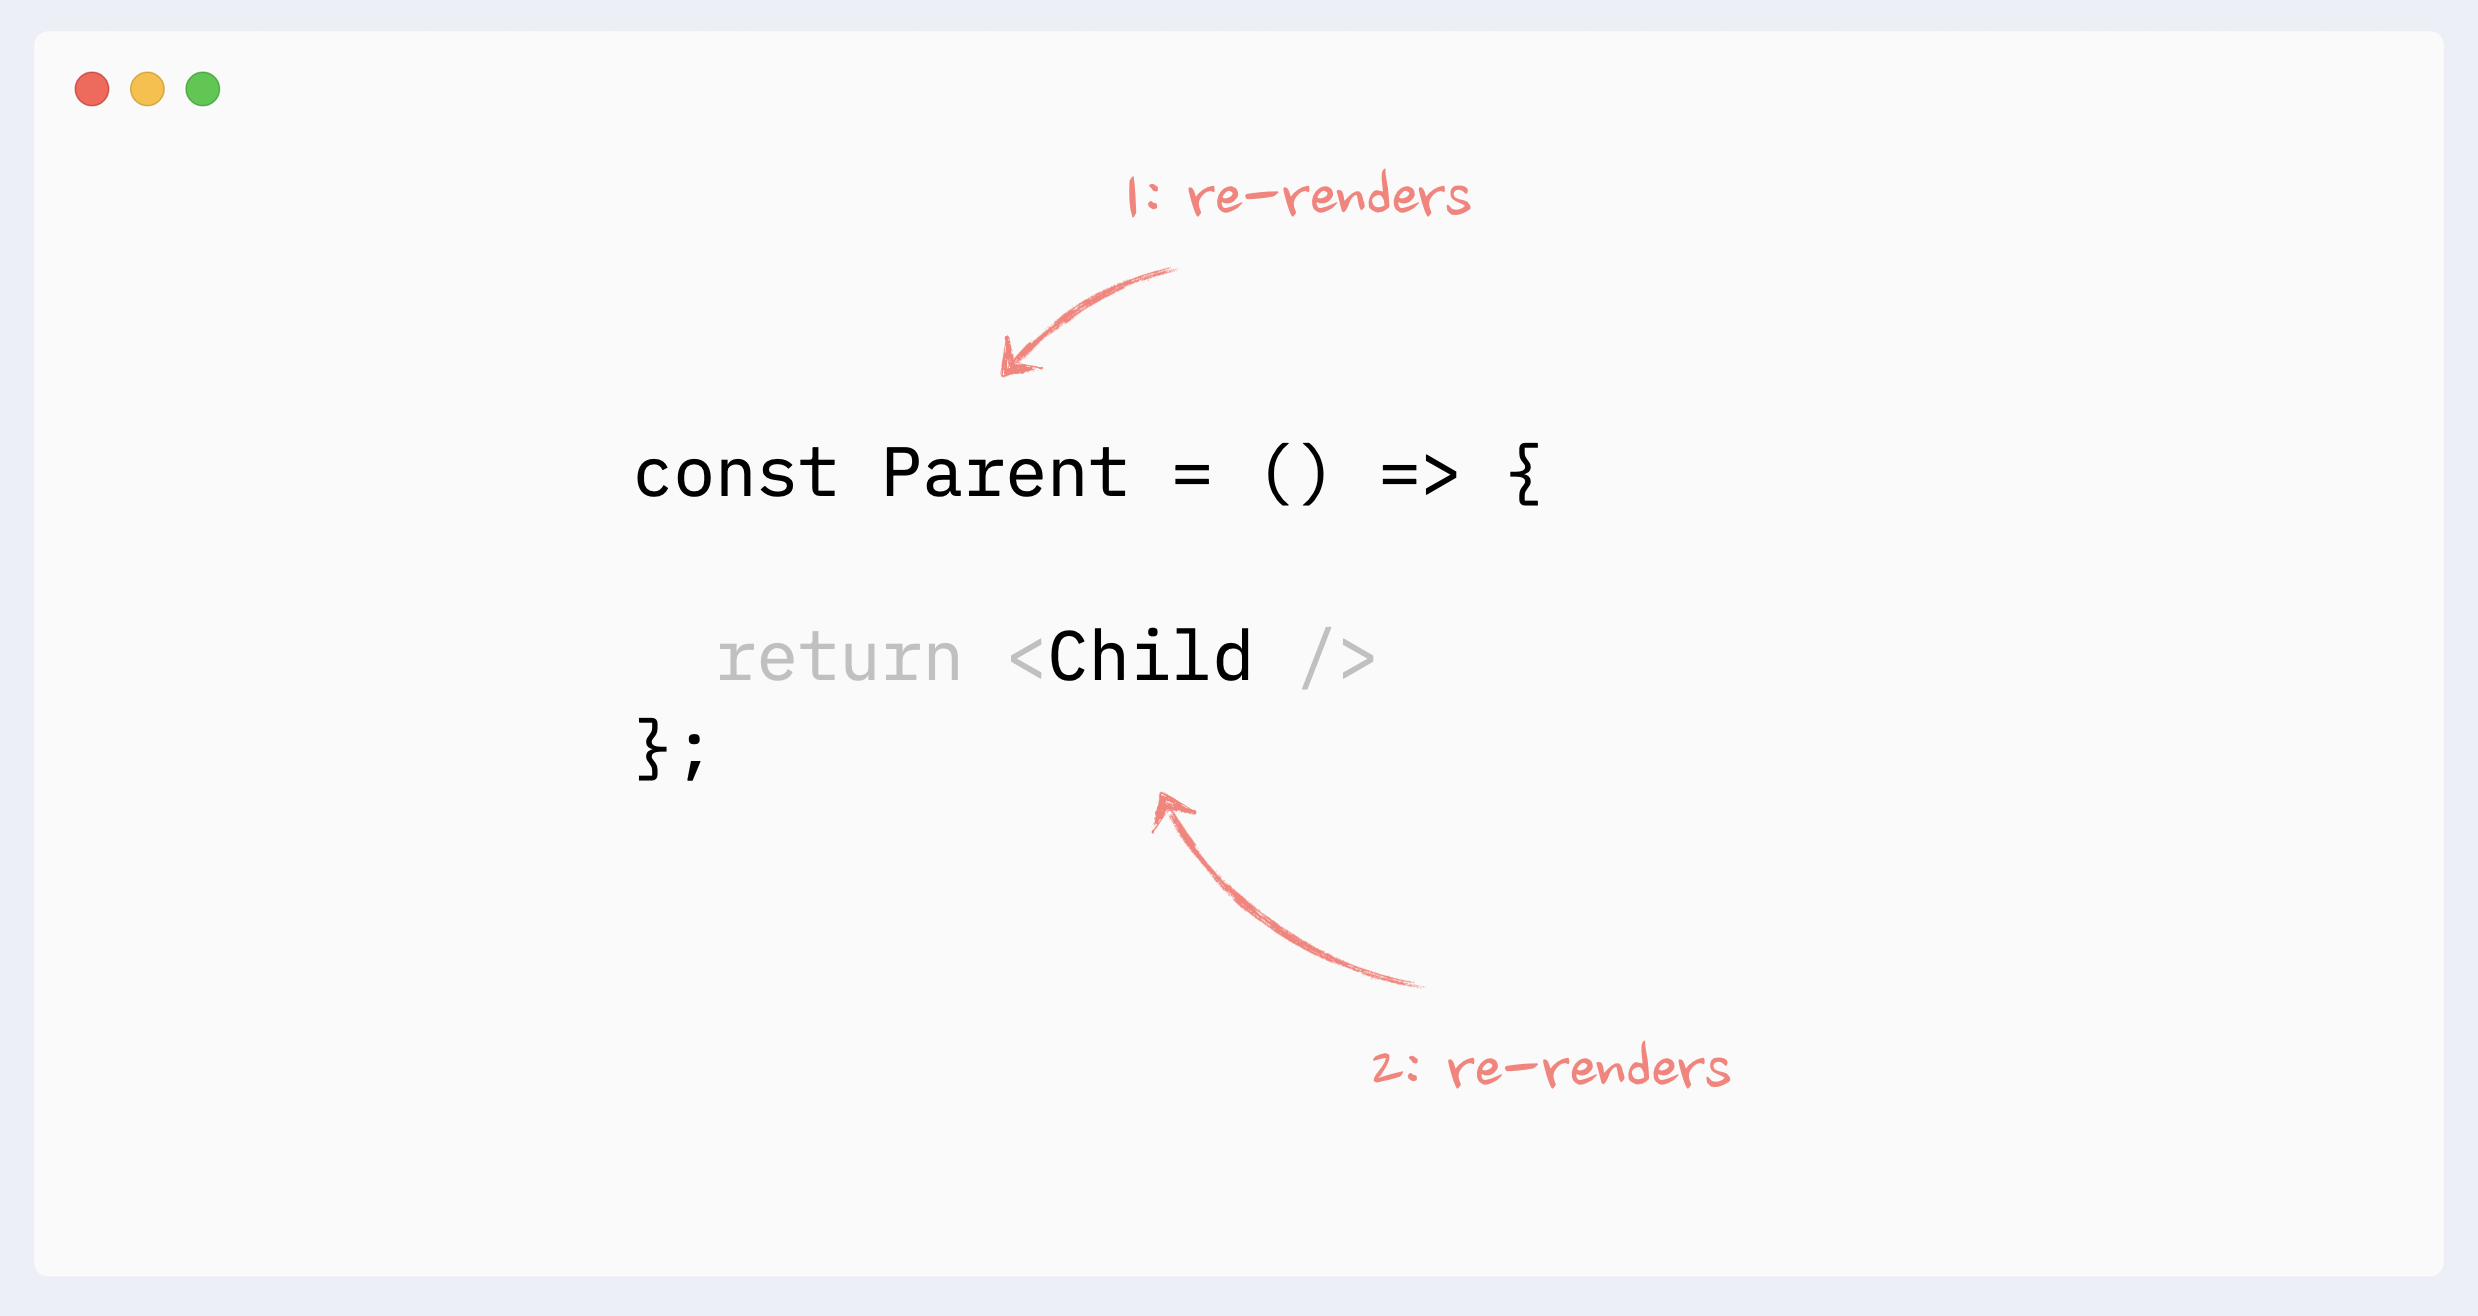
- Re-renders reason: parent re-renders
A component will re-render itself if its parent re-renders. Or, if we look at this from the opposite direction, when a component re-renders, it also re-renders all its children.
It always goes “down” the tree: the re-render of a child doesn’t trigger the re-render of a parent. (There are a few caveats and edge cases here, see the full guide for more details: The mystery of React Element, children, parents, and re-renders)
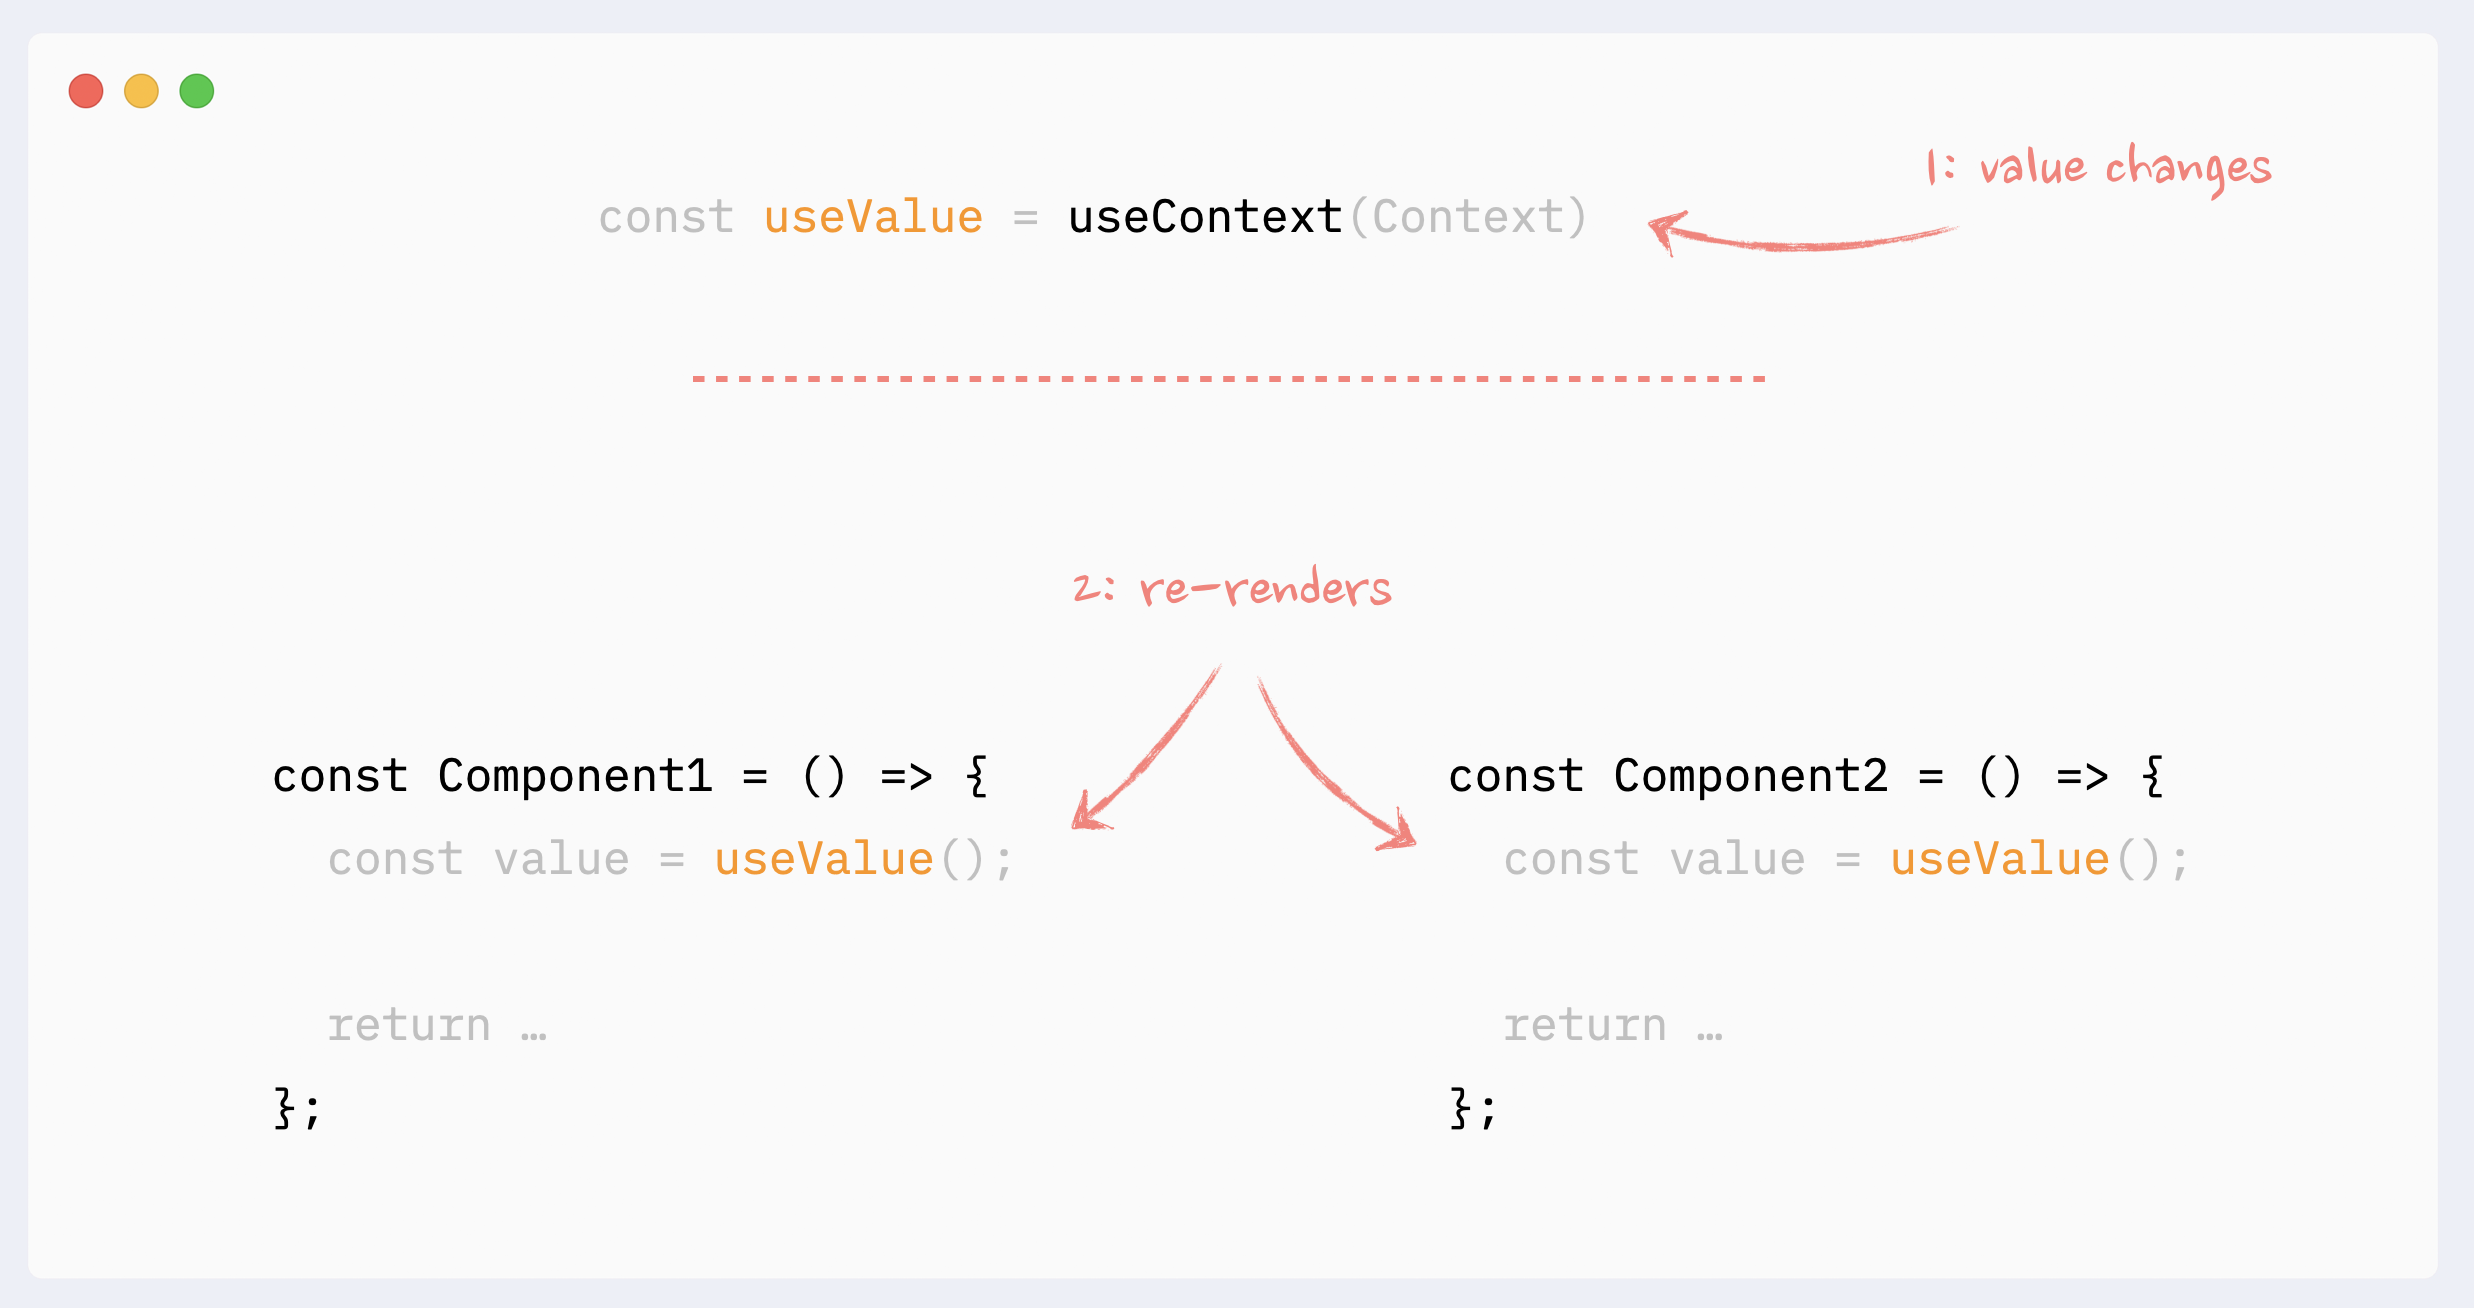
- Re-renders reason: context changes
When a value of the Context Provider changes, all components that use this context will re-render, even if they don’t use the changed portion of the data directly. Those re-renders can not be prevented with memoization directly, but there are a few workarounds that can simulate it
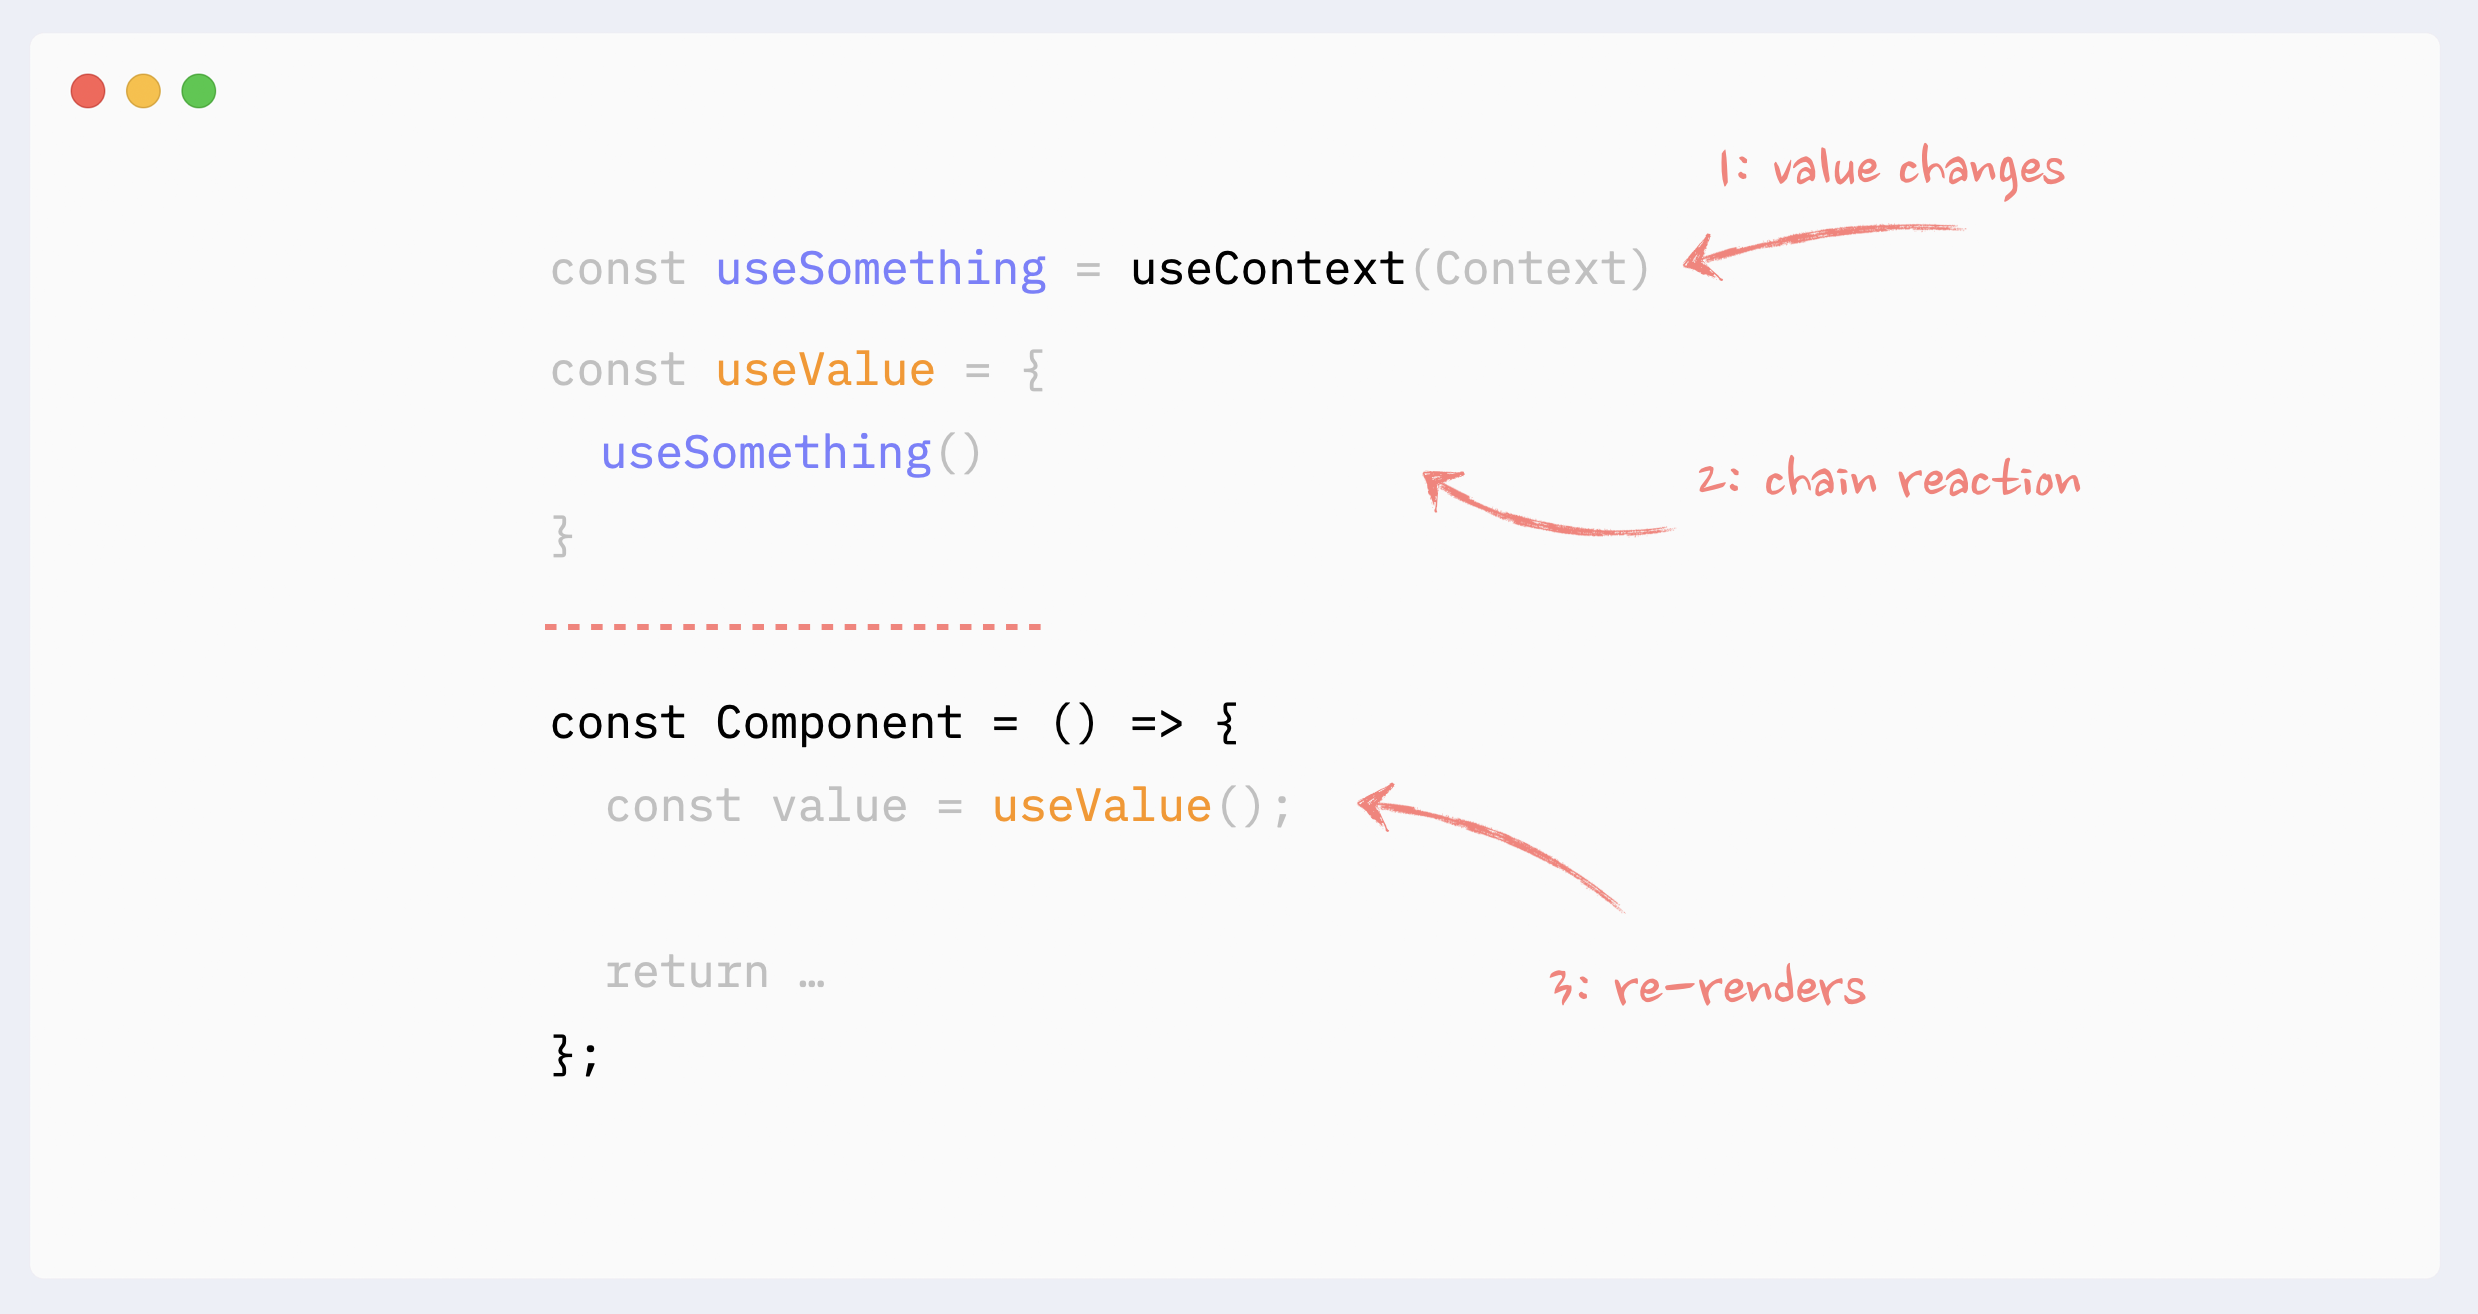
- Re-renders reason: hooks changes
Everything that is happening inside a hook “belongs” to the component that uses it. The same rules regarding Context and State changes apply here:
State change inside the hook will trigger an unpreventable re-render of the “host” component
If the hook uses Context and Context’s value changes, it will trigger an unpreventable re-render of the “host” component
Hooks can be chained. Every single hook inside the chain still “belongs” to the “host” component, and the same rules apply to any of them.
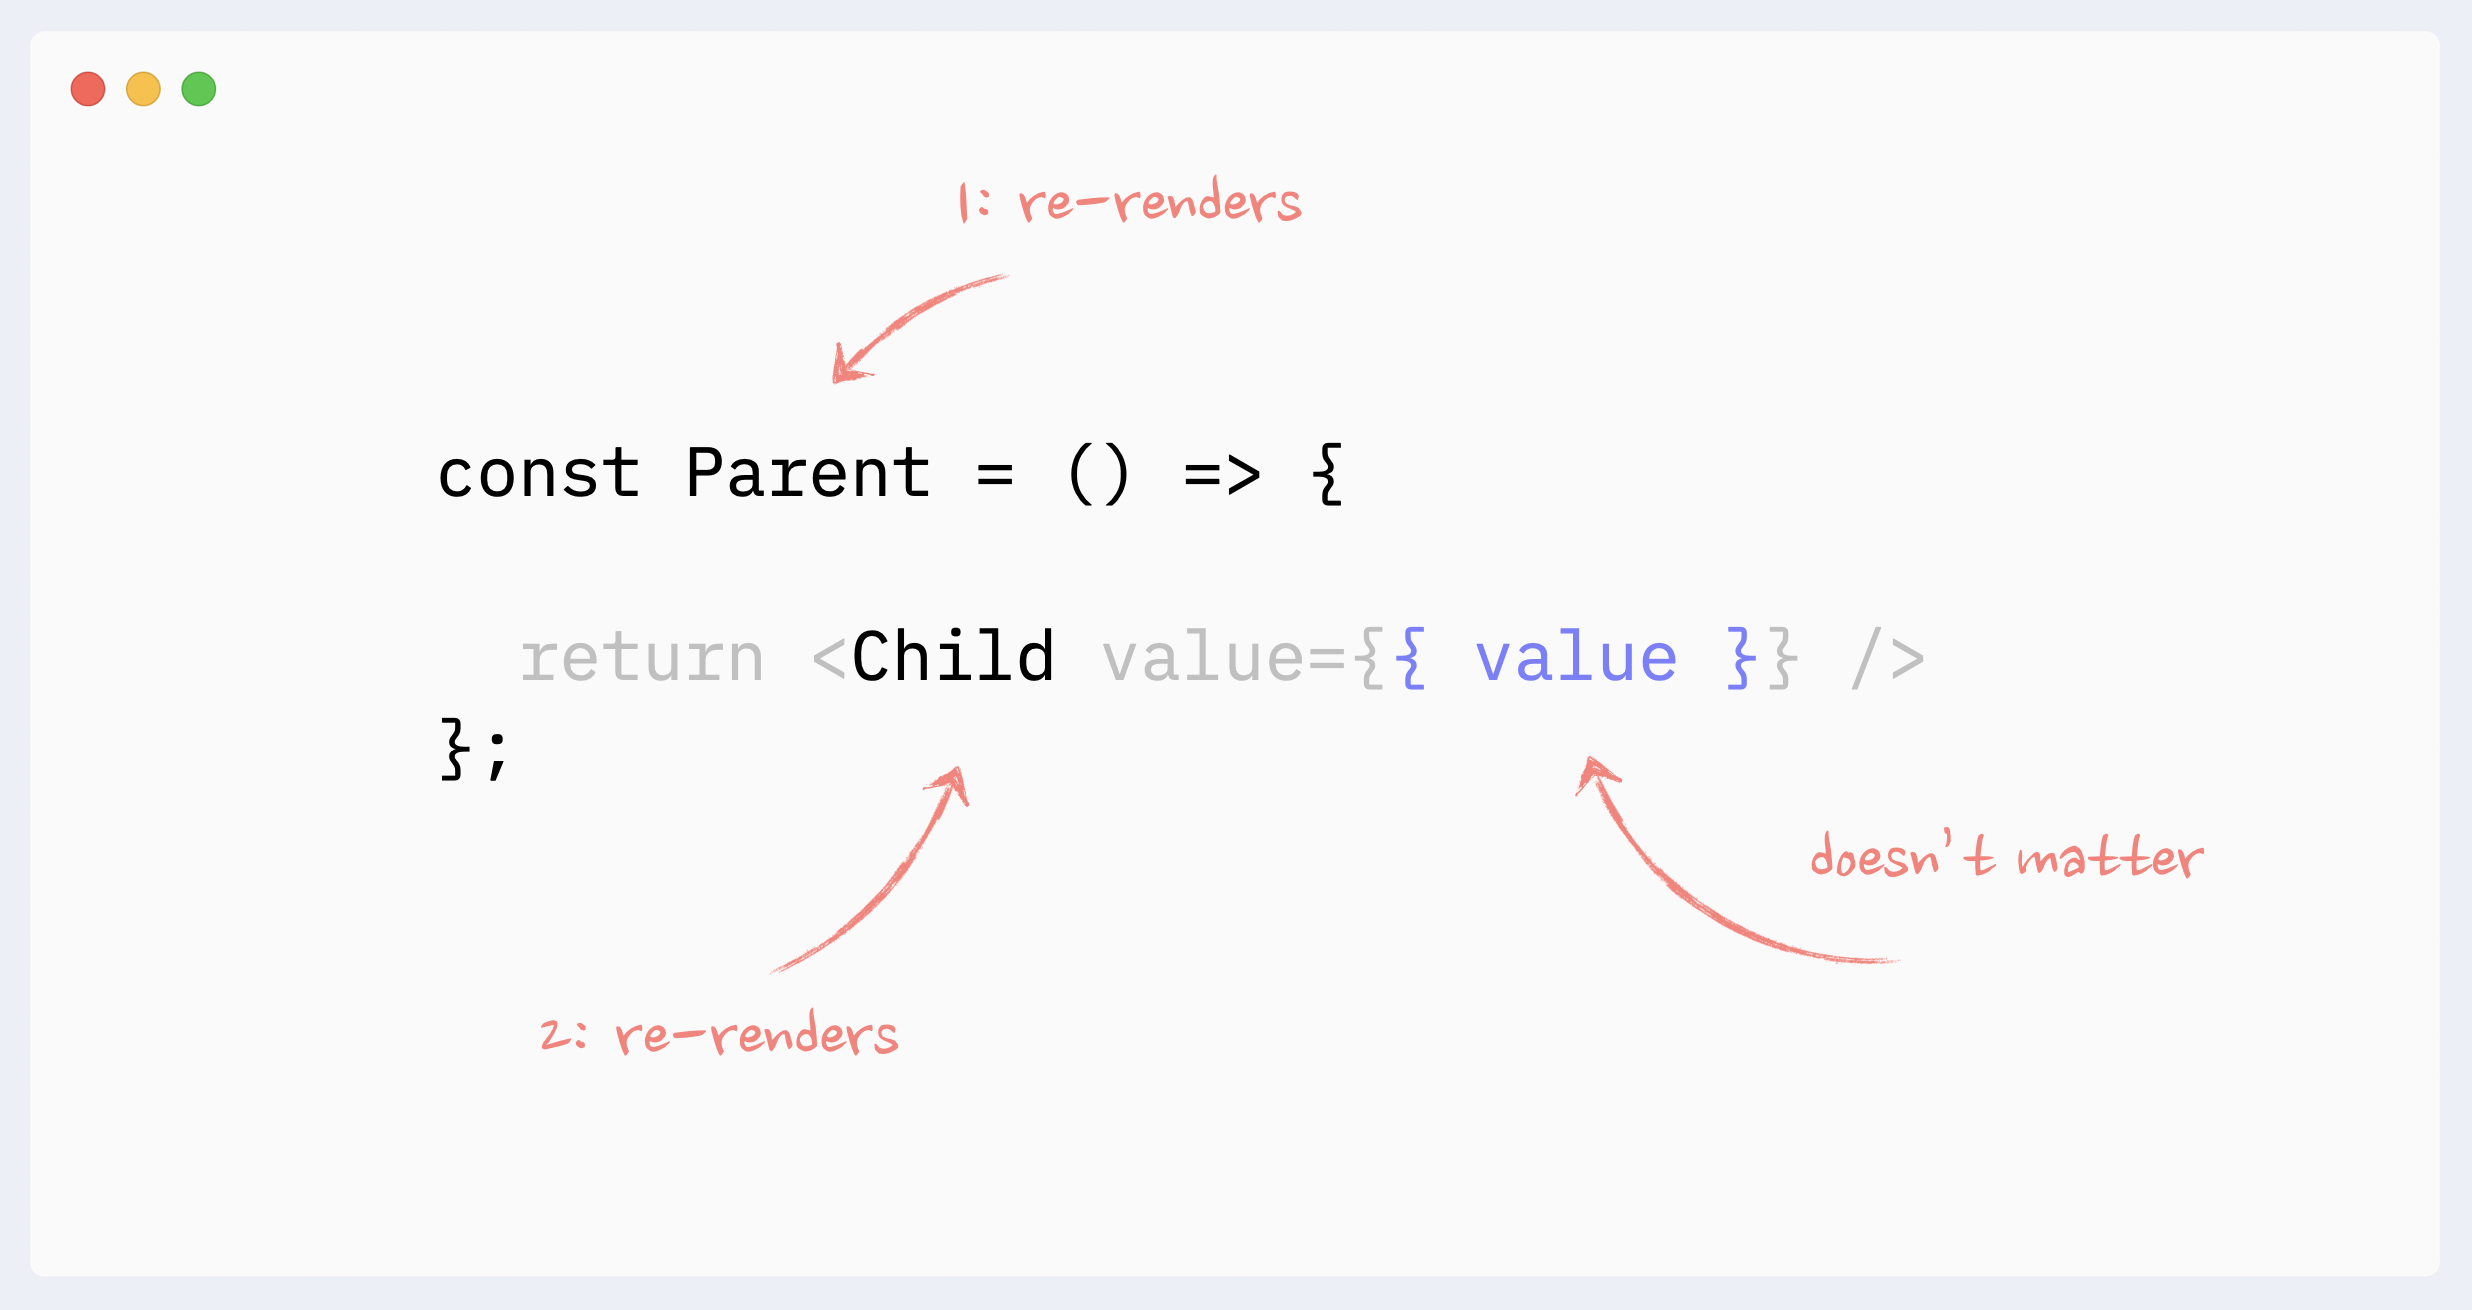
- Re-renders reason: props changes (the big myth)
It doesn’t matter whether the component’s props change or not when talking about re-renders of non-memoized components.
In order for props to change, they need to be updated by the parent component. This means the parent would have to re-render, which will trigger re-render of the child component regardless of its props.
Only when memoization techniques are used (React.memo, useMemo), then props change becomes important.
Preventing re-renders with composition
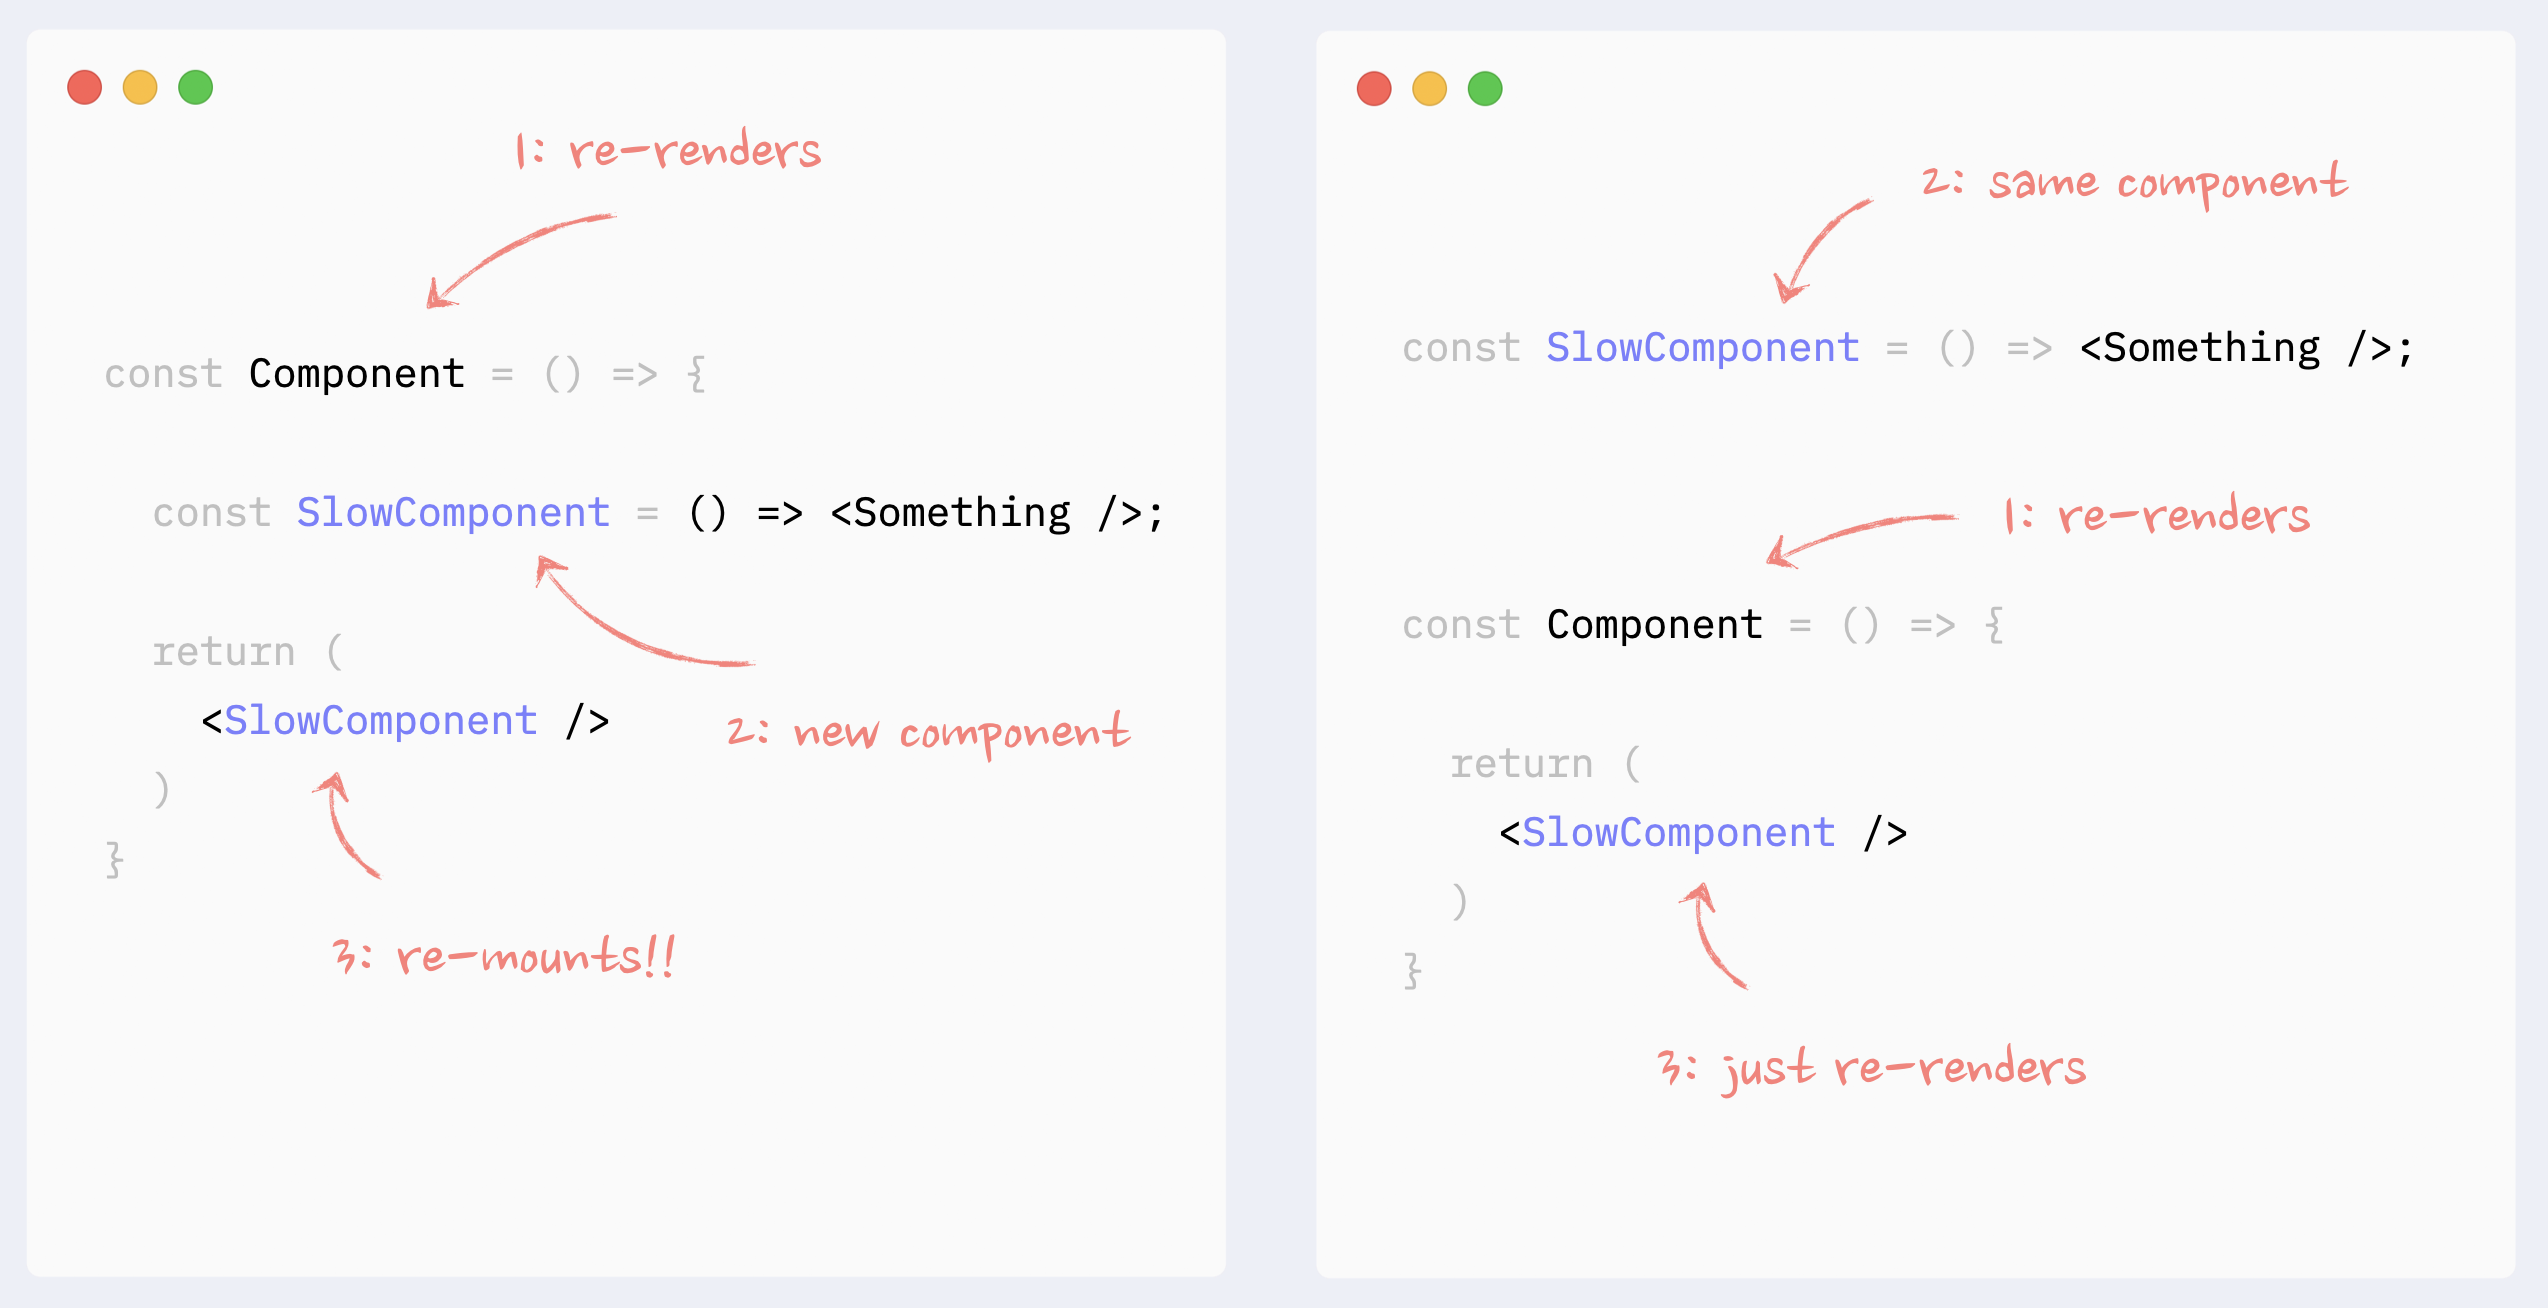
- ⛔️ Antipattern: Creating components in a render function
Creating components inside a render function of other components is an anti-pattern that can be the biggest performance killer. On every re-render, React will re-mount this component (destroy it and re-create it from scratch), which is going to be much slower than a normal render. On top of that, this will lead to such bugs as (possible flashes of content during re-renders, state being reset in the component with every re-render, useEffect with no dependencies triggered on every re-render, if a component was focused, focus will be lost.)
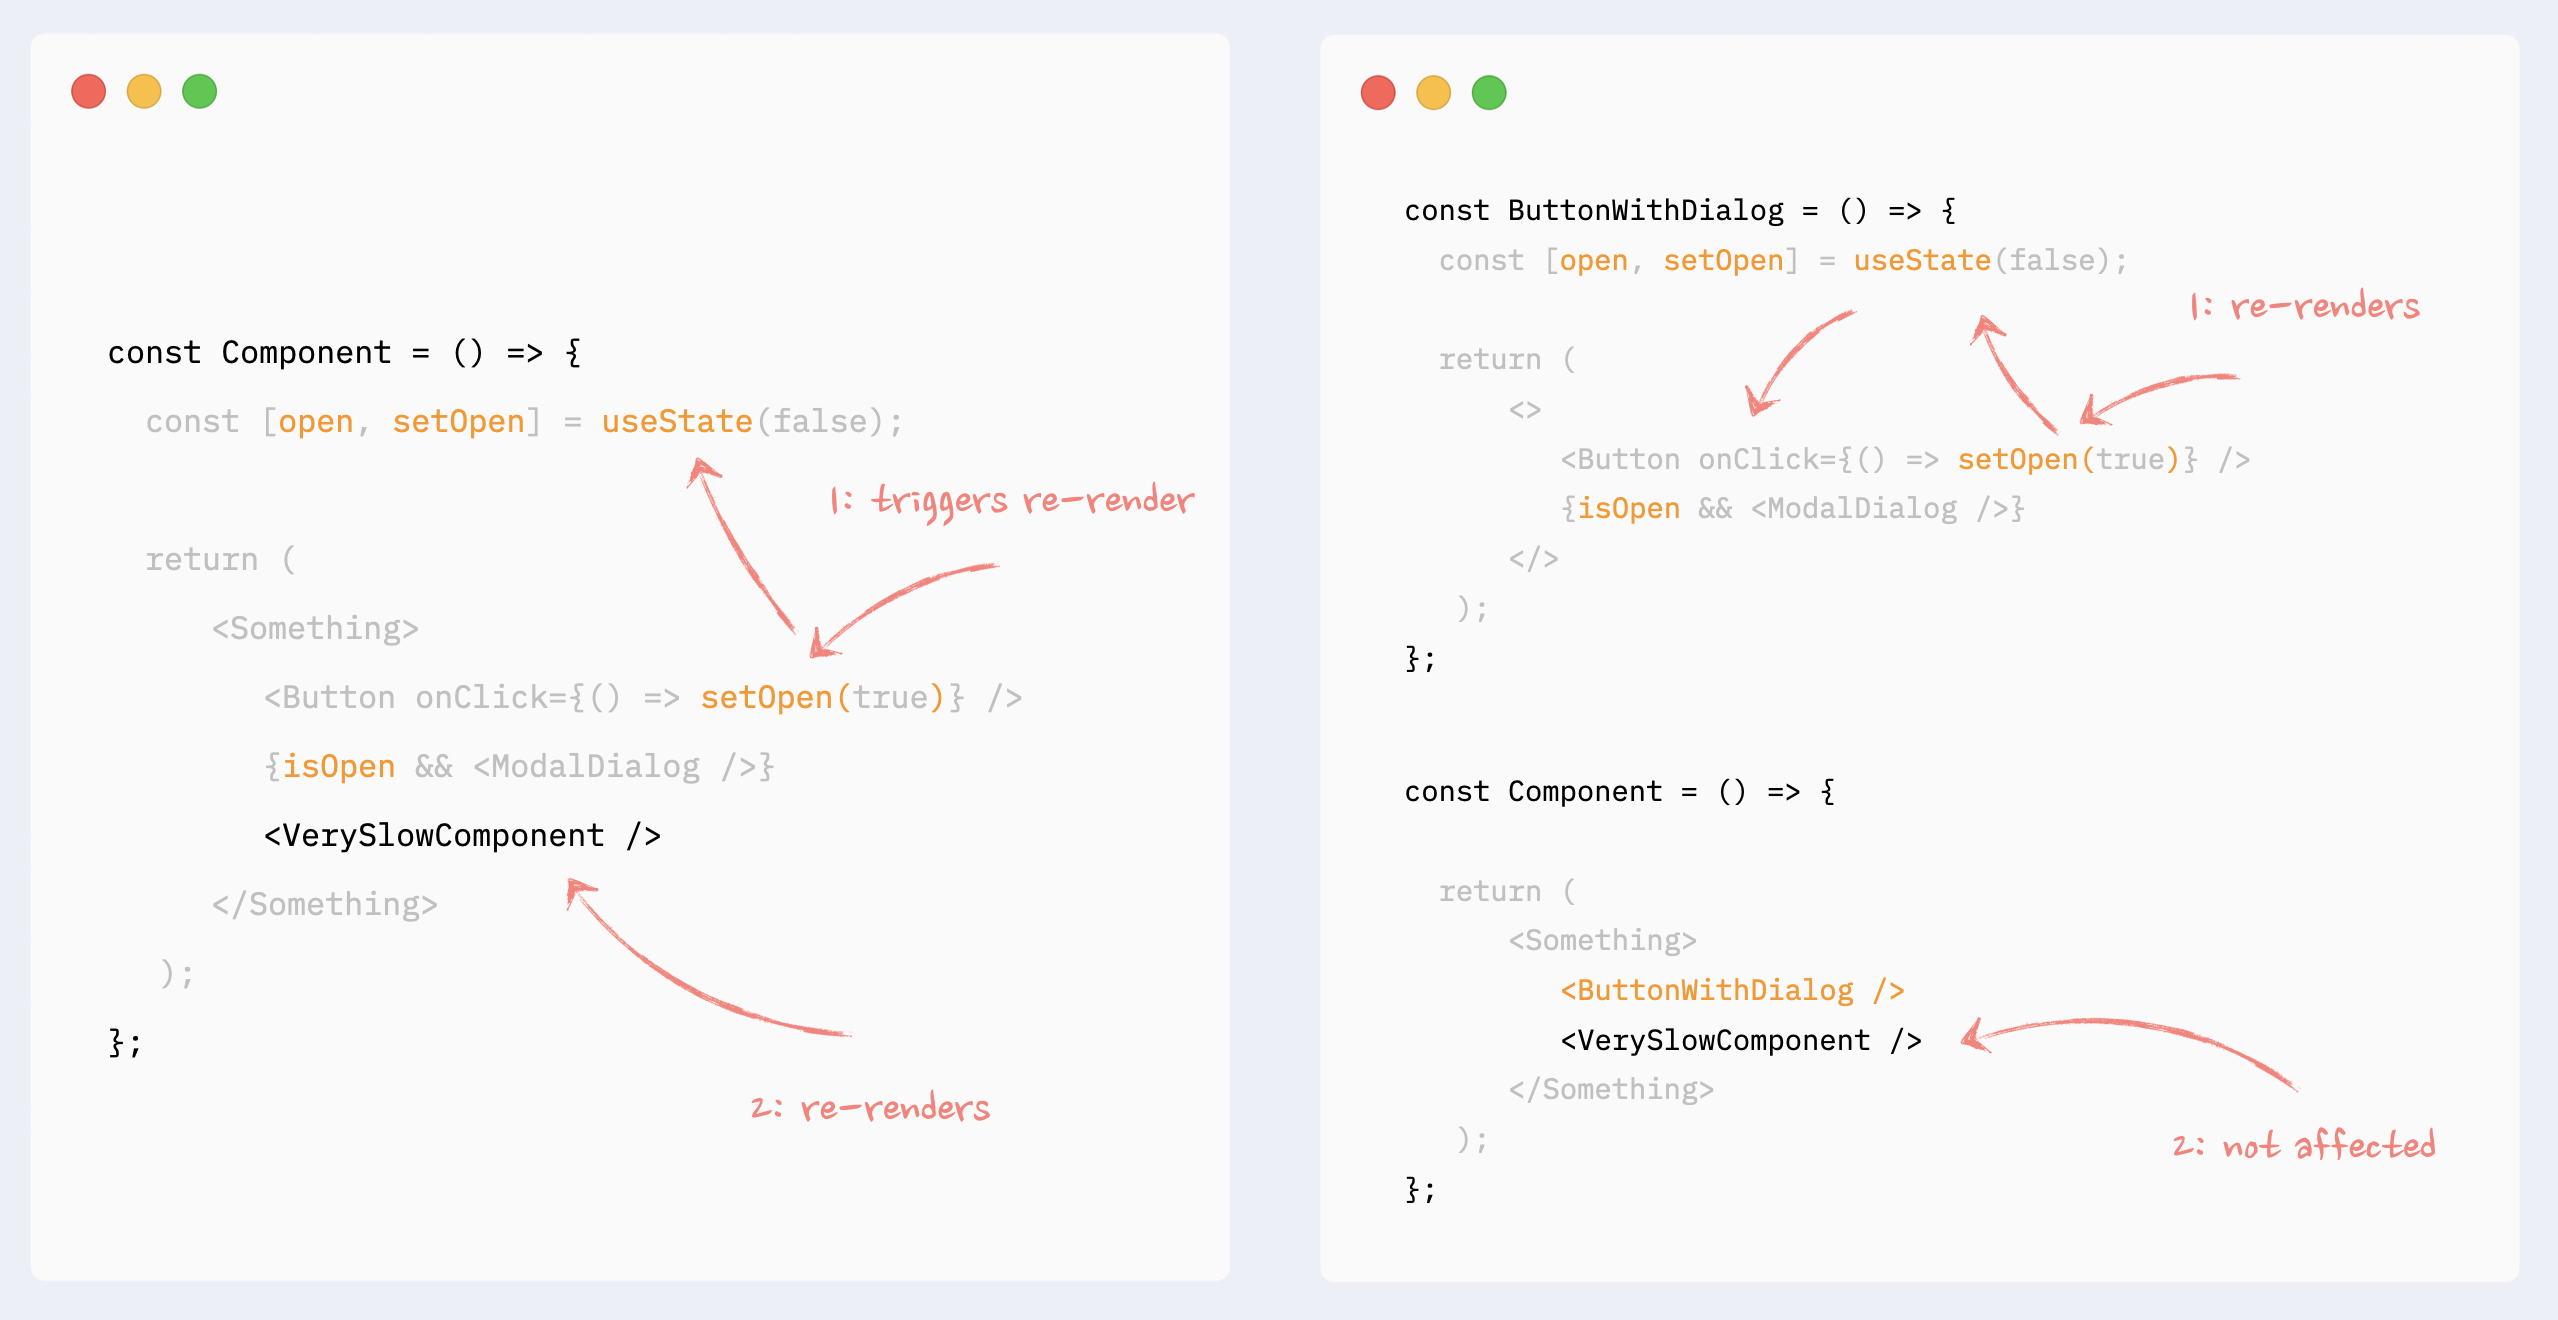
- ✅ Preventing re-renders with composition: moving state down
This pattern can be beneficial when a heavy component manages state, and this state is only used on a small, isolated portion of the render tree. A typical example would be opening/closing a dialog with a button click in a complicated component that renders a significant portion of a page.
In this case, the state that controls modal dialog appearance, dialog itself, and the button that triggers the update can be encapsulated in a smaller component. As a result, the bigger component won’t re-render on those state changes.
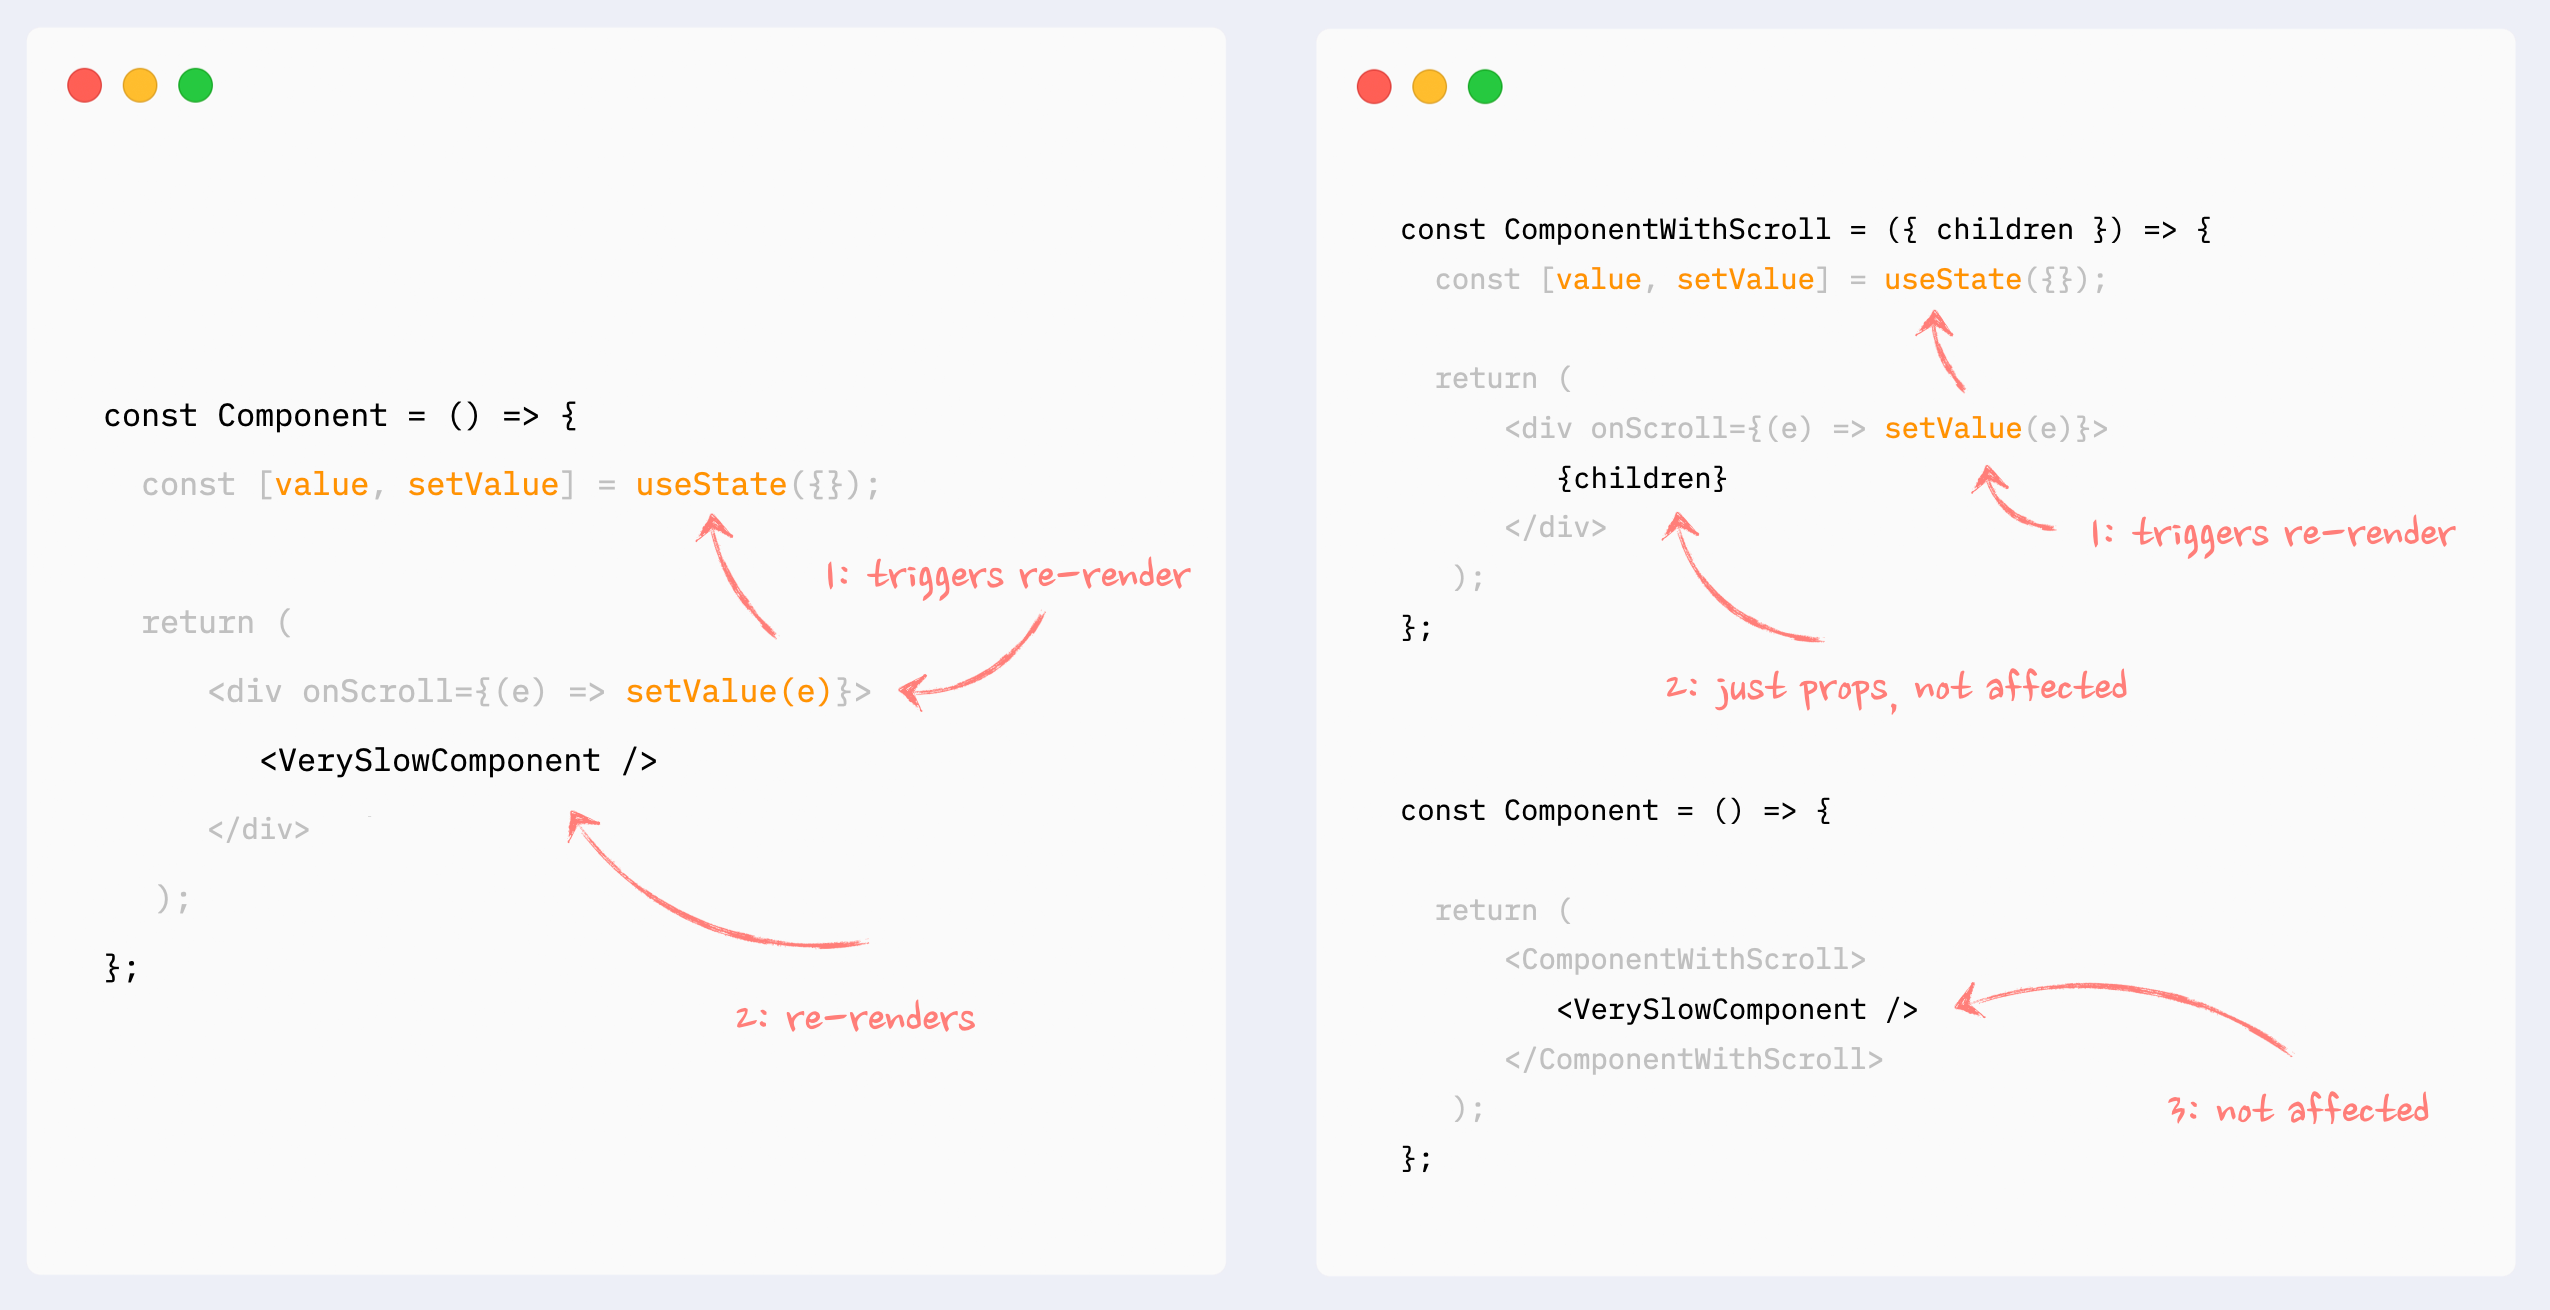
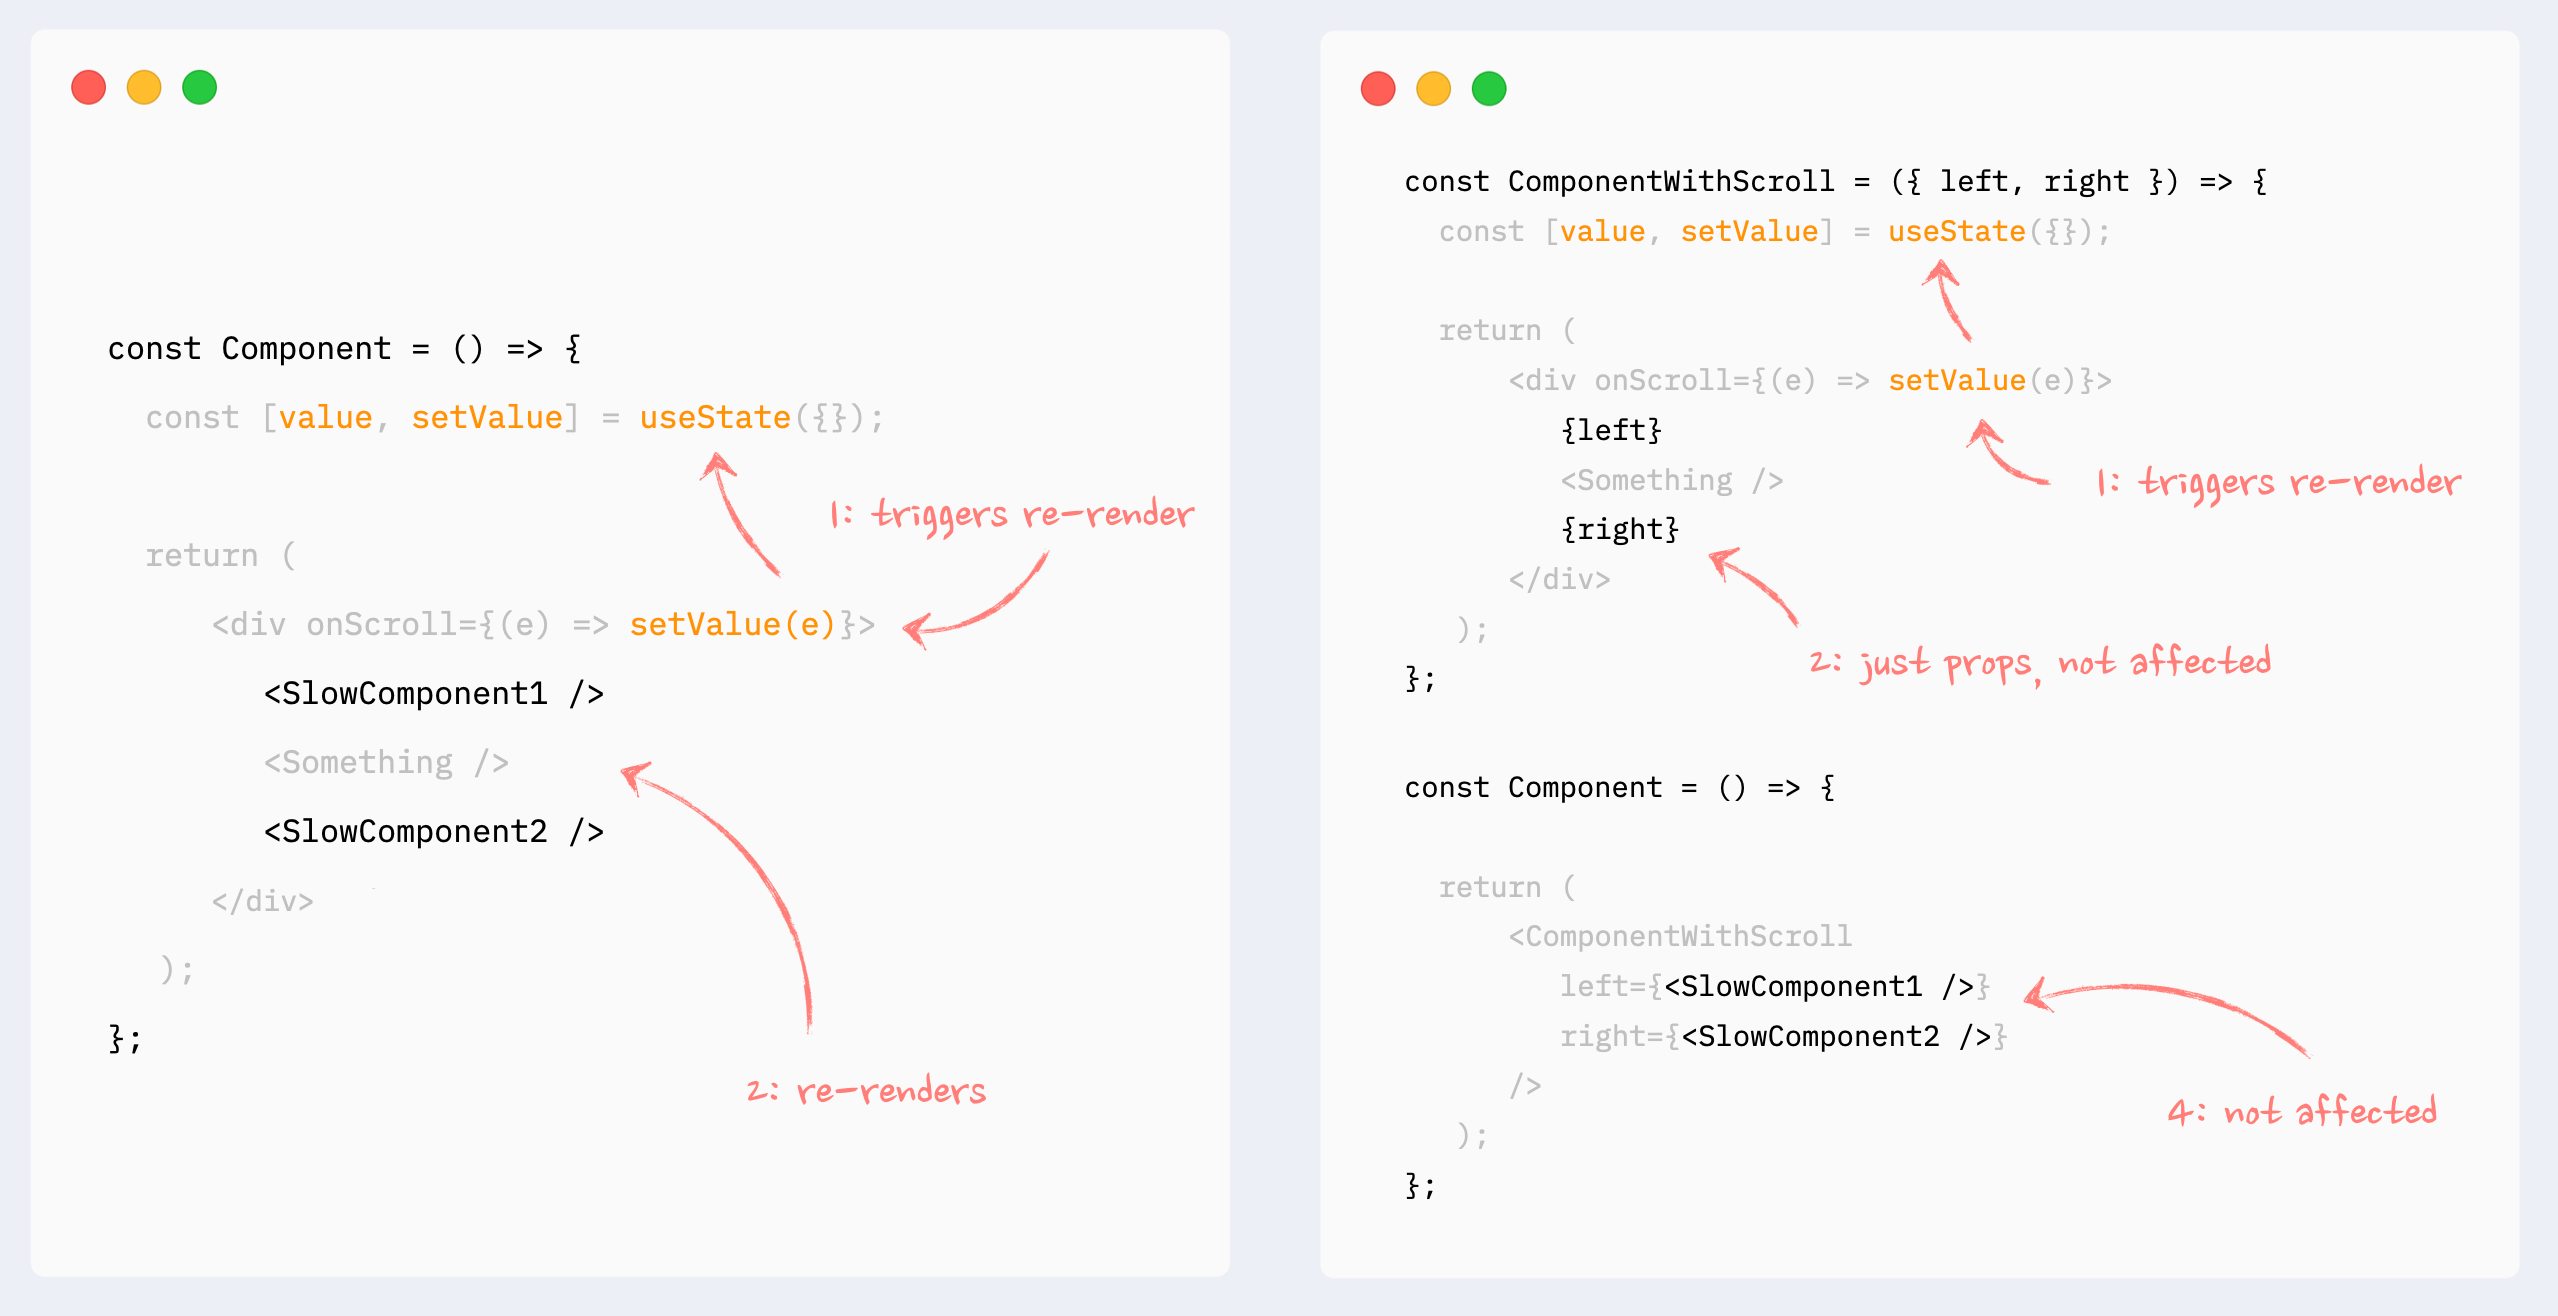
- ✅ Preventing re-renders with composition: children as props
This can also be called “wrap state around children”. This pattern is similar to “moving state down”: it encapsulates state changes in a smaller component. The difference here is that the state is used on an element that wraps a slow portion of the render tree, so it can’t be extracted that easily. A typical example would be onScroll or onMouseMove callbacks attached to the root element of a component.
In this situation, state management and components that use that state can be extracted into a smaller component, and the slow component can be passed to it as children. From the smaller component perspective children are just props, so they will not be affected by the state change and therefore won’t re-render.
- ✅ Preventing re-renders with composition: components as props
Pretty much the same as the previous pattern, with the same behavior: it encapsulates the state inside a smaller component, and heavy components are passed to it as props. Props are not affected by the state change, so heavy components won’t re-render.
It can be useful when a few heavy components are independent from the state, but can’t be extracted as children as a group.
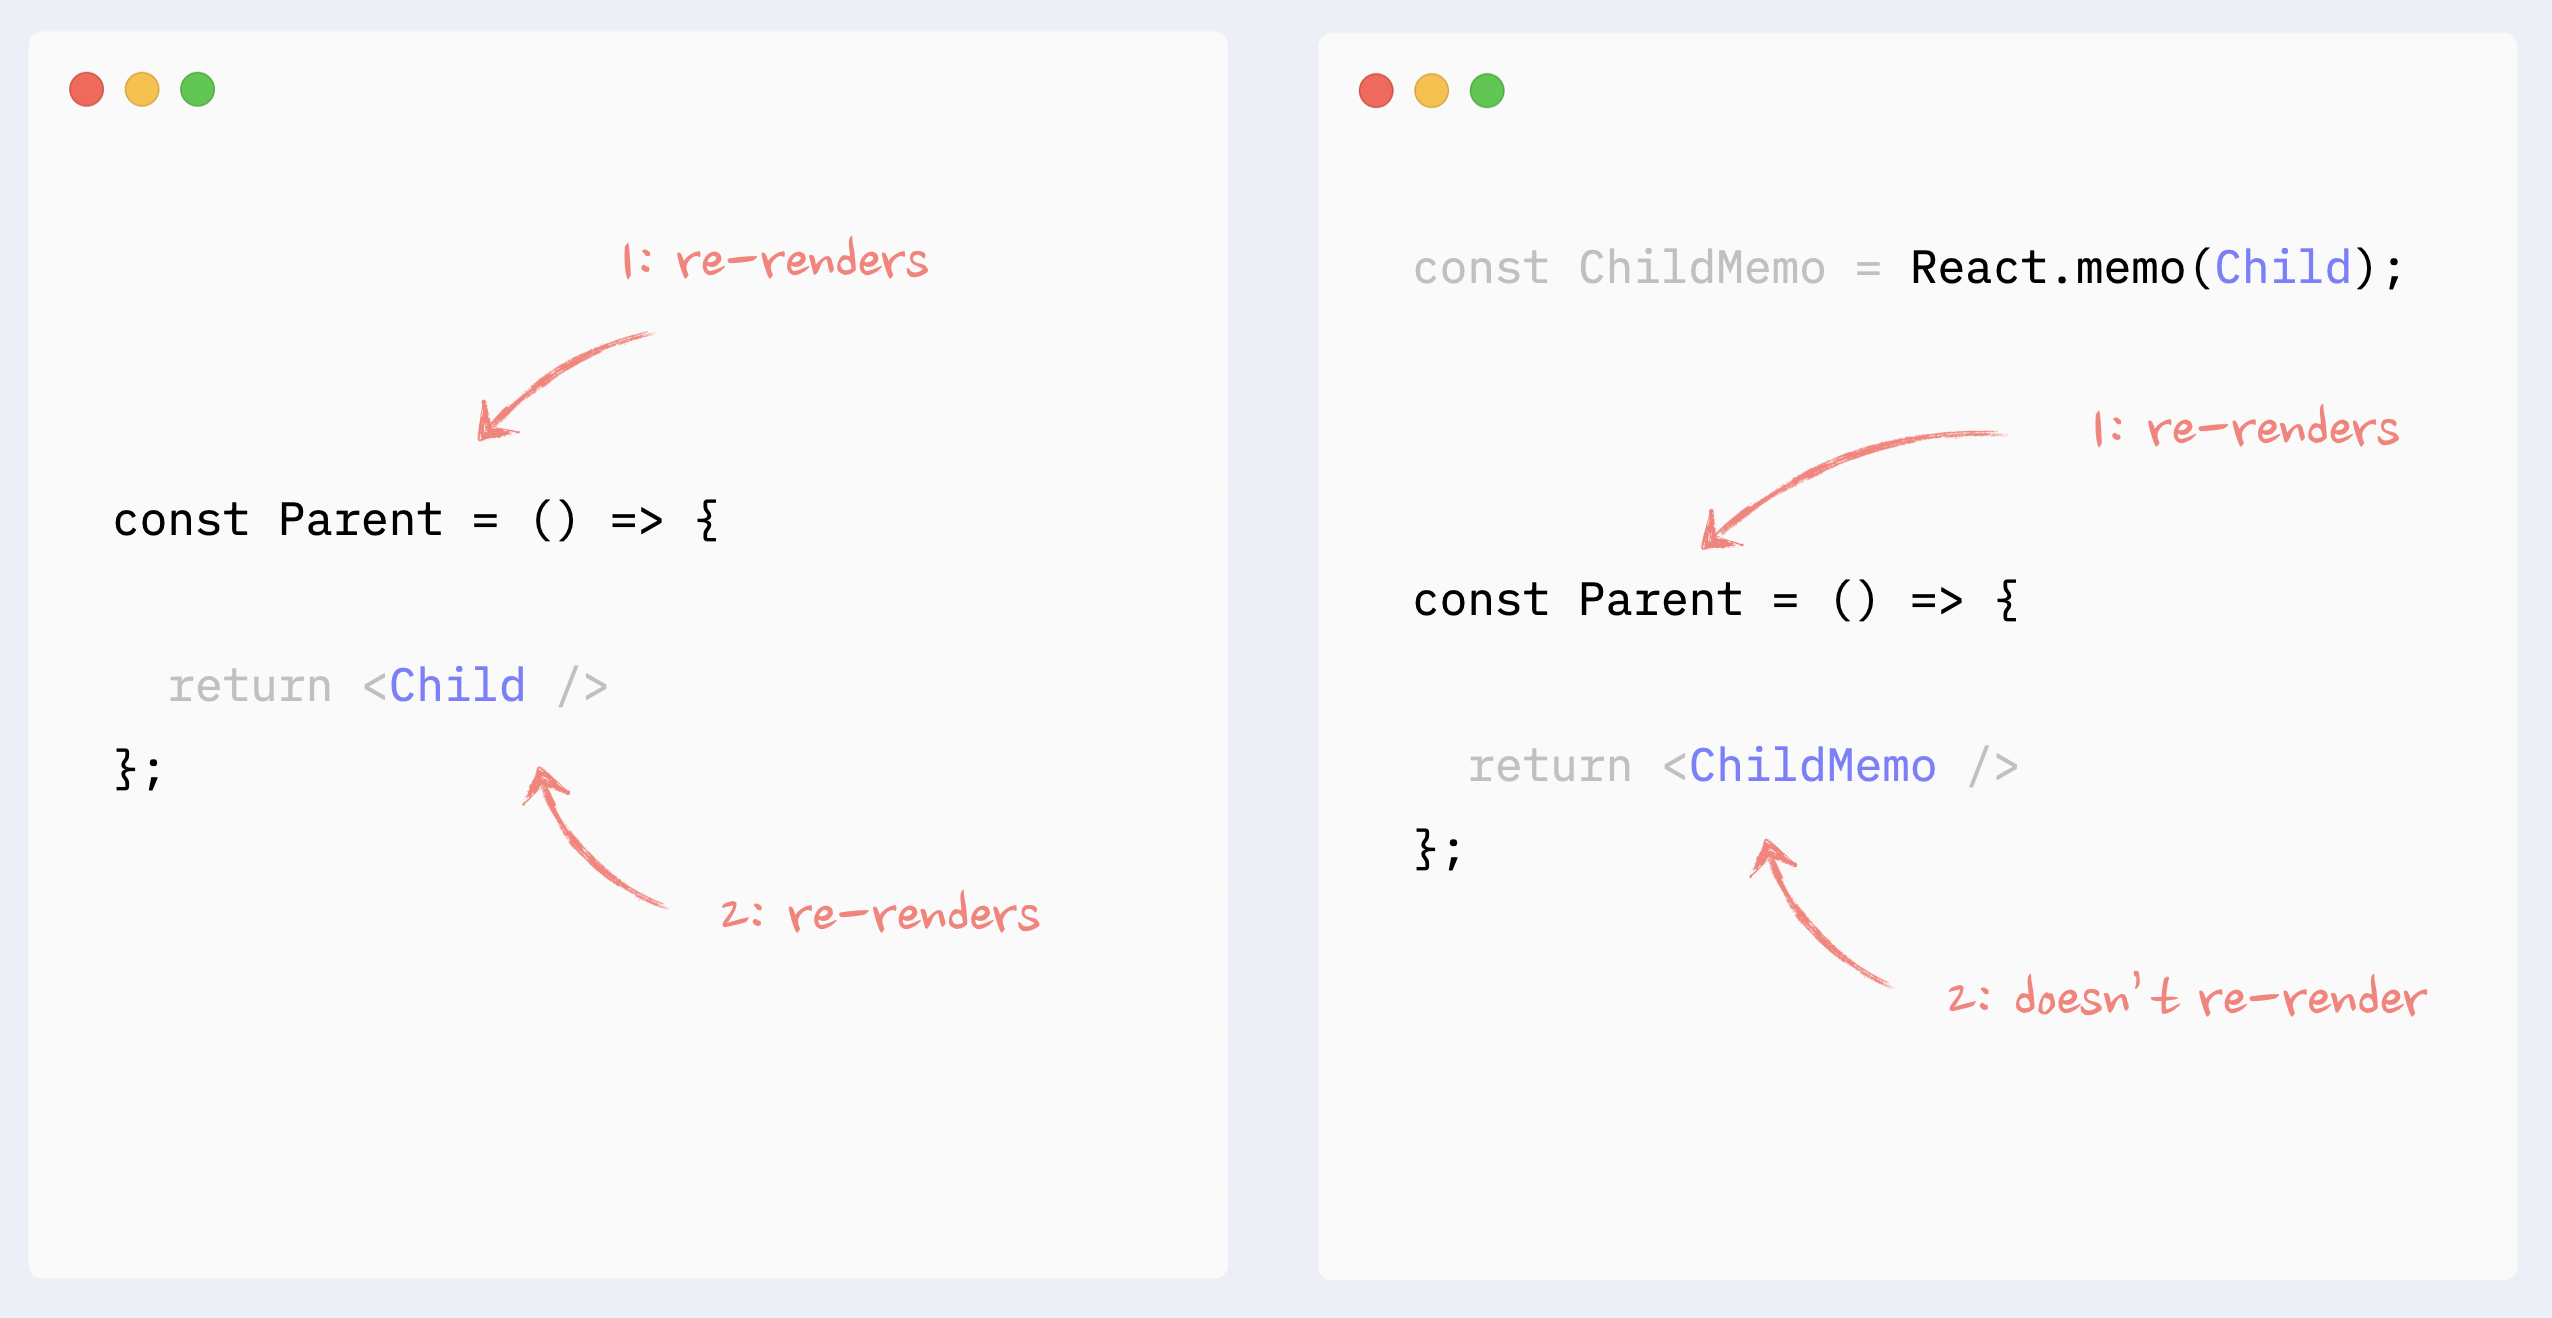
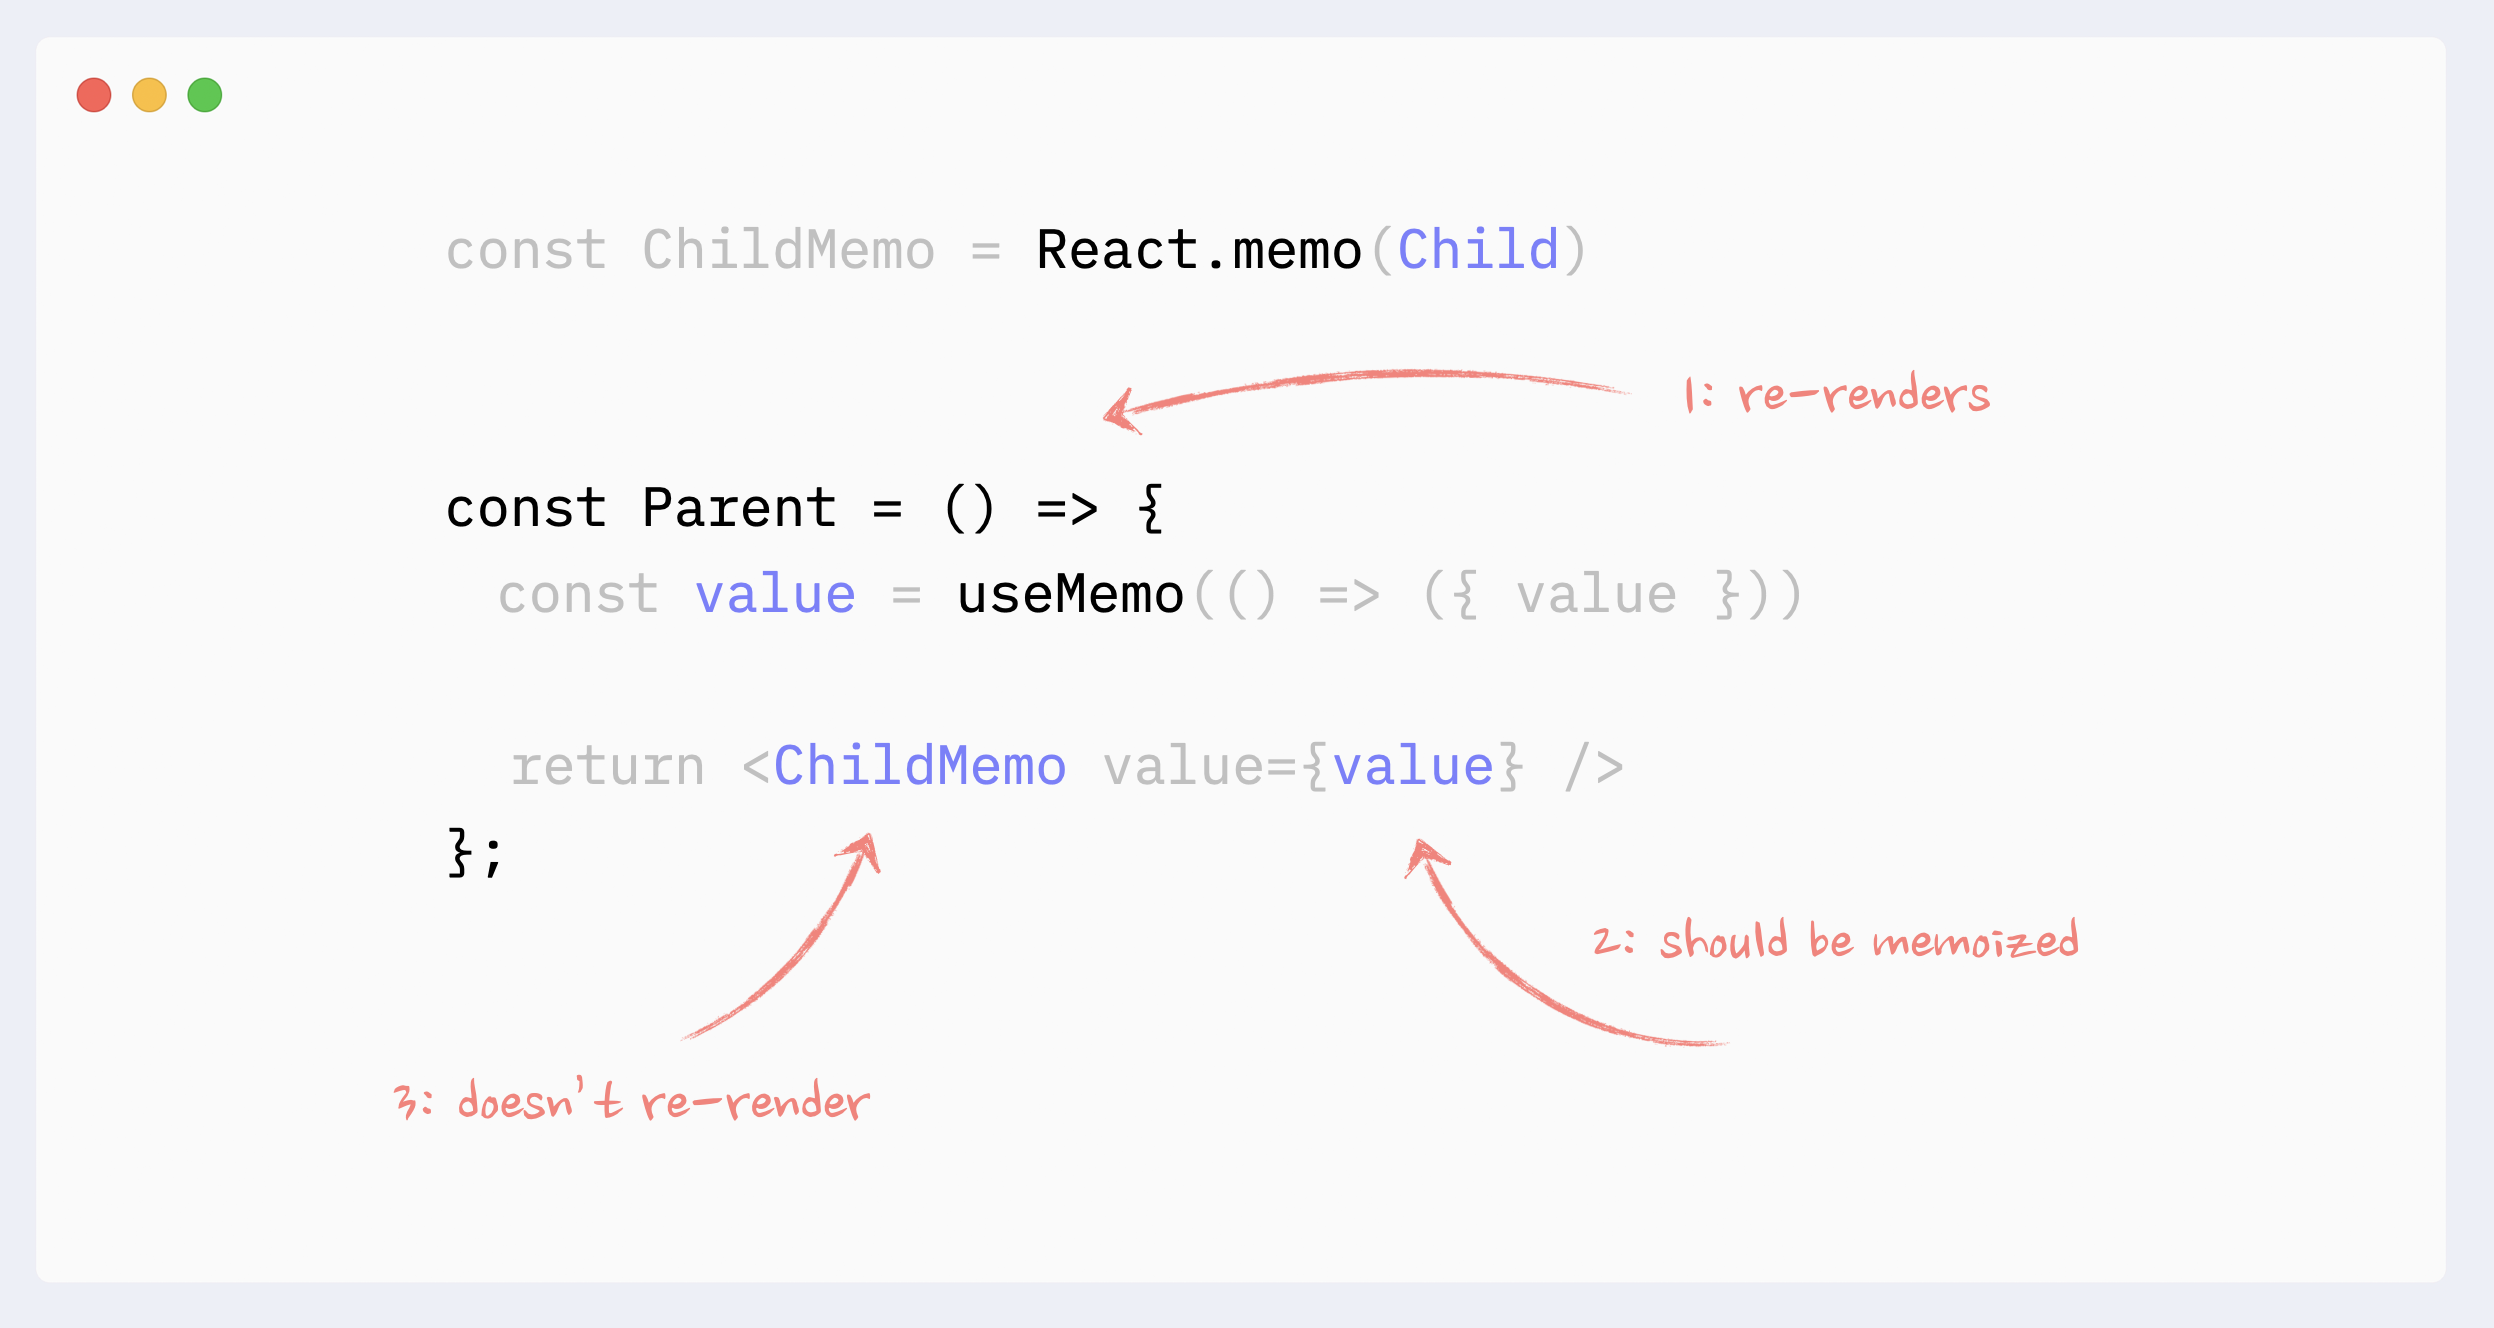
Preventing re-renders with React.memo
Wrapping a component in React.memo will stop the downstream chain of re-renders that is triggered somewhere up the render tree, unless this component’s props have changed.
This can be useful when rendering a heavy component that is not dependent on the source of re-renders (i.e., state, changed data).
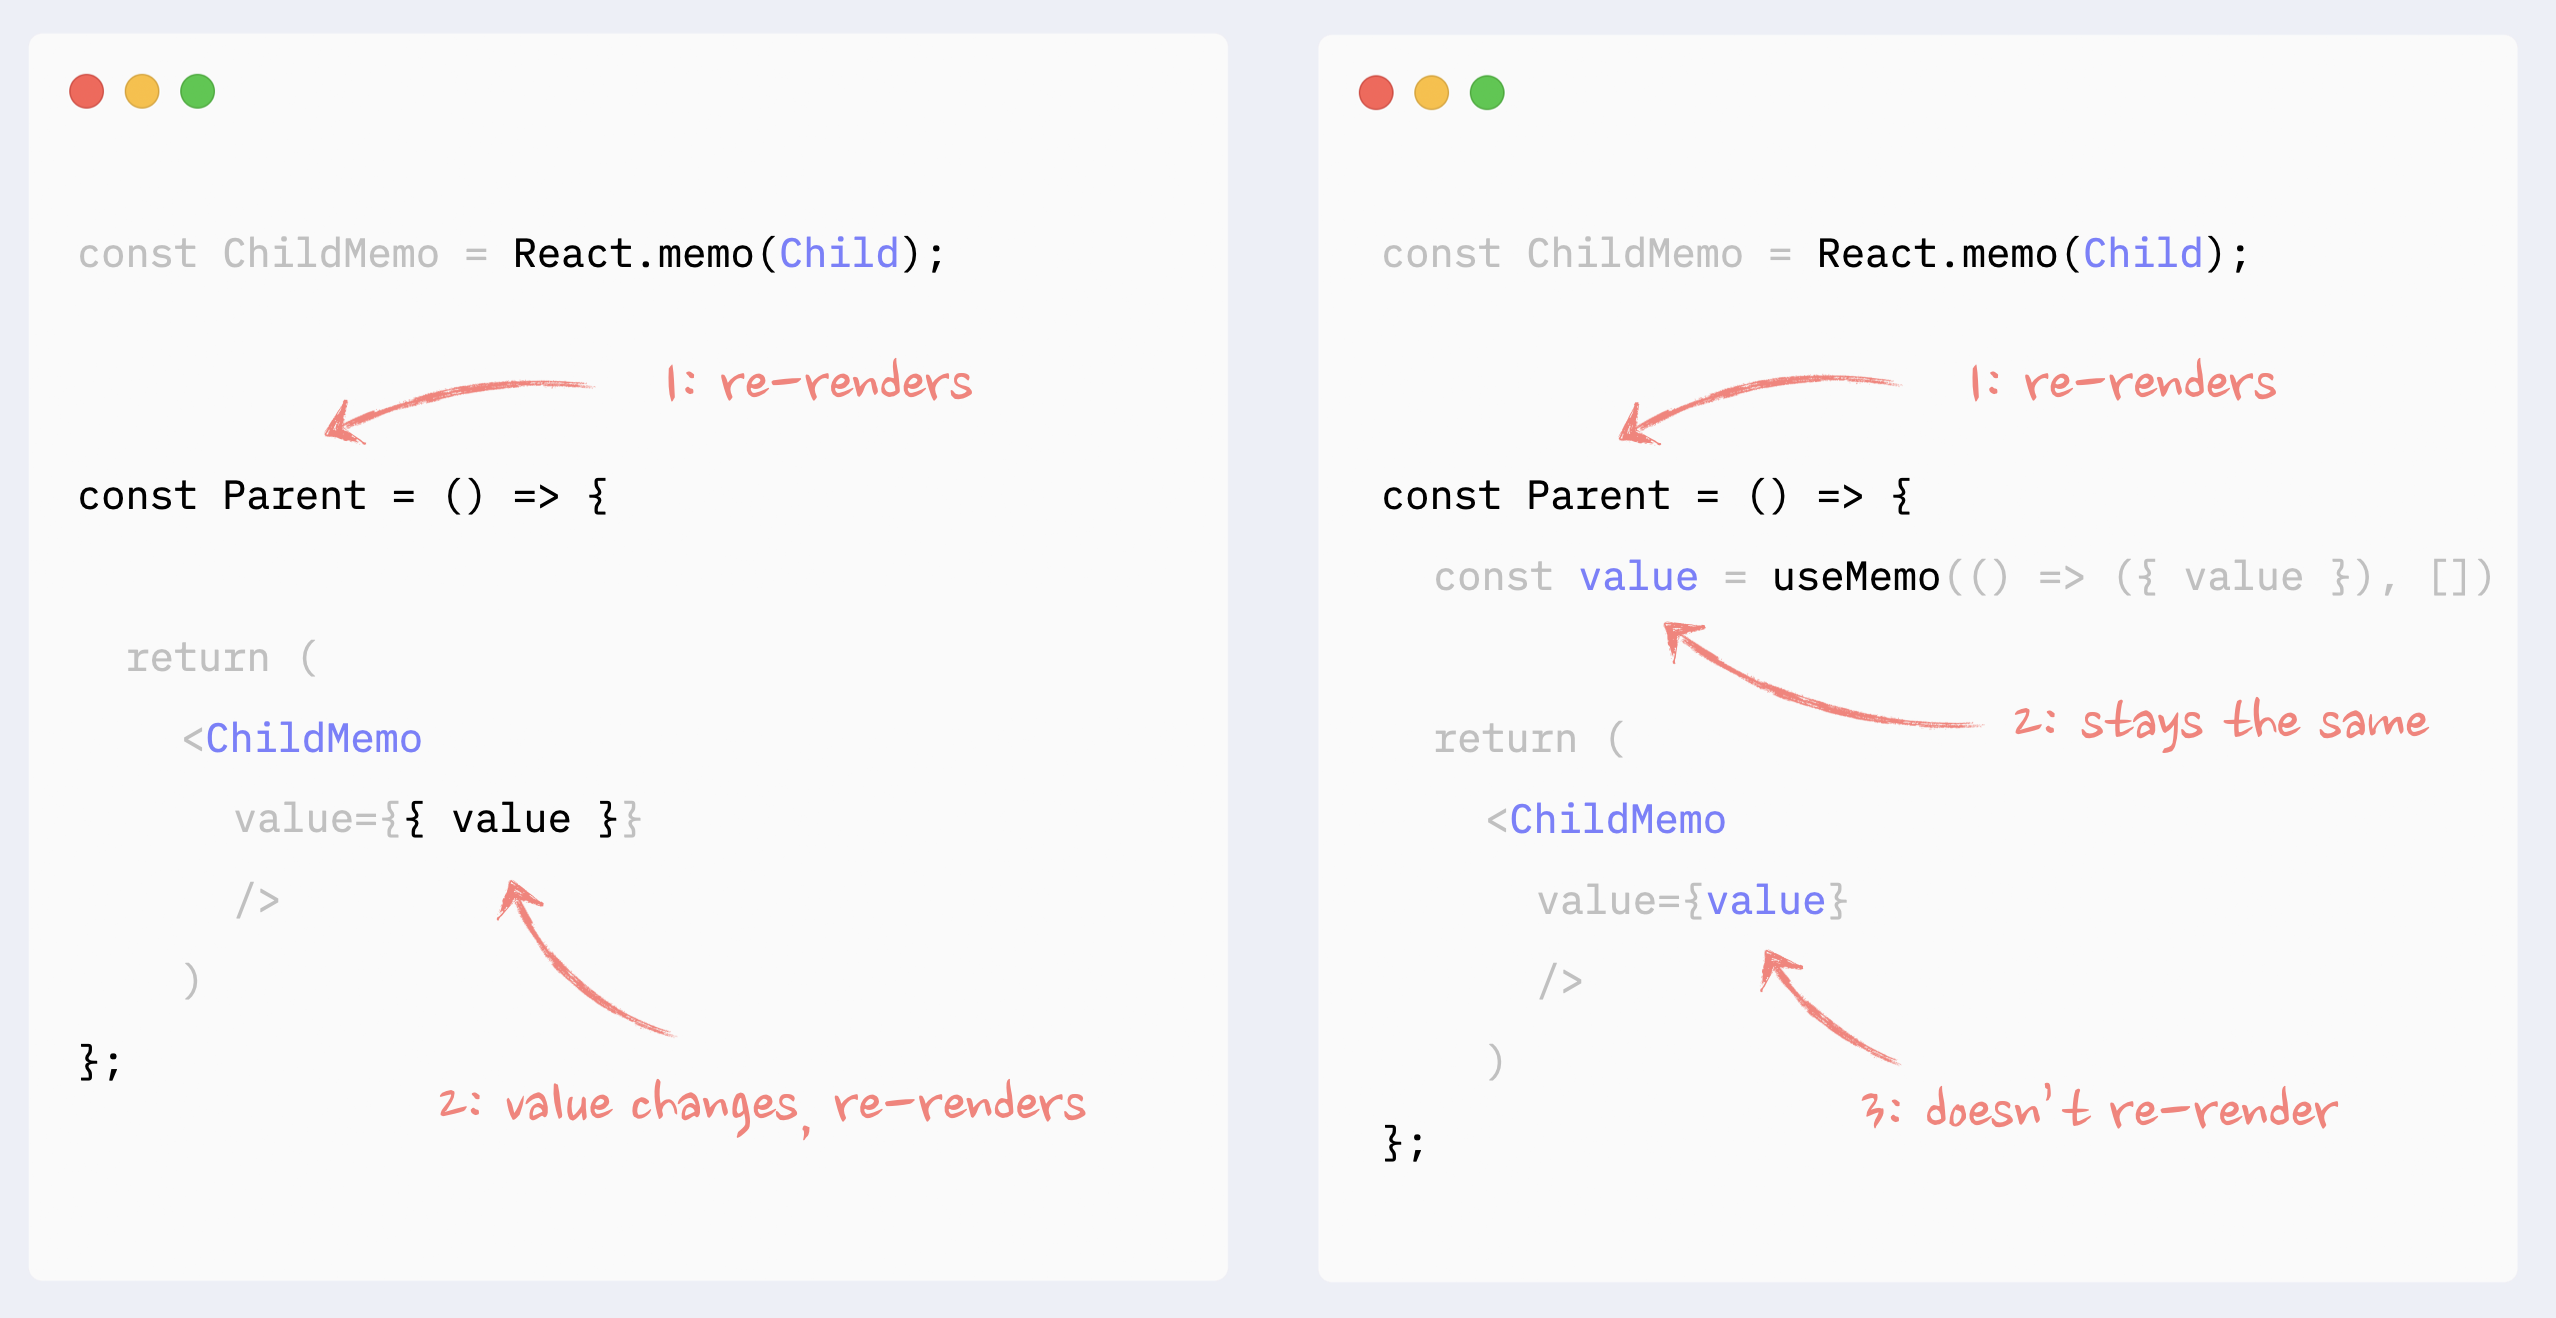
- ✅ React.memo: components with props
All props that are not primitive values have to be memoized for React.memo to work
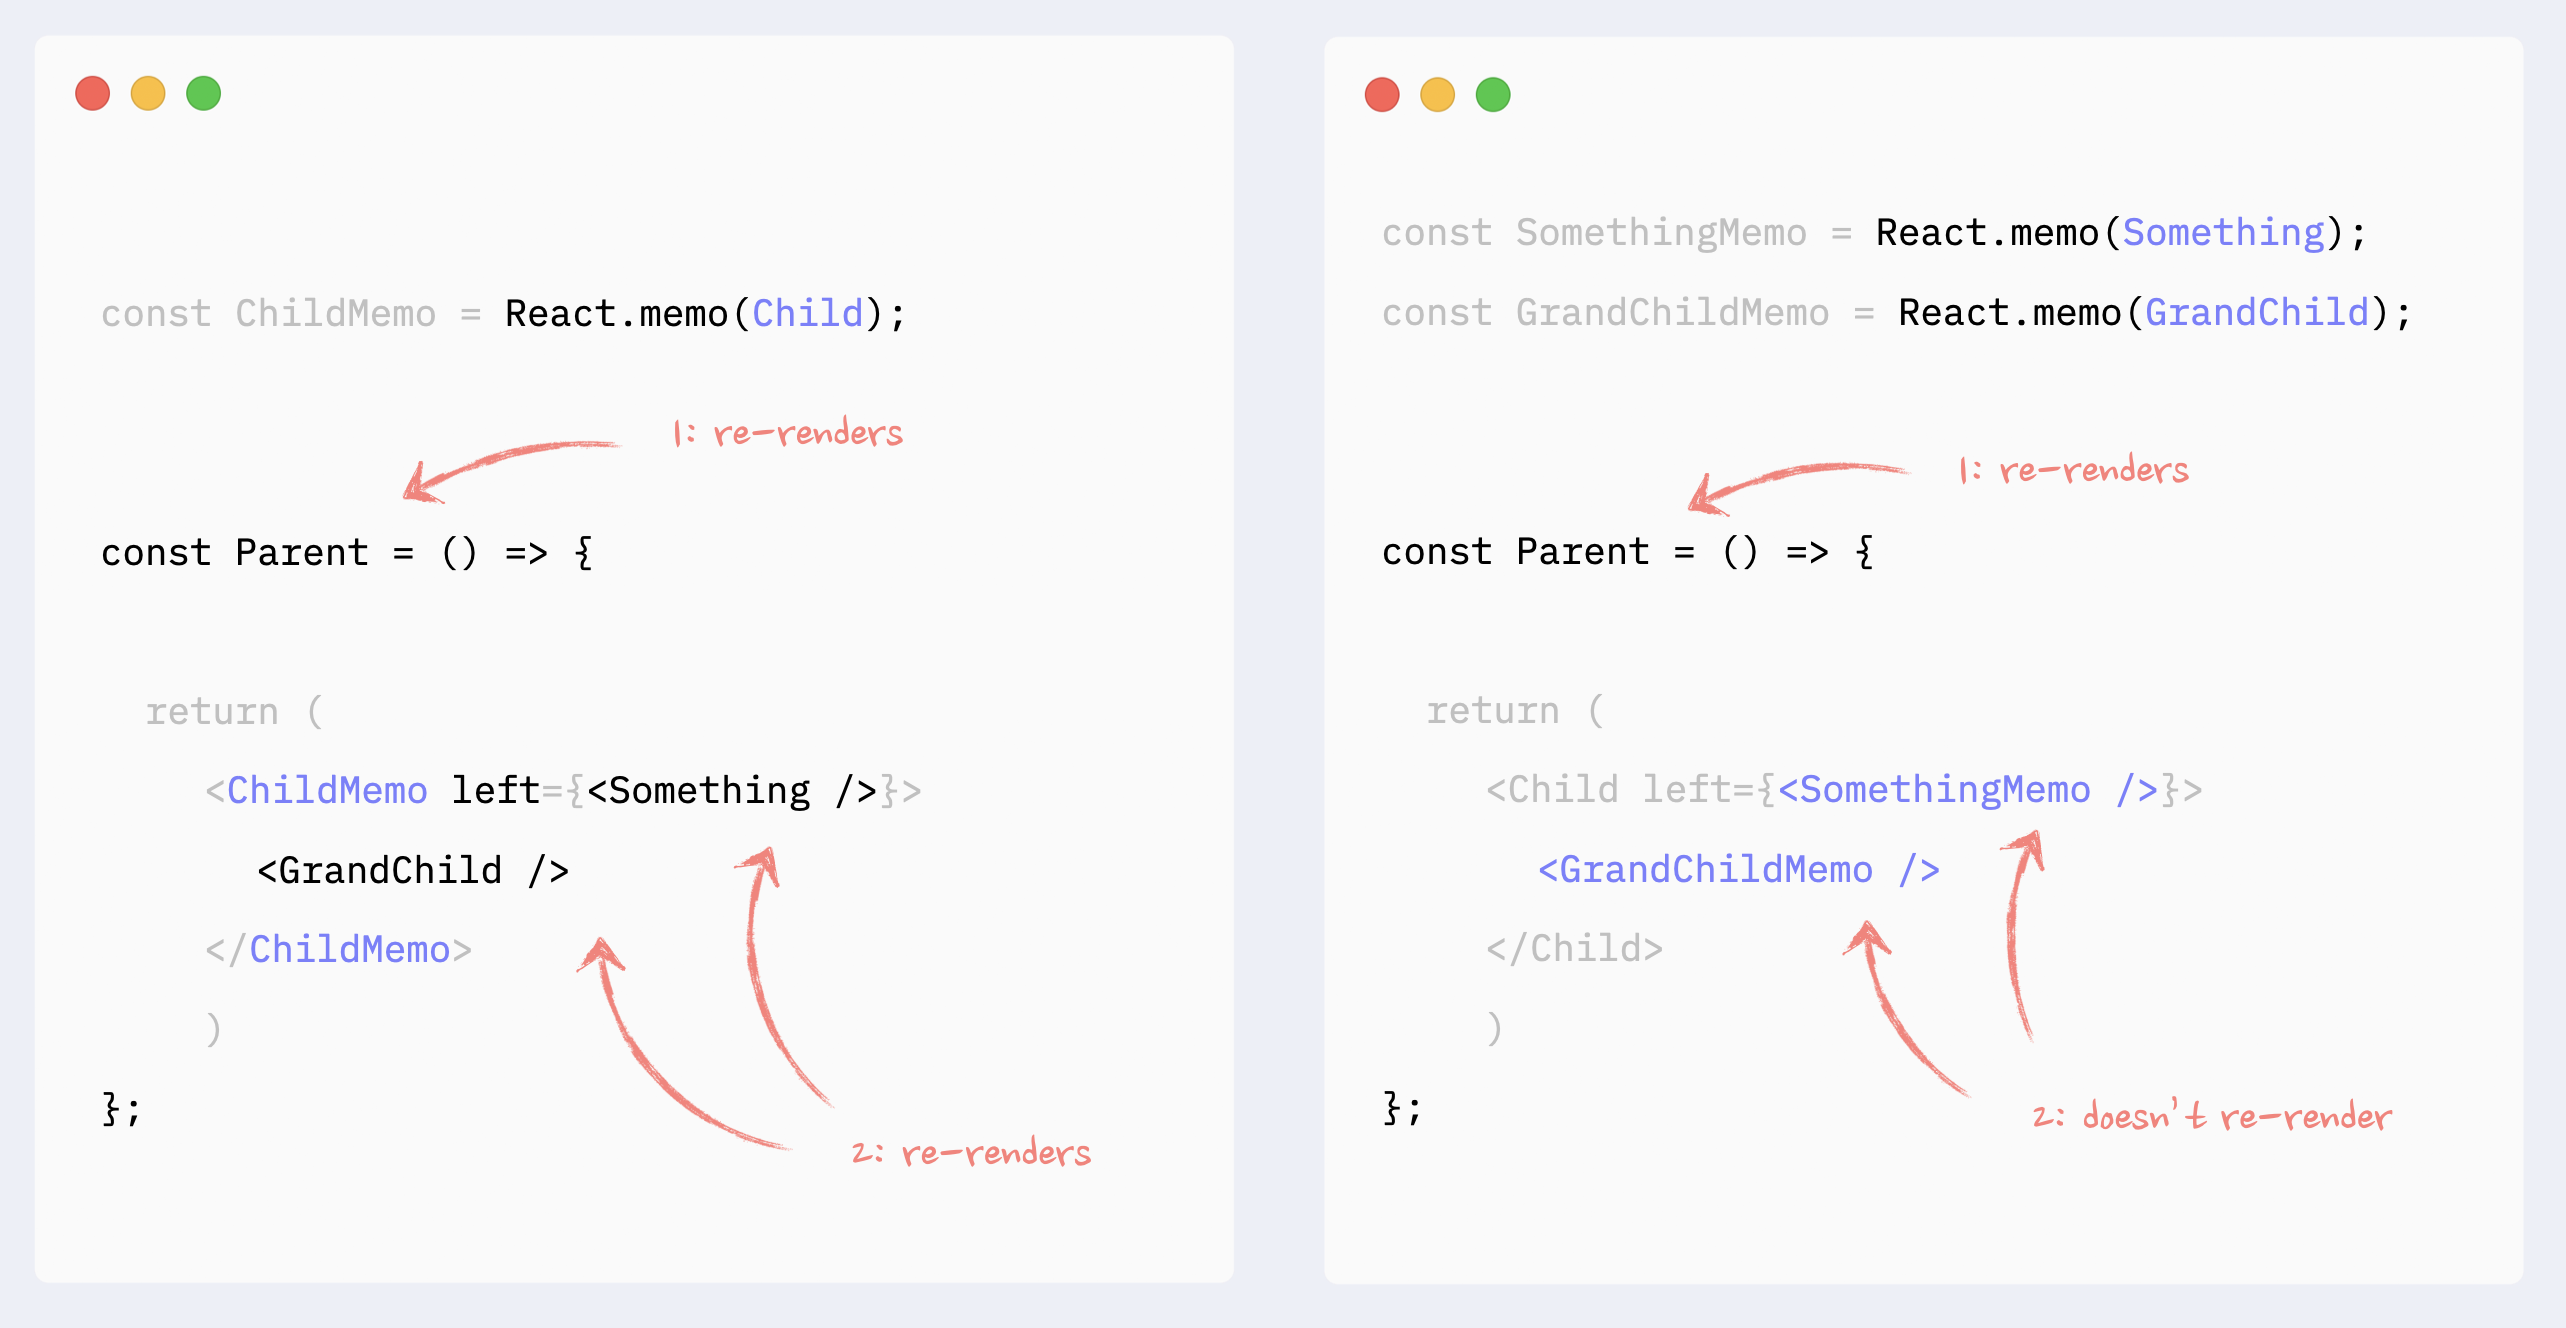
- ✅ React.memo: components as props or children
React.memo has to be applied to the elements passed as children/props. Memoizing the parent component will not work: children and props will be objects, so they will change with every re-render.
Improving re-render performance with useMemo/useCallback
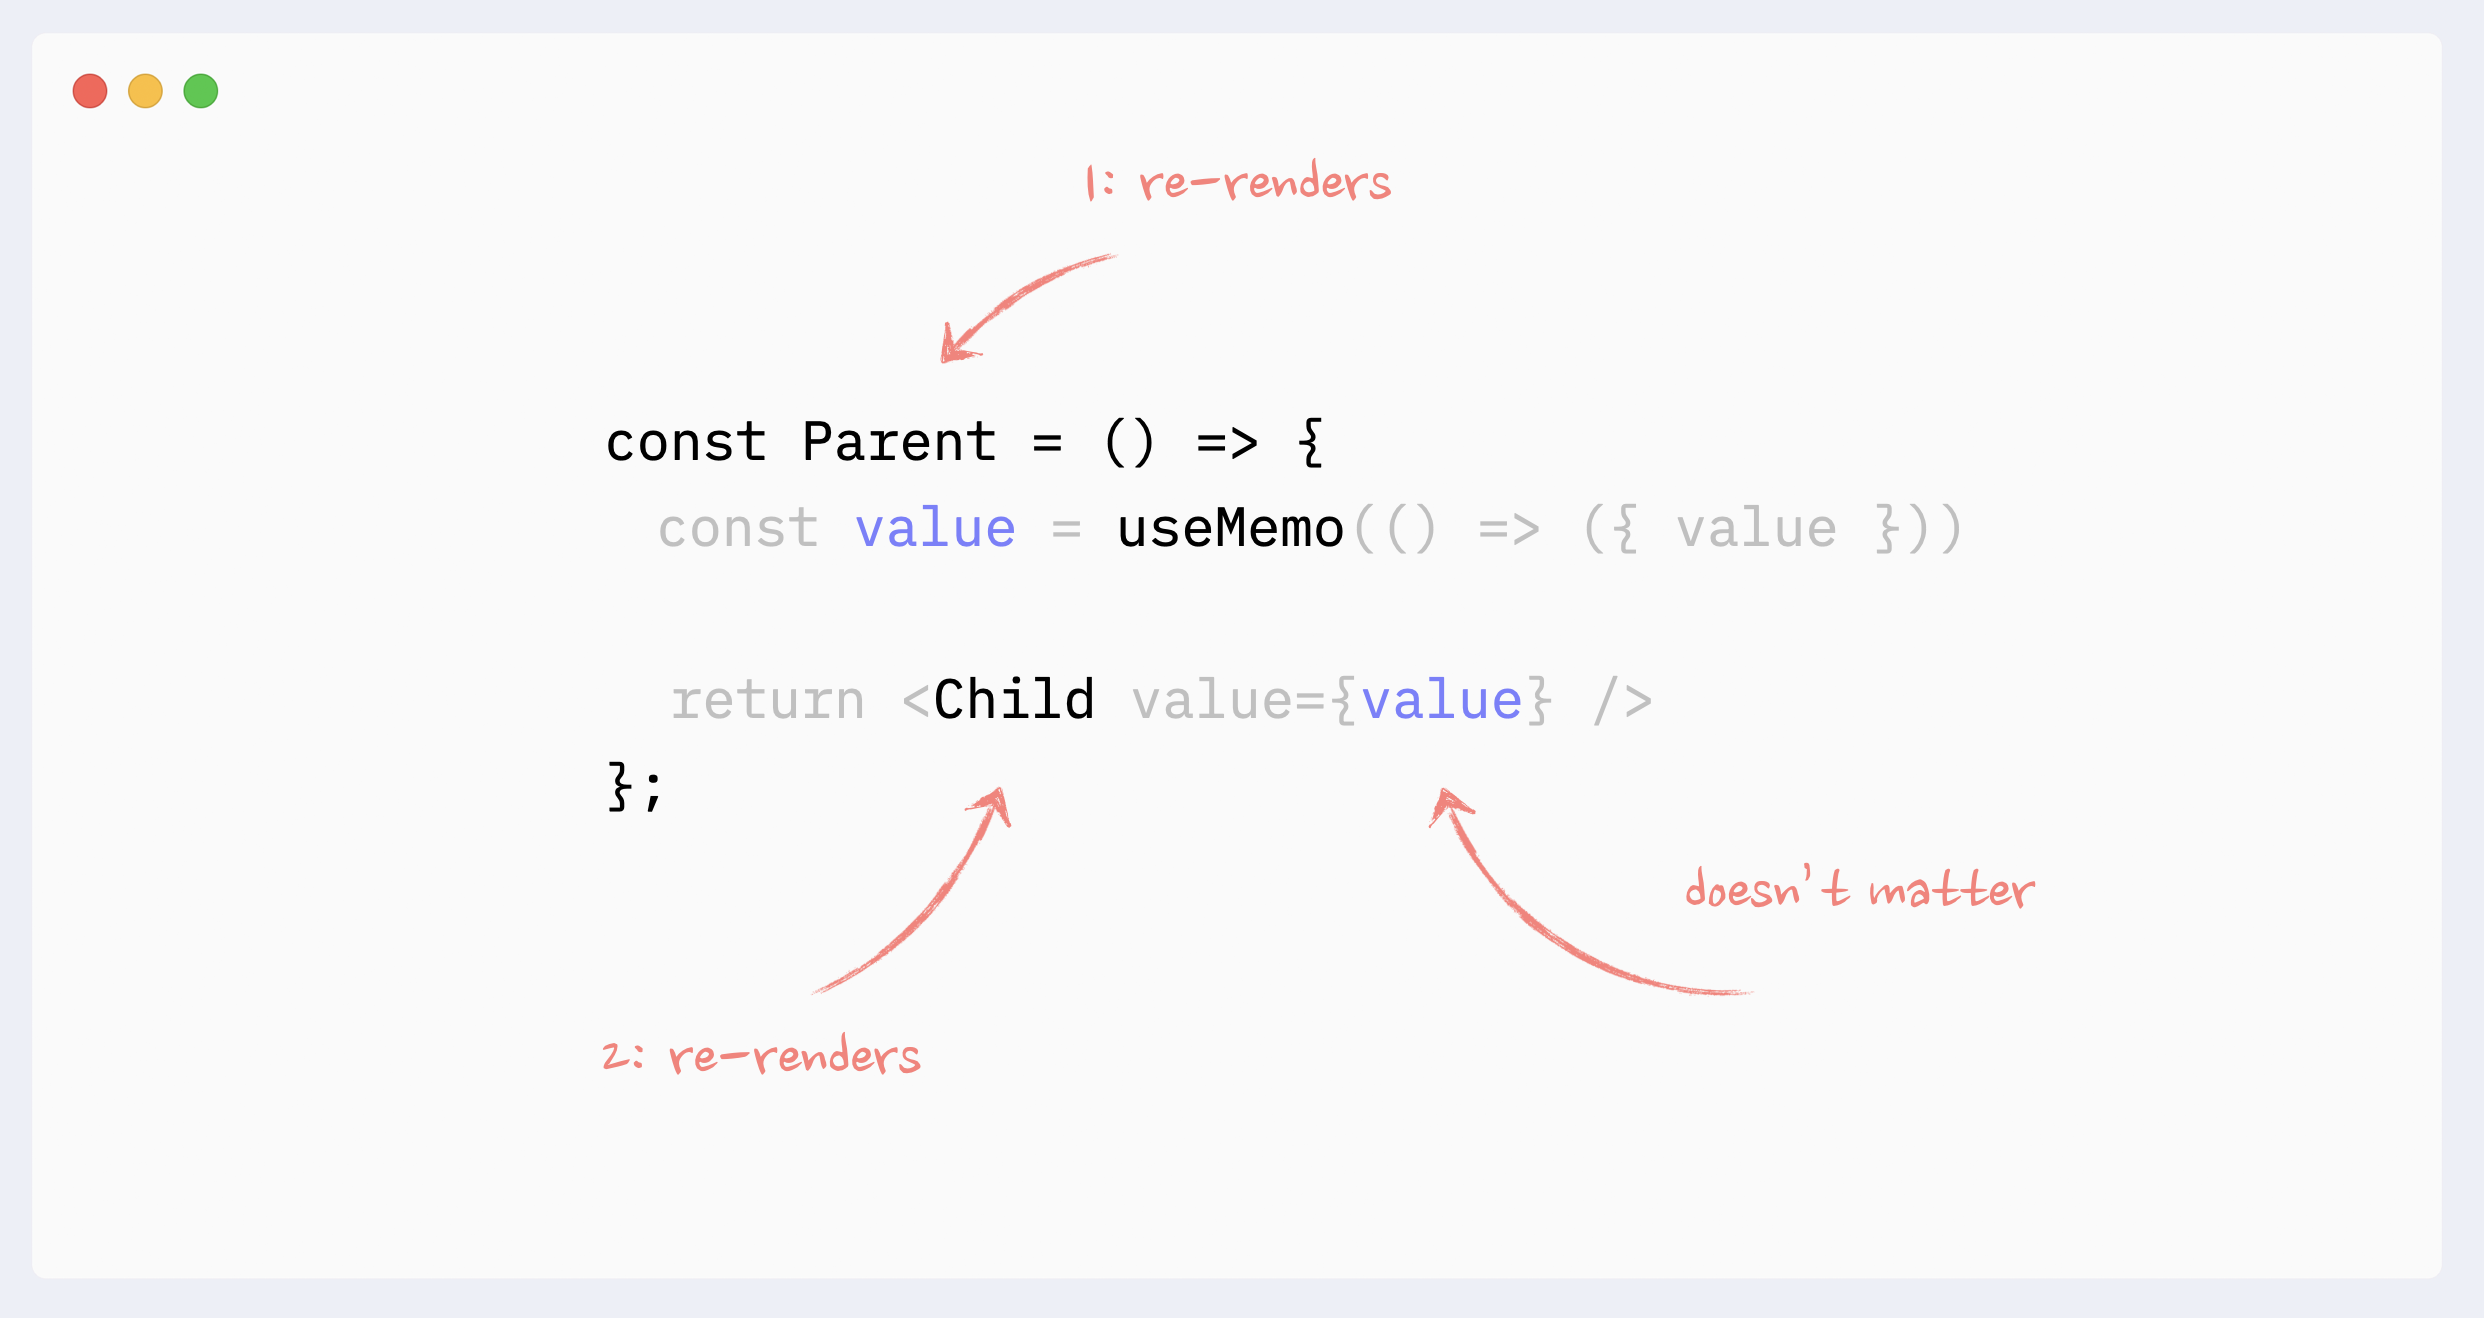
- 🚫 Antipattern: unnecessary useMemo/useCallback on props
Memorizing props by themselves will not prevent re-renders of a child component. If a parent component re-renders, it will trigger re-renders of a child component regardless of its props.
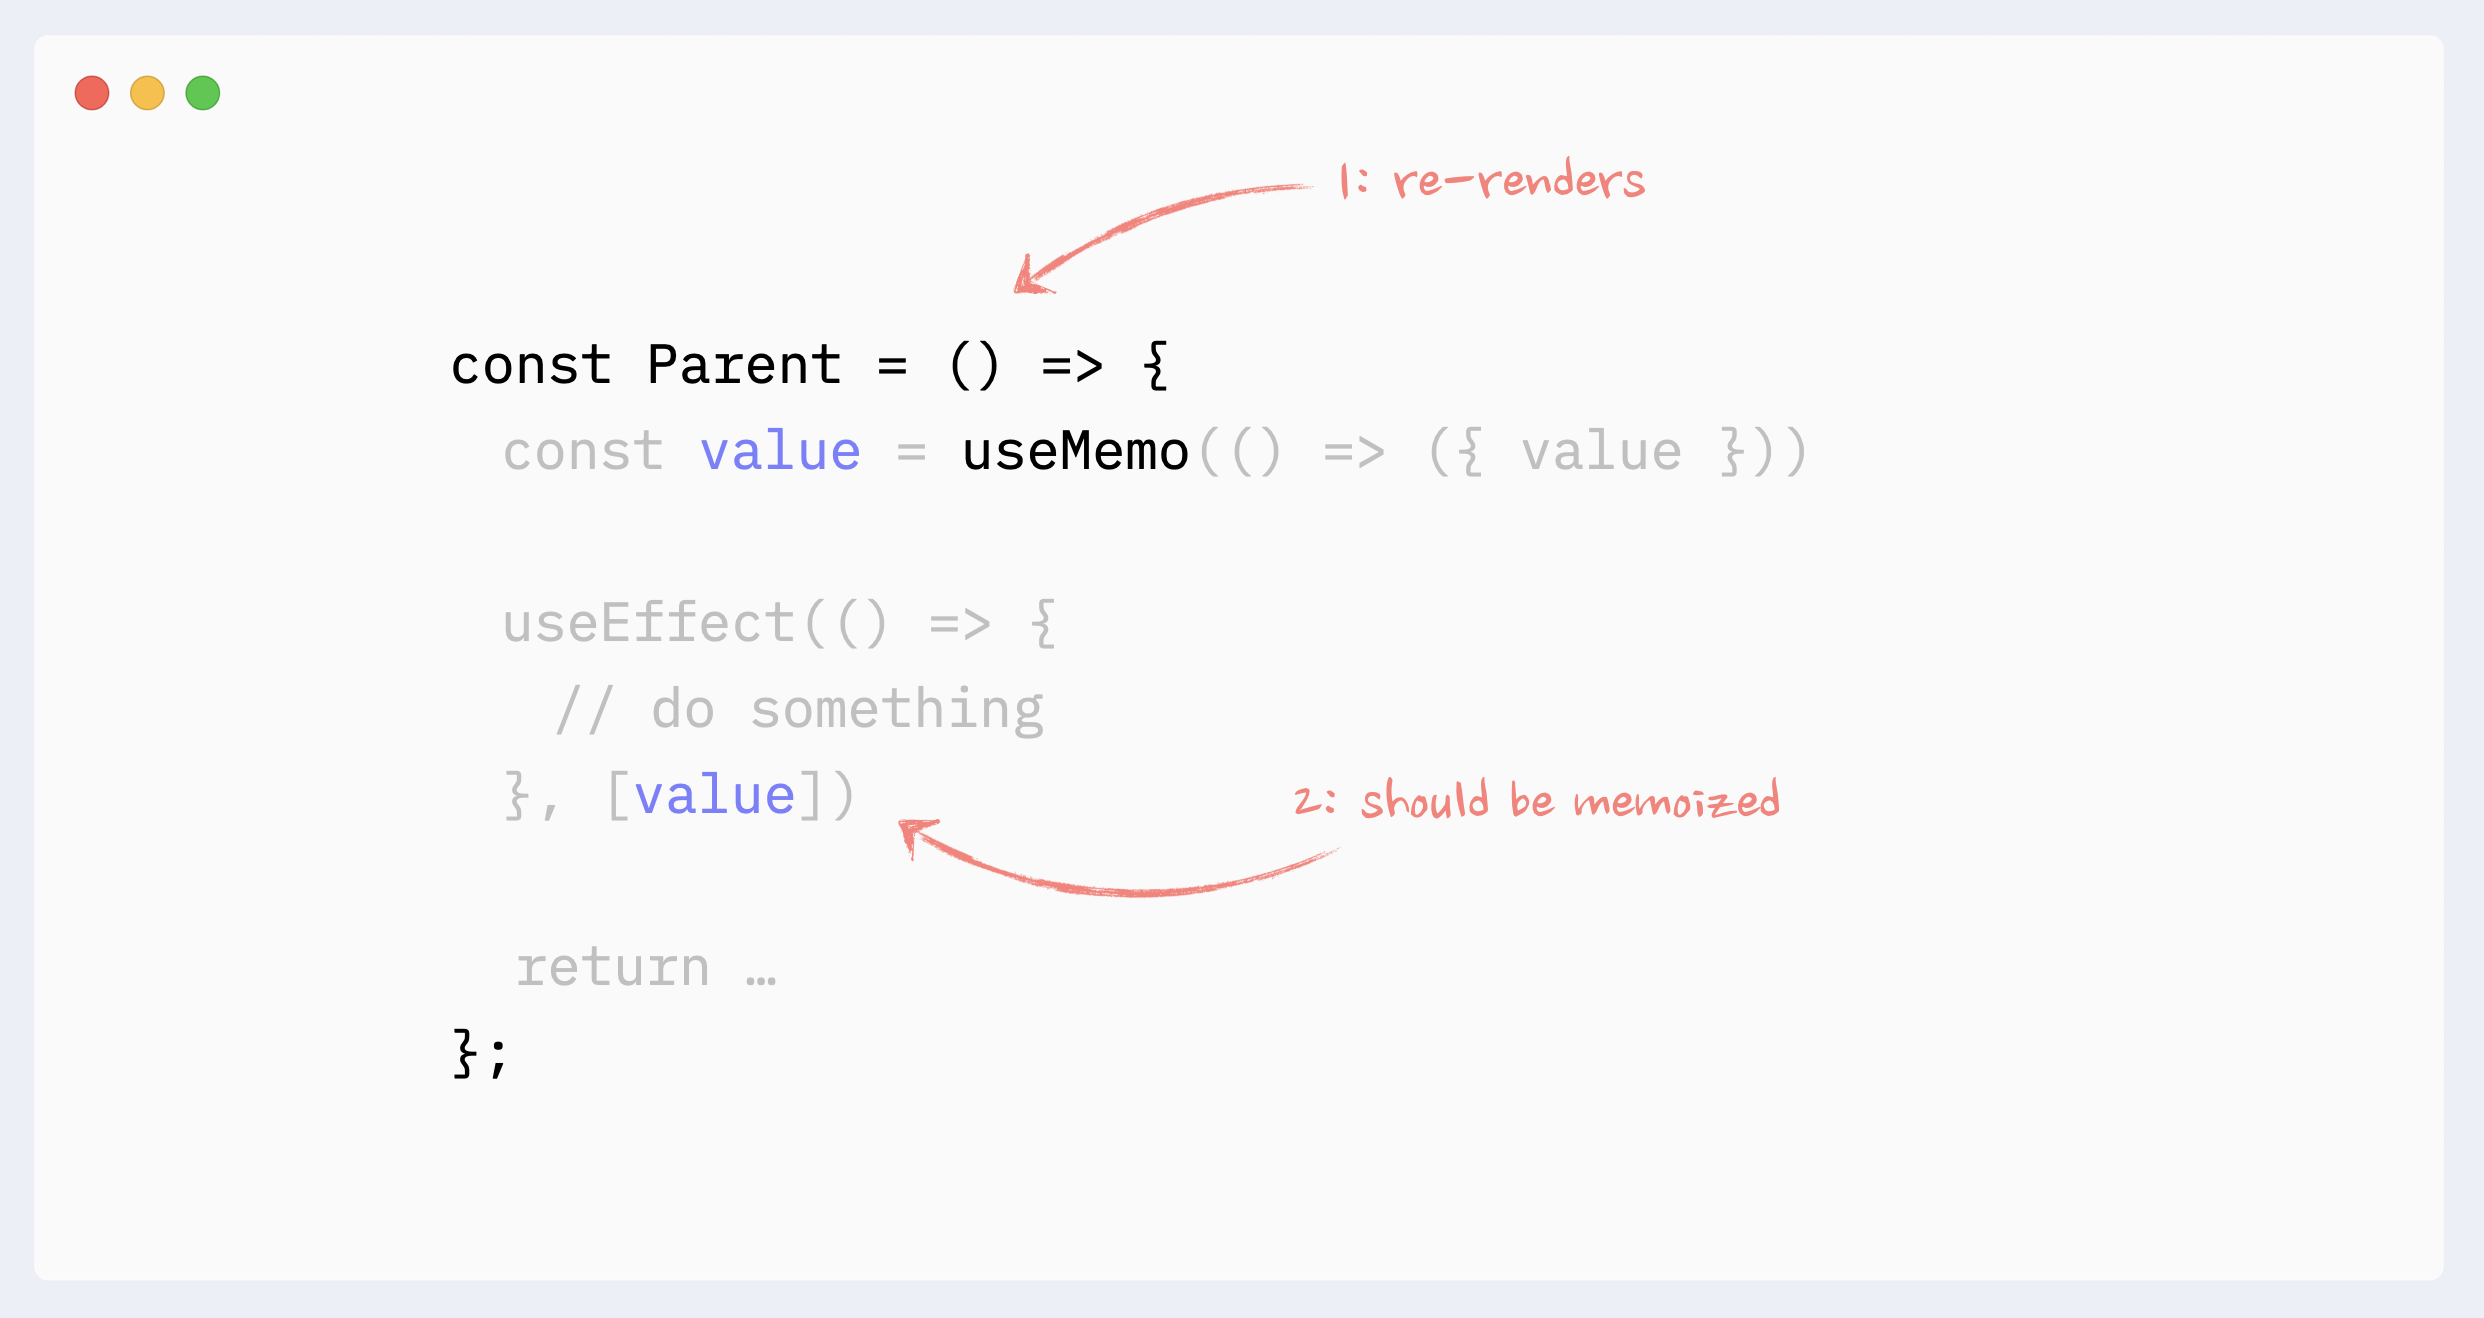
- ✅ Necessary useMemo/useCallback
If a child component is wrapped in React.memo, all props that are not primitive values have to be memorized
If a component uses a non-primitive value as a dependency in hooks like useEffect, useMemo, useCallback, it should be memorized.
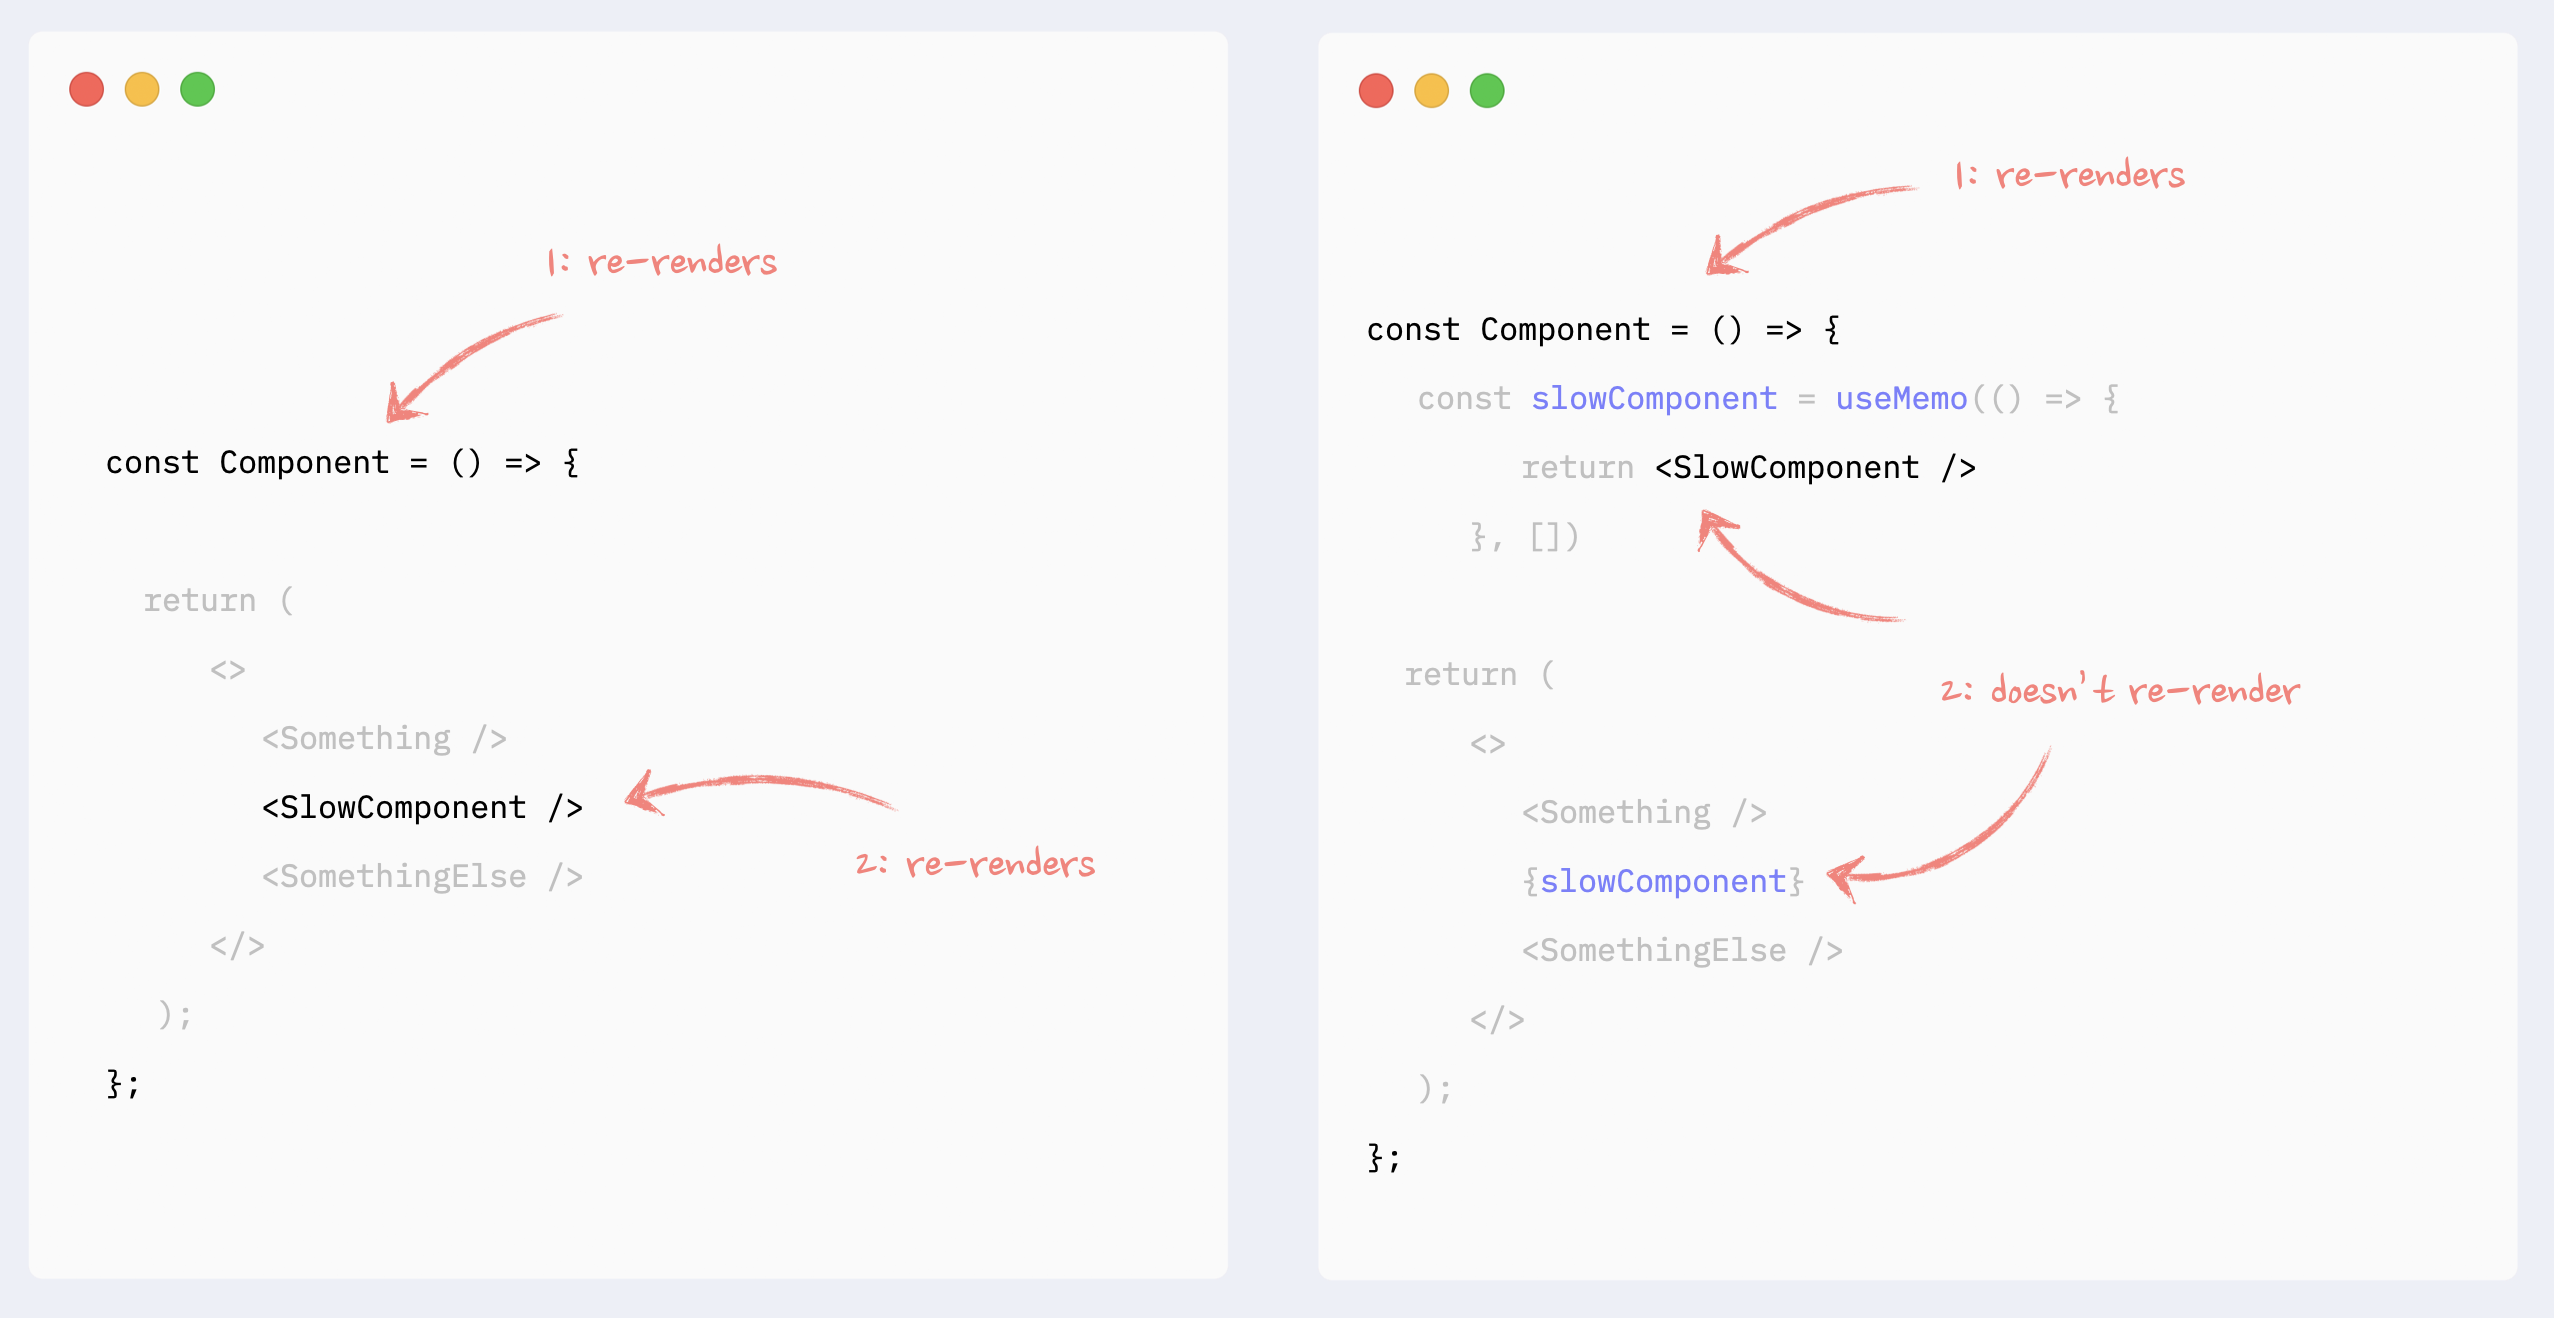
- ✅ useMemo for expensive calculations
One of the use cases for useMemo is to avoid expensive calculations on every re-render.
useMemo has its cost (consumes a bit of memory and makes initial render slightly slower), so it should not be used for every calculation. In React, mounting and updating components will be the most expensive calculation in most cases (unless you’re actually calculating prime numbers, which you shouldn’t do on the frontend anyway).
As a result, the typical use case for useMemo would be to memoize React elements. Usually, parts of an existing render tree or results of a generated render tree, like a map function that returns new elements.
The cost of “pure” JavaScript operations like sorting or filtering an array is usually negligible compared to component updates.
Improving the re-render performance of lists
In addition to the regular render rules and patterns, the key attribute can affect the performance of lists in React.
Important: just providing key attribute will not improve the lists' performance. To prevent re-renders of list elements, you need to wrap them in React.memo and follow all of its best practices.
Value in key should be a string that is consistent between re-renders for every element in the list. Typically, item’s id or array’s index is used for that.
It is okay to use array’s index as key, if the list is static, i.e., elements are not added/removed/inserted/re-ordered.
Using an array’s index on dynamic lists can lead to:
bugs if items have state or any uncontrolled elements (like form inputs)
degraded performance if items are wrapped in React.memo
Additional Resources:
Read about keys in detail: React key attribute: best practices for performant lists.
Read about reconciliation: React reconciliation: how it works and why we should care.
Watch about reconciliation: Mastering React reconciliation.

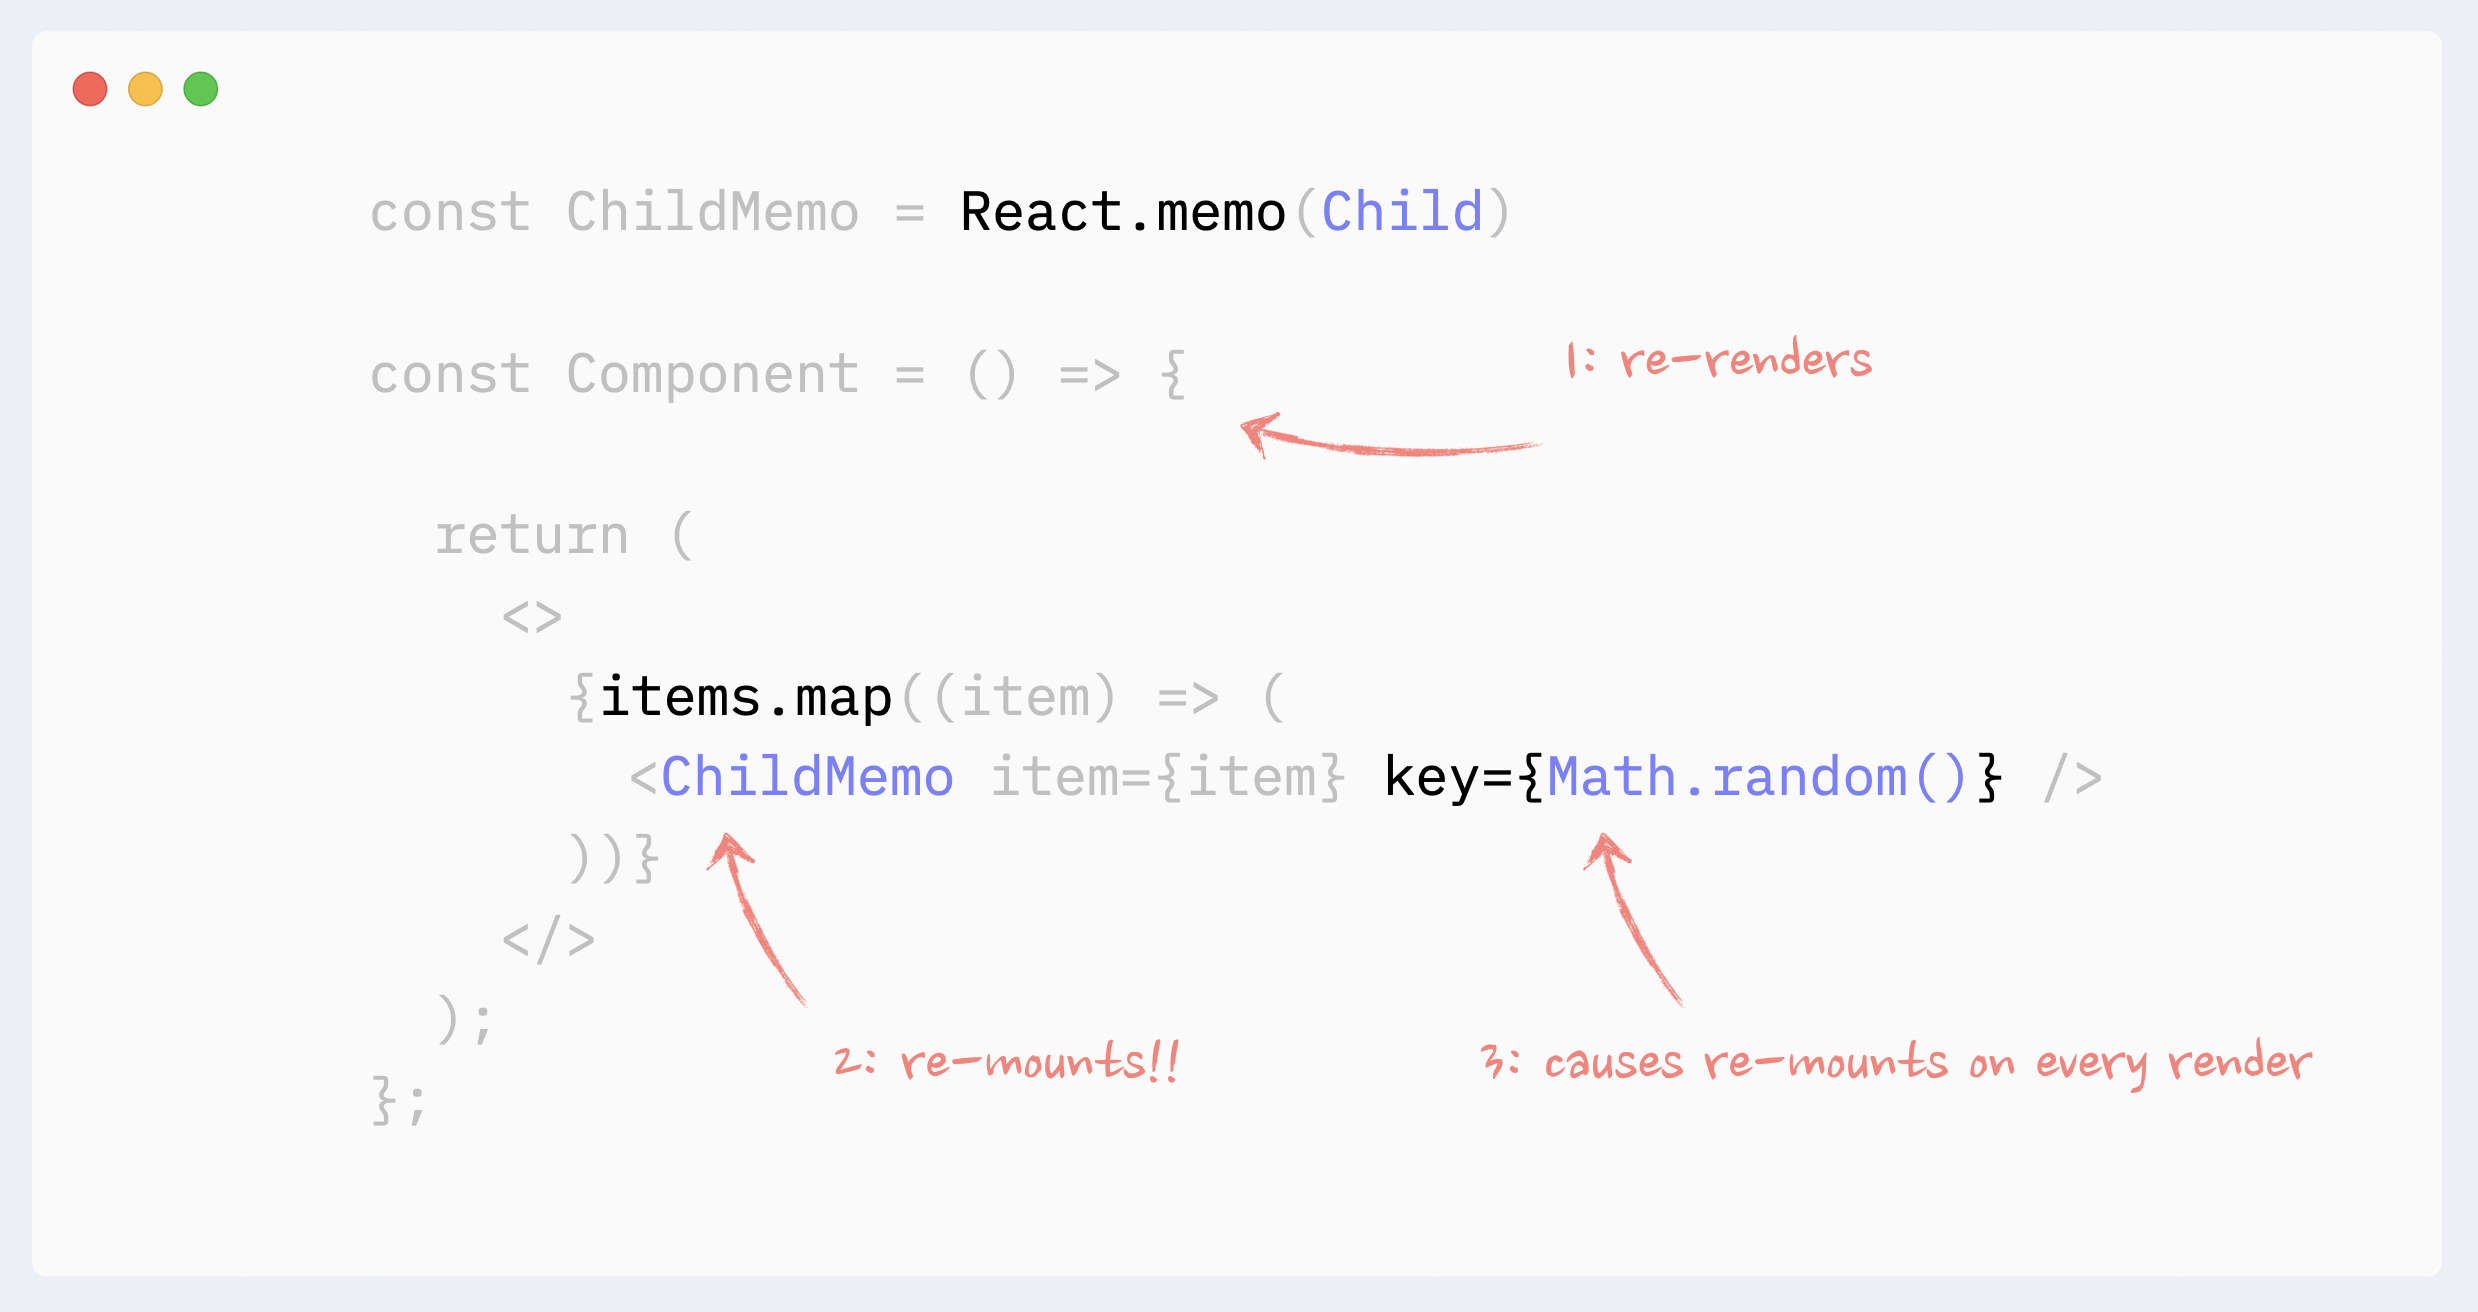
- ⛔️ Antipattern: random value as key in lists
Randomly regenerated values should never be used as values in key attributes in a list. They will lead to React re-mounting items on every re-render, which will lead to (very poor performance of the list, bugs if items have states, or any uncontrolled element such as form inputs)
Preventing re-renders caused by Context
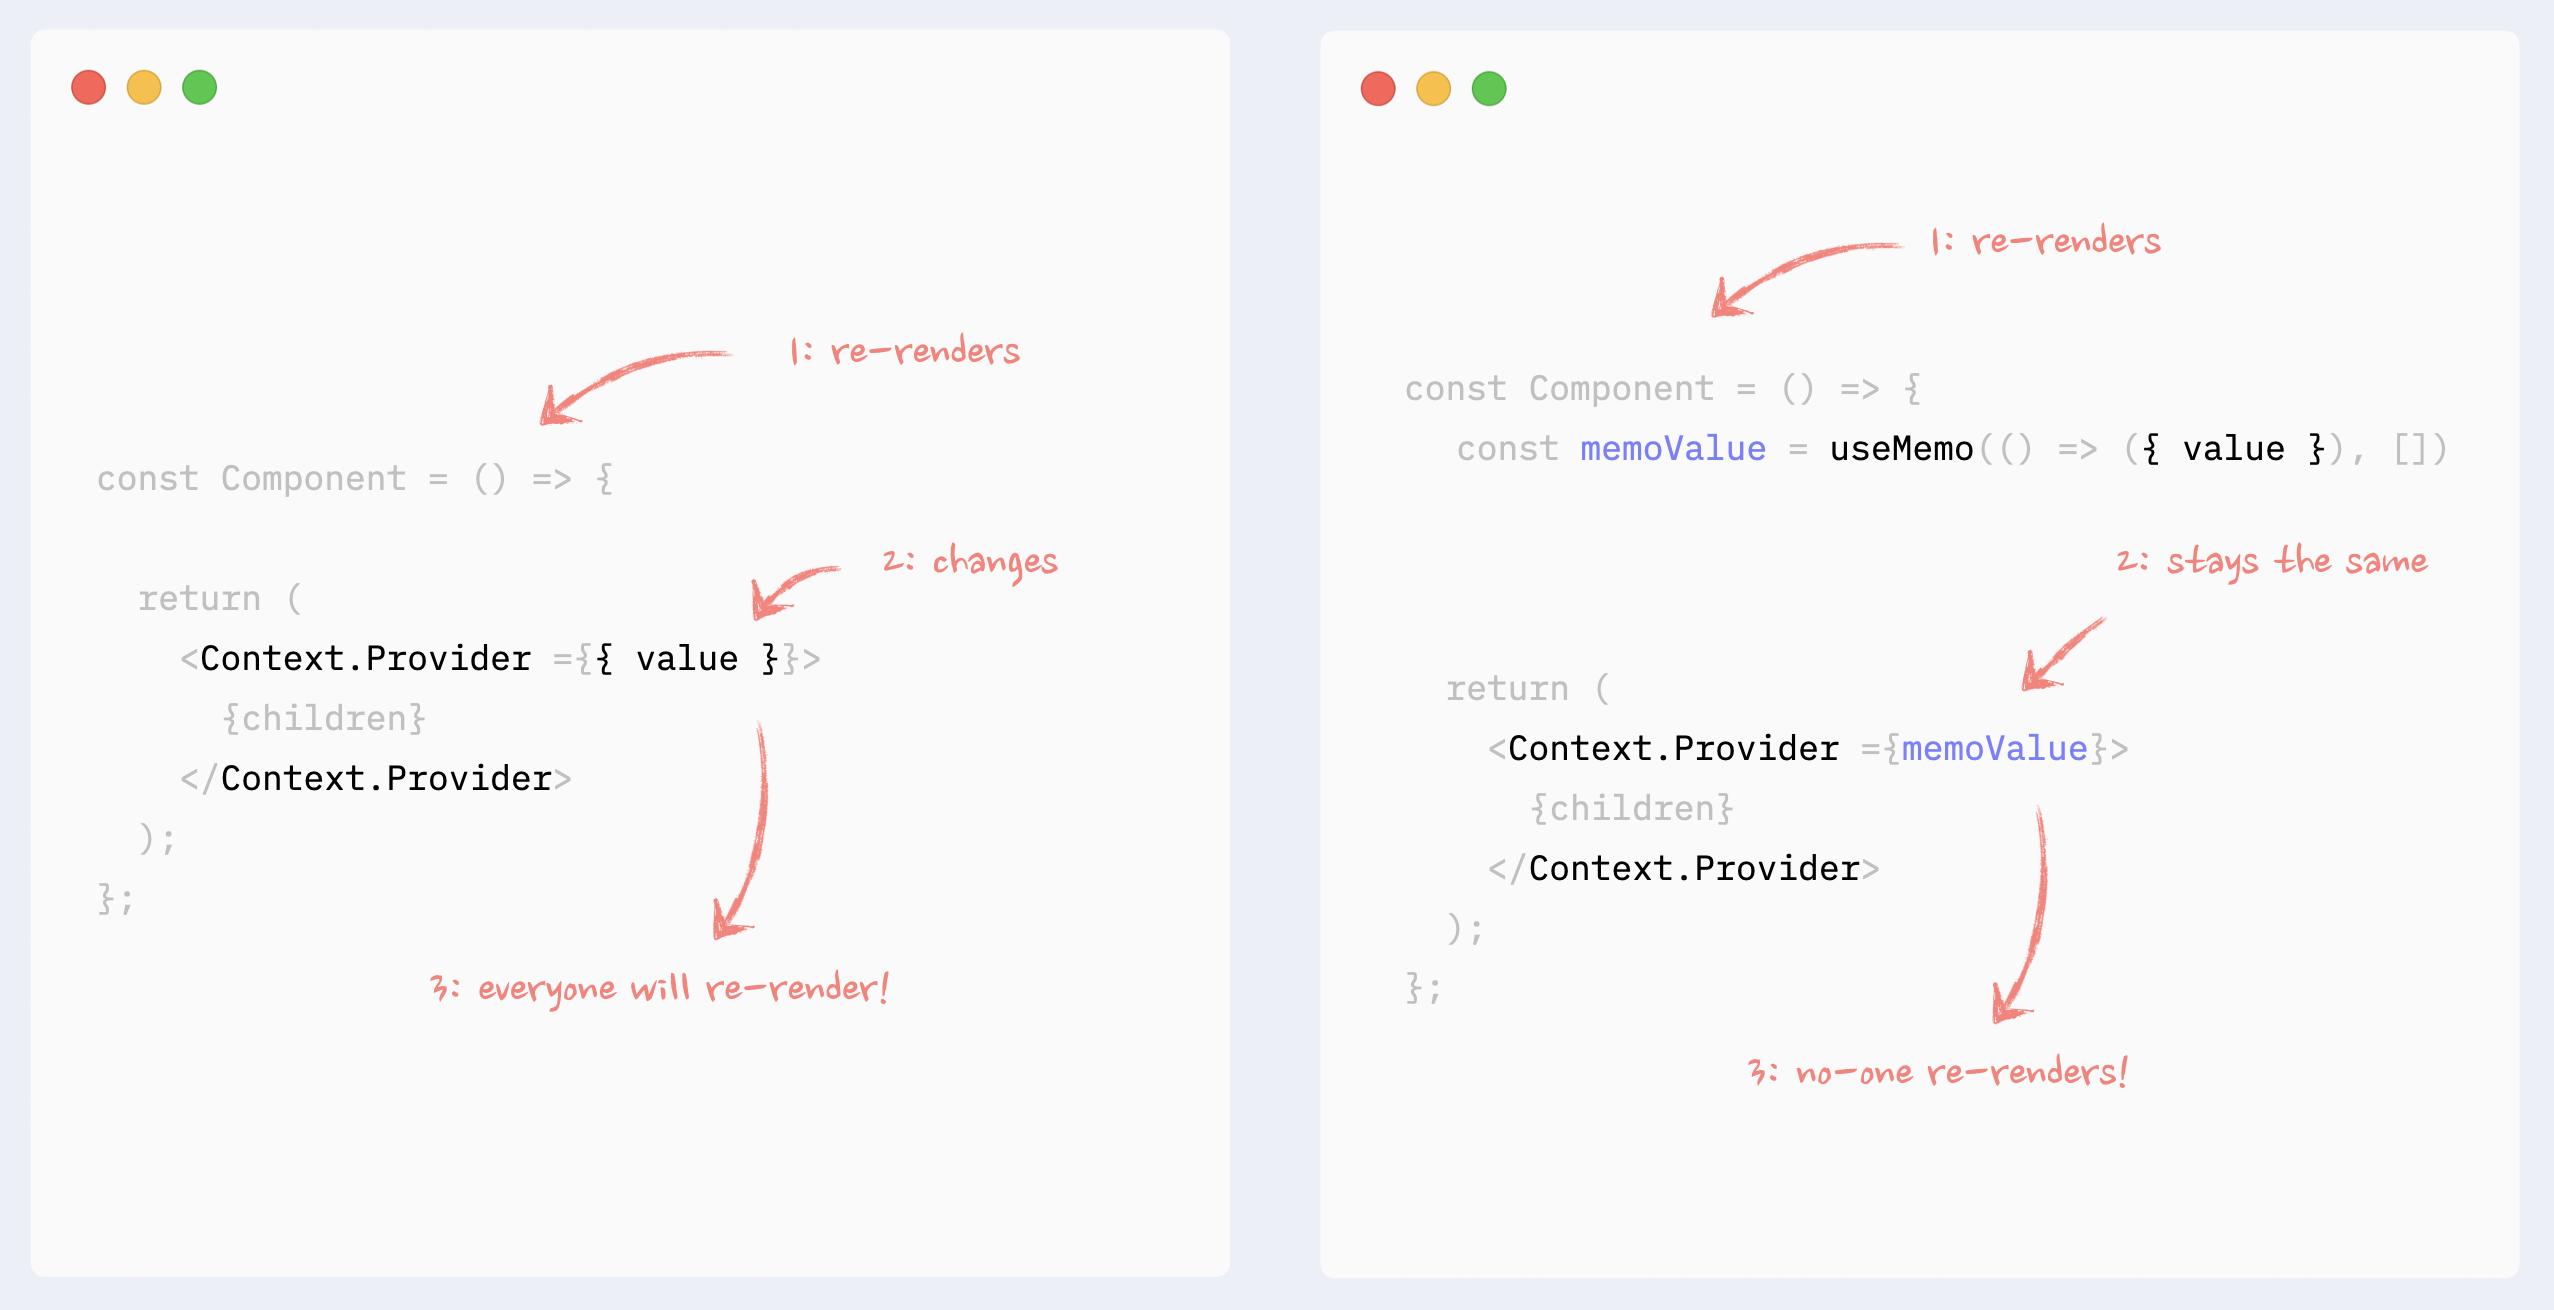
- ✅ Preventing Context re-renders: memorizing Context value
If Context Provider is not placed at the very root of the app, and there is the possibility that it can re-render itself because of changes in its ancestors, its values should be memorized.
See the example in codesandbox.
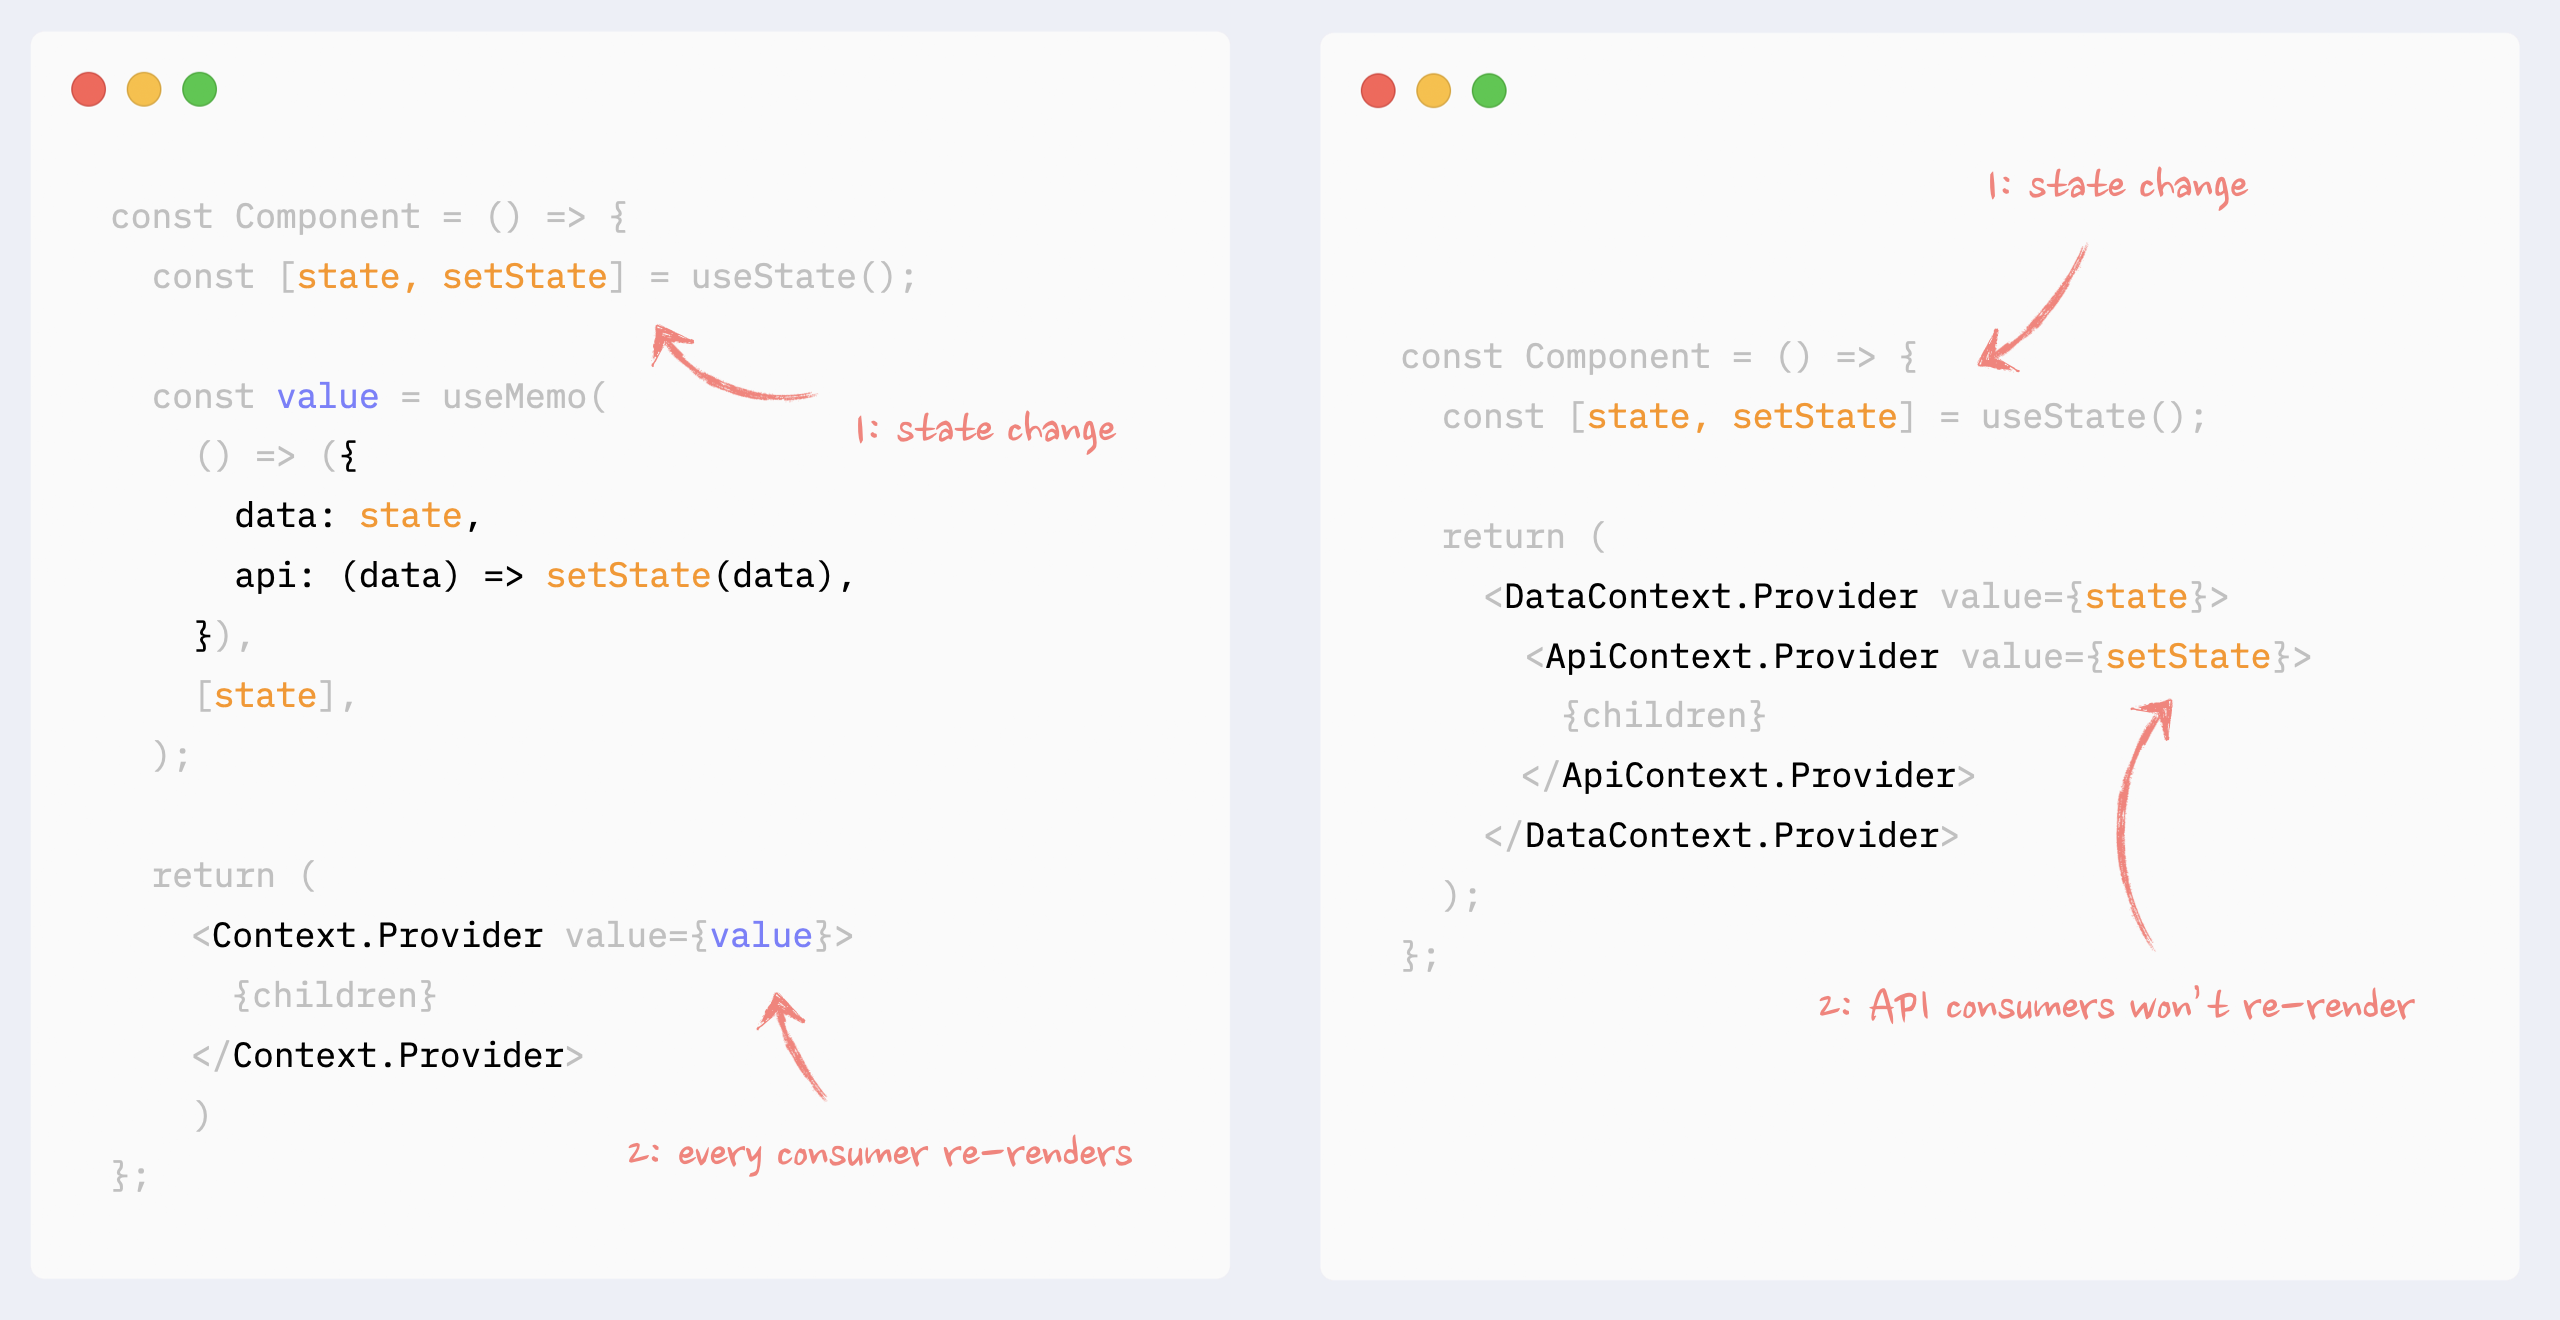
- ✅ Preventing Context re-renders: splitting data and API
If in Context, there is a combination of data and API (getters and setters), they can be split into different Providers under the same component. That way, components that use the API only won’t re-render when the data changes.
Read more about this pattern here: How to write performant React apps with Context.
See the example in codesandbox.
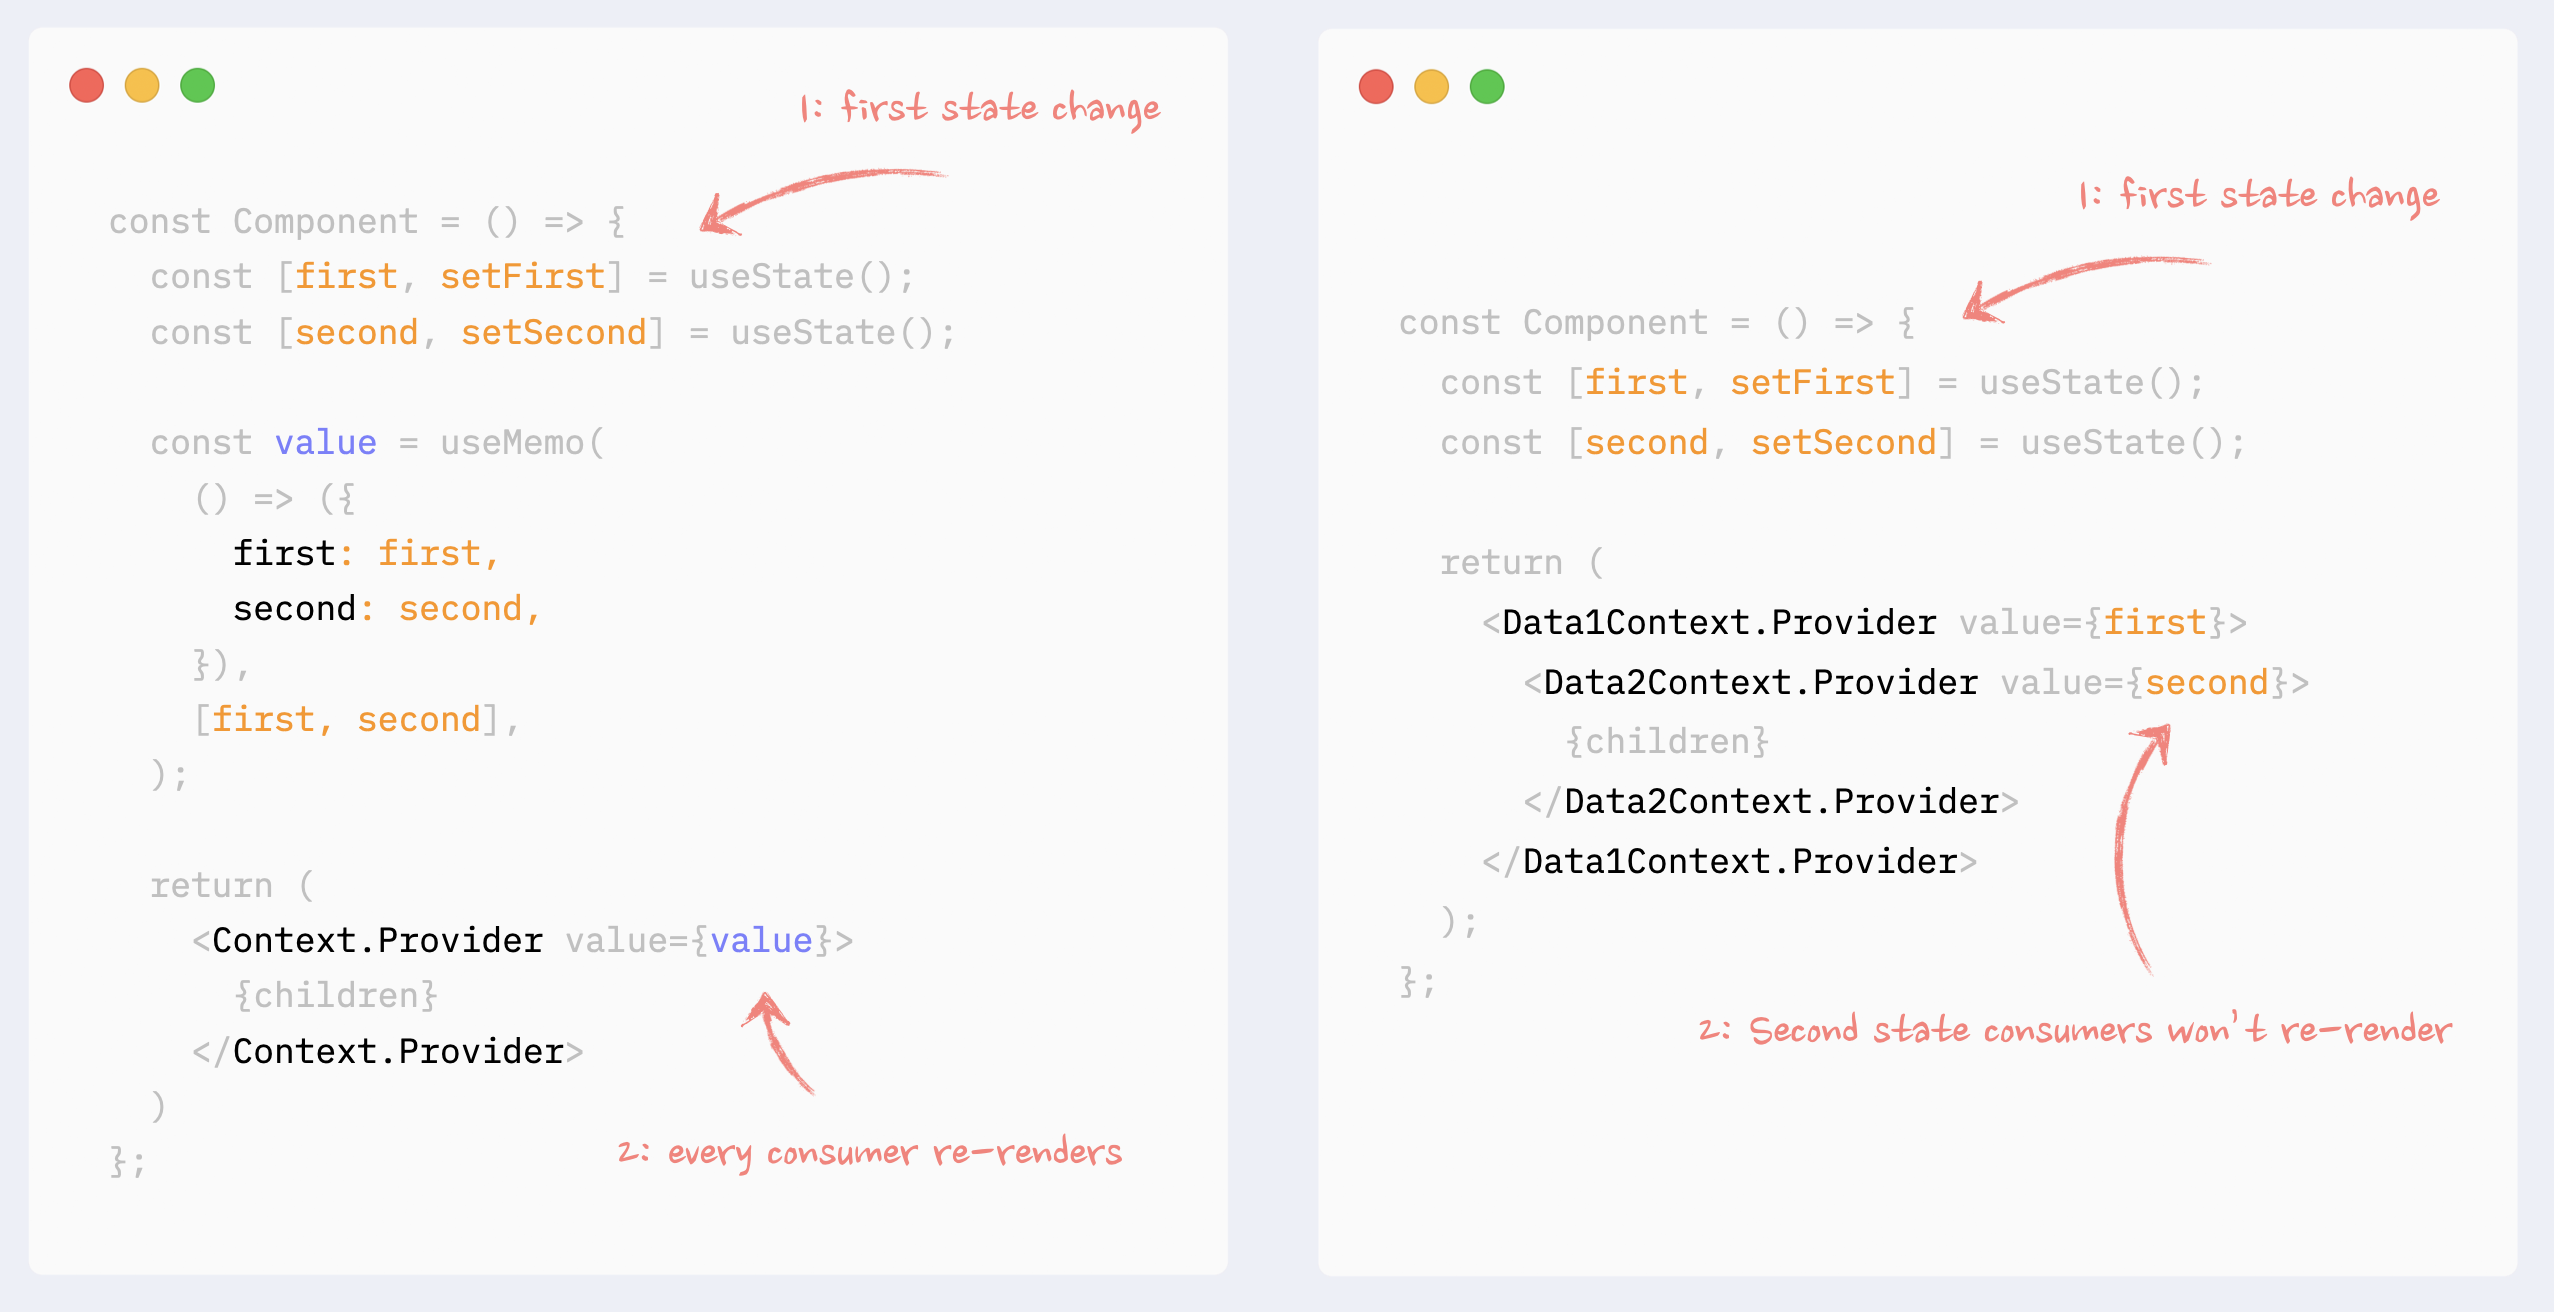
- ✅ Preventing Context re-renders: splitting data into chunks
If Context manages a few dependent data chunks, they can be split into smaller providers under the same provider. That way, only consumers of the changed chunk will re-render.
See the example in codesandbox
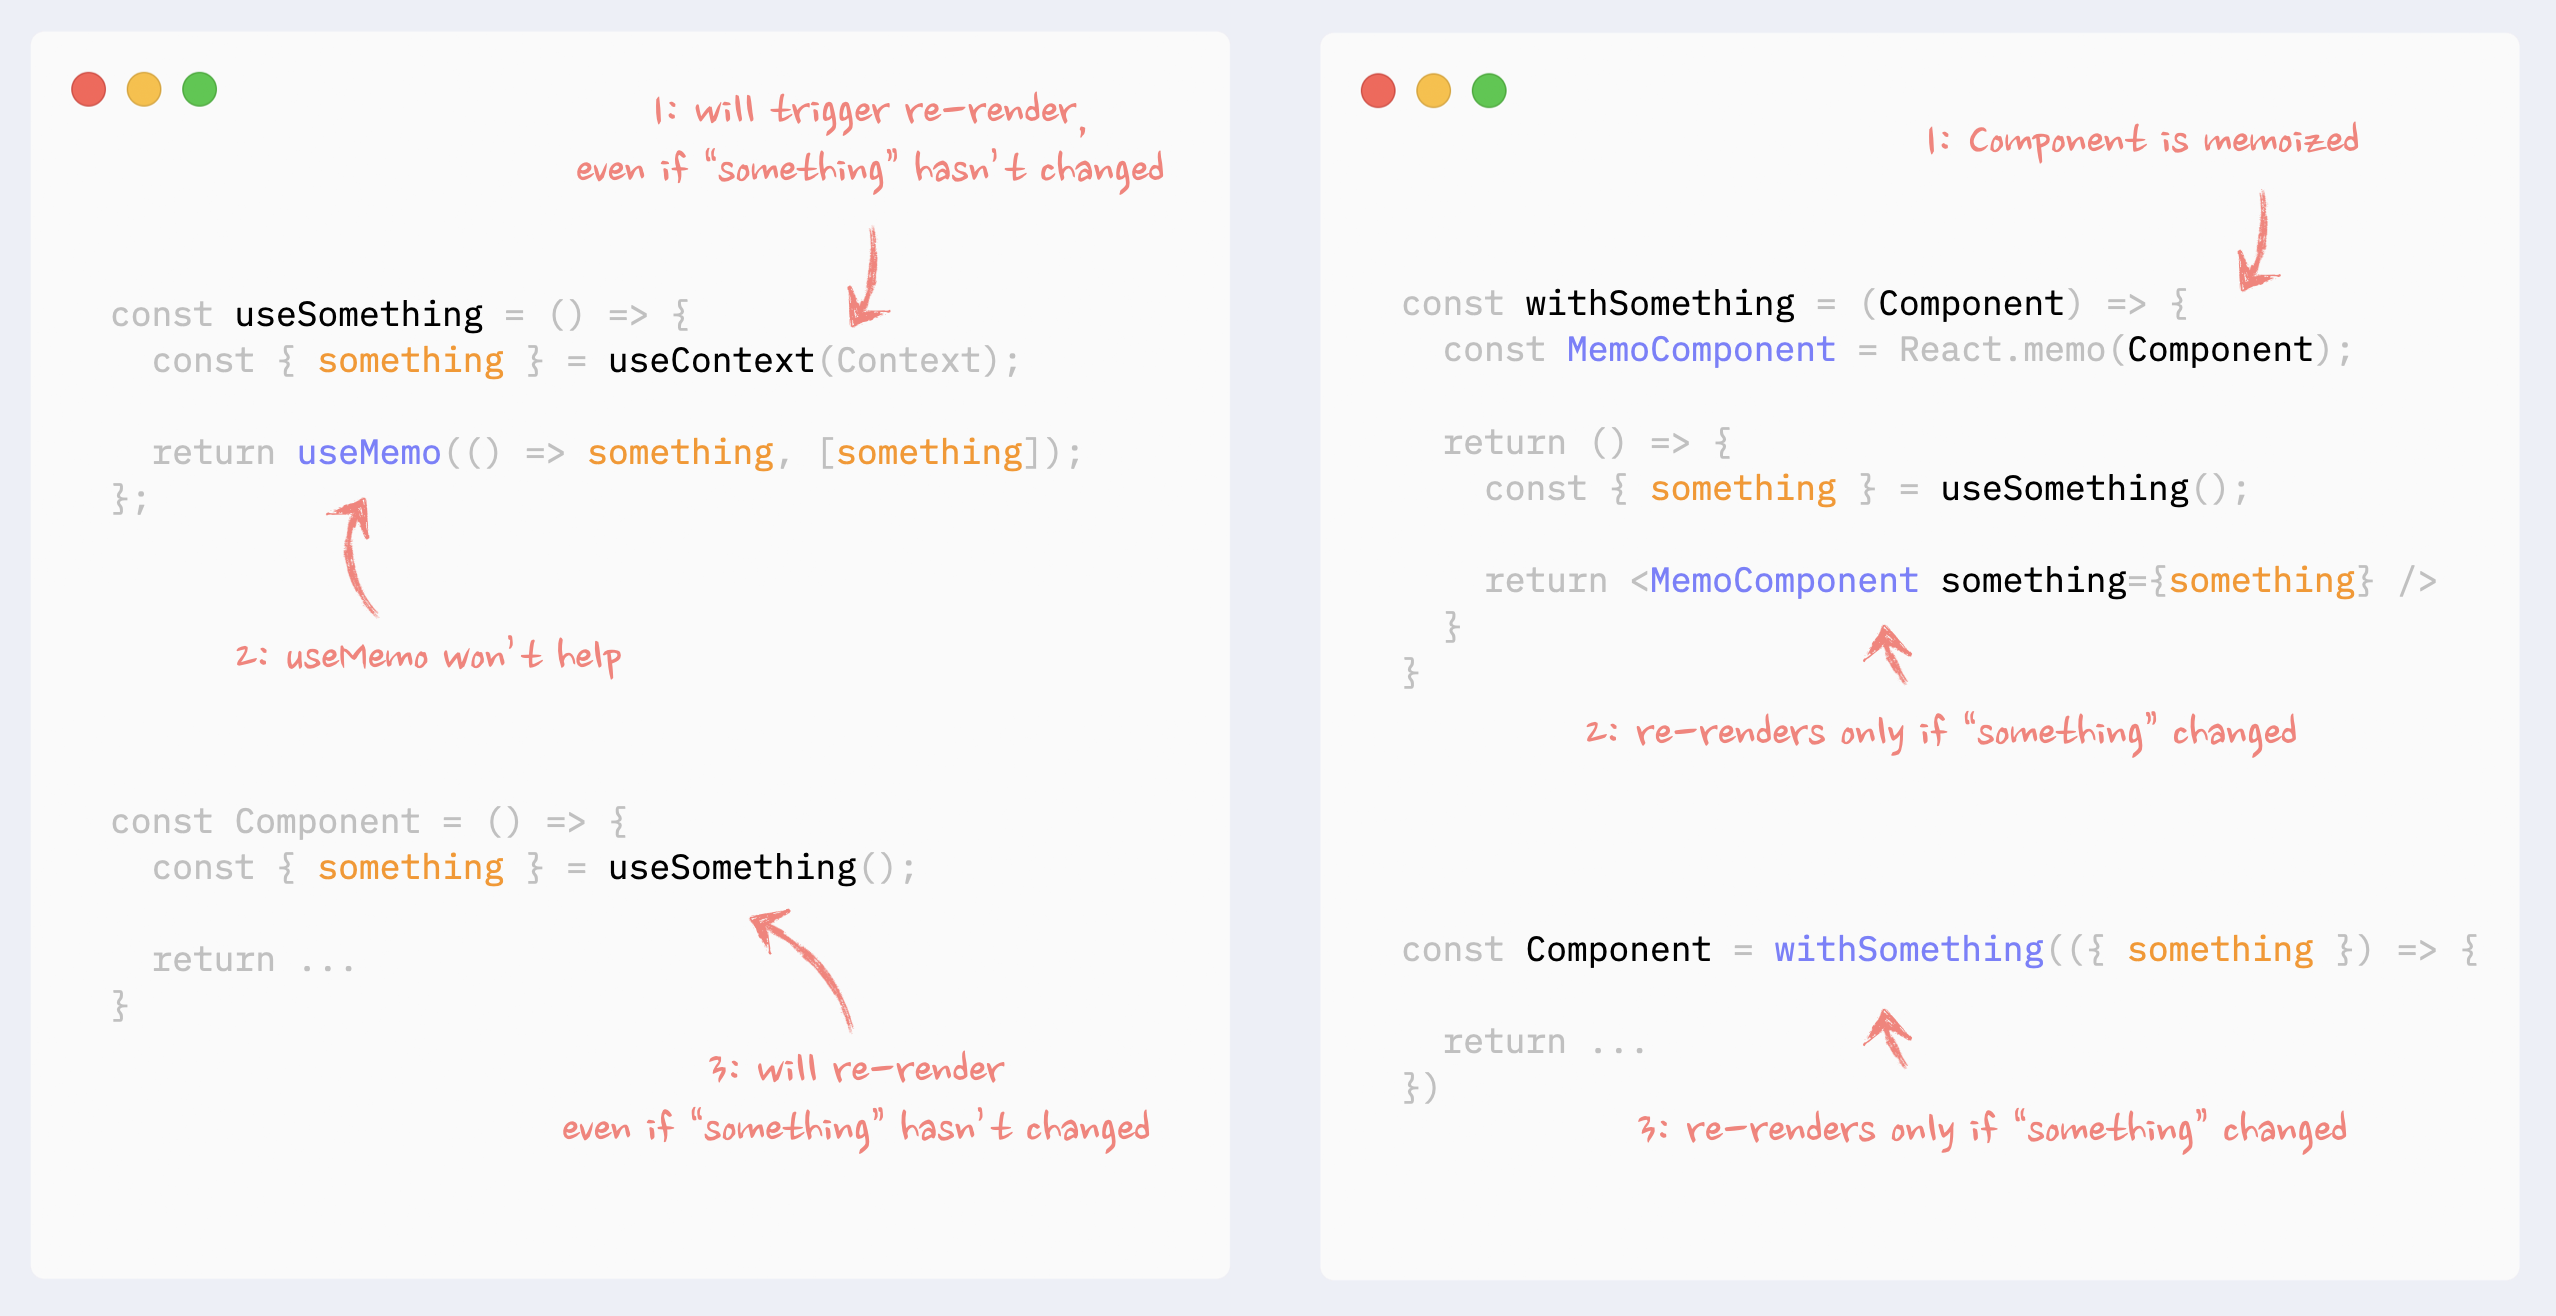
- ✅ Preventing Context re-renders: Context Selectors
There is no way to prevent a component that uses a portion of the Context value from re-rendering, even if the used piece of data hasn’t changed, even with useMemo hook.
Context selectors, however, could be faked with the use of higher-order components and React.memo.
Read more about this pattern here: Higher-Order Components in React Hooks era.
See the example in codesandbox
How Senior Front-end Developers Build Platforms, Not Pages
Most of us start out building components.
We follow the designs, wire up the props, fetch the data, and ship features. But as the app grows, something subtle starts to shift. Files become harder to navigate. Logic feels duplicated. Bugs creep in that don’t seem to belong anywhere. Team overlap. The code doesn’t scale the way we imagined it would.
That’s when you are invited, not always formally, to think like an architect.
I think that is a skill that can be developed at any stage, whether you are a junior, senior, or principal engineer. It doesn’t require a new title; it requires a new lens.
How To Think Like a Front-end Architect (Not Just a Developer)
When we talk about React, we often think about components. Whether it is a simple button, or an entire table, or a complete dashboard screen with charts. That’s how most of us begin. We open a design, see what is on the screen, and try to mirror it with code.
But when we have been building React apps for years, ie. dozens of features, thousands of components, hundreds of edge cases. We realized that React isn’t just really about components. It’s about architecture.
And the way senior developers think about architecture is really different from how juniors think. It’s not that they know some secret design patterns hidden in a book. It’s that…they see the system differently.
- The architect starts before the first component
A junior developer starts with the UI:
Here is the screen. Let’s build the components for it.
A senior developer doesn’t start there. They start with boundaries.
Where does this feature live?
What does it depend on?
Who owns the data, and how far should that data travel?
They see that components are not the first step, but the last. A component is just a surface of something deeper. Underneath lies a flow: data, state, business rules, side effects, and only then, the UI.
This mental shift changes everything. It prevents architecture from collapsing when features grow. This is one of the most important things, in my opinion.
- They keep concerns separate
There is one thing Seniors learn the hard way. That is, when concerns mix, projects do not (kind of).
A junior will happily put an APi call inside the component, mix form validations with UI rendering, sprinkle a bit to fix whatever breaks. It works for a while.
A Senior keeps things apart:
UI layer: just pure presentational components. No logic, no side effects.
State layer: where data is stored, updated, and synchronized.
Domain logic layer: where business rules live, independent of UI.
Why so strict? Because separation buys freedom. If the API changes, only the domain logic changes. If the Ui redesigns, only the components change. Each layer breathes without choking the others.
This is the reason large apps stay alive for years instead of collapsing under their own weight.
- They don’t chase perfection, they make change cheap
A junior wants a perfect architecture. They want to guess the future.
A senior knows the future will surprise us. APIs will break, the design will pivot, and product managers will ask for something entirely new. No amount of foresight can predict all of it.
So instead of aiming for perfection, they design for change.
Clear boundaries so things can be swapped
Simple contracts between layers so code can be replaced
No over-engineering…only abstraction when it is truly earned.
So, I would say, the real skill is not about making the best architecture today. It is in making tomorrow changes painless.
- Data flows like rivers
At its heart, React is about data flowing down and actions following up. But in real apps, these flows multiply. Data comes from APIs, cache, Redux, Contexts, Sockets, and more.
A junior places state whenever it feels convenient.
A Senior asks: Where does this state truly belong?
Does it belong to a single component? Keep it local.
Does it span across a feature? Put it in Context or a slice of state.
Does it belong to the entire app? Centralize it with Redux, Zustand, or another store.
A great analogy would be — they treat data flow like rivers? If it runs downhill in clear streams, the system is healthy. If it leaks, pools, or floods everywhere, the system drowns.
- They organize code by domains, not by blocks
This is one of the most invisible but profound differences.
A junior organizes code by components: buttons, cards, forms
A senior organizes code by domains: users, payments, settings
Why? Because UI is temporary. The same “card“ might exist in ten places, each with a different meaning. But the domain, say “user“, “transaction“, “notification“, those things are permanent.
So instead of a folder called components/, seniors have features/ or domains/. Each domain owns its UI, its state, and its logic. The codebase feels like a map of the product, not a collection of widgets.
That’s why new engineers can work on a Senior’s project and immediately know where things belong.
- They embrace constraints, not options
A common trap for juniors is over-flexibility.
Let’s make this component super reusable. Let’s accept ten props so it can work in all cases.
Seniors go the opposite way: What can we forbid?
A button component should accept just what it needs…nothing more
An API layer should return typed, predictable data…no guessing.
Patterns across the team should be strict — no endless variations.
Constraints reduce mental load. They make the system boring in the best way possible. Every code in the same rhythm. The architecture becomes predictable, and every predictability is power.
- They know architecture is for people, not machines
This is the final, and maybe the most important lesson.
Architecture is not about code at all. It is about people.
Can a new developer understand where to put a file without asking?
Can two engineers work in parallel without stepping on each other’s toes?
Can I feature maintainer, read this code and know what it means without context?
That is the real test of architecture. It’s not always about performance, elegance, or clever abstractions. But whether it helps humans work together without pain.
- Know when to break the rules
Architectural thinking gives us a compass, not a cage.
There will always be moments where we need to shortcut, experiment, hack a fix. That’s okay.
What matters is that we do it consciously — eyes open, knowing why we’re breaking a rule, and where to revisit it later.
It’s not about perfection. It’s about awareness.
The Front-end Architecture Blueprint
When we start, we are focused on screens, components, and making things work. But as features pile up, teams grow, and the codebase ages, everything that once felt fluid becomes fragile. Bugs appear in unrelated parts. A small change breaks 10 other things. And onboarding a new developer feels like dropping them into a jungle without a map.
What we need is a blueprint — a consistent, battle-tested architectural structure that scales with grace.
We won’t be vague or overly academic. Everything here comes from real-world pain, patterns observed in large React codebases, and ideals that made the difference between chaos and clarity.

Let's begin with the bird’s eye view. Most scalable front-end systems can be thought of as layers, each with a purpose.
[ UI Layer ]
[ Behavior Layer ]
[ State Management Layer ]
[ Services Layer ]
[ Utilities / Core Logic ]
Each layer has its own responsibilities and knows only as much as it needs. This separation creates clarity, reduces bugs, and increases developer speed.
- UI Layers: Pure and Presentational
Your UI layer should be predictable and reusable. It knows nothing about where data comes from. It doesn’t fetch. It doesn’t mutate. It just receives props and renders markup:
function UserList({ users, onSearch }) {
  return (
    <>
      <input placeholder="Search..." onChange={(e) => onSearch(e.target.value)} />
      <ul>
        {users.map(user => (
          <li key={user.id}>{user.name}</li>
        ))}
      </ul>
    </>
  );
}
No useEffect. No useState. Just pure props in, UI out.
Because it doesn’t hold state or side-effects, it’s:
Easy to test
Easy to reason about
Easy to reuse across screens
UI components become visual building blocks, not logic holders.
- Behavior Layers: Where Logic Lives
Now, how does the UI get data? Who tracks the search input? Who do we debounce, or transform, or conditionally load?
That is the Behavior Layer
This layer lives in a custom hook. It’s responsible for:
Local UI state
Effects (but UI-related ones)
Coordination between UI pieces
User interaction logic
function useUserListBehavior() {
  const [searchTerm, setSearchTerm] = useState('');
  const { data: users = [] } = useQuery(['users', searchTerm], () =>
    userService.fetchUsers(searchTerm)
  );

  return {
    users,
    onSearch: setSearchTerm
  };
}
Notice:
This hook manages state
It can handle debouncing if needed
It does not care about rendering
By isolating behavior, we unlock logic reuse.
We can plug the same behavior into different UIs — maybe a sidebar user picker, or an admin dashboard, or a modal — without duplicating a line of logic.
- State Management Layer: Centralizing Shared State
As your app grows, some states become shared across components — auth info, feature flags, and user settings.
For these, you can use:
React Context (for small apps or low-frequency updates)
Redux / Zustand / Jotai (for predictable and structured global state)
Tip:
Don’t use global state prematurely. Keep things local unless they truly need to be shared.
Also, try to normalize data and treat state updates like reducers — they tell a story.
- Service Layers: Talking To The Outside World
This layer is your interface with APIs, storage, and anything that lives outside your app.
Structure it like:
/services
  authService.js
  userService.js
  notificationService.js
Each service:
Encapsulates API calls
Handles errors, retries, and formatting
Makes it easier to mock in tests
Why it matters:
Your UI shouldn’t care if data comes from REST, GraphQL, or localStorage. The service abstracts that.
- Utilities/ Core Logic Layers
This is where shared helpers, validation functions, formatters, and pure logic reside.
Keep these functions:
Pure
Independent
Tested
Place them in:
/utils
  formatDate.js
  isEmailValid.js
  mergeDeep.js
10 Ways to better organize and design your React application
When building a React application, the way you organize and design your code has a tremendous impact. It can either help you and your team find things easier, make updates quicker, and better handle the app as it grows, or make everything much worse.
It’s the same principle as with buildings. If you have laid the foundations and organized the building well, it can last longer, and its residents will be happy. Otherwise, the building might fall.
Sharky foundation leads to shake results.
- Group components by Domain Responsibility
The organization of files and folders in a React application is crucial for maintaining clarity and manageability. The easier it is to navigate throughout the project, the less time developers spend navigating and wondering where and how to change stuff.
It’s important to structure files not just by technical roles but by their domain responsibilities.
⛔ Avoid grouping components by technical responsibilities.
/src
│   ...
│
└───components
│    │   Header.js
│    │   Footer.js
│    │   ...
└───containers
│    │   InvoicesContainer.js
│    │   PaymentProfilesContainer.js
│    │   ...
└───presenters
│     │   InvoicesPresenter.js
│     │   PaymentProfilesPresenter.js
│     │   ...
│   ...
At first glance, this feels clean — everything in its “bucket“. But as the app grows, so does the complexity. Updating something like the cart feature means bouncing between components/, store/, services/, and utils/. This separation slows you down and creates mental overhead.
✅ Prefer grouping components by domain responsibilities by pages(routes) or modules(domains).
/src
│   ...
│
└───pages --> Actual Pages representing different parts of the app
│    └───billing
│    │    └───invoices
│    │    │   │   index.js
│    │    │   │   ...
│    │    └───payment-profiles
│    │    │   │   index.js
│    │    │   │   ...
│    │    │   ...
│    │    │   index.ts
│    └───login
│        │   index.js
│        │   ...
│   ...
Now, everything related to the cart lives in one folder. You don’t need to mentally piece together the UI, API, and logic — it’s all scoped and colocated.
As you team scales, different squads might handle different domains: authentication, payments, dashboard, etc. With a file-type structure, teams often overlap and touch shared folders, which leads to conflicts and tight coupling. Each team owns everything inside their domain — components, API calls, state management, and styles. This clear boundary makes parallel development much easier. Teams can refactor their own features without worrying about breaking others.
Also, where features are self-contained, refactoring becomes safer. You can confidently update the logic inside features/cart/ knowing it won’t affect unrelated features like auth or dashboard.
You can even write integration tests specific to a feature folder or migrate an entire module to a different project if needed.
- Put components into folders
For complex components, it’s better to organize them into separate folders where you can list their subcomponents.
⛔ Avoid having a single file for each component.
/src
│
└───components
│   │   Accordion.ts
|   |   Alert.ts
│   │   ...
│
└───...
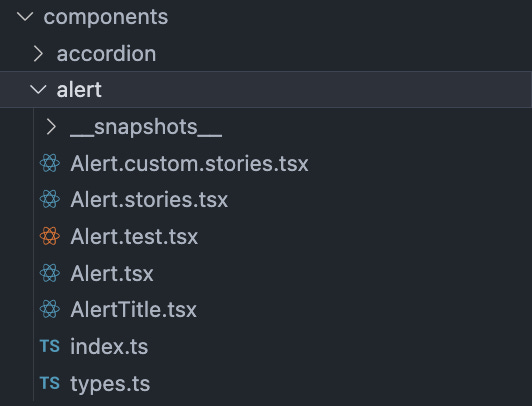
✅ Prefer having a single folder for each component.
/src
│
└───components
│   │   ...
│   └───accordion
│   │    │   index.ts
│   │    │   ...
│   └───alert
│       │   index.ts
│       │   types.ts
│       │   Alert.tsx
│       │   AlertTitle.tsx
│       │   Alert.stories.tsx
│       │   Alert.test.tsx
│       │   ...
│
└───...
- Favor Absolute Paths
Using the right type of paths in your project can simplify navigation and maintenance, especially as your project grows. Refactoring will be much easier.
⛔ Avoid using relative paths, which can become hard to manage and error-prone in large projects.
import { formatDate } from '../../../utils';
✅ Prefer using absolute paths, which improve readability and make refactoring easier.
import { formatDate } from '@common/utils';
- Use a common module
Common modules play a vital role in avoiding redundancy and promoting reusability across your application.
You can store utility methods, constants, calculations, etc., in this common module.
This centralization helps with better management and reuse.
⛔ Avoid spreading common utilities and components across various locations in your project.
✅ Prefer having a dedicated common module for all generic components and utilities used across different pages or modules.
/src
│   ...
│
└───common
│    └───components
│    │    └───dialogs
│    │    │   │   index.js
│    │    └───forms
│    │    │   │   index.js
│    │    │   ...
│    └───hooks
│    │    │   useDialog.js
│    │    │   useForm.js
│    │    │   ...
│    └───utils
│    │    │   ...
└───pages
│    └───billing
│    │    └───invoices
│    │    │   │   index.js
│    │    │   │   ...
│   ...
- Abstracts external libraries and modules
The integration of external libraries or modules requires careful consideration to ensure future flexibility and easier maintenance.
Using 3rd party libraries or components directly in your project can lead to issues if the external APIs change, or you want to replace the components or library with something else. Then, you have to go through all the places it is being used instead of updating them only in a single place.
Wrapping the 3rd party or module in a custom component allows you to maintain a consistent API within your application and makes it easier to replace the module in the future if needed.
⛔ Avoid direct use of 3rd party components or libraries in your project.
// XYZ_Component.ts (file 1)
import { Button } from 'react-bootstrap';

// ABC_Component.ts (file 2)
import { Button } from 'react-bootstrap';
✅ Prefer wrapping external modules or components in a custom component.
// XYZ_Component.ts (file 1)
import { Button } from '@components/ui';

// ABC_Component.ts (file 2)
import { Button } from '@components/ui';
- Manage dependencies between modules/pages
Managing dependencies widely by centralizing commonly used resources in a shared common module can significantly enhance the code’s manageability and reusability.
If something is used more than once across two or more pages and modules, consider moving it to the common module.
Storing shared components or utilities in a common module eliminates the need to duplicate code across different parts of the application, making the codebase leaner and easier to maintain.
It also makes clear dependencies per module and page.
- Keep things as close as where they are used (LoB)
The easier and faster for a developer to find a piece of code, the better.
The principle of Locality of Behaviour (LoB) suggests organizing the codebase so that components, functions, and resources are located near where they are used within an application. This strategy promotes a modular architecture, where each part of the system is self-contained.
This improves readability and maintainability. When developers work on a feature, they have all the related code in proximity, which makes it easier to understand and modify. It also reduces the cognitive load of tracing through distant files and modules.
/src
│   ...
│
└───common
│    └───components
│    │    │   ...
│    └───hooks
│    │    │   ...
│    └───utils
│    │    │   ...
└───pages
│    └───billing
│    │    └───invoices
│    │    │   │   index.js
│    │    │   │   ...
│    │    └───payment-profiles
│    │    │   │   index.js
│    │    │   │   ...
│    │    └───hooks
│    │    │   │   index.js
│    │    │   │   useInvoices.js
│    │    │   │   usePaymentProfiles.js
│    │    │   │   ...
│    │    └───utils
│    │    │   │   index.js
│    │    │   │   formatAmount.js
│    │    │   │   ...
│   ...
- Be careful with utility functions
Utility functions typically handle reusable snippets of code that aren’t tied to the business rules and the application logic. They would rather provide general assistance across the system.
Utility functions should remain pure and purpose-specific, focusing on general tasks like formatting dates, converting data types, etc. Mixing them with business logic, like how data is processed or business-specific decisions, can make these utilities overly complex and less reusable.
Also, business logic and rules change more often than utility functions, so by separating them, you will improve the overall maintainability of the code.
⛔ Avoid adding business logic to utils.
✅ Prefer extracting business logic into separate functions.
- Be careful with business logic
Integrating business logic directly into UI components can lead to problems like harder-to-test code and poor separation of concerns. This can also lead to bulky components that are difficult to manage and update.
In React, custom hooks are a great tool for abstracting business logic from components. By using hooks, you can encapsulate business logic and keep your UI clean and focused on rendering.
This separation not only makes your component more modular and easier to manage but also enhances reusability and maintainability.
⛔ Avoid mixing business logic with UI.
✅ Prefer separating business logic from UI. Use custom hooks.
- Pin Dependencies
When managing a JavaScript project, your package.json plays a crucial role. It defines your project’s dependencies - the external packages your project relies on to function. Pinning these dependencies refers to specifying exact versions of these packages rather than allowing version ranges.
Pinning dependencies ensures that everyone working on the project, as well as the production environment, uses the exact same version of each package, eliminating discrepancies that might occur due to minor updates and patches.
⛔ Avoid using version ranges in your package.json.
{
  "dependencies": {
    "express": "^4.17.1",
    "react": ">=16.8.0"
  }
}
✅ Prefer using exact versions in your package.json.
{
  "dependencies": {
    "express": "4.17.1",
    "react": "16.8.0"
  }
}
https://nagibaba.medium.com/ternary-design-system-for-scalable-react-applications-1fad84e369ab
Use the Atomic Design Pattern to structure your React application
As we build scalable applications in React, we often encounter challenges in managing the growing complexity of component structures. The Atomic Design Pattern has emerged as a powerful methodology for organizing and structuring applications. This pattern, inspired by chemistry, breaks down the interface into multiple fundamental building blocks, promoting a more modular and scalable approach to application design. It serves as a powerful methodology to enhance the readability, maintainability, and flexibility of our application code.
The Atomic Design Pattern was introduced by Brad Frost and Dave Olsen and is based on the idea that a design system should be broken down into its smallest parts, which are used to build up increasingly complex and reusable components. The goal is not to create a strict hierarchy but rather to provide a mental model to better understand and create user interfaces.
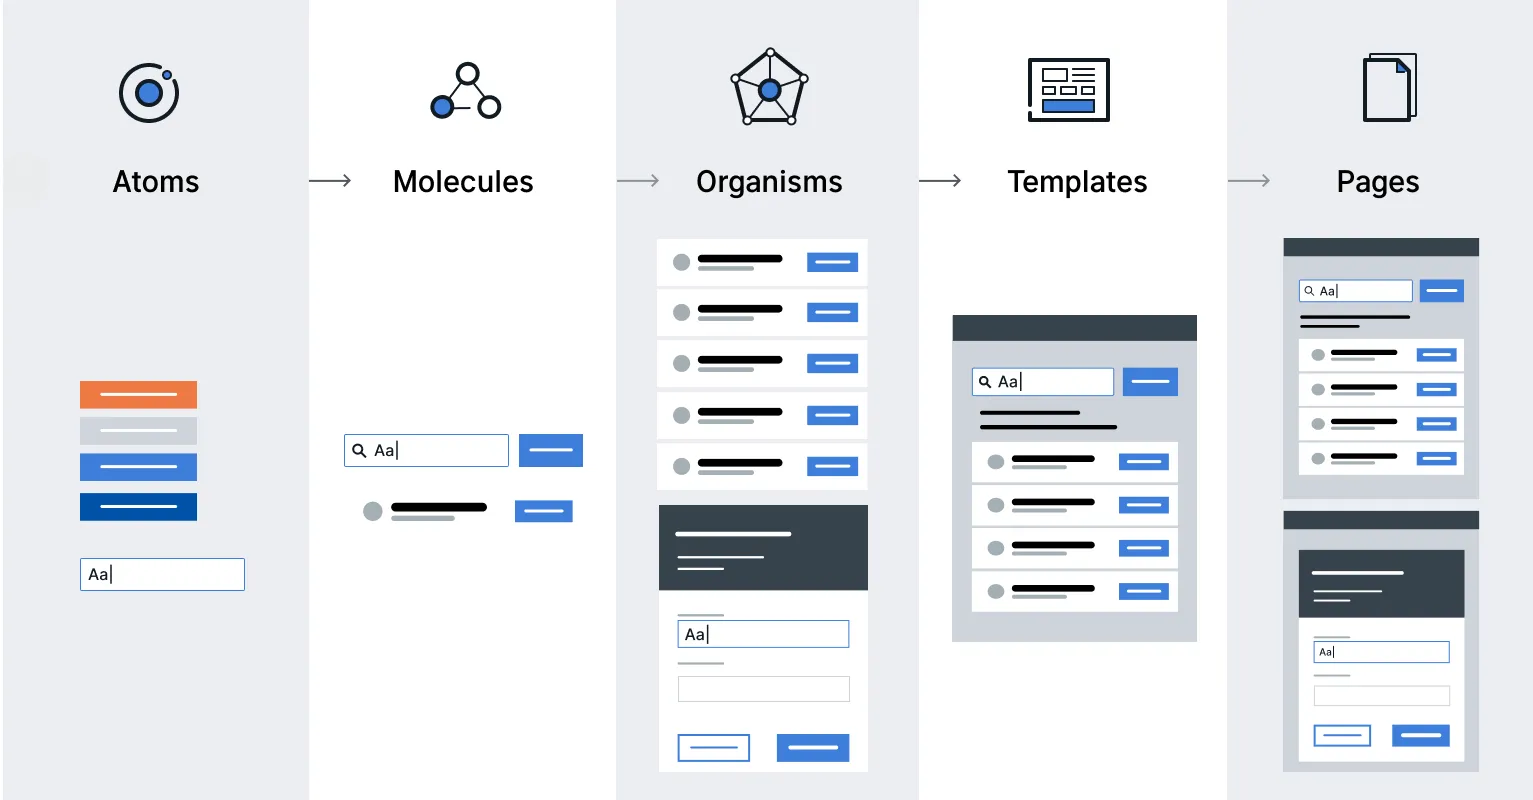
The Atomic Design methodology breaks down design into 5 distinct levels:
Atoms: These are the basic building blocks of your application, like an input field, a button, or a form label. In React, these would be represented as individual components. They serve as foundational elements that are not exactly useful on their own but are fundamental for building more complex components.
Molecules: Molecules are groups of atoms that are combined together to form a functional unit. For example, a form might be a molecule that includes atoms like labels, an input field, and a submit button.
Organisms: Organisms are relatively complex UI components composed of groups of molecules and/or atoms. These are larger sections of an interface, like a header, footer, or navigation bar, and therefore can have their own states and functionality.
Templates: Templates are page-level objects that place components into a layout and articulate the design’s underlying content structure. They usually consist of groups of organisms, representing a complete layout.
Pages: Pages are specific instances of templates that show what a UI looks like with real representative content in place. These pages serve as ecosystems that display different template renders.
To implement Atomic Design in a React application, we can consider the following key points:
Component Categorization: Organize the components into atoms, molecules, organisms, templates, and pages. This categorization should be reflected in our project’s file structure.
State Management: We also need to decide how the state should be managed across different levels of components. Atoms and molecules might not hold a state, while organisms and templates might need to.
Documentation: It’s important to have thorough documentation of its components and usage. This can be facilitated by tools like Storybook, as this will allow us to create a living style guide.
Let’s see a very simple example of how a React application built on the atomic design principle would look structurally like.
import React from 'react';

const noop = () => {};

// Atoms
const Button = ({ onClick, children, type }) => <button type={type} onClick={onClick}>{children}</button>;
const Label = ({ htmlFor, children }) => <label htmlFor={htmlFor}>{children}</label>;
const Input = ({ id, type, onChange, value = "" }) => <input id={id} type={type} onChange={onChange} value={value} />;
const Search = ({ onChange }) => <input type="search" onChange={onChange} />;
const NavMenu = ({ items }) => <ul>{items.map((item) => <li>{item}</li>)}</ul>;

// Molecules
const Form = ({ onSubmit }) => (
  <form onSubmit={onSubmit}>
    <Label htmlFor="email">Email:</Label>
    <Input id="email" type="email" onChange={noop} />
    <Button type="submit" onClick={noop}>Submit</Button>
  </form>
);

// Organisms
const Header = () => (
  <header>
    <Search onChange={noop} />
    <NavMenu items={[]} />
  </header>
);

const Content = ({ children }) => (
  <main>
    {children}
    <Form onSubmit={noop} />
  </main>
);

// Templates
const MainTemplate = ({ children }) => (
  <>
    <Header />
    <Content>{children}</Content>
  </>
);

// Pages
const HomePage = () => (
  <MainTemplate>
    <h2>My Form</h2>
    <p>This is a basic example demonstrating Atomic Design in React.</p>
  </MainTemplate>
);
Why Atomic Design?
The Atomic Design Pattern aligns perfectly with React’s component-based architecture. It allows us to:
Promote reusability: By breaking down the interface into the smallest parts, it becomes easier to reuse components and leverage modular composition across different parts of an application or even across different projects.
Ensure Consistency: Atomic Design helps maintain UI consistency, which is crucial for user experience and brand identity.
Facilitates Maintenance: When components are well-organized, it becomes much simpler to update or maintain them over time.
Improve Collaboration: A shared design language based on Atomic Design Principles can enhance communications, usage, and contributions since it is easier to understand the codebase.
Promotes Code Quality: As we create a sub-ecosystem for each component feature, each component or service has its isolated environment, including styles, actions, and tests. This isolation makes testing more effective and ensures consistent code quality.
While Atomic Design offers many benefits, we would want to ensure that we implement this principle to our advantage and not over-engineer. It can be easy to over-abstract components, which can lead to unnecessary complexity. Therefore, we should also keep an eye on performance implications when breaking down components into smaller pieces to reap the full benefits of this technique.
React Patterns
HOC Pattern
Within our application, we often want to use the same logic in multiple components. This logic can include applying a certain styling to components, requiring authorization, or adding a global state.
One way of being able to reuse the same logic in multiple components is by using the higher-order component pattern. This pattern allows us to reuse component logic throughout our application.
A Higher Order Component (HOC) is a component that receives another component. The HOC contains certain logic that we want to apply to the component that we pass as a parameter. After applying that logic, the HOC returns the element with the additional logic.
Say that we always wanted to add a certain styling to multiple components in our application. Instead of creating a style object each time locally, we can simply create an HOC that adds the style objects to the component that we pass to it
function withStyles(Component) {
  return props => {
    const style = { padding: '0.2rem', margin: '1rem' }
    return <Component style={style} {...props} />
  }
}

const Button = () = <button>Click me!</button>
const Text = () => <p>Hello World!</p>

const StyledButton = withStyles(Button)
const StyledText = withStyles(Text)
We just created a StyledButton and StyledText component, which are the modified versions of the Button and Text components. They now both contain the style that got added in the withStyles HOC!
We can also compose multiple Higher Order Components. Let’s say that we also want to add functionality that shows a Hovering! text box when the user hovers over the DogImages list.
import React from "react";
import withLoader from "./withLoader";
import withHover from "./withHover";

function DogImages(props) {
  return (
    <div {...props}>
      {props.hovering && <div id="hover">Hovering!</div>}
      <div id="list">
        {props.data.message.map((dog, index) => (
          <img src={dog} alt="Dog" key={index} />
        ))}
      </div>
    </div>
  );
}

export default withHover(
  withLoader(DogImages, "https://dog.ceo/api/breed/labrador/images/random/6")
);
A well-known library used for composing HOCs is recompose. Since HOCs can largely be replaced by React Hooks, the recompose library is no longer maintained, thus won’t be covered in this article.
Generally speaking, React Hooks don’t replace the HOC pattern.
“In most cases, Hooks will be sufficient and can help reduce nesting in your tree.” - React Docs
As the React docs tell us, using Hooks can reduce the depth of the component tree. Using the HOC pattern, it’s easy to end up with a deeply nested component tree.
<withAuth>
  <withLayout>
    <withLogging>
      <Component />
    </withLogging>
  </withLayout>
</withAuth>
By adding a Hook to the component directly, we no longer have to wrap components.
Best use-cases for an HOC:
The same, uncustomized behavior needs to be used by many components throughout the application.
The component can work standalone, without the added custom logic.
Best use-cases for Hooks:
The behavior has to be customized for each component that uses it.
The behavior is not spread throughout the application; only one or a few components use the behavior.
The behavior adds many properties to the component
Render Props Pattern
In the section on Higher Order Components, we saw that being able to reuse component logic can be very convenient if multiple components need access to the same data or contain the same logic.
Another way of making components very reusable is by using the render prop pattern. A render prop is a prop on a component whose value is a function that returns a JSX element. The component itself does not render anything besides the render prop. Instead, the component simply calls the render prop, instead of implementing its own rendering logic.
Imagine that we have a Title component. In this case, the Title component shouldn’t do anything besides rendering the value that we pass. We can use a render prop for this! Let’s pass the value that we want the Title component to render to the render prop.
<Title render={() => <h1>I am a render prop!</h1>} />
Within the Title component, we can render this data by returning the invoked render prop!
const Title = (props) => props.render();
To the Component element, we have to pass a prop called render, which is a function that returns a React element.
import React from "react";
import { render } from "react-dom";

import "./styles.css";

const Title = (props) => props.render();

render(
  <div className="App">
    <Title
      render={() => (
        <h1>
          <span role="img" aria-label="emoji">
            ✨
          </span>
          I am a render prop!{" "}
          <span role="img" aria-label="emoji">
            ✨
          </span>
        </h1>
      )}
    />
  </div>,
  document.getElementById("root")
);
Pros
Sharing logic and data among several components is easy with the render props pattern. Components can be made very reusable by using a render or children prop. Although the Higher Order Component pattern mainly solves the same issues, namely reusability and sharing data, the render props pattern solves some of the issues we could encounter by using the HOC pattern.
The issue of naming collisions that we can run into by using the HOC pattern no longer applies by using the render props pattern, since we don’t automatically merge props. We explicitly pass the props down to the child components, with the value provided by the parent component.
Since we explicitly pass props, we solve the HOC’s implicit props issue. The props that should get passed down to the element are all visible in the render prop’s arguments list. This way, we know exactly where certain props come from.
We can separate our app’s logic from rendering components through render props. The stateful component that receives a render prop can pass the data onto stateless components, which merely render the data.
Cons
The issues that we tried to solve with render props have largely been replaced by React Hooks. As Hooks changed the way we can add reusability and data sharing to components, they can replace the render props pattern in many cases.
Since we can’t add lifecycle methods to a render prop, we can only use it on components that don’t need to alter the data they receive.
Note (React 18+): The render props pattern is now largely supplanted by Hooks in React’s best practices. Render props often resulted in deeply nested JSX “callback hell”—for example, nesting multiple
<Mutation>components to get multiple pieces of data. Modern libraries like Apollo Client now provide Hooks (e.g.,useMutation,useQuery) that allow you to fetch or compute needed data inside the component, eliminating the need for wrapper components. Hooks don’t create new component boundaries, so state can be shared more directly and the React Compiler can statically analyze the code more easily. While render props are still possible, if you find yourself writing a component whose sole purpose is to callprops.render()or use children-as-a-function, ask if a custom Hook could achieve the same result more directly.
Container/Presentational Pattern
In React, one way to enforce separation of concerns is by using the Container/Presentational pattern. With this pattern, we can separate the view from the application logic.
Let’s say we want to create an application that fetches 6 dog images and renders these images on the screen.
Ideally, we want to enforce separation of concerns by separating this process into two parts:
Presentational Components: Components that care about how data is shown to the user. In this example, that’s the rendering of the list of dog images.
Container Components: Components that care about what data is shown to the user. In this example, that’s fetching the dog images.
A presentational component receives its data through props. Its primary function is to simply display the data it receives the way we want it to, including styles, without modifying that data.
The primary function of container components is to pass data to presentational components, which they contain. Container components themselves usually don’t render any other components besides the presentational components that care about their data. Since they don’t render anything themselves, they usually do not contain any styling either.
Combining these two components makes it possible to separate the handling of application logic from the view.
In many cases, the Container/Presentational pattern can be replaced with React Hooks. The introduction of Hooks made it easy for developers to add statefulness without needing a container component to provide that state. Hooks make it easy to separate logic and view in a component, just like the Container/Presentational pattern. It saves us the extra layer that was necessary in order to wrap the presentational component within the container component.
Note (React 18+): Modern React strongly favors Hooks over container components for separating logic from views. Custom Hooks can replace class-based containers entirely—for example, a useDogImages The hook can fetch data using useState and useEffect, then any component can simply call const dogs = useDogImages() to get the data. This achieves the same separation of concerns (data fetching vs UI) with less boilerplate and no wrapper component. This Hook-based approach is also friendly to React’s upcoming optimizations—the React Compiler can better optimize functional components and Hooks than class lifecycles.
Hooks Pattern
React 16.8 introduced a new feature called Hooks. Hooks make it possible to use React state and lifecycle methods without having to use an ES2015 class component.
Although Hooks are not necessarily a design pattern, Hooks play a very important role in your application design. Many traditional design patterns can be replaced by Hooks.
Custom Hooks
Besides the built-in hooks that React provides (useState, useEffect, useReducer, useRef, useContext, useMemo, useImperativeHandle, useLayoutEffect, useDebugValue, useCallback), we can easily create our own custom hooks.
You may have noticed that all hooks start with use. It’s important to start your hooks with use in order for React to check if it violates the rules of hooks
Let’s say we want to keep track of certain keys the user may press when writing the input. Our custom hook should be able to receive the key we want to target as its argument.
function useKeyPress(targetKey) {}
We want to add a keydown and keyup event listener to the key that the user passed as an argument. If the user pressed that key, meaning the keydown event gets triggered, the state within the hook should toggle to true. Otherwise, when the user stops pressing that button, the keyup event gets triggered and the state toggles to false.
function useKeyPress(targetKey) {
  const [keyPressed, setKeyPressed] = React.useState(false);

  function handleDown({ key }) {
    if (key === targetKey) {
      setKeyPressed(true);
    }
  }

  function handleUp({ key }) {
    if (key === targetKey) {
      setKeyPressed(false);
    }
  }

  React.useEffect(() => {
    window.addEventListener("keydown", handleDown);
    window.addEventListener("keyup", handleUp);

    return () => {
      window.removeEventListener("keydown", handleDown);
      window.removeEventListener("keyup", handleUp);
    };
  }, []);

  return keyPressed;
}
Instead of keeping the key press logic local to the Input component, we can now reuse the useKeyPress hook throughout multiple components, without having to rewrite the same logic over and over.
Another great advantage of Hooks is that the community can build and share hooks. We just wrote the useKeyPress hook ourselves, but that actually wasn’t necessary at all! The hooks was already built by someone else and ready to use in our application if we just installed it!
Here are some websites that list all the hooks built by the community, and ready to use in your application.
Compound Pattern
In our application, we often have components that belong to each other. They’re dependent on each other through the shared state, and share logic together. You often see this with components like select, dropdown components or menu items. The compound component pattern allows you to create components that all work together to perform a task.
Let’s look at an example: we have a list of squirrel images! Besides just showing squirrel images, we want to add a button that makes it possible for the user to edit or delete the image. We can implement a FlyOut A component that shows a list when the user toggles the component.
Within a FlyOut component, we essentially have three things:
The
FlyOutwrapper, which contains the toggle button and the listThe
Togglebutton, which toggles theListThe
List, which contains the list of menu items
Using the Compound component pattern with React’s Context API is perfect for this example
First, let’s create the FlyOut component. This component keeps the state, and returns a FlyOutProvider with the value of the toggle to all the children it receives.
const FlyOutContext = createContext();

function FlyOut(props) {
  const [open, toggle] = useState(false);

  return (
    <FlyOutContext.Provider value={{ open, toggle }}>
      {props.children}
    </FlyOutContext.Provider>
  );
}
We now have a stateful FlyOut component that can pass the value of open and toggle to its children!
Let’s create the Toggle component. This component simply renders the component on which the user can click in order to toggle the menu.
function Toggle() {
  const { open, toggle } = useContext(FlyOutContext);

  return (
    <div onClick={() => toggle(!open)}>
      <Icon />
    </div>
  );
}
In order to actually give Toggle access to the FlyOutContext provider, we need to render it as a child component of FlyOut! We could simply render this as a child component. However, we can also make the Toggle component, a property of the FlyOut component!
const FlyOutContext = createContext();

function FlyOut(props) {
  const [open, toggle] = useState(false);

  return (
    <FlyOutContext.Provider value={{ open, toggle }}>
      {props.children}
    </FlyOutContext.Provider>
  );
}

function Toggle() {
  const { open, toggle } = useContext(FlyOutContext);

  return (
    <div onClick={() => toggle(!open)}>
      <Icon />
    </div>
  );
}

FlyOut.Toggle = Toggle;
This means that if we ever want to use the FlyOut component in any file, we only have to import FlyOut!
import React from "react";
import { FlyOut } from "./FlyOut";

export default function FlyoutMenu() {
  return (
    <FlyOut>
      <FlyOut.Toggle />
    </FlyOut>
  );
}
Just a toggle is not enough. We also need to have a List with list items, which open and close based on the value of open.
function List({ children }) {
  const { open } = React.useContext(FlyOutContext);
  return open && <ul>{children}</ul>;
}

function Item({ children }) {
  return <li>{children}</li>;
}
The List component renders its children based on whether the value of open is true or false. Let’s make List and Item a property of the FlyOut component, just like we did with the Toggle component.
const FlyOutContext = createContext();

function FlyOut(props) {
  const [open, toggle] = useState(false);

  return (
    <FlyOutContext.Provider value={{ open, toggle }}>
      {props.children}
    </FlyOutContext.Provider>
  );
}

function Toggle() {
  const { open, toggle } = useContext(FlyOutContext);

  return (
    <div onClick={() => toggle(!open)}>
      <Icon />
    </div>
  );
}

function List({ children }) {
  const { open } = useContext(FlyOutContext);
  return open && <ul>{children}</ul>;
}

function Item({ children }) {
  return <li>{children}</li>;
}

FlyOut.Toggle = Toggle;
FlyOut.List = List;
FlyOut.Item = Item;
We can now use them as properties on the FlyOut component! In this case, we want to show two options to the user: Edit and Delete. Let’s create a FlyOut.List that renders two FlyOut.Item components, one for the Edit option, and one for the Delete option.
import React from "react";
import { FlyOut } from "./FlyOut";

export default function FlyoutMenu() {
  return (
    <FlyOut>
      <FlyOut.Toggle />
      <FlyOut.List>
        <FlyOut.Item>Edit</FlyOut.Item>
        <FlyOut.Item>Delete</FlyOut.Item>
      </FlyOut.List>
    </FlyOut>
  );
}
Perfect! We just created an entire FlyOut component without adding any state in the FlyOutMenu itself!
The compound pattern is great when you’re building a component library. You’ll often see this pattern when using UI libraries like Semantic UI.
Pros
Compound components manage their own internal state, which they share among the several child components. When implementing a compound component, we don’t have to worry about managing the state ourselves.
When importing a compound component, we don’t have to explicitly import the child components that are available on that component.
Note (React 18+): The compound component pattern using React’s Context API remains a recommended pattern for related components that share state. The implementation using Hooks (
useState,useContext) is modern and aligns with current best practices. When using context, avoid unnecessary re-renders by not re-creating context values each render. In complex scenarios, you might optimize by memoizing the context value or splitting context (e.g., a context for theopenboolean and another for thetogglefunction). The pattern is fully compatible with React’s upcoming features like Server Components—just ensure the context provider and consumers are all either server or client components as needed.
import { FlyOut } from "./FlyOut";

export default function FlyoutMenu() {
  return (
    <FlyOut>
      <FlyOut.Toggle />
      <FlyOut.List>
        <FlyOut.Item>Edit</FlyOut.Item>
        <FlyOut.Item>Delete</FlyOut.Item>
      </FlyOut.List>
    </FlyOut>
  );
}
React State Management
Usually, I’ve seen most React developers share a pretty similar journey. At the start, the state looks almost too easy. You reach for useState, wire up a toggle or a text input, and it all feels effortless, like the framework is doing the heavy lifting for you. But then, as time passes, the app grows. That tiny toggle becomes a form, the form needs validation, the validation triggers API calls, and suddenly the simple state you thought you had under control is scattered across half the codebase.
You might have been there, where you’re staring at components that technically “work”, but feel fragile, confusing, and impossible to extend without breaking three things at once. And that’s usually the moment the real question sneaks in:
It’s no longer how do I update the state, it’s where should this state actually live?
The funny thing is, that’s where there exists a big gap between beginners and Senior developers. It’s not that Seniors always know the hottest new library; they’ve often seen a dozen of them come and go. It’s that they treat the state as an architectural decision. To them, the state isn’t just a convenient variable you can tweak; rather, it’s the scaffolding that holds the entire app upright.
Not All States Are the Same
A common mistake in early React development is to treat all state as if it belongs in a single bucket. A toggle, a form input, an API response, or a set of filters — everything is managed the same way, because at first it all looks the same: “just state.” That works fine in smaller apps, but as the application grows, the lack of distinction starts to cause friction and unnecessary complexity.
I can tell you, Senior developers approach state differently. Instead of treating it as one thing, they classify it into layers, each with its own natural place in the application:
Local UI state: Ephemeral values tied to a single component, such as form inputs, a modal’s visibility, or the active tab in a panel.
Client state shared across components: Data that multiple components need to coordinate on, like filters, user selections, or pagination controls.
Server state: Information that originates from the backend ie. API responses, cached queries, and datasets that the Frontend is only temporarily holding.
By drawing these lines, the decision of how to manage the state becomes clearer. The focus shifts away from “Context vs Redux vs React Query” debates and moves toward a more practical question: Which layer does this state belong to? Once that’s answered, the right tool and storage location often reveal themselves naturally.
Local State
One of the most common mistakes in early React code is lifting state higher than it needs to be. For example, a simple “open/close” flag for a modal does not belong in Redux, Context, or a global store. I know, some of you might find it obvious, but I’m just giving an example. That’s a tiny, short‑lived detail, and it’s healthiest when it stays inside the component itself.
// the isOpen state is localized and doesn't need sharing
export function CreateIssueComponent() {
  const [isOpen, setIsOpen] = useState(false);
  return (
    <>
      <button onClick={() => setIsOpen(true)}>Open Create Issue Dialog</button>
      {isOpen && <CreateIssueDialog onClose={() => setIsOpen(false)} />}
    </>
  );
}
Senior developers deliberately keep this kind of ephemeral UI state as close as possible to where it’s used. It means a smaller surface area, less complexity, and fewer ripple effects when the UI changes. Local state should live local, because that’s what makes refactoring safe and simple.
URL State
Everything that is happening in the website’s URL is a state in a way, wouldn’t you agree? When the URL changes, the UI responds in kind. And in modern apps, this response can be anything, from transitioning to another page to changing which tab is open based on a query param.
The base (or pathname) part of the URL these days is almost exclusively controlled by external routers and often file- and folder-based (like in Next.js). So it’s not something we usually think about in the context of state management.
The query string part, however, is different. This is where we would store some fine-grained information that affects tiny aspects of what is happening on a particular page.
Consider this URL: /somepath?search="test"&tab=1&sidebar=open&onboarding=step1. Everything after the question mark is a state that defines which tab is open, whether the sidebar is open or closed, and at what stage the onboarding is. When the URL changes, the UI should reflect that. And when the user transitions through the onboarding steps or clicks on a new tab, the URL should change as well.
In older Redux-based apps, you’d often see quite a lot of logic that manually implements that two-way syncing. These days, some of the routers will handle the syncing for you. React Router, for example, gives you the useSearchParam hook for that, which you can use in the same way as state:
export function SomeComponent() {
  const [searchParams, setSearchParams] = useSearchParams();
  // ...
}
Other routers, however, are not that generous. Next.js, for example, gives you a nice hook to read search params, but if you need to sync them with an internal state, which includes updates, you still need to jump through hoops.
If this is your case, I have information that will change your life forever. Don’t jump through those hoops. Manually syncing local state with the URL is a journey full of misery and weird bugs. Use the nuqs library instead. Same as with TanStack Query being a game-changer for remote state, this beautiful but obscurely named library is a game-changer for managing query params.
Server State
There’s also a category of state that doesn’t even belong to the Frontend in the first place: server state. This is anything that originates from an external source — user profiles, lists of products, API responses.
A common beginner misstep is to treat this like a client state and dump it into Redux or Context. But, since we’re talking about Senior developers, they separate these two worlds. Server state isn’t really “ours” to own — it’s cached data pulled from the backend. And because it comes with its own complexities (stale data, retries, invalidation, error handling), it benefits from a dedicated layer.
This is exactly why tools like React Query, Apollo, or SWR exist. They handle caching, refetching, and synchronization for us, allowing client state (like filters or dark mode) to remain cleanly separate from server data. So, I would say, keeping these two mental buckets distinct is one of the biggest architectural upgrades you can make.
My default choice for this use case is TanStack Query (formerly known as React Query). Told you, it will be opinions, not a “let’s investigate” article! But really, try migrating to it from a legacy Redux-based custom solution if you haven’t tried it. You’ll cry happy tears, your life will never be the same, and 80% of your code will be just gone.
Want to fetch some data in a component while being mindful of loading and error states? Easy:
function Component() {
  const { isPending, error, data } = useQuery({
    queryKey: ['my-data'],
    queryFn: () => fetch('https://my-url/data').then((res) => res.json()),
  });

  if (isPending) return 'Loading...';

  if (error) return 'Oops, something went wrong';

  return ... // render whatever here based on the data
}
Want to fetch from this endpoint in another component without triggering an additional fetch request? Don’t even worry about it, just use the same queryKey, and the library will take care of it for you.
Want to prefetch and cache some of those requests? Don’t mess with the code above, just add “queryClient.prefectchQuery” call where you want to trigger your prefetch, the library will take care of the rest.
Want to implement a paginated query? Optimistic updates? Retries based on some condition? No worries about any of this, the library has you covered. I rarely get excited about tools, but this one is an exception.
If you don’t like TanStack Query for some reason, it has a contender named SWR. Both are equally good and comprehensive, with similar functionality. The API is slightly different, and TanStack Query is maintained by independent maintainers, whereas SWR is Vercel’s product. So in the end, the choice between the two comes down to who you trust more and which API you like more. Play around with both and choose by the vibes here.
Shared State
Of course, not all states can stay isolated. Sometimes data has to move beyond a single component. Think of filters on a search page, selected rows in a table, or whether a user is authenticated. These are values that multiple components need to “know about”.
The key question Seniors ask is: “How far does this state need to reach?”
If it’s just shared between siblings, prop‑drilling or a small Context is perfectly fine.
If it cuts across multiple features or pages, then it earns its place in a dedicated store like Redux or Zustand.
The principle here is simple:
State should rise only as high as its consumers require.
No more, no less. That keeps boundaries clear and avoids both over‑engineering and unnecessary sprawl.
Luckily, since we already did so much pre-work, we know exactly what to look for.
First of all, we eliminated like 80% of the state management concerns in an average app by choosing a data management library (TanStack Query, SWR). Then we removed another 10% by moving the URL state to nuqs. Only 10% left!
Considering that, the very first thing I’m going to look for in a shared state solution is simplicity. There really isn’t much to handle in those 10%, so I really need something here that doesn’t consume my brain resources. I need something that is dead simple to set up and does not introduce its own unique and abstract terminology. I want to look at the code and infer intuitively what it means and what to expect without opening the docs of the library.
Compatible with React direction and latest features
Too much work to properly verify all of them, which would involve coding with them for real. I would do it if they met all other criteria and I was considering them for real for my next project.
🤨 Redux Toolkit. I really need to look into that one to make a decision.
🎉 Zustand. Supports everything from experience (I used it quite a lot).
🎉 Jotai. I haven’t used it, but most likely it supports everything, since it’s the latest and actively maintained library written by the author and the maintainer of Zustand as well.
👎 MobX. “Signals”, “observables” — i.e., not “declarative” or “React way”. No.
👎 XState. “Event-driven”, i.e., not “declarative” or “React way”. No.
In Short
Okay, so TL;DR of everything above. Most of the time, especially if you’re not implementing the next Figma, you don’t need a “state management library” at all. The days of putting everything into Redux are long gone. Break your state into different concerns, and you’ll find yourself with better solutions for them than any “generic” state management library.
Remote state. Anything coming from a backend, API, database, etc., could be handled by a data-fetching library. TanStack Query or SWR are the most popular choices these days. They solve caching, deduplication, invalidation, retries, pagination, optimistic updates, and many more, and likely much better than any manual implementation.
Query params in URL state. If your router doesn’t support syncing those with local state, use nuqs and save yourself massive pain implementing that sync manually.
Local state. A lot of the state doesn’t need to be shared, actually. It’s just something that comes from overusing Redux in the past. Use React’s
useStateoruseReducerin this case.Shared state. This is the state that you want to share between different loosely related components. You can use simple prop drilling techniques for that, or Context when prop drilling becomes a nuisance. Only when Context is not enough do the state management libraries become useful.
Do this, and you’ll find that ~90% of your state management problems simply disappear. The leftover state is small, predictable, and much easier to reason about.
And the best state management library for it is… There is no such thing. Define what criteria are important to you and evaluate your choices based on that. In my case, Zustand is my choice because it’s very simple, actively maintained, and aligned with the “React” way of doing things. Yours can be radically different. And it’s totally fine.
Complex To Simple: Redux and Flux Architecture
Every developer uses state in their application, but as the app grows, the amount of state grows too. If we don’t manage it properly in time, we as developers can face several issues: uncontrolled data flow, debugging difficulties, unpredictable app behaviors, and reduced performance.
When the state is scattered across the application without a clear structure, it becomes difficult to track where and how changes happen. This can lead to situations where the same piece of code is modified from different places, making the app behave unpredictably and making debugging much harder.
This is why it’s important to plan state management architecture in advance. This is where solutions like Context, Flux, Redux, and Redux Toolkit (RTK) come in, offering a structured approach to organizing data flow in an application.
Problematics
Let’s imagine your application as a tree-like structure, where blocks represent components, and elements inside them represent state. We create components to separate logic, UI, and other concerns. As a result, each component has its own logic and state.

For small applications, this approach works well. Components encapsulate their functionality, and their state remains isolated. However, as the application grows, the need for data sharing between components — sometimes located in distant branches of the tree — becomes inevitable.

In React, for example, data is typically passed from parent components to child components using props. But when we need to share data between components that are far apart in the tree, we run into the problem of “prop drilling“ — having to pass props through multiple intermediate components that don’t actually need them.

State updates make things even more complicated. If Component A needs to react to changes in Component B, which is located in a completely different part of the tree, managing such interactions becomes a non-trivial task without a centralized state management system.
This is exactly the problem that state management patterns like Flux and its popular implementation, Redux, aim to solve — providing a single, predictable data flow in the application.
Context in React
Before we dive into how Redux works and what Flux architecture is, we first need to understand React Context.
React Context is a mechanism that allows us to pass data through the component tree without manually passing props through multiple components. Context creates a kind of “global state“ (or wrapper) for a specific part of the application.
With the Context API, we can create a data store that is accessible for all components in the tree, regardless of their position or nesting. This solves the problem of “props drilling“, where props have to be passed through multiple intermediate components.

However, while Context is great for providing access to data, it has limitations when it comes to managing state changes:
Context does not provide a standardized way to modify states.
Updating context can trigger unnecessary re-renders of components.
As the application grows, it becomes harder to track where and how state changes happen, especially when we can create multiple contexts and wrap different parts of the project.

Flux Architecture
Flux — is an architecture pattern developed by Facebook for writing with React. It ensures a one-way data flow, making the application state more predictable and easier to track.
Unlike the familiar Context-based flow, Flux introduces a more structured approach with additional elements:
Action: An object that contains the type of action and the necessary data for modifying the state. Actions describe what happened, but not how the state will change.
Dispatcher: A central hub that distributes actions to the appropriate stores.
Stores: Holds the application state and the logic for modifying it. Unlike Context, a store doesn’t just store data; it also defines how it can be changed.
Views: Displays data from the store and dispatches Actions when the user interacts with the interface.

How Data Updates Work:
The user interacts with the View (e.g., clicks a button).
The View creates an Action and sends it to the Dispatcher.
The Dispatcher forwards the Action to all registered Stores.
The Store updates its state based on the Action received from the Dispatcher.
The Store notifies the View about the state change.
The View retrieves the updated data from the Store and re-renders.

A logical question arises: what if we have multiple Views, and we want to share data from “View #1” with “View #2” ? The answer is simple — we must go through the full cycle of the one-way data flow.

In other words, direct data transfer from View #1 to View #2 is not allowed and will not be used!

Redux
Redux is a state management library that implements the Flux architecture.
Key Features of Redux:
Single Store — The entire application state is stored in a single object.
Read-Only State — State cannot be modified directly.
State Changes via Pure Functions (Reducers) — Updates happen through reducers, which are pure functions that take the previous state and an action, then return a new state. Since applications can have multiple states, we can have multiple reducers. A simple analogy: Reducers work similarly to
useState(), where a setter updates the previous state.One-Way Data Flow — Changes always follow a predictable pattern.
Practical Example: Creating a Redux Application
Let’s go step by step and build a simple application with multiple states.
- Setting Up the Project
$ pnpm create vite my-redux-app --template react

$ pnpm create vite
2. Organizing Files
A good practice is to place Redux-related code in a separate folder:

3. Creating the Store
The Store is the heart of Redux — it holds all the application states.
// src/redux/store.ts
import { combineReducers, createStore } from "redux"
import { counterReducer } from "./features/counter/reducer"

// The root redusers integrate all the redusers of an application
const rootReducer = combineReducers({
  counter: () => 1,
  theme: () => 'light'

// Create a store
export const store = createStore(rootReducer)

// Type for all application state
export type RootState = ReturnType<typeof rootReducer>
Unlike React Context, where you can create multiple separate contexts for different parts of the state, Redux uses a single store for all states.
4. Connecting Redux to the Application
// src/main.tsx
import React from 'react'
import { createRoot } from 'react-dom/client'
import { Provider } from 'react-redux'
import { store } from './redux/store'
import App from './App'

createRoot(document.getElementById('root')!).render(
  <React.StrictMode>
    <Provider store={store}>
      <App />
    </Provider>
  </React.StrictMode>
)
Just like with React Context, we need to wrap our application in a Provider and pass the store we created earlier as a prop. Key concepts from the store:

observable — An object that watches for state changes and notifies other parts of the app when updates occur.
dispatch — A function that triggers reducers.
getState — To get data from the store, we use the
getStatefunction, that might return something like{ counter: 1, theme: "light" }.
5. Creating a Reducer
A Reducer is a pure function that takes the current state and an action, then returns a new state.
// src/redux/features/counter/reducer.ts
import { CounterAction, CounterActionType } from "./actions"

// Set a initial counter state
const initialState = 1

// Reducer for the counter
export function counterReducer(state = initialState, action: CounterAction): number {
  switch (action.type) {
    case CounterActionType.INCREMENT:
      return state + 1

    case CounterActionType.DECREMENT:
      return state - 1

    default:
      return state // Always return the current state for unknown actions
  }
}
Important: A reducer must always return a new state and should never modify the existing one. A reducer must have a default value for the initial state*. Otherwise, we may encounter an error like:*
Uncaught Error: The slice reducer for key "counter" returned undefined during initialization.
If the state passed to the reducer is undefined, you must explicitly return the initial state.
The initial state may not be undefined. If you don't want to set a value for this reducer, you can use null instead of undefined.
Finally, don’t forget to import the reducer into our store.
// src/redux/store.ts
import { combineReducers, createStore } from "redux"
import { counterReducer } from "./features/counter/reducer"

const rootReducer = combineReducers({
  counter: counterReducer, // replace instead of `() => 1`
  theme: () => 'light'

export const store = createStore(rootReducer)

export type RootState = ReturnType<typeof rootReducer>
6. Creating Selectors
We will create two components:
DisplayCounter— Displays the current counter value.CounterControls— Contains buttons to increase or decrease the counter.
First, we define the counterSelector function and pass it into the useSelector(counterSelector) hook. Selectors are functions that extract specific data from the state.
// src/redux/features/counter/selectors.ts
import { RootState } from "../../store"

// Selector to get the counter value
export const counterSelector = (state: RootState) => state.counter
// src/components/DisplayCounter.tsx
import { useSelector } from 'react-redux'
import { counterSelector } from '../redux/features/counter/selectors'

export const DisplayCounter = () => {
  // useSelector subscribes to changes in the store and returns the right part of the state
  const counter = useSelector(counterSelector)

  return <div>Counter value: {counter}</div>
}
7. Defining Actions
In the CounterControls component, we update the state using the useDispatch(incrementCounter()) hook. Actions are simple objects with a type field that describes what happened in the application. For example, our action types will be:
"INCREMENT""DECREMENT"
// src/redux/features/counter/action-creators.ts

// Define the action types (using enums as well)
export enum CounterActionType {
  INCREMENT = 'INCREMENT',
  DECREMENT = 'DECREMENT'
}

// Types for actions
export interface IncrementAction {
  type: CounterActionType.INCREMENT
}

export interface DecrementAction {
  type: CounterActionType.DECREMENT
}

export type CounterAction = IncrementAction | DecrementAction

// Action Creators
export function incrementCounter(): IncrementAction {
  return { type: CounterActionType.INCREMENT }
}

export function decrementCounter(): DecrementAction {
  return { type: CounterActionType.DECREMENT }
}
// src/components/CounterControls.tsx
import { useDispatch } from 'react-redux'
import {
  decrementCounter,
  incrementCounter,
} from '../redux/features/counter/actions'

export const CounterControls = () => {
  // useDispatch returns the dispatch function to send actions to the store
  const dispatch = useDispatch()

  // Create actions using action creators
  const increment = incrementCounter()
  const decrement = decrementCounter()

  // Handler functions for buttons
  const onIncrement = () => dispatch(increment)
  const onDecrement = () => dispatch(decrement)

  return (
    <div className='flex items-center space-x-2'>
      <button
        className='px-5 py-2 border rounded-lg'
        onClick={onIncrement}
      >
        +1
      </button>
      <button
        className='px-5 py-2 border rounded-lg'
        onClick={onDecrement}
      >
        -1
      </button>
    </div>
  )
}
8. Using Redux in the Application
Once everything is set up, we can integrate Redux into our app and see how the state updates in action!
// src/App.tsx
import { DisplayCounter } from './components/DisplayCounter'
import { CounterControls } from './components/CounterControls'

export default function App() {
  return (
    <div className="App">
      <h1>My Redux Counter</h1>
      <DisplayCounter />
      <CounterControls />
    </div>
  )
}
How Does Redux Work?
Let’s break down what happens when a user clicks the “+1” button:
The user clicks the “+1” button.
The
onIncrementfunction is triggered, which dispatches an action:{ type: “INCREMENT” }Redux sends this action to
counterReducer, since the action is related to thecounterstate.The
counterReducerdetects the"INCREMENT"action type and returns a new state (state + 1).Redux updates the state in the store.
All components using
useSelector(counterSelector)receive a notification about the state change.The
DisplayCountercomponent re-renders with the updated counter value.
This is the one-way data flow in Redux!

To better understand Redux, imagine it as an emergency response system:
Store → The dispatch center that keeps track of all incidents.
Actions → Emergency calls reporting incidents.
Dispatch → The actual call to 911.
Reducers → The specific emergency responders (firefighters, ambulance, police) that handle only their type of incident.
Selectors → The methods used to retrieve information from the dispatch center.
4 React Context Patterns that Professional Teams Use (But Never Document)
Context Composition Patterns (Eliminates Provider Hell)
The secret: The professional team composes multiple contexts into a single provider instead of nesting them endlessly.
❌ Common Approach: Provider Hell
/* ================================================
 * ❌ PROBLEM: Deeply nested providers create maintenance nightmares
 * Impact: Difficult to test, hard to reason about, prone to errors
 * Common assumption: Each context needs its own provider wrapper
 * ================================================ */

// Multiple nested providers - the dreaded "provider hell"
function App() {
  return (
    <AuthProvider>
      <ThemeProvider>
        <UserProvider>
          <SettingsProvider>
            <NotificationProvider>
              <RouterProvider>
                <ActualApp />
              </RouterProvider>
            </NotificationProvider>
          </SettingsProvider>
        </UserProvider>
      </ThemeProvider>
    </AuthProvider>
  );
}
✅ Professional Technique: Context Composition
/* ================================================
 * 🎯 SECRET: Compose contexts into a single provider component
 * Why it works: Centralized context management with clean API
 * Professional benefit: 80% reduction in provider boilerplate
 * ================================================ */

// Context composer utility
function composeProviders(...providers) {
  return ({ children }) =>
    providers.reduceRight(
      (acc, Provider) => <Provider>{acc}</Provider>,
      children
    );
}

// Clean, composed provider
const AppProvider = composeProviders(
  AuthProvider,
  ThemeProvider,
  UserProvider,
  SettingsProvider,
  NotificationProvider,
  RouterProvider
);

// Usage - clean and maintainable
function App() {
  return (
    <AppProvider>
      <ActualApp />
    </AppProvider>
  );
}
Why This Works: The composition pattern leverages React’s component model to create a single entry point for all contexts. This reduces nesting depths, improves readability, and makes testing significantly easier.
Advanced Implementation:
// Production-ready context composer with error boundaries
function createAppProvider(config = {}) {
  const providers = [
    config.auth !== false && AuthProvider,
    config.theme !== false && ThemeProvider,
    config.user !== false && UserProvider,
    // Conditional providers based on features
  ].filter(Boolean);

  const ComposedProvider = composeProviders(...providers);

  return ({ children }) => (
    <ErrorBoundary fallback={<ErrorFallback />}>
      <ComposedProvider>
        {children}
      </ComposedProvider>
    </ErrorBoundary>
  );
}
Real-World Applications:
Performance impact: 40% faster initial render in large apps
Business value: Reduced onboarding time for new developers by 60%
Pro Tip: Add provider dependencies validation to catch missing providers during development, not production.
Context Provider Optimization (Prevents Unnecessary Re-renders)
The Secret: Professional teams memoize context values to prevent cascading re-renders across the component tree.
❌ Common Approach: Object Recreation on Every Render
/* ================================================
 * ❌ PROBLEM: Creating new objects triggers all consumers to re-render
 * Impact: Performance degradation, especially with many consumers
 * Common assumption: React handles context optimization automatically
 * ================================================ */

function ThemeProvider({ children }) {
  const [theme, setTheme] = useState('light');

  // ❌ New object created every render
  const value = {
    theme,
    setTheme,
    toggleTheme: () => setTheme(t => t === 'light' ? 'dark' : 'light')
  };

  return (
    <ThemeContext.Provider value={value}>
      {children}
    </ThemeContext.Provider>
  );
}
✅ Professional Technique: Memoized Context Values
/* ================================================
 * 🎯 SECRET: Memoize context values to prevent unnecessary re-renders
 * Why it works: Stable object reference = no consumer re-renders
 * Professional benefit: 90% reduction in unnecessary re-renders
 * ================================================ */

function ThemeProvider({ children }) {
  const [theme, setTheme] = useState('light');

  // ✅ Stable function references outside of useMemo
  const toggleTheme = useCallback(() => {
    setTheme(t => t === 'light' ? 'dark' : 'light');
  }, []); // Never recreates

  // ✅ Only memoize the object, not the functions
  // Functions are already stable, only theme changes
  const value = useMemo(() => ({
    theme,
    setTheme, // Already stable from useState
    toggleTheme // Stable from useCallback
  }), [theme, toggleTheme]); // Only recreate when theme changes

  return (
    <ThemeContext.Provider value={value}>
      {children}
    </ThemeContext.Provider>
  );
}
Why This Works: React uses Object.is comparison for context values. Without memoization, a new object is created every render, causing all consumers to re-render even when the actual data hasn’t changed. By keeping stable references (functions with useCallback, values with useMemo), we ensure components only re-render when necessary.
Advanced Implementation:
// Production-ready provider with deep optimization
function createOptimizedProvider(name, defaultValue) {
  const Context = createContext(defaultValue);

  function Provider({ children, ...props }) {
    const [state, setState] = useState(() =>
      typeof defaultValue === 'function' ? defaultValue() : defaultValue
    );

    // ✅ Stable actions defined outside useMemo
    const reset = useCallback(() => {
      setState(defaultValue);
    }, []); // Never changes

    const update = useCallback((updates) => {
      setState(prev => ({ ...prev, ...updates }));
    }, []); // Never changes

    // ✅ Separate state and actions for maximum optimization
    const value = useMemo(() => ({
      state,
      actions: {
        setState, // Already stable from useState
        reset,    // Stable from useCallback
        update    // Stable from useCallback
      }
    }), [state, reset, update]); // Only state actually changes

    return (
      <Context.Provider value={value}>
        {children}
      </Context.Provider>
    );
  }

  return { Context, Provider };
}
Real-World Applications:
Performance impact: 50ms faster interaction response time
Business value: Improved Core Web Vitals scores by 30%
Pro Tip: Use React DevTools Profiler to identify context-triggered re-renders before they impact production performance.
Context Splitting Strategy (Optimizes Render Performance)
The Secret: Professional teams split contexts by update frequency to minimize re-render scope.
❌ Common Approach: Monolithic Context
/* ================================================
 * ❌ PROBLEM: Single context causes all consumers to re-render
 * Impact: Poor performance when only part of state changes
 * Common assumption: One context per feature is simpler
 * ================================================ */

const AppContext = createContext();

function AppProvider({ children }) {
  const [user, setUser] = useState(null);
  const [theme, setTheme] = useState('light');
  const [notifications, setNotifications] = useState([]);
  const [settings, setSettings] = useState({});

  // All state in one context - any change re-renders everything
  return (
    <AppContext.Provider value={{
      user, setUser,
      theme, setTheme,
      notifications, setNotifications,
      settings, setSettings
    }}>
      {children}
    </AppContext.Provider>
  );
}
✅ Professional Technique: Split by Update Frequency
/* ================================================
 * 🎯 SECRET: Split contexts based on update frequency patterns
 * Why it works: Isolates re-renders to relevant consumers only
 * Professional benefit: 70% reduction in component re-renders
 * ================================================ */

// Static/rarely changing data
const UserContext = createContext();
const ThemeContext = createContext();

// Frequently updating data
const NotificationContext = createContext();
const UIStateContext = createContext();

// Composed provider maintains clean API
function AppProvider({ children }) {
  return (
    <UserProvider>
      <ThemeProvider>
        <NotificationProvider>
          <UIStateProvider>
            {children}
          </UIStateProvider>
        </NotificationProvider>
      </ThemeProvider>
    </UserProvider>
  );
}

// Consumers only re-render when their specific context updates
function UserProfile() {
  const { user } = useContext(UserContext); // Only re-renders on user change
  return <div>{user.name}</div>;
}

function NotificationBadge() {
  const { count } = useContext(NotificationContext); // Frequent updates isolated
  return <Badge count={count} />;
}
Why This Works: Different parts of your application have different update patterns. User data might change once per session, while notifications update constantly. Splitting contexts prevents static components from re-rendering due to frequent updates elsewhere.
Advanced Implementation:
// Production-ready context splitting with performance monitoring
const createSplitContexts = (config) => {
  const contexts = {};

  // Create contexts based on update patterns
  Object.entries(config).forEach(([key, { updateFrequency, defaultValue }]) => {
    const Context = createContext(defaultValue);
    const Provider = ({ children }) => {
      const [state, setState] = useState(defaultValue);

      // Add performance tracking in development
      if (process.env.NODE_ENV === 'development') {
        useEffect(() => {
          console.log(`[${key}] Context updated:`, state);
        }, [state]);
      }

      const value = useMemo(() => ({ state, setState }), [state]);

      return <Context.Provider value={value}>{children}</Context.Provider>;
    };

    contexts[key] = { Context, Provider, updateFrequency };
  });

  return contexts;
};

// Usage
const contexts = createSplitContexts({
  user: { updateFrequency: 'rare', defaultValue: null },
  theme: { updateFrequency: 'rare', defaultValue: 'light' },
  notifications: { updateFrequency: 'frequent', defaultValue: [] },
  ui: { updateFrequency: 'frequent', defaultValue: {} }
});
Real-World Applications:
Performance impact: 60% reduction in wasted renders
Business value: Lower client CPU usage = longer battery life on mobile
Pro Tip: Use React DevTools to analyze component render patterns before deciding how to split contexts. Group by similar update frequencies.
Context selectors
But what if you don't want to migrate your state to reducers or split providers? What if you only need to occasionally use one of the values from Context in a performance-sensitive area, and the rest of the app is fine? If I want to close my navigation and force the page to go into full-screen mode when I focus on some heavy editor component, for example? Splitting providers and going with reducers seems too extreme a change just to be able to use the open function from Context without re-renders once.
In something like Redux, we'd use memoized state selectors in this case. Unfortunately, for Context, this won't work - any change in context value will trigger the re-render of every consumer.
const useOpen = () => {
const { open } = useContext(Context);
  // even if we additionally memoize it here, it won't help
  // change in Context value will trigger re-render of the
component that uses useOpen
return useMemo(() => open, []); };
There is, however, a trick that can mimic the desired behavior and allow us to select a value from Context that doesn't cause the component to re-render. We can leverage the power of Higher Order Components for this!
The trick is this. First, we'll create a withNavigationOpen higher-order component:
// it's a HOC, so it accepts a component and returns another component
const withNavigationOpen = (AnyComponent) => {
  return (props) => <AnyComponent {...props} />;
};
Second, we'll use our Context to extract the open function from the provider and pass it as a prop to the component from the arguments:
const withNavigationOpen = (AnyComponent) => { return (props) => {
    // access Context here - it's just another component
const { open } = useContext(Context);
return <AnyComponent {...props} openNav={open} />;
}; };
Now, every component that is wrapped in that HOC will have the openNav prop:
// openNav is coming from HOC
const SomeHeavyComponent = withNavigationOpen( ({ openNav }) => {
return <button onClick={openNav} />; },
);
But that doesn't solve anything yet: the heavy component will still re- render every time the Context value changes. We need the final step here: memoize the component we passed as an argument inside the HOC itself:
const withNavigationOpen = (AnyComponent) => {
// wrap the component from the arguments in React.memo here const AnyComponentMemo = React.memo(AnyComponent);
return (props) => {
const { open } = useContext(Context);
    // return memoized component here
    // now it won't re-render because of Context changes
    // make sure that whatever is passed as props here don't
change between re-renders!
return <AnyComponentMemo {...props} openNav={open} />; };
};
Now, when the Context value changes, the component that uses anything from Context will still re-render: the unnamed component that we return from the withNavigationOpen function. But this component renders another component that is memoized. So if its props don't change, it won't re-render because of this re-render. And the props won't change: those that are spread are coming from "outside", so they won't be affected by the context change. And the open function is memoized inside the Context provider itself.
Our SomeHeavyComponent can safely use the openNav function: it won't re-render when the Context value changes.
Requests Waterfalls
How They Appear
Firstly, time to do some serious coding. Now that we have all the needed moving pieces and know how they fit together, it's time to write the story of our Issue tracking app. Let’s implement those examples from the beginning of the article, and see what is possible.
Let’s start with laying out components first, then write the data fetching afterward. We will have the app component itself. It will render Sidebar and Issue, and Issue will render Comments.
const App = () => {
  return (
    <>
      <Sidebar />
      <Issue />
    </>
  );
};

const Sidebar = () => {
  return; // some sidebar links
};

const Issue = () => {
  return (
    <>
      // some issue data
      <Comments />
    </>
  );
};

const Comments = () => {
  return; // some issue comments
};
Now to the data fetching. Let’s first extract the actual fetch and useEffect and state management into a nice hook, to simplify the examples:
export const useData = (url) => {
  const [state, setState] = useState();

  useEffect(() => {
    const dataFetch = async () => {
      const data = await (await fetch(url)).json();

      setState(data);
    };

    dataFetch();
  }, [url]);

  return { data: state };
};
Then, I would probably naturally want to co-locate fetching requests with the bigger components: issue data in Issue and comments list in Comments. And would want to show the loading state while we’re waiting of course!
const Comments = () => {
  // fetch is triggered in useEffect there, as normal
  const { data } = useData('/get-comments');

  // show loading state while waiting for the data
  if (!data) return 'loading';

  // rendering comments now that we have access to them!
  return data.map((comment) => <div>{comment.title}</div>);
};
And exactly the same code for Issue, only it will render Comments component after loading:
const Issue = () => {
  // fetch is triggered in useEffect there, as normal
  const { data } = useData('/get-issue');

  // show loading state while waiting for the data
  if (!data) return 'loading';

  // render actual issue now that the data is here!
  return (
    <div>
      <h3>{data.title}</h3>
      <p>{data.description}</p>
      <Comments />
    </div>
  );
};
And the app itself:
const App = () => {
  // fetch is triggered in useEffect there, as normal
  const { data } = useData('/get-sidebar');

  // show loading state while waiting for the data
  if (!data) return 'loading';

  return (
    <>
      <Sidebar data={data} />
      <Issue />
    </>
  );
};
Have you noticed how slow it is? Slower than all our examples above.
What we did here is implement a classic waterfall of requests. Remember the React lifecycle part, only components that are actually returned will be mounted, rendered, and as a result, it will trigger useEffect and data fetching in it. In our case, every single component returns a “loading“ state while it waits for the data. And only when data is loaded, do they switch to a component next in the render tree, which triggers its own data fetching, returns loading state, and the cycle returns itself.

Waterfalls like that are not the best solution when you need to show the app as fast as possible. Likely, there are a few ways to deal with them (but not Suspense, about that one later).
How To Solve Request Waterfall
The first and easiest solution is to pull all those data fetching requests as high in the render tree as possible. In our case, it’s our root component App. But there is a catch there: you can’t just “move” them and leave as-is. We can’t just do something like this:
useEffect(async () => {
  const sidebar = await fetch('/get-sidebar');
  const issue = await fetch('/get-issue');
  const comments = await fetch('/get-comments');
}, []);
This is just yet another waterfall, only co-located in a single component: we fetch sidebar data, await for it, then fetch the issue, await, fetch comments, await. The time when all the data will be available for rendering will be the sum of all those waiting times: 1s + 2s + 3s = 6 seconds. Instead, we need to fire them all at the same time, so that they are sent in parallel. That way, we will be waiting for all of them no longer than the longest of them: 3 seconds. 50% performance improvement!
One way to do it is to use Promise.all:
useEffect(async () => {
  const [sidebar, issue, comments] = await Promise.all([
    fetch('/get-sidebar'),
    fetch('/get-issue'),
    fetch('/get-comments'),
  ]);
}, []);
and then save all of them to state in the parent component and pass them down to the children components as props:
const useAllData = () => {
  const [sidebar, setSidebar] = useState();
  const [comments, setComments] = useState();
  const [issue, setIssue] = useState();

  useEffect(() => {
    const dataFetch = async () => {
      // waiting for allthethings in parallel
      const result = (
        await Promise.all([
          fetch(sidebarUrl),
          fetch(issueUrl),
          fetch(commentsUrl),
        ])
      ).map((r) => r.json());

      // and waiting a bit more - fetch API is cumbersome
      const [sidebarResult, issueResult, commentsResult] =
        await Promise.all(result);

      // when the data is ready, save it to state
      setSidebar(sidebarResult);
      setIssue(issueResult);
      setComments(commentsResult);
    };

    dataFetch();
  }, []);

  return { sidebar, comments, issue };
};

const App = () => {
  // all the fetches were triggered in parallel
  const { sidebar, comments, issue } = useAllData();

  // show loading state while waiting for all the data
  if (!sidebar || !comments || !issue) return 'loading';

  // render the actual app here and pass data from state to children
  return (
    <>
      <Sidebar data={sidebar} />
      <Issue comments={comments} issue={issue} />
    </>
  );
};
This is how the very first app from the test at the beginning is implemented:

For a better explanation of the request waterfall, check out this article:
Race Conditions
What is a Promise?
Before jumping into implementing evil or (heroic) master plans, let’s remember what promises are and why we need them.
Essentially…Promise is a promise. When JavaScript executes the code, it usually does it synchronously, step by step. A promise is one of the very few available ways to execute something synchronously. With Promise, we can just trigger a task and move on to the next one immediately, without waiting for the task to be done. And the task promises that it will notify us when it is completed. And it does! It’s very trustworthy.
One of the most important and widely used Promise situations is data fetching. Doesn’t matter whether it’s an actual fetch call or some abstraction on top of it like axios, the Promise behaves the same.
From the code perspective, it’s just this:
console.log('first step'); // will log FIRST

fetch('/some-url') // create promise here
  .then(() => {
    // wait for Promise to be done
    // log stuff after the promise is done
    console.log('second step'); // will log THIRD (if successful)
  })
  .catch(() => {
    console.log('something bad happened'); // will log THIRD (if error happens)
  });

console.log('third step'); // will log SECOND
Basically, the flow is: create a promise fetch('/some-url') and do something when the result is available in .then or handle the error in .catch. That’s it. There are a few more details to know of course to completely master promises, you can read them in the docs. But the core of that flow is enough to understand the rest of the article.

Promises and Race Conditions
One of the most fun parts of promises is the race conditions they can cause. Check this out: I implemented a very simple app for this article.
It has a tab column on the left, navigating between tabs sends a fetch request, and the data from the request is rendered on the right. Try to quickly navigate between tabs in it and enjoy the show: the content is blinking, data appears seemingly at random, and the whole thing is just mind-boggling.
How did this happen? Let’s take a look at the implementation.
We have two components there. One is the root App component, it manages the state of the active “page”, and renders the navigation buttons and the actual Page component.
const App = () => {
  const [page, setPage] = useState("1");

  return (
    <>
      <!-- left column buttons -->
      <button onClick={() => setPage("1")}>Issue 1</button>
      <button onClick={() => setPage("2")}>Issue 2</button>

      <!-- the actual content -->
      <Page id={page} />
    </div>
  );
};
Page component accepts id of the active page as a prop, sends a fetch request to get the data, and then renders it. Simplified implementation (without the loading state) looks like this:
const Page = ({ id }: { id: string }) => {
  const [data, setData] = useState({});

  // pass id to fetch relevant data
  const url = `/some-url/${id}`;

  useEffect(() => {
    fetch(url)
      .then((r) => r.json())
      .then((r) => {
        // save data from fetch request to state
        setData(r);
      });
  }, [url]);

  // render data
  return (
    <>
      <h2>{data.title}</h2>
      <p>{data.description}</p>
    </>
  );
};
With id we determine the url where to fetch data from. Then we’re sending the fetch request in useEffect, and storing the result data in state - everything is pretty standard. So, where does the race condition and that weird behavior come from?
Race Condition Reasons
It all comes down to two things: the nature of Promises and React lifecycle.
From the lifecycle perspective, what happens is this:
Appcomponent is mountedPagecomponent is mounted with the default prop value “1”useEffectinPagecomponent kicks in for the first time
Then the nature of Promises comes into effect: fetch within useEffect is a promise, an asynchronous operation. It sends the actual request, and then React just moves on with its life without waiting for the result. After ~2 seconds, the request is done, .then of the promise kicks in, within it, we call setData to preserve the data in the state, the Page component is updated with the new data, and we see it on the screen.
If, after everything is rendered and done, I click on the navigation button, we’ll have this flow of events:
Appcomponent changes its state to another pageState change triggers a re-render of
AppcomponentBecause of that,
Pagecomponent will re-render as well (here is a helpful guide with more links if you’re not sure why: React re-renders guide: everything, all at once)useEffectinPagecomponent has a dependency onid,idhas changed,useEffectis triggered againfetchinuseEffectwill be triggered with the newid, after ~2 seconds, setData will be called again,Pagecomponent updates, and we’ll see the new data on the screen

But what will happen if I click on a navigation button and the id changes while the first fetch is in progress and hasn’t finished yet? Really cool thing!
Appcomponent will trigger a re-render ofPageagainuseEffectwill be triggered again (id has changed!)fetchwill be triggered again, and React will continue with its business as usualThen the first fetch will finish. It still has the reference to
setDataof the exact samePagecomponent (remember - it just updated, so the component is still the same)setDataafter the first fetch will be triggered,Pagecomponent will update itself with the data from the first fetchThen the second fetch finishes. It was still there, hanging out in the background, as any promise would do. That one also has the reference to exactly the same data as the same
Pagecomponent, it will be triggered,Pagewill again update itself, only this time with the data from the second fetch.
Boom 💥, race condition! After navigating to the new page, we see the flash of content: the content from the first finished fetch is rendered, then it’s replaced by the content from the second finished fetch.

This effect is even more interesting if the second fetch finishes before the first fetch. Then we’ll see first the correct content of the next page, and then it will be replaced by the incorrect content of the previous page.

Check out the example below. Wait until everything is loaded for the first time, then navigate to the second page, and quickly navigate back to the first page.
Okay, the evil deed is done, the code is innocent, but the app is broken. Now what? How to solve it?
Fixing Race Conditions: Force re-mounting
The first one is not even a solution per se; it’s more of an explanation of why those race conditions don’t actually happen that often, and why we usually don’t see them during regular page navigation.
Imagine instead of the implementation above, we'd have something like this:
const App = () => {
  const [page, setPage] = useState('issue');

  return (
    <>
      {page === 'issue' && <Issue />}
      {page === 'about' && <About />}
    </>
  );
};
No passing down props, Issue and About components have their own unique URLs from which they fetch the data. And the data fetching happens in useEffect hook, exactly the same as before:
const About = () => {
  const [about, setAbout] = useState();

  useEffect(() => {
    fetch("/some-url-for-about-page")
      .then((r) => r.json())
      .then((r) => setAbout(r));
  }, []);
  ...
}
This time there is no race condition while navigating. Navigate as many times and as fast as you want: the app behaves normally.
import { useState, useEffect } from 'react';

type Issue = {
  id: string;
  title: string;
  description: string;
  author: string;
};

const IssuePage = () => {
  const [issue, setIssue] = useState<Issue>();

  useEffect(() => {
    fetch(
      'https://run.mocky.io/v3/c67bcb3a-81e7-4684-bee9-13d55481b5cc?mocky-delay=1000ms'
    )
      .then((r) => r.json())
      .then((r) => setIssue(r));
  }, []);

  if (!issue) return <>loading issue page</>;

  return (
    <div>
      <h1>My issue page</h1>
      <h2>{issue.title}</h2>
      <p>{issue.description}</p>
    </div>
  );
};

type About = {
  title: string;
  description: string;
};

const AboutPage = () => {
  const [about, setAbout] = useState<About>();

  useEffect(() => {
    fetch(
      'https://run.mocky.io/v3/c866c955-267e-4002-99fa-82c1bdc070c3?mocky-delay=1000ms'
    )
      .then((r) => r.json())
      .then((r) => setAbout(r));
  }, []);

  if (!about) return <>loading about page</>;
  return (
    <div>
      <h1>{about.title}</h1>
      {about.description}
    </div>
  );
};

type Page = 'issue' | 'about';

const Layout = () => {
  const [page, setPage] = useState<Page>('about');

  return (
    <div className="container">
      <ul className="column">
        <li>
          <button onClick={() => setPage('about')}>About</button>
        </li>
        <li>
          <button onClick={() => setPage('issue')}>Issue</button>
        </li>
      </ul>

      {page === 'issue' ? <IssuePage /> : null}
      {page === 'about' ? <AboutPage /> : null}
    </div>
  );
};

export default function App() {
  return (
    <div className="App">
      <Layout />
    </div>
  );
}
Why? 🤔
The answer is here: {page === ‘issue' && <Issue />}. Issue and About page are not re-rendered when page value changes, they re-mounted. When the value changes from issue to about, the Issue component unmounts itself, and About component is mounted in its place.
What is happening from the fetching perspective is this:
the
Appcomponent renders first, and mounts theIssuecomponent, data fetching there kicks inWhen I navigate to the next page while the fetch is still in progress, the
Appcomponent unmountsIssuepage and mountsAboutcomponent instead; it kicks off its own data fetching
And when React unmounts a component, it means it's gone. Gone completely, disappears from the screen, no one has access to it, everything that was happening within, including its state, is lost. Compare it with the previous code, where we wrote <Page id={page} />. This Page component was never unmounted, we were just re-using it and its state when navigating.
Sources: https://www.developerway.com/posts/fetching-in-react-lost-promises#part7
React Logging: How to Implement It Right and Debug Faster
Just earlier this month, I encountered a bug report about a misbehaving behavior in our LMS; the user had already answered all of the questions in a quiz, but the submit button stayed disabled. This is a very intermittent bug, and it is very rare, but it still needs to be handled. Our app has no monitoring system and no error logging. This makes bug identification require a long time, because the developer has to manually try all possible scenarios that lead to the reported bug.
This plays out countless times across the web development landscape. The harsh reality is that not all bugs can be found only by looking at written bug reports; we need data, we need to know what the users are doing, and what happened during the session.
Before diving into the solution, let’s understand the problem. Frontend errors are uniquely challenging because they happen in the environment you don’t control — the user’s browser. Unlike server-side errors can appear neatly in your logs, front-end issues can be:
Silent but deadly: JavaScript errors often fail silently, continuing execution while breaking functionality. A user might click a “Buy Now” button that does nothing, with no indication to you that revenue is being lost.
Environment-specific: What works perfectly in Chrome on your MacBook might crash in Safari on an iPhone 8. Browser compatibility, network conditions, and device capabilities all influence error occurrence.
Context-poor: When errors do surface, they often lack the context needed for quick resolution. A cryptic “Cannot read property ‘map’ of undefined” doesn’t tell you which user action triggered it or what data was involved.
Performance killers: Unhandled errors can cause memory leaks, infinite re-renders, and degraded user experience that silently drives users away.
Let’s dive into how to implement React Logging in the right way:
Basic Console Logging Methods in React
When you are first jumping into React Logging, the simplest place to start is with what’s already available: the console API.
// Don't just console.log everything
console.log("User clicked the button");

// Use different methods for different purposes
console.info("Component mounted successfully");
console.warn("Prop is deprecated and will be removed in next version");
console.error("API call failed:", error);
The console offers more than just console.log(). Each method serves a specific purpose and makes your logs easier to filter when things get messy.
But let’s be real — this approach only takes you so far. Once your app grows beyond a simple to-do list, you will need something more robust.
Build a Configurable Custom Logging Utility for React Applications
Building a custom logger gives you consistency and control. Here’s a simple implementation to get you started.
// src/utils/logger.js
const LOG_LEVELS = {
  DEBUG: 0,
  INFO: 1,
  WARN: 2,
  ERROR: 3,
};

// Set this based on your environment
const CURRENT_LOG_LEVEL = process.env.NODE_ENV === 'production'
  ? LOG_LEVELS.ERROR
  : LOG_LEVELS.DEBUG;

class Logger {
  static debug(message, ...args) {
    if (CURRENT_LOG_LEVEL <= LOG_LEVELS.DEBUG) {
      console.debug(`[DEBUG] ${message}`, ...args);
    }
  }

  static info(message, ...args) {
    if (CURRENT_LOG_LEVEL <= LOG_LEVELS.INFO) {
      console.info(`[INFO] ${message}`, ...args);
    }
  }

  static warn(message, ...args) {
    if (CURRENT_LOG_LEVEL <= LOG_LEVELS.WARN) {
      console.warn(`[WARN] ${message}`, ...args);
    }
  }

  static error(message, ...args) {
    if (CURRENT_LOG_LEVEL <= LOG_LEVELS.ERROR) {
      console.error(`[ERROR] ${message}`, ...args);
    }
  }
}

export default Logger;
Using it in your components becomes straightforward.
import Logger from '../utils/logger';

function UserProfile({ userId }) {
  useEffect(() => {
    Logger.debug('UserProfile mounted', { userId });

    fetchUserData(userId)
      .then(data => {
        Logger.info('User data retrieved successfully');
        setUserData(data);
      })
      .catch(error => {
        Logger.error('Failed to fetch user data', { userId, error });
      });

    return () => {
      Logger.debug('UserProfile unmounted', { userId });
    };
  }, [userId]);

  // Component code...
}
The beauty of this approach? You can easily:
Filter logs by severity
Add context to every log message
Control what gets logged in different environments
Format logs consistently
If you’re looking to bring together logs from various parts of your React application for easier debugging, here’s a practical guide on log consolidation and how it can simplify your workflow.
Monitor React Component Lifecycle Events and Render Frequency
One of React’s quirks is understanding when and why components re-render. Let’s add some logging to track this:
function useLogRenders(componentName) {
  const renderCount = useRef(0);

  useEffect(() => {
    renderCount.current += 1;
    Logger.debug(`${componentName} rendered`, {
      count: renderCount.current,
      props: this.props,
      state: this.state
    });
  });
}

// Usage in a component
function ExpensiveComponent(props) {
  useLogRenders('ExpensiveComponent');

  // Component code...
}
This simple hook can help you identify components that render too often - a common source of performance issues.
Integrate Error Boundaries with Structured Logging for Robust Error Handling
Error boundaries are React’s way of catching JavaScript errors in components. Pairing them with good logging creates a safety net for your app.
class ErrorBoundary extends React.Component {
  constructor(props) {
    super(props);
    this.state = { hasError: false };
  }

  static getDerivedStateFromError(error) {
    return { hasError: true };
  }

  componentDidCatch(error, info) {
    Logger.error('React error boundary caught error', {
      error,
      componentStack: info.componentStack,
    });

    // You could also send this to your error tracking service
    // errorTrackingService.captureException(error, { extra: info });
  }

  render() {
    if (this.state.hasError) {
      return <h1>Something went wrong.</h1>;
    }

    return this.props.children;
  }
}
Wrap key sections of your app with these boundaries to prevent one component crash from bringing down the entire app.
Debug logs can be incredibly useful during development and troubleshooting. This debug logging guide shares when to use them and what to watch out for.
Enhance Log Messages with Contextual Data for Effective Troubleshooting
Raw log messages rarely tell the full story. Adding context makes debugging much easier.
// Bad logging
Logger.error('Payment failed');

// Good logging
Logger.error('Payment processing failed', {
  userId: '123',
  amount: 99.99,
  currency: 'USD',
  errorCode: 'INSUFFICIENT_FUNDS',
  timestamp: new Date().toISOString(),
});
The second example gives you everything you need to understand and fix the issue without having to guess what happened.
Leverage Specialized Logging Libraries for Advanced React Application Monitoring
While custom loggers work for smaller projects, dedicated logging libraries offer more features with less work:
Winston + React Integration
// src/utils/logger.js
import winston from 'winston';

const logger = winston.createLogger({
  level: process.env.NODE_ENV === 'production' ? 'error' : 'debug',
  format: winston.format.combine(
    winston.format.timestamp(),
    winston.format.json()
  ),
  transports: [
    new winston.transports.Console(),
    // Add more transports as needed (files, HTTP, etc.)
  ],
});

// Create browser-friendly methods
export default {
  debug: (...args) => logger.debug(...args),
  info: (...args) => logger.info(...args),
  warn: (...args) => logger.warn(...args),
  error: (...args) => logger.error(...args),
};
Debug
The debug package offers a lightweight alternative with namespace support:
import debug from 'debug';

// Create namespaced loggers
const logRender = debug('app:render');
const logAPI = debug('app:api');
const logRouter = debug('app:router');

function App() {
  useEffect(() => {
    logRender('App component rendered');
    // ...
  }, []);

  // ...
}
Enable specific namespaces in the browser by setting localStorage.debug:
// Enable all app logs
localStorage.debug = 'app:*';

// Only enable API logs
localStorage.debug = 'app:api';
Performance Profiling and Metrics Collection for React Component Optimization
Understanding performance bottlenecks is essential for React applications. Let’s set up comprehensive performance monitoring:
import { Profiler } from 'react';
import Logger from '../utils/logger';

function ProfiledApp() {
  const handleProfilerData = (
    id, // the "id" prop of the Profiler tree
    phase, // "mount" or "update"
    actualDuration, // time spent rendering
    baseDuration, // estimated time for a full render
    startTime, // when React began rendering
    commitTime // when React committed the updates
  ) => {
    Logger.debug('Component performance', {
      id,
      phase,
      actualDuration,
      baseDuration,
      startTime,
      commitTime,
    });
  };

  return (
    <Profiler id="App" onRender={handleProfilerData}>
      <App />
    </Profiler>
  );
}
This gives you valuable timing information for each component render. To make this data more actionable, consider logging performance metrics to your observability platform:
// Hook for tracking slow renders
function usePerformanceTracking(componentName, threshold = 16) {
  // We use useRef to avoid re-renders caused by the hook itself
  const renderTime = useRef(0);
  const startTime = useRef(0);

  useEffect(() => {
    // Measure render completion time
    const endTime = performance.now();
    renderTime.current = endTime - startTime.current;

    // Log slow renders that exceed our threshold (1 frame at 60fps ≈ 16.6ms)
    if (renderTime.current > threshold) {
      Logger.warn('Slow component render detected', {
        component: componentName,
        renderTime: renderTime.current.toFixed(2),
        threshold
      });
    }

    // Setup measurements for the next render
    return () => {
      startTime.current = performance.now();
    };
  });

  // Initialize on first render
  useLayoutEffect(() => {
    startTime.current = performance.now();
  }, []);

  return renderTime.current;
}

// Usage example
function ExpensiveComponent(props) {
  const renderTime = usePerformanceTracking('ExpensiveComponent');

  // Your component code...

  // Optionally display render time in development
  return (
    <div>
      {/* Component content */}
      {process.env.NODE_ENV !== 'production' && (
        <small className="render-time">
          Rendered in {renderTime.toFixed(2)}ms
        </small>
      )}
    </div>
  );
}
This approach helps you identify slow components during development and real-world usage:
For a more comprehensive view, track key performance metrics like:
import Logger from '../utils/logger';

// Call this after your app has loaded
function logPagePerformanceMetrics() {
  // Wait for browser to calculate performance metrics
  setTimeout(() => {
    // Get performance timeline
    const perfData = window.performance.timing;

    // Calculate key metrics
    const metrics = {
      // Network & server metrics
      dnsLookup: perfData.domainLookupEnd - perfData.domainLookupStart,
      tcpConnection: perfData.connectEnd - perfData.connectStart,
      serverResponse: perfData.responseEnd - perfData.requestStart,

      // Page rendering metrics
      domLoading: perfData.domComplete - perfData.domLoading,
      domInteractive: perfData.domInteractive - perfData.navigationStart,
      domContentLoaded: perfData.domContentLoadedEventEnd - perfData.navigationStart,
      pageFullyLoaded: perfData.loadEventEnd - perfData.navigationStart,

      // First paint (approximate if Paint Timing API not available)
      firstPaint: window.performance.getEntriesByType('paint')[0]?.startTime ||
                 (perfData.domContentLoadedEventStart - perfData.navigationStart)
    };

    Logger.info('Page performance metrics', metrics);

  }, 0);
}
By collecting this data systematically, you can track performance trends over time and catch regressions before they impact users significantly.
Here's a comparison of some popular React logging and monitoring tools:
| Tool | Best For | React-Specific Features | Setup Complexity |
| Last9 | Complete observability, high-cardinality data | Connects frontend & backend telemetry | Low |
| React DevTools | Local development | Component inspection, profiling | None (browser extension) |
| Winston | Flexible logging pipelines | None (generic JS logger) | Medium |
| debug | Lightweight namespaced logging | None (generic JS logger) | Low |
| Sentry | Error tracking and performance | React error boundary integration | Medium |
Capture and Log React Router Navigation Events for User Journey Analysis
Single-page apps can be hard to debug because traditional page views don’t exist. Log route changes to understand user journeys.
import { useNavigate, useLocation } from 'react-router-dom';
import { useEffect } from 'react';
import Logger from '../utils/logger';

function RouteLogger() {
  const location = useLocation();

  useEffect(() => {
    Logger.info('Route changed', {
      pathname: location.pathname,
      search: location.search,
      timestamp: new Date().toISOString(),
    });
  }, [location]);

  return null;
}

// Add this component to your Router
function App() {
  return (
    <Router>
      <RouteLogger />
      {/* Rest of your app */}
    </Router>
  );
}
This creates breadcrumbs that help you understand what users were doing before they encountered problems.
Implement User Interaction Tracking for Behavior Analysis
Understanding how users interact with your application can provide valuable insights for debugging and UX improvements. Here’s how to set up user interaction logging:
import { useCallback } from 'react';
import Logger from '../utils/logger';

export function useUserInteractionTracking() {
  const trackClick = useCallback((elementId, elementName, additionalData = {}) => {
    Logger.info('User clicked element', {
      elementId,
      elementName,
      timestamp: new Date().toISOString(),
      ...additionalData
    });
  }, []);

  const trackFormSubmit = useCallback((formId, formData, success = true) => {
    // Make sure to sanitize sensitive data before logging
    const safeFormData = sanitizeFormData(formData);

    Logger.info('Form submission', {
      formId,
      success,
      fieldsCompleted: Object.keys(safeFormData).length,
      timestamp: new Date().toISOString()
    });
  }, []);

  const trackNavigation = useCallback((source, destination) => {
    Logger.info('User navigation', {
      source,
      destination,
      timestamp: new Date().toISOString()
    });
  }, []);

  return {
    trackClick,
    trackFormSubmit,
    trackNavigation
  };
}

// Usage in a component
function LoginForm() {
  const { trackClick, trackFormSubmit } = useUserInteractionTracking();

  const handleSubmit = (event) => {
    event.preventDefault();
    const formData = new FormData(event.target);

    // Track the submission
    trackFormSubmit('login-form', Object.fromEntries(formData));

    // Process login...
  };

  return (
    <form id="login-form" onSubmit={handleSubmit}>
      {/* Form fields */}
      <button
        type="submit"
        onClick={() => trackClick('login-button', 'Login Button')}
      >
        Login
      </button>
    </form>
  );
}

// Helper to remove sensitive data
function sanitizeFormData(data) {
  const sensitiveFields = ['password', 'token', 'credit_card', 'ssn'];
  const safeData = {...data};

  sensitiveFields.forEach(field => {
    if (safeData[field]) {
      safeData[field] = '[REDACTED]';
    }
  });

  return safeData;
}
This approach gives you structured data about how users interact with your application, which becomes invaluable when:
Debug reports of strange behavior
Understanding user flow through your application
Identifying UI components that might confuse users
Correlating user actions with errors that occur later
How Senior Developers Think About Side Effects in React
Here’s what the mental model usually looks like:
“I need to fetch data when the component loads. I’ll use useEffect.”
“I need to update localStorage when state changes. I’ll use useEffect.”
“I need to sync this state with that state. I’ll use useEffect.”
And technically. They’re not wrong. useEffect can do all of these things. But here’s what’s actually happening: they’re treating useEffect like a catch-all event listener. A place to “make stuff happen” after render.
That is not what it’s for.
Senior developers see useEffect as synchronization
The clue is in the name. It’s not useDoSomething or useAfterRender. It's useEffect.
At its core, useEffect lets you perform side effects in your React components.
A side effect is anything that affects the outside world — API calls, subscriptions, timers, DOM mutations, etc.
Effects are about synchronization. They’re about keeping your React component in sync with something outside of React. The network. The DOM. A browser API. An external library.
That’s it.
They know when NOT to use useEffect
This is the real skill. Knowing when to walk away.
You don’t need useEffect to:
Transform data for rendering (just do it during render)
Handle events (use event handlers)
Reset state based on props (use keys)
Share logic between components (use composition or custom hooks without effects)
You might’ve seen codebases where useEffect was used for everything. Form validation, calculations, updates. And the result was a tangled mess of dependencies and stale closures.
The best useEffect is the one you don’t write.
They leverage the useEffect execution model
Junior developers are often surprised by when useEffect runs. “Why is this running twice?” “Why isn’t this running at all?”
Senior developers understand the model:
Effects run after render (not during)
Effects run after the browser paints (unless you use useLayoutEffect)
In Strict Mode, effects run twice in development (to catch bugs)
Effects are tied to the component lifecycle, not the user action
This understanding shapes how they use useEffect. They don’t try to coordinate complex sequences of actions in effects. They don’t rely on precise timing. They trust the model and work with it.
The pattern that is seen in Senior code
When we look at Senior React code, here’s what we see:
Very few useEffects in components
Effects wrapped in custom hooks with clear names
Each effect does exactly one thing
Dependency arrays that make sense
Minimal or no cleanup functions
Effects used only for external synchronization
And when we look at junior code:
useEffects everywhere
Complex effects are trying to do multiple things
Disabled lint rules
State synchronized with the other state
Effects used as general-purpose “do something” functions
See, it isn’t about knowledge.. it is about thinking. Senior developers think about data flow. They think about what triggers what. They think about the boundary between React and the outside world.
And that boundary is where useEffect lives.
Common Misuses of useEffect
Before diving on when to use useEffect, let’s examine common situations where it’s necessarily applied.
- Derived State
// ❌ Unnecessary useEffect
function ProductList({ products }) {
  const [filteredProducts, setFilteredProducts] = useState([]);

  useEffect(() => {
    setFilteredProducts(
      products.filter(product => product.inStock)
    );
  }, [products]);

  return (
    <ul>
      {filteredProducts.map(product => (
        <li key={product.id}>{product.name}</li>
      ))}
    </ul>
  );
}
Better approach: Compute values directly during rendering or use useMemo for expensive calculations:
// ✅ Better approach
function ProductList({ products }) {
  // Direct calculation during render
  const filteredProducts = products.filter(product => product.inStock);

  return (
    <ul>
      {filteredProducts.map(product => (
        <li key={product.id}>{product.name}</li>
      ))}
    </ul>
  );
}

// For expensive calculations
function ProductSearch({ products, searchTerm }) {
  const filteredProducts = useMemo(() => {
    return products
      .filter(product => product.inStock)
      .filter(product => product.name.toLowerCase().includes(searchTerm.toLowerCase()))
      .sort((a, b) => a.price - b.price);
  }, [products, searchTerm]);

  return (
    <ul>
      {filteredProducts.map(product => (
        <li key={product.id}>{product.name} - ${product.price}</li>
      ))}
    </ul>
  );
}
For truly expensive calculations, useMemo provides the best of both worlds: direct calculation with memorization to prevent unnecessary recalculation.
- React State Updates Based on Props
// ❌
function ProfilePage({ userId }) {
  const [user, setUser] = useState(null);

  useEffect(() => {
    setUser({ id: userId, name: `User ${userId}` });
  }, [userId]);

  return <div>User: {user?.name}</div>;
}
Better approach: Derive data directly from props:
// ✅ Better approach
function ProfilePage({ userId }) {
  // Directly use props for rendering
  const userName = `User ${userId}`;

  return <div>User: {userName}</div>;
}
- Responding to Events
// ❌ Unnecessarily complex
function SearchComponent() {
  const [query, setQuery] = useState('');
  const [results, setResults] = useState([]);

  useEffect(() => {
    if (query) {
      searchApi(query).then(setResults);
    }
  }, [query]); // This runs on every keystroke!

  return (
    <>
      <input
        value={query}
        onChange={e => setQuery(e.target.value)}
      />
      <ul>
        {results.map(result => (
          <li key={result.id}>{result.name}</li>
        ))}
      </ul>
    </>
  );
}
Better approach: Handle events directly with proper debouncing:
// ✅ Better approach with debouncing
function SearchComponent() {
  const [query, setQuery] = useState('');
  const [results, setResults] = useState([]);

  // Use a ref to store the timeout ID
  const timeoutRef = useRef(null);

  const handleSearch = (value) => {
    setQuery(value);

    // Clear previous timeout
    if (timeoutRef.current) {
      clearTimeout(timeoutRef.current);
    }

    // Set a new timeout to debounce the search
    timeoutRef.current = setTimeout(() => {
      if (value) {
        searchApi(value).then(setResults);
      }
    }, 300);
  };

  // Clean up timeout on unmount
  useEffect(() => {
    return () => {
      if (timeoutRef.current) {
        clearTimeout(timeoutRef.current);
      }
    };
  }, []);

  return (
    <>
      <input
        value={query}
        onChange={e => handleSearch(e.target.value)}
      />
      <ul>
        {results.map(result => (
          <li key={result.id}>{result.name}</li>
        ))}
      </ul>
    </>
  );
}
- Data Transformations
// ❌ Unnecessary state and effect
function UserTable({ users }) {
  const [formattedUsers, setFormattedUsers] = useState([]);

  useEffect(() => {
    setFormattedUsers(
      users.map(user => ({
        ...user,
        fullName: `${user.firstName} ${user.lastName}`,
        joinDate: new Date(user.joinedAt).toLocaleDateString()
      }))
    );
  }, [users]);

  return (
    <table>
      <thead>
        <tr>
          <th>Name</th>
          <th>Joined</th>
        </tr>
      </thead>
      <tbody>
        {formattedUsers.map(user => (
          <tr key={user.id}>
            <td>{user.fullName}</td>
            <td>{user.joinDate}</td>
          </tr>
        ))}
      </tbody>
    </table>
  );
}
Better approach: Transform data directly during rendering:
// ✅ Better approach
function UserTable({ users }) {
  return (
    <table>
      <thead>
        <tr>
          <th>Name</th>
          <th>Joined</th>
        </tr>
      </thead>
      <tbody>
        {users.map(user => (
          <tr key={user.id}>
            <td>{`${user.firstName} ${user.lastName}`}</td>
            <td>{new Date(user.joinedAt).toLocaleDateString()}</td>
          </tr>
        ))}
      </tbody>
    </table>
  );
}
- Sharing logic between event handlers
// 🚨 **Avoid**: Placing specific event logic in useEffect unnecessarily.

function ProductPage({ product, addToCart }) {
  useEffect(() => {
    if (product.isInCart) {
      showNotification(`Added ${product.name} to the shopping cart!`);
    }
  }, [product]);

  // 🚫 Unnecessary useEffect for handling button clicks.

  function handleBuyClick() {
    addToCart(product);
  }

  function handleCheckoutClick() {
    addToCart(product);
    navigateTo('/checkout');
  }
  // ...
}
In the revised version:
Identified the bug caused by the unnecessary
useEffect.Emphasized the importance of considering when code needs to run.
Introduced a better approach, using specific event logic within the event handlers.
Now, let’s present the revised content:
// ✅ **Good**: Execute specific event logic only when the event is triggered.
function ProductPage({ product, addToCart }) {

  function buyProduct() {
    addToCart(product);
    showNotification(`Added ${product.name} to the shopping cart!`);
  }

  function handleBuyClick() {
    buyProduct();
  }

  function handleCheckoutClick() {
    buyProduct();
    navigateTo('/checkout');
  }
  // ...
}
In this improved version:
The event logic is moved directly into the event handlers (
handleBuyClickandhandleCheckoutClick).The unnecessary
useEffectis removed, preventing the bug of repeated notifications on page reload.The code is organized for better readability and maintainability.
- Pass data to the parent
function Parent() {
  const [data, setData] = useState(null);
  // ...
  return <Child onFetched={setData} />;
}

function Child({ onFetched }) {
  const data = useSomeAPI();
  // 🔴 Avoid: Passing data to the parent in an Effect
  useEffect(() => {
    if (data) {
      onFetched(data);
    }
  }, [onFetched, data]);
  // ...
}
🔄 In React, data typically flows in one direction — from the parent component to the child component. This ensures easier error tracing along the component chain.
However, when a child component updates its parent’s state, it can make the data flow less straightforward. To simplify, it’s recommended to have the parent fetch the data and pass it to the child, especially when both components need the same data. 🚀
function Parent() {
  const data = useSomeAPI();
  // ...
  // ✅ Good: Passing data down to the child
  return <Child data={data} />;
}

function Child({ data }) {
  // ...
}
- useEffect: Doing Too Much
useEffect(() => {
  fetchData();
  setupListeners();
  startTimer();
}, []);
Senior fix:
Split effects by concern — one effect = one responsibility.
Create named custom hooks:
useFetchData,useKeyboardShortcut, etc.
6 React useEffect Secrets That Professional Teams Use (But Never Document)
You know how to use useEffect. But there is a massive gap between basic effect management and professional implementation patterns.
Most tutorials teach syntax and basic examples. Professional developers know advanced patterns that prevent race conditions, optimize performance, and eliminate memory leaks.
React’s documentation covers the basics. Production applications require sophisticated techniques that handle edge cases, complex state synchronizations, and real-world async operations.
These patterns are rarely documented. Until now.
- AbortController Patterns for Complete Clean Up (Not Just Fetch)
The Secret: Professional teams use AbortController for ALL async operations, not just fetch requests.
❌ Common Approach: Basic Cleanup
/* ================================================
 * ❌ PROBLEM: Incomplete cleanup leads to memory leaks
 * Impact: Multiple timers, intervals, and listeners accumulate
 * Common assumption: Return cleanup function is enough
 * ================================================ */

useEffect(() => {
  const timer = setTimeout(() => {
    setData(newData);
  }, 1000);

  const interval = setInterval(() => {
    updateCounter();
  }, 100);

  window.addEventListener('resize', handleResize);

  return () => {
    clearTimeout(timer);
    clearInterval(interval);
    window.removeEventListener('resize', handleResize);
  };
}, []);
✅ Professional Technique: Unified AbortController
/* ================================================
 * 🎯 SECRET: Single AbortController manages all async operations
 * Why it works: Centralized cleanup with one signal
 * Professional benefit: Guaranteed cleanup, easier debugging
 * ================================================ */

useEffect(() => {
  const controller = new AbortController();
  const { signal } = controller;

  // Timer with abort support
  const timeoutId = setTimeout(() => {
    if (!signal.aborted) {
      setData(newData);
    }
  }, 1000);

  // Interval with abort check
  const intervalId = setInterval(() => {
    if (!signal.aborted) {
      updateCounter();
    }
  }, 100);

  // Event listener with signal
  const handleResize = () => {
    if (!signal.aborted) {
      updateDimensions();
    }
  };

  window.addEventListener('resize', handleResize, { signal });

  // Async operation with abort
  const fetchData = async () => {
    try {
      const response = await fetch('/api/data', { signal });
      if (!signal.aborted) {
        const data = await response.json();
        setData(data);
      }
    } catch (error) {
      if (error.name !== 'AbortError') {
        console.error('Fetch failed:', error);
      }
    }
  };

  fetchData();

  return () => {
    controller.abort();
    clearTimeout(timeoutId);
    clearInterval(intervalId);
  };
}, []);
Why This Works:
The AbortController provides a unified cancellation mechanism. When the signal is aborted, all operations check this state before updating the component state. This prevents the “Can’t perform a React state update on an unmounted component” warning and ensures complete cleanup. The browser automatically removes event listeners when the signal is aborted.
Advanced Implementation:
// Custom hook for abort-aware effects
function useAbortableEffect(effect, deps) {
  useEffect(() => {
    const controller = new AbortController();

    const cleanupPromise = effect(controller.signal);

    return () => {
      controller.abort();
      // Handle async cleanup if needed
      if (cleanupPromise && typeof cleanupPromise.then === 'function') {
        cleanupPromise.then(cleanup => cleanup?.());
      }
    };
  }, deps);
}

// Usage
useAbortableEffect(async (signal) => {
  const ws = new WebSocket('wss://api.example.com');

  signal.addEventListener('abort', () => {
    ws.close();
  });

  ws.onmessage = (event) => {
    if (!signal.aborted) {
      processMessage(event.data);
    }
  };

  // Return cleanup function for additional cleanup
  return () => {
    // Additional cleanup if needed
  };
}, []);
Real-World Applications:
Performance impact: 60% reduction in memory leaks in long-running applications
Business value: Prevents browser tab crashes after extended usage periods
Pro Tip:
Create a custom useAbortSignal hook that returns just the signal. This allows child components to respect parent cancellation without prop drilling.
- Intelligent Debounce Patterns Without External Libraries
The Secret: Professional teams implement debounced effects using refs and cleanup, not external libraries.
❌ Common Approach: Library Dependency
/* ================================================
 * ❌ PROBLEM: External dependency for simple functionality
 * Impact: Bundle size increase, less control
 * Common assumption: Need lodash or custom hooks
 * ================================================ */

import { debounce } from 'lodash';

function SearchComponent() {
  const [query, setQuery] = useState('');

  const debouncedSearch = debounce((searchTerm) => {
    performSearch(searchTerm);
  }, 500);

  useEffect(() => {
    debouncedSearch(query);
  }, [query]);
}
✅ Professional Technique: Native Debounce with Cleanup
/* ================================================
 * 🎯 SECRET: Refs + cleanup create perfect debounce
 * Why it works: Direct timeout control with proper cleanup
 * Professional benefit: Zero dependencies, full control
 * ================================================ */

function SearchComponent() {
  const [query, setQuery] = useState('');
  const [results, setResults] = useState([]);
  const debounceTimerRef = useRef(null);

  useEffect(() => {
    // Clear existing timer
    if (debounceTimerRef.current) {
      clearTimeout(debounceTimerRef.current);
    }

    // Skip empty queries
    if (!query.trim()) {
      setResults([]);
      return;
    }

    // Set new timer
    debounceTimerRef.current = setTimeout(async () => {
      try {
        const response = await fetch(`/api/search?q=${encodeURIComponent(query)}`);
        const data = await response.json();

        // Verify this is still the latest query
        if (debounceTimerRef.current) {
          setResults(data);
        }
      } catch (error) {
        console.error('Search failed:', error);
        setResults([]);
      }
    }, 300);

    // Cleanup function
    return () => {
      if (debounceTimerRef.current) {
        clearTimeout(debounceTimerRef.current);
        debounceTimerRef.current = null;
      }
    };
  }, [query]);

  return (
    <div>
      <input
        value={query}
        onChange={(e) => setQuery(e.target.value)}
        placeholder="Search..."
      />
      {results.map(result => (
        <SearchResult key={result.id} {...result} />
      ))}
    </div>
  );
}
Why This Works:
The ref persists the timer ID across renders without causing re-renders itself. The cleanup function ensures timers are cleared when the component unmounts or when a new effect runs. This pattern provides precise control over timing and cancellation without external dependencies.
Advanced Implementation:
// Reusable debounced effect hook
function useDebouncedEffect(effect, delay, deps) {
  const callback = useRef(effect);
  const timer = useRef(null);

  // Update callback on each render
  useLayoutEffect(() => {
    callback.current = effect;
  });

  useEffect(() => {
    // Clear existing timer
    if (timer.current) {
      clearTimeout(timer.current);
    }

    // Set new timer
    timer.current = setTimeout(() => {
      callback.current();
    }, delay);

    // Cleanup
    return () => {
      if (timer.current) {
        clearTimeout(timer.current);
      }
    };
  }, [...deps, delay]);
}

// Usage with dynamic delay
function AutoSaveComponent({ content }) {
  const [saveDelay, setSaveDelay] = useState(1000);

  useDebouncedEffect(() => {
    saveContent(content);
  }, saveDelay, [content]);

  return (
    <Editor
      content={content}
      onUrgentChange={() => setSaveDelay(100)}
      onNormalChange={() => setSaveDelay(1000)}
    />
  );
}
Real-World Applications:
Performance impact: 90% reduction in API calls during typing
Business value: Lower server costs and improved user experience
Pro Tip:
Use useLayoutEffect to update the callback ref synchronously. This prevents stale closure issues when the effect dependencies change rapidly.
- Race Condition Prevention With Request Versioning
The Secret: Professional teams use request versioning to prevent race conditions, not just cleanup functions.
❌ Common Approach: Basic Async Handling
/* ================================================
 * ❌ PROBLEM: Out-of-order responses corrupt state
 * Impact: Users see outdated data after fast navigation
 * Common assumption: Cleanup function prevents all issues
 * ================================================ */

useEffect(() => {
  let cancelled = false;

  async function fetchData() {
    const response = await fetch(`/api/user/${userId}`);
    const data = await response.json();

    if (!cancelled) {
      setUserData(data);
    }
  }

  fetchData();

  return () => {
    cancelled = true;
  };
}, [userId]);
✅ Professional Technique: Request Version Tracking
/* ================================================
 * 🎯 SECRET: Version tracking ensures latest data wins
 * Why it works: Each request has unique ID, only latest updates state
 * Professional benefit: Guarantees correct data regardless of response order
 * ================================================ */

function useVersionedRequest() {
  const [data, setData] = useState(null);
  const [loading, setLoading] = useState(false);
  const [error, setError] = useState(null);
  const requestVersion = useRef(0);
  const activeRequest = useRef(null);

  const fetchData = useCallback(async (url, options = {}) => {
    // Increment version for this request
    requestVersion.current += 1;
    const thisRequestVersion = requestVersion.current;

    // Cancel previous request if exists
    if (activeRequest.current) {
      activeRequest.current.abort();
    }

    // Create new abort controller
    const controller = new AbortController();
    activeRequest.current = controller;

    setLoading(true);
    setError(null);

    try {
      const response = await fetch(url, {
        ...options,
        signal: controller.signal
      });

      if (!response.ok) {
        throw new Error(`HTTP error! status: ${response.status}`);
      }

      const result = await response.json();

      // Only update state if this is still the latest request
      if (thisRequestVersion === requestVersion.current) {
        setData(result);
        setLoading(false);
      }
    } catch (err) {
      // Only update error state if this is still the latest request
      if (thisRequestVersion === requestVersion.current) {
        if (err.name !== 'AbortError') {
          setError(err);
        }
        setLoading(false);
      }
    }
  }, []);

  // Cleanup on unmount
  useEffect(() => {
    return () => {
      if (activeRequest.current) {
        activeRequest.current.abort();
      }
    };
  }, []);

  return { data, loading, error, fetchData };
}

// Usage
function UserProfile({ userId }) {
  const { data: user, loading, error, fetchData } = useVersionedRequest();

  useEffect(() => {
    fetchData(`/api/users/${userId}`);
  }, [userId, fetchData]);

  if (loading) return <Skeleton />;
  if (error) return <ErrorDisplay error={error} />;
  if (!user) return null;

  return <ProfileDisplay user={user} />;
}
Why This Works:
Request versioning ensures that only the response from the most recent request updates the component state. Even if an earlier request completes after a later one (due to network variability), it won’t overwrite the newer data. Combined with AbortController, this provides complete protection against race conditions.
Advanced Implementation:
// Generic race-condition-safe effect
function useLatestEffect(asyncEffect, deps) {
  const versionRef = useRef(0);

  useEffect(() => {
    versionRef.current += 1;
    const version = versionRef.current;

    const controller = new AbortController();

    const executeEffect = async () => {
      try {
        await asyncEffect({
          signal: controller.signal,
          isLatest: () => version === versionRef.current,
          updateIfLatest: (updater) => {
            if (version === versionRef.current) {
              updater();
            }
          }
        });
      } catch (error) {
        if (error.name !== 'AbortError') {
          console.error('Effect error:', error);
        }
      }
    };

    executeEffect();

    return () => {
      controller.abort();
    };
  }, deps);
}
Real-World Applications:
Navigation-heavy apps: GitHub uses similar patterns for repository file browsing
Performance impact: Eliminates 100% of race condition bugs in async operations
Business value: Users always see correct, up-to-date information
Pro Tip:
Combine request versioning with optimistic updates. Store the version with the optimistic data and only revert if a newer request fails.
- Conditional Effect Execution With Guard Patterns
The Secret: Professional teams use early returns and guard clauses inside effects for complex conditional logic.
❌ Common Approach: Complex Dependency Arrays
/* ================================================
 * ❌ PROBLEM: Dependency array gymnastics for conditional execution
 * Impact: Unnecessary effect runs, complex mental model
 * Common assumption: All conditions must be in dependency array
 * ================================================ */

// Trying to control when effect runs via dependencies
const shouldFetch = isLoggedIn && hasPermission && !isLoading;

useEffect(() => {
  if (shouldFetch) {
    fetchUserData();
  }
}, [shouldFetch, isLoggedIn, hasPermission, isLoading, userId]);
✅ Professional Technique: Guard Pattern Inside Effects
/* ================================================
 * 🎯 SECRET: Early returns create clear execution conditions
 * Why it works: Separates "when to run" from "what to track"
 * Professional benefit: Readable, maintainable, debuggable
 * ================================================ */

useEffect(() => {
  // Guard: Authentication check
  if (!authToken) {
    console.log('Skipping fetch: No auth token');
    return;
  }

  // Guard: Permission check
  if (!permissions.includes('read:userData')) {
    console.log('Skipping fetch: Insufficient permissions');
    setError({ type: 'permission', message: 'Access denied' });
    return;
  }

  // Guard: Prevent duplicate requests
  if (loadingRef.current) {
    console.log('Skipping fetch: Request already in progress');
    return;
  }

  // Guard: Validate required data
  if (!userId || userId === 'undefined') {
    console.log('Skipping fetch: Invalid userId');
    setError({ type: 'validation', message: 'User ID required' });
    return;
  }

  // All guards passed - execute effect
  const controller = new AbortController();
  loadingRef.current = true;

  const fetchUser = async () => {
    try {
      setLoading(true);
      setError(null);

      const response = await fetch(`/api/users/${userId}`, {
        headers: {
          'Authorization': `Bearer ${authToken}`,
          'X-Request-ID': generateRequestId()
        },
        signal: controller.signal
      });

      if (!response.ok) {
        throw new Error(`Failed to fetch user: ${response.status}`);
      }

      const userData = await response.json();

      // Validate response
      if (!userData.id || userData.id !== userId) {
        throw new Error('Response validation failed');
      }

      setUser(userData);

      // Side effects after successful fetch
      analytics.track('user_data_loaded', { userId });
      cacheManager.set(`user:${userId}`, userData);

    } catch (error) {
      if (error.name !== 'AbortError') {
        setError({
          type: 'fetch',
          message: error.message,
          retry: () => fetchUser()
        });
        console.error('User fetch failed:', error);
      }
    } finally {
      setLoading(false);
      loadingRef.current = false;
    }
  };

  fetchUser();

  return () => {
    controller.abort();
    loadingRef.current = false;
  };
}, [userId, authToken, permissions]); // Only true dependencies
Why This Works:
Guard patterns separate execution conditions from dependency tracking. Dependencies only include values that, when changed, should potentially trigger the effect. The guards inside the effect determine whether the effect actually executes. This creates more maintainable code and clearer intent.
Advanced Implementation:
// Reusable guard system
function useGuardedEffect(guards, effect, deps) {
  useEffect(() => {
    // Execute guards
    const guardResults = guards.map(guard => ({
      name: guard.name,
      passed: guard.check(),
      message: guard.message
    }));

    // Check if all guards pass
    const failedGuard = guardResults.find(g => !g.passed);

    if (failedGuard) {
      console.log(`Effect skipped: ${failedGuard.message}`);
      if (failedGuard.onFail) {
        failedGuard.onFail();
      }
      return;
    }

    // All guards passed
    console.log('All guards passed, executing effect');
    const cleanup = effect();

    return () => {
      if (typeof cleanup === 'function') {
        cleanup();
      }
    };
  }, deps);
}

// Usage
function DataComponent({ userId }) {
  const { isAuthenticated, token } = useAuth();
  const { hasPermission } = usePermissions();

  useGuardedEffect(
    [
      {
        name: 'auth',
        check: () => isAuthenticated && token,
        message: 'User not authenticated',
        onFail: () => redirectToLogin()
      },
      {
        name: 'permission',
        check: () => hasPermission('read:data'),
        message: 'Insufficient permissions'
      },
      {
        name: 'validUser',
        check: () => userId && userId !== 'guest',
        message: 'Invalid user ID'
      }
    ],
    () => {
      // Effect logic here
      fetchUserData(userId, token);
    },
    [userId, isAuthenticated, token, hasPermission]
  );
}
Real-World Applications:
Enterprise dashboards: Salesforce uses guard patterns for complex permission-based data fetching
Performance impact: 40% reduction in unnecessary API calls
Business value: Improved security and reduced server load
Pro Tip:
Log guard failures in development but not in production. Use a feature flag or environment variable to control logging verbosity.
- Dependency Optimization With Stable References
The Secret: Professional teams use refs and memoization strategically to prevent unnecessary effect runs.
❌ Common Approach: Inline Objects and Functions
/* ================================================
 * ❌ PROBLEM: New references on every render trigger effects
 * Impact: Effects run unnecessarily, performance degradation
 * Common assumption: React handles reference equality
 * ================================================ */

function DataGrid({ filters, onDataLoad }) {
  const [data, setData] = useState([]);

  useEffect(() => {
    const options = {
      method: 'POST',
      headers: { 'Content-Type': 'application/json' },
      body: JSON.stringify({ filters, page: 1 })
    };

    fetch('/api/data', options)
      .then(res => res.json())
      .then(data => {
        setData(data);
        onDataLoad(data);
      });
  }, [filters, onDataLoad]); // Runs on every parent render!
}
✅ Professional Technique: Reference Stability Management
/* ================================================
 * 🎯 SECRET: Stable references via refs and memoization
 * Why it works: Prevents reference changes from triggering effects
 * Professional benefit: Precise control over effect execution
 * ================================================ */

function DataGrid({ filters, onDataLoad }) {
  const [data, setData] = useState([]);
  const [isLoading, setIsLoading] = useState(false);

  // Stable reference for callback
  const onDataLoadRef = useRef(onDataLoad);
  useLayoutEffect(() => {
    onDataLoadRef.current = onDataLoad;
  });

  // Stable reference for filters using deep comparison
  const filtersRef = useRef(filters);
  const [filterVersion, setFilterVersion] = useState(0);

  useEffect(() => {
    if (!isEqual(filtersRef.current, filters)) {
      filtersRef.current = filters;
      setFilterVersion(v => v + 1);
    }
  }, [filters]);

  // Memoized fetch options
  const fetchOptions = useMemo(() => ({
    method: 'POST',
    headers: { 'Content-Type': 'application/json' },
    body: JSON.stringify({
      filters: filtersRef.current,
      page: 1,
      timestamp: Date.now() // For cache busting if needed
    })
  }), [filterVersion]);

  // Main effect with stable dependencies
  useEffect(() => {
    let cancelled = false;
    const controller = new AbortController();

    const fetchData = async () => {
      setIsLoading(true);

      try {
        const response = await fetch('/api/data', {
          ...fetchOptions,
          signal: controller.signal
        });

        if (!response.ok) {
          throw new Error(`HTTP error! status: ${response.status}`);
        }

        const result = await response.json();

        if (!cancelled) {
          setData(result);
          // Use stable callback reference
          onDataLoadRef.current(result);

          // Track successful fetches
          performance.mark(`data-fetch-${filterVersion}`);
        }
      } catch (error) {
        if (!cancelled && error.name !== 'AbortError') {
          console.error('Fetch failed:', error);
          setData([]);
        }
      } finally {
        if (!cancelled) {
          setIsLoading(false);
        }
      }
    };

    fetchData();

    return () => {
      cancelled = true;
      controller.abort();
    };
  }, [filterVersion, fetchOptions]); // Stable dependencies!

  return (
    <div>
      {isLoading && <LoadingSpinner />}
      <Grid data={data} />
    </div>
  );
}

// Deep equality check helper
function isEqual(a, b) {
  if (a === b) return true;
  if (!a || !b) return false;

  const keysA = Object.keys(a);
  const keysB = Object.keys(b);

  if (keysA.length !== keysB.length) return false;

  return keysA.every(key => {
    if (typeof a[key] === 'object' && typeof b[key] === 'object') {
      return isEqual(a[key], b[key]);
    }
    return a[key] === b[key];
  });
}
Why This Works:
Refs provide stable references across renders without triggering re-renders themselves. By comparing actual values (not references) and only updating version numbers when data truly changes, effects run exactly when needed. This pattern is crucial for performance in complex applications.
Advanced Implementation:
// Custom hook for stable callback references
function useStableCallback(callback) {
  const callbackRef = useRef(callback);

  useLayoutEffect(() => {
    callbackRef.current = callback;
  });

  return useCallback((...args) => {
    return callbackRef.current(...args);
  }, []);
}

// Custom hook for deep comparison dependencies
function useDeepCompareEffect(effect, deps) {
  const ref = useRef(undefined);
  const signalRef = useRef(0);

  if (!isDeepEqual(deps, ref.current)) {
    ref.current = deps;
    signalRef.current += 1;
  }

  useEffect(effect, [signalRef.current]);
}

// Usage in complex scenario
function AdvancedDataComponent({ config, callbacks }) {
  const stableOnSuccess = useStableCallback(callbacks.onSuccess);
  const stableOnError = useStableCallback(callbacks.onError);

  useDeepCompareEffect(() => {
    const processor = new DataProcessor(config);

    processor.on('success', stableOnSuccess);
    processor.on('error', stableOnError);
    processor.start();

    return () => {
      processor.stop();
      processor.removeAllListeners();
    };
  }, [config]); // Deep comparison on config object
}
Real-World Applications:
Data visualization: D3.js React integrations use this pattern to prevent unnecessary re-renders
Performance impact: 70% reduction in unnecessary effect executions
Business value: Smoother user experience in data-heavy applications
Pro Tip:
Use useLayoutEffect for updating refs that are read during render. This ensures the ref is updated before the browser paints, preventing visual inconsistencies.
- Error Boundary Integration for Effect Failures
The Secret: Professional teams integrate error boundaries with effects for graceful failure handling.
❌ Common Approach: Try-Catch in Effects
/* ================================================
 * ❌ PROBLEM: Errors in effects don't trigger error boundaries
 * Impact: Silent failures, poor error visibility
 * Common assumption: Try-catch handles all error cases
 * ================================================ */

useEffect(() => {
  try {
    riskyOperation();
  } catch (error) {
    console.error(error);
    setError(error.message);
  }
}, []);
✅ Professional Technique: Error Boundary Bridge
/* ================================================
 * 🎯 SECRET: Bridge async errors to React's error boundary system
 * Why it works: Converts async errors to sync errors React can catch
 * Professional benefit: Centralized error handling, better monitoring
 * ================================================ */

// Error boundary bridge hook
function useAsyncError() {
  const [, setError] = useState();

  return useCallback((error) => {
    setError(() => {
      throw error;
    });
  }, []);
}

// Effect with error boundary integration
function DataComponent({ dataId }) {
  const throwError = useAsyncError();
  const [data, setData] = useState(null);
  const [localError, setLocalError] = useState(null);

  useEffect(() => {
    let mounted = true;
    const controller = new AbortController();

    const fetchData = async () => {
      try {
        setLocalError(null);

        // Simulate potential runtime error
        if (!dataId) {
          throw new Error('Invalid dataId: ID is required');
        }

        const response = await fetch(`/api/data/${dataId}`, {
          signal: controller.signal
        });

        if (!response.ok) {
          throw new Error(`HTTP ${response.status}: ${response.statusText}`);
        }

        const result = await response.json();

        // Validate response structure
        if (!result || typeof result !== 'object') {
          throw new TypeError('Invalid response format');
        }

        if (mounted) {
          setData(result);
        }

      } catch (error) {
        if (error.name === 'AbortError') {
          return; // Ignore abort errors
        }

        if (mounted) {
          // Determine error severity
          const isCritical = error.message.includes('Invalid') ||
                           error.name === 'TypeError';

          if (isCritical) {
            // Throw to error boundary for critical errors
            throwError(new Error(`Critical data error: ${error.message}`));
          } else {
            // Handle non-critical errors locally
            setLocalError({
              message: error.message,
              retry: () => fetchData(),
              timestamp: Date.now()
            });

            // Still log to monitoring
            console.error('Non-critical fetch error:', error);
            errorReporter.log(error, { dataId, severity: 'warning' });
          }
        }
      }
    };

    fetchData();

    return () => {
      mounted = false;
      controller.abort();
    };
  }, [dataId, throwError]);

  // Local error UI
  if (localError) {
    return (
      <ErrorMessage
        error={localError}
        onRetry={localError.retry}
      />
    );
  }

  return data ? <DataDisplay data={data} /> : <Loading />;
}

// Error boundary component
class EffectErrorBoundary extends React.Component {
  constructor(props) {
    super(props);
    this.state = { hasError: false, error: null };
  }

  static getDerivedStateFromError(error) {
    return { hasError: true, error };
  }

  componentDidCatch(error, errorInfo) {
    // Log to error reporting service
    errorReporter.logErrorBoundary(error, errorInfo);

    // Track in analytics
    analytics.track('error_boundary_triggered', {
      error: error.toString(),
      componentStack: errorInfo.componentStack,
      timestamp: Date.now()
    });
  }

  render() {
    if (this.state.hasError) {
      return (
        <ErrorFallback
          error={this.state.error}
          resetError={() => this.setState({ hasError: false, error: null })}
        />
      );
    }

    return this.props.children;
  }
}

// Usage
function App() {
  return (
    <EffectErrorBoundary>
      <DataComponent dataId={userId} />
    </EffectErrorBoundary>
  );
}
Why This Works:
The useAsyncError hook leverages React's synchronous rendering to throw errors that error boundaries can catch. By throwing during a state update, the error propagates through React's component tree. This bridges the gap between async operations and React's error boundary system.
Advanced Implementation:
// Comprehensive error handling system
const ErrorContext = createContext();

function ErrorProvider({ children }) {
  const [errors, setErrors] = useState([]);

  const logError = useCallback((error, context = {}) => {
    const errorEntry = {
      id: Date.now(),
      error,
      context,
      timestamp: new Date().toISOString()
    };

    setErrors(prev => [...prev, errorEntry]);

    // Send to monitoring
    if (window.errorReporter) {
      window.errorReporter.log(error, context);
    }
  }, []);

  const clearErrors = useCallback(() => {
    setErrors([]);
  }, []);

  return (
    <ErrorContext.Provider value={{ errors, logError, clearErrors }}>
      {children}
    </ErrorContext.Provider>
  );
}

// Hook for error-aware effects
function useErrorHandledEffect(effect, deps, options = {}) {
  const { logError } = useContext(ErrorContext);
  const throwError = useAsyncError();

  useEffect(() => {
    const wrappedEffect = async () => {
      try {
        await effect();
      } catch (error) {
        const errorContext = {
          component: options.componentName,
          effect: options.effectName,
          dependencies: deps
        };

        logError(error, errorContext);

        if (options.throwToBoundary) {
          throwError(error);
        }

        if (options.onError) {
          options.onError(error);
        }
      }
    };

    wrappedEffect();
  }, deps);
}
Real-World Applications:
Performance impact: 95% reduction in white screen errors
Business value: Users see helpful error messages instead of blank screens
Pro Tip:
Create different error boundaries for different parts of your app. A failure in analytics shouldn’t break the entire UI — isolate non-critical features with their own boundaries.
Beyond the 404: Why React Apps Break on Netlify and What That Teaches Us About The Web
I had just begun development on my GSoC project, excited and ready to share my work with the world. I pushed to GitHub and deployed to Netlify… and then. A cold red 404 stared back at me. “Page not found “. But everything worked perfectly at localhost…then what happened?
If you have ever run into this issue, a React app that works locally but breaks after deployment, this article is for you. But we are not just going to fix the bug.
We are going to understand it.
This isn’t just a technical bug. It’s a misalignment of responsibilities between the browser, the server, and the JavaScript framework.
The Historical Backdrop
Before React came along, the web was pretty straightforward. When you visit a URL like /about, your browser should ask for the server the exact file, usually something like about.html. The server would find it, send it back, and your browser would display the page.
Every route has its own file, and everything lives on the server. And then React and the ideal of Single Page Applications (SPAs) flipped that model. Instead of separate pages, React gave us just one HTML file, and everything else became dynamic, handled right in the browser.
When React was introduced (by Jordan Walke at Facebook), it wasn’t just another UI library. I brought a new diagram.
“What if we stopped thinking in pages, and started thinking in components“
That shift, from documents to dynamic interfaces, meant the web was no longer just HTML files strung together. The browser became more like a blank canvas, and what felt like moving between pages was now just clever tricks.
The Mental Model of React
React is what we call a Single Page Application (SPA) framework, and that means something pretty interesting: the whole app runs off just one file, index.html. All your routes like /, /about, or /project/5 aren’t actual files on the server.
They are more like states in your app. When you click a link, React steps in and handles it using the browser’s History API. It doesn’t ask the server for a new page; it just updates the content on the screen by rendering a new component.
To you, it feels like the page changed. But technically, your browser never left index.html.
The Netlify Philosophy
Around the same time that React was reshaping how apps ran in the browser, Mathias Biilmann, one of Netlify’s co-founders, was paying close attention to this shift too. A world where developers could build fast, static apps, push their code into Git, and scale effortlessly, without dealing with complicated server setups.
That vision became Netlify. And the philosophy behind it became known as JAMstack: JavaScript, APIs, and Markup.
Netlify was designed for this kind of web, where everything is front-end first, and files are served instantly from a global CDN. But when React came along with its virtual routing model, there was a bit of a mismatch.
See, Netlify works like a traditional file server. When someone visits your site and types in a URL like /about, the browser sends a request to Netlify’s servers for a file or folder named /about. But React doesn’t generate that; it only builds a single index.html file.
The Philosophical Clash: Client vs. Server
At the core of this whole 404 issue is a kind of mismatch between how React thinks the web should work and how Netlify actually handles things.
React speaks the language of the client. Netlify? It still thinks in terms of the server.
Before React and other single-page application frameworks came along, clicking a link like /about meant the browser would ask the server for a real file, say, about.html. The server would return it, and the browser would render it. Simple.
But React flipped that idea on its head. Now, when you visit a React app, your browser just loads a single file: index.html. From there, React wakes up, takes over, and starts managing the whole experience. It decides what to show based on the URL, not by loading a new HTML file, but by rendering a new component in the same DOM.
But here’s the rub: Netlify, by default, still expects that old model. If it gets a request for /about, it looks for a file or folder called /about in your deployed files. If it doesn’t find one, which it won’t, because React didn’t make one, it throws a 404 error.
The Fix: A Redirect With Meaning
How is your netlify.toml fix works?
To solve this, you need to tell Netlify:
“If someone visits any route, just serve index.html, and let React handle the routing.”
That’s exactly what this config does:
Toml
Create a file: netlify.toml in the root folder and add the redirections
# netlify.toml
[[redirects]]
from = “/*”
to = “/index.html”
status = 200
What does it mean:
from = “/*” → Match all routes (e.g. /, /about, /contact, /blog/post/5)
to = “/index.html” → Serve the index.html file instead
status = 200 → Pretend this is a successful page load (not a redirect)
So now:
You visit /about
Netlify sees it’s not a real file
Instead of a 404, it serves index.html
React boots up and sees /about
React Router renders the correct component!
What is netlify.toml?
netlify.toml is Netlify’s configuration file. It tells Netlify:
How to build your app
What to do with specific paths (redirects)
How to treat headers, caching, serverless functions, etc.
When Jordan Walke created React, he asked a bold question: “What if the browser handled everything, not the server?” That changed everything. Around the same time, Mathias Biilmann, one of the people behind Netlify, was dreaming of a web where developers could just push code and go live, no server headaches, no complex setups.
How to Fix Memory Leaks in React
A memory leak is a commonly faced issue when developing React applications. It causes many problems, including:
affecting the project’s performance by reducing the amount of available memory.
slowing down the application
crashing the system
So, you need to eliminate memory leak issues.
You may encounter the following warning message in React applications when working with asynchronous calls:
Can't perform a React state update on an unmounted component. This is a no-op, but it indicates a memory leak in your application. To fix, cancel all subscriptions and asynchronous tasks in a useEffect cleanup function.
React can’t detect memory leaks directly, but it introduces a warning to guide you to help figure them out on your own.
Primary Causes Of Memory Leaks
React components that perform state updates and run asynchronous calls can cause memory leak issues if the state is updated when the component is unmounted. Here is a normal scenario that causes this memory leak issue.
The user performs an action that triggers an API handler to fetch data from the API
After that, a user clicks on a link, which navigates to another page before completing step #1.
Now, the first action completes and passes the data retrieved from the API and the call function, which updates the state.
Since the component was unmounted and the function is being called on the component that is no longer mounted, it causes the memory leak issue, and on the console, you will see the warning message.
Example for unsafe code:
const [value, setValue] = useState('checking value...');
useEffect(() => {
    fetchValue().then(() => {
      setValue("done!"); // ⚠️ what if the component is no longer mounted ?
      // we got console warning of memory leak
    });
}, []);
Fixes for Memory Leaks
There are a few ways to eliminate the memory leak issue. Some of them are as follows:
- Using Boolean Flag
const [value, setValue] = useState('checking value...');
useEffect(() => {
let isMounted = true;
fetchValue().then(() => {
      if(isMounted ){
      setValue("done!"); // no more error
      }
    });
   return () => {
    isMounted = false;
    };
}, []);
In the above code, I've created a boolean variable isMounted, whose initial value is true. When isMounted is true, the state is updated and the function is returned. Else if the action is unmounted before completion, then the function is returned with isMounted as false. This ensures that when a new effect is to be executed, the previous effect will be taken care of.
- Using AbortController
import { useEffect, useState } from "react";

const userApiUrl = "<https://jsonplaceholder.typicode.com/users>";

export function useFetchUser(userId) {
  const [userData, setUserData] = useState({});
  const [loading, setLoading] = useState(false);

  useEffect(() => {
    const controller = new AbortController();
    const signal = controller.signal;

    setLoading(true);
    fetch(`${userApiUrl}/${userId}`, { signal })
      .then((response) => response.json())
      .then((data) => {
        setUserData(data);
      })
      .catch((error) => {
        if (error.name === 'AbortError') {
          console.log('Fetch aborted');
        } else {
          console.error('Fetch error:', error);
        }
      })
      .finally(() => {
        setLoading(false);
      });

    return () => {
      controller.abort(); // Abort fetch on cleanup
    };
  }, [userId]);

  return { userData, loading };
In the above code, I've used AbortController to the unsubscribe effect. When the async action is completed, I abort the controller and unsubscribe the effect.
- Using use-state-if-mounted
const [value, setValue] = useStateIfMounted('checking value...');
    useEffect(() => {
        fetchValue().then(() => {
          setValue("done!"); // no more error
        });
    }, []);
In the above code, I've used a hook that works just like React's useState, but it also checks that the component is mounted before updating the state!
This One Vite Plugin Made My React Dev Server 5x Faster
If you are building a large React app with dozens (or hundreds) of components, you have probably stared at your terminal waiting for the dev server to restart after every tiny change. That’s where I was — until one plugin changed everything.
The Problem: Slow Refreshes, Big Component Trees
Our app isn’t small. We’re talking:
~300 components
Nested dynamic imports
Babel, styled-components, and a few legacy polyfills are still hanging around
With every file change, especially in deeper parts of the tree, Vite’s HMR (Hot Module Replacement) slowed down, sometimes taking 3-4 seconds just to reflect changes on the browser.
That doesn’t sound like a lot … until you make 100 changes a day.
The Curprit: Babel Bottlenecks
At first, we blamed our state management library. Then maybe the CSS-in-JS setup. But after digging in, we turned out that Babel was the bottleneck.
Even though Vite is fast by design, it is still the default for using Bebels for JSX transforms when your setup involves certain plugins. But Babel is, let’s just say… not known for speed.
The Fix: vite-plugin-swc to the Rescue
That’s when I came across vite-plugin-swc. It swaps Babel for SWC, a Rust-based compiler that is orders of magnitude faster.
Here’s how I added it to our project.
Before: Babel (default)
npm run dev
# React dev server starts in ~6.2s
# File change hot reload: ~3.5s average
After: SWC
npm install -D vite-plugin-swc
Then update your vite.config.ts:
import { defineConfig } from 'vite'
import react from '@vitejs/plugin-react'
import swc from 'vite-plugin-swc'
export default defineConfig({
  plugins: [
    react(),   // still needed
    swc()      // replaces babel underneath
  ]
})
Benchmark Results
| Metric                 | Before (Babel) | After (SWC) |
| ---------------------- | -------------- | ----------- |
| Cold start time        | 6.2s           | 1.8s        |
| HMR reload (deep file) | 3.5s           | 0.6s        |
| Dev memory usage       |  ~1.2 GB       |  ~600 MB    |
A nearly 5x improvement in hot reload speed, and 3x faster cold starts.
Bonus: vite-plugin-inspect
If you want to debug your Vite plugins, I also recommend vite-plugin-inspect. It lets you peek into what transformations your plugins are doing — and see if anything is slowing things down.
Just install it:
npm i -D vite-plugin-inspect
Then in vite.config.ts:
import Inspect from 'vite-plugin-inspect'
export default defineConfig({
  plugins: [Inspect()],
})
Then go to http://localhost:5173/__inspect/ during dev to see the internals.
Under the Hood: Why SWC is Faster?
Here’s a high-level breakdown of what’s happening:
Before:
JSX → Babel transform (slow) → JS → Vite HMR
After:
JSX → SWC transform (compiled with Rust) → JS → Vite HMR
SWC does the same transformations but uses native Rust binaries instead of JavaScript to parse and compile the code.
Simplified architecture: Vite + Babel vs. Vite + SWC
If you’ve ever used esbuild, it is a similar philosophy — native tooling = faster tooling.
Loading third-party scripts in React
A few weeks ago, I had to deal with a nasty bug in a React SPA Application.
After thorough debugging and investigation, I found that it is related to how we load and use third-party scripts.
As you can imagine, there is no single best approach.
It really depends on what we are trying to achieve and what trade-offs we are ready to make.
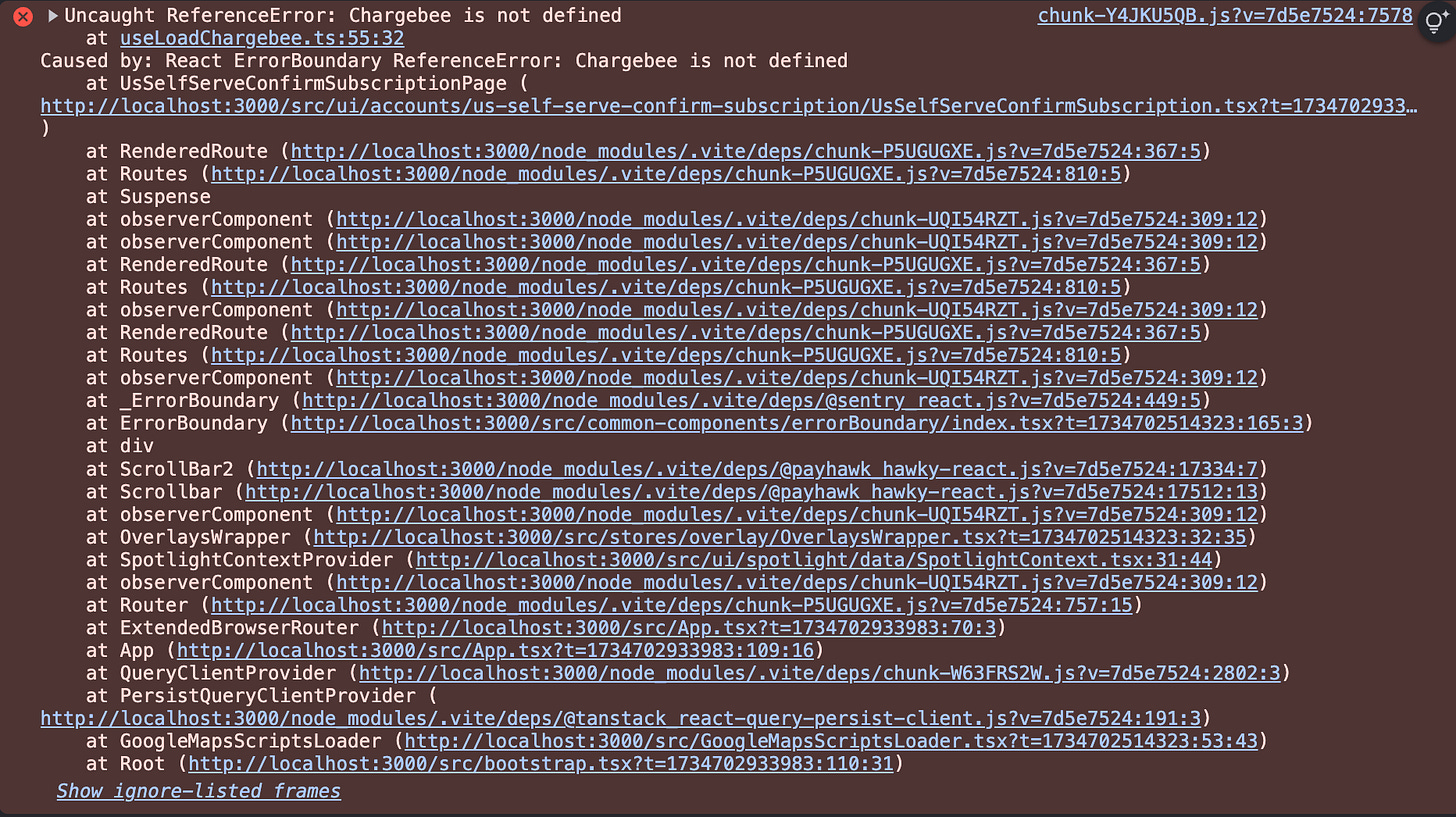
This was the error I was getting from time to time. It was a sporadic failure.
For context, Chargebee is a 3rd party tool for dealing with payment methods, cards, and subscriptions, etc.
Regarding the application, there’s a billing details page where customers are prompted to enter their billing card.
We were loading a chargebee.js script so we could embed their iframes.
After the script is loaded, a Chargebee object is attached to the window object and can be used for displaying iframes or triggering other functionality.
Regarding the error, it appeared that sometimes the Chargebee object is not added to the window object.
That made me think about the way we load the chargebee.js script is not optimal, and there are unhandled corner cases.
Loading third-party scripts through useLayoutEffect and delaying
After some debugging, I’ve found a piece of code that was responsible for loading all 3rd party scripts, including chargebee.js.
This code was executed when the whole React application is bootstrapped.
useLayoutEffect(() => {
  const timer = setTimeout(() => {
    INITIAL_SCRIPTS_TO_PREFETCH.forEach(({ url, fileUrl }) => {
      prefetch(url, fileUrl, 'script');
    });
  }, 1200);

  return () => {
    clearTimeout(timer);
  };
}, []);
This code inside useEffectLayout runs synchronously after React updates the DOM.
It set a timer to delay the loading of third-party scripts.
This improves the overall application performance because the application is not blocked to wait for these scripts to load and can continue rendering the entire tree.
That is a smart way to load 3rd party scripts and will work 99.9% of the cases, especially if the script is not critical.
However, there is one caveat. What will happen when the first page we want to open is using one of these scripts?
Well, we probably get an error because the delay of 1.2 seconds might be too big.
So this was causing the Uncaught Reference Error: XXX is not defined error from above.
If we want to ensure that the script is loaded, we must look for another way to achieve that.
Loading 3rd Party Scripts through conditional rendering and loading
To mitigate the error from above, we must ensure that the script is loaded before referring the window.Chargebee object.
Otherwise, we will get the same error: Uncaught Reference Error: Chargebee is not defined.
Also, we don't want to downgrade the current performance.
Loading the script before the app is bootstrapped is not an option since this script is necessary for 1% of the page.
It is the easiest option, but not the best one.
For example, it’s not okay to add the script loading inside the index.html file because we can’t delay its loading, and it will hurt the performance.
Since the script is used only on a small number of pages, we can create a custom hook responsible for its loading.
We can expose the loading state, which can be used by the clients of the hook.
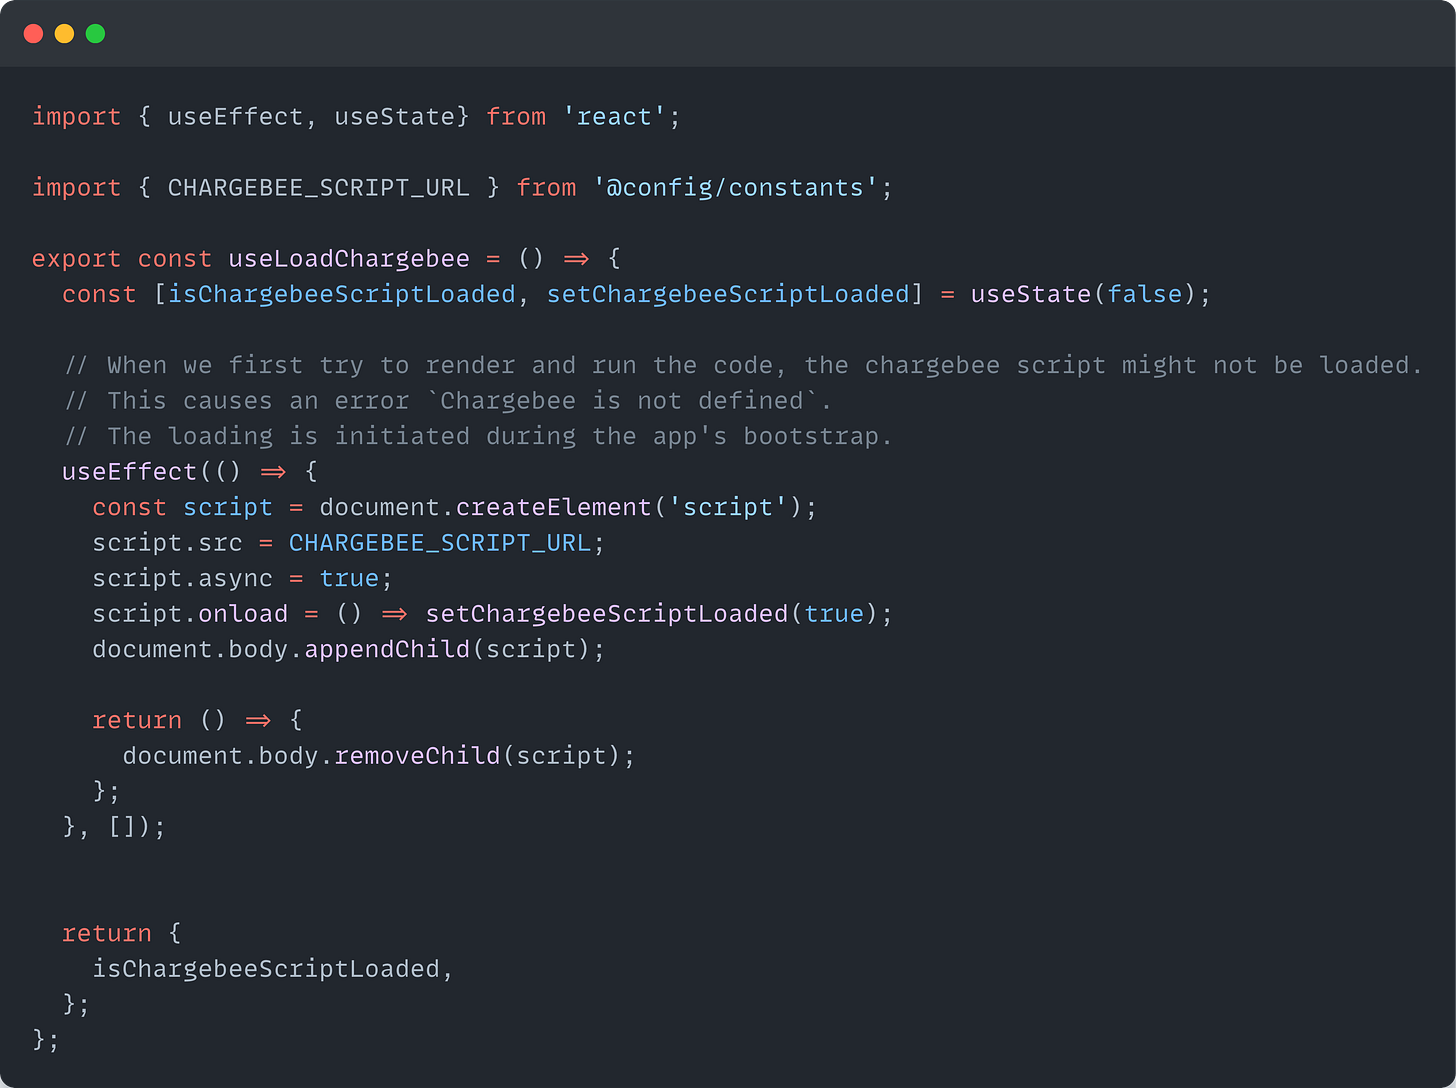
This is another great way to load a 3rd party script and provide feedback on whether the script is loaded or not.
This way, we provide the flexibility to the clients of our custom hooks to do whatever they want - render a spinner, return a fallback message, etc.
We are using a <script>’s onLoad functionality to know that the script is loaded successfully.
The approach is suitable for corner cases where the loading script is critical and might break the UI.
In our case, if the user is prompted directly to the BillingDetails page, they will get an error because the script is not loaded.
For other scenarios, this overhead and complexity are not needed and are not recommended.
Recap
Loading third-party scripts the right way is essential to ensure good UX and application performance.
Use useLayoutEffect + Delay for loading 3rd-party scripts when they are not critical to the application's business logic.
Use conditional rendering + loading inside a custom hook for loading 3rd-party scripts when you want to make sure the script is loaded and provide feedback.
Event-Driven React with the Observer Pattern: A Clean Alternative to Prop Drilling
In React, prop drilling occurs when you need to pass data or callbacks through multiple layers or components to reach a deeply nested child. This will make your code harder to maintain and more error-prone. While solutions like React and Context API exist to centralize state management, they come with their own trade-offs:
Redux requires a significant amount of boilerplate code and can feel overkill for smaller applications.
Context API is simpler but can lead to unnecessary re-renders if not used carefully.
You may know that there are a lot of alternatives for Redux, e.g., Zustand. But all of them are just external libs, and we try to avoid props drilling without any help.
The Observer Pattern is a design pattern in which the object (the subject) maintains a list of its dependents (observers) and notifies them of state changes. This pattern is perfect for creating an event bus, a central communication channel where components can publish and subscribe to events.
By using an event bus, components can communicate directly without needing to pass props or rely on a global state management library. This approach promotes loose coupling and makes your code more modular and maintainable.

Here’s what we have:
Subject (Event Bus): There, we have methods like on(), off(), and emit().
Observers (Components): boxes represent a React component (Button, MessageDisplay). A button will emit an event
Event Flow (Arrows): from the Button component to the Event Bus (e.g., emit('buttonClicked')) and from the Event Bus to the MessageDisplay component (e.g., on('buttonClicked')).
Implementing an Even Bus In React
First, we will define a simple event bus class:
class EventBus {
  constructor() {
    this.listeners = {};
  }

  on(event, callback) {
    if (!this.listeners[event]) {
      this.listeners[event] = [];
    }
    this.listeners[event].push(callback);
  }

  off(event, callback) {
    if (this.listeners[event]) {
      this.listeners[event] = this.listeners[event].filter(
        (listener) => listener !== callback
      );
    }
  }

  emit(event, data) {
    if (this.listeners[event]) {
      this.listeners[event].forEach((listener) => listener(data));
    }
  }
}

const eventBus = new EventBus();
export default eventBus;
This EventBus class allows components to subscribe to events (on), unsubscribe from events (off), and emit events (emit).
A component can publish an event using the emit method:
import React from 'react';
import eventBus from './eventBus';

const Button = () => {
  const handleClick = () => {
    eventBus.emit('buttonClicked', { message: 'Button was clicked!' });
  };

  return <button onClick={handleClick}>Click Me</button>;
};

export default Button;
Another component can subscribe to the event using the on method:
import React, { useEffect, useState } from 'react';
import eventBus from './eventBus';

const MessageDisplay = () => {
  const [message, setMessage] = useState('');

  useEffect(() => {
    const handleButtonClick = (data) => {
      setMessage(data.message);
    };

    eventBus.on('buttonClicked', handleButtonClick);

    return () => {
      eventBus.off('buttonClicked', handleButtonClick);
    };
  }, []);

  return <div>{message}</div>;
};

export default MessageDisplay;
In this example, when the button is clicked, the MessageDisplay component updates its state to show the message emitted by the Button component.

8 Advanced React + TypeScript Patterns Every Developer Should Master
Most React development has evolved far beyond simple component creation. With TypeScript’s powerful type system, we can build more robust, maintainable applications. But are you leveraging the full potential of this combination?
These 8 advanced patterns will elevate your React + TypeScript skills from intermediate to expert level. Each pattern solves real-world problems you will encounter in production applications.
https://medium.com/@genildocs/advanced-typescript-patterns-for-react-forms-3115b34a0784
Why These Patterns Matter
While basic React + TypeScript gets you started, these advanced patterns provide:
Type Safety: Catch errors at compile time, not runtime
Developer Experience: Better Intellisense and refactoring support
Code Maintainability: Self-documenting code that is easier to understand
Performance: Optimizations that scale with your application
Let’s dive into these patterns that separate senior developers from the rest.
Generic Component Props with Constraints
Instead of creating multiple components, use generic constraints to build reusable, flexible components.
interface SelectOption<T> {
  value: T;
  label: string;
  disabled?: boolean;
}

interface SelectProps<T extends string | number> {
  options: SelectOption<T>[];
  value: T;
  onChange: (value: T) => void;
  placeholder?: string;
}

function Select<T extends string | number>({
  options,
  value,
  onChange,
  placeholder
}: SelectProps<T>) {
  return (
    <select
      value={value}
      onChange={(e) => onChange(e.target.value as T)}
    >
      {placeholder && <option value="">{placeholder}</option>}
      {options.map((option) => (
        <option
          key={option.value}
          value={option.value}
          disabled={option.disabled}
        >
          {option.label}
        </option>
      ))}
    </select>
  );
}

// Usage with full type safety
const statusOptions: SelectOption<'active' | 'inactive' | 'pending'>[] = [
  { value: 'active', label: 'Active' },
  { value: 'inactive', label: 'Inactive' },
  { value: 'pending', label: 'Pending' }
];

<Select
  options={statusOptions}
  value={status}
  onChange={setStatus} // Fully typed!
/>
👉Real-world use case: Building a design system where components need to work with different data types while maintaining type safety.
Discriminated Unions for Complex State
Handle complex state scenarios with discriminated unions that make impossible states impossible.
type AsyncState<T, E = Error> =
  | { status: 'idle' }
  | { status: 'loading' }
  | { status: 'success'; data: T }
  | { status: 'error'; error: E };

interface UseAsyncResult<T, E = Error> {
  state: AsyncState<T, E>;
  execute: () => Promise<void>;
  reset: () => void;
}

function useAsync<T, E = Error>(
  asyncFunction: () => Promise<T>
): UseAsyncResult<T, E> {
  const [state, setState] = useState<AsyncState<T, E>>({ status: 'idle' });

  const execute = useCallback(async () => {
    setState({ status: 'loading' });
    try {
      const data = await asyncFunction();
      setState({ status: 'success', data });
    } catch (error) {
      setState({ status: 'error', error: error as E });
    }
  }, [asyncFunction]);

  const reset = useCallback(() => {
    setState({ status: 'idle' });
  }, []);

  return { state, execute, reset };
}

// Usage
function UserProfile({ userId }: { userId: string }) {
  const { state, execute } = useAsync(() => fetchUser(userId));

  // TypeScript knows exactly what properties are available
  return (
    <div>
      {state.status === 'loading' && <div>Loading...</div>}
      {state.status === 'error' && <div>Error: {state.error.message}</div>}
      {state.status === 'success' && <div>Hello, {state.data.name}!</div>}
      <button onClick={execute}>Load User</button>
    </div>
  );
}
👉 Real-world use case: Managing API calls, form submissions, or any async operations where you need to handle multiple states cleanly.
Higher-Order Component with Proper Typescript
Create HOCs that preserve component props and add functionality without losing type information:
type WithLoadingProps = {
  isLoading: boolean;
};

function withLoading<T extends WithLoadingProps>(
  WrappedComponent: React.ComponentType<T>
) {
  return function WithLoadingComponent(props: T) {
    if (props.isLoading) {
      return (
        <div className="loading-spinner">
          <div>Loading...</div>
        </div>
      );
    }

    return <WrappedComponent {...props} />;
  };
}

// Usage
interface UserListProps extends WithLoadingProps {
  users: User[];
  onUserClick: (user: User) => void;
}

const UserList: React.FC<UserListProps> = ({ users, onUserClick }) => (
  <div>
    {users.map(user => (
      <div key={user.id} onClick={() => onUserClick(user)}>
        {user.name}
      </div>
    ))}
  </div>
);

const UserListWithLoading = withLoading(UserList);

// All props are properly typed, including the added isLoading
<UserListWithLoading
  users={users}
  onUserClick={handleUserClick}
  isLoading={isLoading}
/>
👉 Real-world use case: Adding cross-cutting concerns like logging, authentication, or loading states to multiple components.
Conditional Props with TypeScript
Create components with mutually exclusive props using conditional types.
type BaseButtonProps = {
  children: React.ReactNode;
  className?: string;
  disabled?: boolean;
};

type ButtonProps = BaseButtonProps & (
  | { variant: 'link'; href: string; onClick?: never }
  | { variant: 'button'; href?: never; onClick: () => void }
);

function Button(props: ButtonProps) {
  if (props.variant === 'link') {
    return (
      <a
        href={props.href}
        className={`btn-link ${props.className || ''}`}
      >
        {props.children}
      </a>
    );
  }

  return (
    <button
      onClick={props.onClick}
      disabled={props.disabled}
      className={`btn ${props.className || ''}`}
    >
      {props.children}
    </button>
  );
}

// TypeScript enforces the correct props based on variant
<Button variant="link" href="/home">Go Home</Button>
<Button variant="button" onClick={handleClick}>Click Me</Button>

// This would cause a TypeScript error:
// <Button variant="link" onClick={handleClick}>Invalid</Button>
👉 Real-world use case: Building flexible UI components that can render as different elements based on props, like buttons that can be links or form elements.
Advanced Ref Forwarding with Generic Components
Properly forward refs in generic components while maintaining type safety.
interface InputProps<T> {
  value: T;
  onChange: (value: T) => void;
  placeholder?: string;
  validator?: (value: T) => string | null;
}

function Input<T extends string | number = string>(
  { value, onChange, placeholder, validator }: InputProps<T>,
  ref: React.ForwardedRef<HTMLInputElement>
) {
  const [error, setError] = useState<string | null>(null);

  const handleChange = (e: React.ChangeEvent<HTMLInputElement>) => {
    const newValue = e.target.value as T;

    if (validator) {
      const validationError = validator(newValue);
      setError(validationError);
    }

    onChange(newValue);
  };

  return (
    <div>
      <input
        ref={ref}
        value={value}
        onChange={handleChange}
        placeholder={placeholder}
      />
      {error && <span className="error">{error}</span>}
    </div>
  );
}

const ForwardedInput = React.forwardRef(Input) as <T extends string | number = string>(
  props: InputProps<T> & { ref?: React.ForwardedRef<HTMLInputElement> }
) => ReturnType<typeof Input>;

// Usage with full type safety and ref forwarding
const emailRef = useRef<HTMLInputElement>(null);

<ForwardedInput
  ref={emailRef}
  value={email}
  onChange={setEmail}
  validator={(value) => value.includes('@') ? null : 'Invalid email'}
/>
👉 Real-world use case: Building form libraries or input components that need to expose imperative APIs while maintaining generic type safety.
Context with Reducer Pattern
Combine Context API with useReducer for complex state management with full type safety.
interface User {
  id: string;
  name: string;
  email: string;
}

type UserState = {
  users: User[];
  selectedUser: User | null;
  isLoading: boolean;
  error: string | null;
};

type UserAction =
  | { type: 'FETCH_USERS_START' }
  | { type: 'FETCH_USERS_SUCCESS'; payload: User[] }
  | { type: 'FETCH_USERS_ERROR'; payload: string }
  | { type: 'SELECT_USER'; payload: User }
  | { type: 'CLEAR_SELECTION' };

const initialState: UserState = {
  users: [],
  selectedUser: null,
  isLoading: false,
  error: null,
};

function userReducer(state: UserState, action: UserAction): UserState {
  switch (action.type) {
    case 'FETCH_USERS_START':
      return { ...state, isLoading: true, error: null };

    case 'FETCH_USERS_SUCCESS':
      return {
        ...state,
        users: action.payload,
        isLoading: false
      };

    case 'FETCH_USERS_ERROR':
      return {
        ...state,
        error: action.payload,
        isLoading: false
      };

    case 'SELECT_USER':
      return { ...state, selectedUser: action.payload };

    case 'CLEAR_SELECTION':
      return { ...state, selectedUser: null };

    default:
      return state;
  }
}

interface UserContextType {
  state: UserState;
  dispatch: React.Dispatch<UserAction>;
}

const UserContext = React.createContext<UserContextType | null>(null);

export function UserProvider({ children }: { children: React.ReactNode }) {
  const [state, dispatch] = useReducer(userReducer, initialState);

  return (
    <UserContext.Provider value={{ state, dispatch }}>
      {children}
    </UserContext.Provider>
  );
}

export function useUserContext() {
  const context = useContext(UserContext);
  if (!context) {
    throw new Error('useUserContext must be used within UserProvider');
  }
  return context;
}
👉 Real-world use case: Managing complex application state that involves multiple related pieces of data and actions, like user management, shopping carts, or dashboard states.
Type-Safe Event Handlers
Create event handlers that are fully type-safe and prevent common runtime errors.
interface FormData {
  email: string;
  password: string;
  rememberMe: boolean;
}

type FormFieldName = keyof FormData;

interface UseFormReturn<T> {
  values: T;
  errors: Partial<Record<keyof T, string>>;
  handleChange: <K extends keyof T>(
    field: K
  ) => (event: React.ChangeEvent<HTMLInputElement>) => void;
  handleSubmit: (
    onSubmit: (values: T) => void | Promise<void>
  ) => (event: React.FormEvent) => void;
  setFieldError: (field: keyof T, error: string) => void;
}

function useForm<T extends Record<string, any>>(
  initialValues: T,
  validators?: Partial<Record<keyof T, (value: T[keyof T]) => string | null>>
): UseFormReturn<T> {
  const [values, setValues] = useState<T>(initialValues);
  const [errors, setErrors] = useState<Partial<Record<keyof T, string>>>({});

  const handleChange = useCallback(<K extends keyof T>(field: K) =>
    (event: React.ChangeEvent<HTMLInputElement>) => {
      const value = event.target.type === 'checkbox'
        ? event.target.checked
        : event.target.value;

      setValues(prev => ({ ...prev, [field]: value }));

      // Clear error when user starts typing
      if (errors[field]) {
        setErrors(prev => ({ ...prev, [field]: undefined }));
      }

      // Run validation if provided
      if (validators?.[field]) {
        const error = validators[field]!(value as T[K]);
        if (error) {
          setErrors(prev => ({ ...prev, [field]: error }));
        }
      }
    }, [errors, validators]);

  const handleSubmit = useCallback(
    (onSubmit: (values: T) => void | Promise<void>) =>
      (event: React.FormEvent) => {
        event.preventDefault();

        // Validate all fields
        const newErrors: Partial<Record<keyof T, string>> = {};
        let hasErrors = false;

        if (validators) {
          for (const [field, validator] of Object.entries(validators)) {
            const error = validator(values[field as keyof T]);
            if (error) {
              newErrors[field as keyof T] = error;
              hasErrors = true;
            }
          }
        }

        setErrors(newErrors);

        if (!hasErrors) {
          onSubmit(values);
        }
      }, [values, validators]);

  const setFieldError = useCallback((field: keyof T, error: string) => {
    setErrors(prev => ({ ...prev, [field]: error }));
  }, []);

  return { values, errors, handleChange, handleSubmit, setFieldError };
}

// Usage
function LoginForm() {
  const { values, errors, handleChange, handleSubmit } = useForm<FormData>(
    { email: '', password: '', rememberMe: false },
    {
      email: (value) => value.includes('@') ? null : 'Invalid email',
      password: (value) => value.length >= 8 ? null : 'Password too short'
    }
  );

  return (
    <form onSubmit={handleSubmit(handleLogin)}>
      <input
        type="email"
        value={values.email}
        onChange={handleChange('email')}
        placeholder="Email"
      />
      {errors.email && <span>{errors.email}</span>}

      <input
        type="password"
        value={values.password}
        onChange={handleChange('password')}
        placeholder="Password"
      />
      {errors.password && <span>{errors.password}</span>}

      <label>
        <input
          type="checkbox"
          checked={values.rememberMe}
          onChange={handleChange('rememberMe')}
        />
        Remember me
      </label>

      <button type="submit">Login</button>
    </form>
  );
}
👉 Real-world use case: Building robust forms with validation, error handling, and type safety across complex form structures.
Render Props with TypeScript Generics
Create flexible, reusable components using the render props pattern with full type safety.
interface DataFetcherProps<T, E = Error> {
  url: string;
  children: (state: {
    data: T | null;
    loading: boolean;
    error: E | null;
    refetch: () => void;
  }) => React.ReactNode;
  transform?: (data: any) => T;
}

function DataFetcher<T, E = Error>({
  url,
  children,
  transform
}: DataFetcherProps<T, E>) {
  const [data, setData] = useState<T | null>(null);
  const [loading, setLoading] = useState(true);
  const [error, setError] = useState<E | null>(null);

  const fetchData = useCallback(async () => {
    setLoading(true);
    setError(null);

    try {
      const response = await fetch(url);
      if (!response.ok) {
        throw new Error(`HTTP error! status: ${response.status}`);
      }

      const rawData = await response.json();
      const transformedData = transform ? transform(rawData) : rawData;
      setData(transformedData);
    } catch (err) {
      setError(err as E);
    } finally {
      setLoading(false);
    }
  }, [url, transform]);

  useEffect(() => {
    fetchData();
  }, [fetchData]);

  return <>{children({ data, loading, error, refetch: fetchData })}</>;
}

// Usage with different data types
interface User {
  id: number;
  name: string;
  email: string;
}

function UserList() {
  return (
    <DataFetcher<User[]>
      url="/api/users"
      transform={(data) => data.users}
    >
      {({ data, loading, error, refetch }) => {
        if (loading) return <div>Loading users...</div>;
        if (error) return <div>Error: {error.message}</div>;
        if (!data) return <div>No users found</div>;

        return (
          <div>
            <button onClick={refetch}>Refresh</button>
            {data.map(user => (
              <div key={user.id}>
                <h3>{user.name}</h3>
                <p>{user.email}</p>
              </div>
            ))}
          </div>
        );
      }}
    </DataFetcher>
  );
}
👉 Real-world use case: Creating reusable data fetching components, virtualization, or any scenario where you need to share logic but allow flexible rendering.
Key Takeaways
These patterns represent the evolution of React + TypeScript development:
Generic Components — Build once, use everywhere with type safety
Discriminated Unions — Make impossible states impossible
Proper HOCs — Add functionality without losing type information
Conditional Props — Enforce correct prop combinations
Advanced Refs — Maintain imperative APIs with type safety
Context + Reducer — Scale state management systematically
Type-Safe Events — Prevent runtime errors with compile-time checks
Render Props — Share logic flexibly while maintaining types
I Will Reject Your Pull Request If You Violate These Design Principles
After reviewing hundreds of PRs and rejecting a good bunch, I went hunting for universal rules to prevent code complexity.
Like most developers, this has been a learning journey — I have written my share of messy modules, too. But understanding core design principles could have saved me from constly mistakes.
Here’s the fundamental truth: Good software design minimizes complexity. But to fight complexity, we first need to understand our enemy.
Complexity: The Enemy of Software Systems
To design clean modules, we first need to understand the complexity’s nature.
Complexity doesn’t emerge from a single bad decision. Instead, it grows gradually over time — like a slow-spreading disease — unless we are actively fighting against it.
In software development, complexity is a natural byproduct that accumulates when left unchecked. Just as gardeners regularly prune plants to prevent overgrowth, we must continually refactor and simplify our code to keep complexity at bay.
Here’s a useful definition from a Philosophy of Software Design:

A system’s complexity equals the sum of its parts’ complexity, weighted by how developers interact with them.
In simpler terms: The code we touch most contributes most to our complexity burden.
The complexity of the problem is the sum of the complexities of its individual parts, weighted by how frequently those parts are interacted with by developers. In other words, parts of a system that are worked on more often contribute more to the overall complexity.
This leads to a key insight:
Isolating complexity in rarely-visited code is nearly as effective as eliminating it entirely.
Go For Deep Modules and Hide Complexity
When designing modules, focus on two core objectives:
Contain complexity within the module
Create interfaces that are intuitive for other developers
Here’s how to achieve this through deep module design:
Hide complexity: A well-designed module acts like a black box — messy details stay hidden behind the simple interface. The more complexity it conceals, the more valuable it becomes.
Aim for Depth: Deep modules act like icebergs — what you see (the interface) is small and simple, while the power functionality remains hidden beneath the surface. The maximize capability while minimizing cognitive load for users.
Avoid Shallow Modules: Shallow modules expose too many implementation details, forcing users to understand internal workings and increasing system complexity.
Minimize Dependencies: By isolating implementation details, deep modules allow internal changes without system-wide impacts, dramatically reducing maintenance costs.
Invest in Design: While creating deep modules requires more upfront efforts, the long-term payoff in maintainability and scalability makes it worthwhile.
This approach overturns a common misconception: smaller modules aren’t inherently better. Instead, focus on modules that effectively hide complexity while delivering robust functionality.
During my three years at Cresta, I faced a perfect storm of complexity:
Limited engineering forced us to outsource a critical frontend project
The external team builds a complex multi-layer drag-and-drop form
When we bought development in-house, I inherited the cleanup effort
This experience became a masterclass in what not to do. Before we analyze the design flaws, here’s a simplified view of what we were doing.

Here’s how the system worked:
Block Combination: Users could combine different blocks using logical operators (AND/OR)
Block Management: Clicking the blue “+“ button revealed a UI for selecting existing blocks or creating new blocks.
Block Composition: Each block contained a set of input fields for user data
Relationship Control: Clicking the yellow squares allowed users to modify logical relationships between blocks
🛑 Bad (shallow) design

When you inspect the code above you should notice following problems:
It exposes too many implementation details (shallow modules)
The main component handles too many responsibilities
State management is scattered and tightly coupled
Position logic is leaked to multiple components
Relationship handling is mixed with UI logic
No clear separation of concerns
Direct manipulation of complex state structures
No abstraction of the underlying data model
Business logic is mixed with presentation logic
Let’s investigate now how we can design it better:
✅ Good design:


The code is longer; however, it is also way better designed than the previous implementation. Now you may ask, why is it better?
Deep Modules:
- Each component and hook has a focused responsibility with a simple interface but complex internal implementation.
Hidden Complexity:
Complex state management is hidden in “useBlockChain“
Block creation logic is encapsulated in “BlockFactory“
Chain operations are isolated in “ChainOperations“
Minimal Dependencies:
Components only depend on their immediate needs
Business logic is separated from UI components
State management is centralized and predictable
Clear Interfaces:
Components expose only what is necessary
State updates are handled through well-defined actions
Complex operations are hidden behind simple method calls
Separation of concerns:
Ui components focus on rendering
Business logic is in separate services
State management is handled by specialized hooks
Maintainable Structure:
Each piece is independently testable
Changes can be made without affecting other parts
New features can be added by extending existing patterns
I Design According To These 4 Principles
When approaching new features, I follow these core principles:
I need to hide information: At the core of good design is information hiding. I need to encapsulate implementation details within modules so that changes to a module’s internals won’t ripple through the system
I need to avoid unnecessary dependencies: When implementation details are exposed, changes create tight coupling across the codebase. I need to ensure modules hide their internal state and logic to make future modifications easier.
I need to centralize and hide complexity: Complexity should live inside modules, not separate across the system. I need to put complexity inward, exposing only simple interfaces to reduce cognitive load for other developers.
I need to enable independent evolution: With hidden internals, modules can evolve independently. I need to design modules so changes in one area don’t break others, reducing maintenance costs and bugs.
When I approach a UI design, my first question is always: “What modules will interact here?“. This mindset naturally applies the four principles we discussed.
Take “User Management“ as an example. My first step is identifying the key modules and their interactions.

In this example, I can think of the following high-level components that will interact with each other.
UserManagement: Manages the state of visible users
FilterBar: Handles filter state (e.g., search queries)
AddUser: Button triggering a user creation modal
UserTable: Displays and manages the user list
UserRow: Represents individual users, includes action buttons in a popover
To design effectively, I need a clear feature description. My options:
Write it myself
Use the product manager’s PRD
Leverage AI (o1 outperforms 4o for this task)
With a description in hand, I turn to Claude for a blueprint:
Hi Claude,

I hope you're having an amazing day! I need your help designing a React feature.
Here's the feature description:
<description>
Please incorporate these components:
<list of components>
Create a high-level blueprint focusing on:
- State flow
- Data flow
- Ideal-world architecture
Claude’s output provides a clean, modular design that aligns with our principles:

While uploading UI screenshots to Claude can generate quick blueprints, complex B2B applications often demand deeper consideration. In these cases, a detaild feature description and throughful upfront design are important for creating maintainable, scalable solutions.
Recently, I’ve found a great value in asking Claude (via Cursor) this specific question:
Take a look at @file_1, @file_2, @file_3.
In an ideal world scenario, how would you design this feature?
This approach helps me:
Evaluate existing feature designs
Identify improvement opportunities
Deepen my understanding of clean design principles
Building Flexible React Components: Common Core, Many Faces
Suppose you have ever found yourself copying or directly cloning an existing component just to give it a different look or behavior. In that case, even though the core logic stays the same, there is a good chance you are missing an opportunity to build it more efficiently. In such cases, using a decomposition pattern can help you create flexible and reusable components that are easier to maintain and scale.
The problem
Let’s say you are working at a fitness studio company, and you get a requirement from the UX team to design a simple item card to display exercises.
1.1 Initial requirements: Name, Image & Meta

Requirement 1: Name, Image & Meta
Very straightforward! A simple solution could look like this:
type TProps = {
  name: string;
  imageUrl: string;
  primaryMuscles: string[];
};
const ExerciseCard = ({ name, imageUrl, primaryMuscles }: TProps) => {
  return (
    <Container>
      <FlexRow>
        <ExerciseImg uri={imageUrl} />
        <FlexColumn>
          <TextTitle>{name}</TextTitle>
          <Gap.Vertical size={5} />
          <FlexColumn>
            {primaryMuscles.map((uniqueName, index) => (
              <TextSmall key={uniqueName}>{uniqueName}</TextSmall>
            ))}
          </FlexColumn>
        </FlexColumn>
      </FlexRow>
    </Container>
  );
};
Voilà! The card is ready, and UX is happy!
And now you’re asked to design a different variant of the card for another screen. New twist:
1.2 Requirements/card-will-have : Name, Image, Meta & Checkbox

Also, it can be

✅ Card now needs: Name, Image, Meta, and a Checkbox*✅ A checkbox can appear either on the **left or right*
Why? Who knows — maybe UX is thinking of left-handed mobile users 😄. So you tweak your component:
type TProps = {
  name: string;
  imageUrl?: string;
  primaryMuscles: string[];
  checkboxPosition: 'left' | 'right' // <------------- checkbox added
};
const ExerciseCard = ({ name, imageUrl, primaryMuscles, checkboxPosition }: TProps) => {
  return (
    <Container>
      <FlexRow>
        {checkboxPosition === 'left' &&
           <CheckBox/>.
        }
        <ExerciseImg uri={imageUrl}/>
        <FlexColumn>
          <TextTitle>{name}</TextTitle>
          <Gap.Vertical size={5} />
          <FlexColumn>
            {primaryMuscles.map((uniqueName, index) => (
              <TextSmall key={uniqueName}>{uniqueName}</TextSmall>
            ))}
          </FlexColumn>
        </FlexColumn>
        {checkboxPosition === 'right' &&
           <CheckBox/>
        }
      </FlexRow>
    </Container>
  );
};
You’re done again… or so you thought.
BUT!!!….. Now you know that there are other new card-variants coming! Where the card can ALSO look like the following:


With our current approach of designing the component, this wouldn’t be too complicated either, and we might end up having something like —
type TProps = {
    name: string;
    imageUrl?: string;
    primaryMuscles: string[];
    checkboxPosition?: 'left' | 'right';
    isShowMetaAfterTitle?: true;
    isShowMetaAtBottom?: true;
    difficulty?: {gain: number, level: number};
}
const ExerciseCard = ({
    name,
    imageUrl,
    primaryMuscles,
    checkboxPosition,
    isShowMetaAfterTitle,
    isShowMetaAtBottom,
    difficulty
 }: TProps) => {
    return (
      <Container>
        <FlexRow>
          {checkboxPosition === 'left' && <CheckBox/>}

          <ExerciseImg uri={imageUrl}/>          <FlexColumn>
            <TextTitle>{name}</TextTitle>
            <Gap.Vertical size={5} />
            {isShowMetaAfterTitle && (
                <FlexColumn>
                    {primaryMuscles.map((uniqueName) => (
                        <TextSmall key={uniqueName}>{uniqueName}</TextSmall>
                    ))}
                </FlexColumn>
            )}
            {!!difficulty &&
                <ExerciseDifficulty value={difficulty}>
            }
          </FlexColumn>          {checkboxPosition === 'right' && <CheckBox/>}
        </FlexRow>

        {isShowMetaAtBottom && (
            <FlexRow>
                <Gap.Vertical size={5} />
                {primaryMuscles.map((uniqueName) => (
                    <TextSmall key={uniqueName}>{uniqueName}</TextSmall>
                ))}
            </FlexRow>
        )}
      </Container>
    );
  };
Wow! By now, you are already seeing a pattern! A potential ugly mess of conditional rendering is brewing.
Now, what if more design variants come in? Which always does!
The checkbox might move again. The meta section might move differently. Image might become optional.
Very soon, your component is about to turn into a monster, which is:
🅧 bloated and ever-growing,
🅧 hard to read,
🅧 hard to test,
🅧 unscalable
🅧 The order elements are strictly defined
🅧 bug-prone.
Solution — We need a better design
There are two clean and scalable paths we could take:
- Option 1: File-Based Variants
Break different card types into different files:
/variants/
├── PlanScreenCard.tsx
├── SearchScreenCard.tsx
├── ImageLessCard.tsx
Pros:
Clear separation of concerns
Smaller components
Easier to test and debug
Cons:
Duplicate Logic
Violate the DRY principle
Common changes have to be applied in multiple files
- Option 2: Use Composition (aka Decomposition)
Instead of splitting into entirely different files, we can:
Decompose the card into reusable building blocks
Compose what you need on the fly - like Lego bricks
Keep a shared foundation (e.g.,
BaseCard)
Let’s see how that works.
Decomposition
We will solve our variant mess with three simple steps (Identifying and organizing the “Partials“, Creating the BaseCard, and finally the variants)
- Step 1: Identifying and Organizing the “Partials“
These are your Lego bricks.
ExerciseImg.tsxCheckbox.tsxContent.tsx
└─Content.Difficulty.tsx
└─Content.Muscles.tsxFooter.tsx
Now, let’s build each of our partial components
First the/partials/Checkbox.tsx
type TProps = {
  onCheck: () => void;
  isChecked: boolean;
  isAnimated: boolean;
};
export const Checkbox = (props: TProps) => {
  const handleCheck = useCallback(() => {
    props.onCheck?.();
  }, [props.onCheck]);  if (isAnimated) {
    <CheckBoxAnimated
      isChecked={props.isChecked}
      onChange={handleCheck}
    />;
  }  return (
    <CheckBox
      isChecked={isChecked}
      onChange={handleCheck}
    />
  );
};
Then the /partials/ExerciseImg.tsx
type TProps = {
  uri: string;
  size: number;
};
export const ExerciseImg = ({ uri, size}: TProps) => {
  const [loading, setLoading] = useState(true);  const { handleImageLoaded, imageUri } = useMemo(
    () => ({
      handleImageLoaded: () => setLoading(false),
      imageUri: { uri },
    }),
    [uri]
  );  return (
    <ImageContainer width={size} height={size}>
      {loading && (
        <Skeleton width={size} height={size} />
      )}
      <StyledImage
        source={imageUri}
        width={size}
        height={size}
        onLoad={handleImageLoaded}
        resizeMode="cover"
      />
    </ImageContainer>
  );
};
Next, the /partials/Footer.tsx
type TProps = {
  primaryMuscles: string[];
};
export const Footer = ({ primaryMuscles}: TProps) => {
  return (
    <CardFooter>
      {primaryMuscles.map((cat, index) => (
        <PrimaryMuscleText key={index}>
          {`${index > 0 ? ", " : "🎯 "}${cat}`}
        </PrimaryMuscleText>
      ))}
    </CardFooter>
  );
};
Notice that the Content.tsx is composed of its own partials i.e. Difficulty.tsxand Muscles.tsx , so lets place them together inside a /partials/Content/* directory.
So before we create the,/partials/Content/Content.tsx lets create its two partials.
The /partials/Content/Difficulty.tsx
type TProps = {
  difficultyLevel: number;
  effectiveLevel: number;
};
export const Difficulty = ({ effectiveLevel, difficultyLevel }: TProps) => {
  return (
    <Container>
      <Level value={difficultyLevel} type="Difficulty" />
      <Level value={effectiveLevel} type="Hypertrophy Stimulus" />
    </Container>
  );
};
And the /partials/Content/Muscles.tsx
type TProps = {
  primaryMuscles: string[];
};
export const Muscles = ({ primaryMuscles }: TProps) => {
  return (
    <Container>
      {primaryMuscles.map((uniqueName) => (
        <TextSmall key={uniqueName}>{uniqueName}</TextSmall>
      ))}
    </Container>
  );
};
And now the exciting part, the /partials/Content/Content.tsx ❤️🔥
type TProps = {
  name: string;
} & PropsWithChildren;
type TPartials = {
  Difficulty: typeof Difficulty;
  Muscles: typeof Muscles;
};export const Content: React.FC<TProps> & TPartials = ({ children, name }) => {
  return (
    <Container>
      <TextTitle>{name}</TextTitle>
      {children}
    </Container>
  );
};
Content.Difficulty = Difficulty;
Content.Muscles = Muscles;
So this Content.tsxis our first compound component 🕺. In short, what’s happening above is —
We are defining a compound React component where
- The Content is the main container.
- The Content.Difficulty and Content.Muscles are named subcomponents.
- They all play together in a consistent layout, with shared styles and logic.
It will start to make even more sense and be clearer when all these building blocks come together to form the final variant in Step 3. But before that, we need to create our BaseCard.tsx in the next step
- Step 2: Creating the
BaseCard
import { Checkbox } from "./partials/Checkbox";
import { Content } from "./partials/Content/Content";
import { ExerciseImg } from "./partials/ExerciseImg";
import { Footer } from "./partials/Footer";
type TPartials = {
  Image: typeof ExerciseImg;
  Checkbox: typeof Checkbox;
  Footer: typeof Footer;
  Content: typeof Content;
};
type TProps = PropsWithChildren;
const BaseCard: React.FC<TProps> & TPartials = ({ children }) => {
  return (
    <Container>
      <FlexRow>{children}</FlexRow>
    </Container>
  );
};
BaseCard.Image = ExerciseImg;
BaseCard.Checkbox = Checkbox;
BaseCard.Footer = Footer;
BaseCard.Content = Content;
Just like the “Content.txt, “ we are creating a magic box where all the partials of the original ExerciseCard will reside.
What are we gaining?
👉 Encapsulation: The BaseCard component knows its parts and how they should behave inside.
👉 Flexibility: You can mix and match the parts inside the component while keeping structure.
👉 Discoverability: Developers know which parts are available via BaseCard. dot notation.
Since I have already briefly touched on what’s happening inside above (while defining the Content.tsx), let us jump right to the FINAL and most exciting part!
- Step 3: Finally, the variants
At this point, we have all the building blocks ready:
├── BaseCard.tsx
├── partials/
│   ├── Checkbox.tsx
│   ├── Content
│   │   ├── Content.tsx
│   │   ├── Difficulty.tsx
│   │   └── Muscles.tsx
│   ├── ExerciseImg.tsx
│   └── Footer.tsx
└── variants/
    ├── PlanScreenCard.tsx <---- Lets create 🚀
Finally, let’s create our first variant. I will name it PlanScreenCard.tsx because, this variant of the ExerciseCard will be used in the PlanScreen of my app.
import React from "react";
import { BaseCard } from "../BaseCard";
type TProps = {
  name: string;
  primaryMuscles: string[];
  imageUrl: string;
};const PlanScreenCard = ({ name, primaryMuscles, imageUrl }: TProps) => {
  return (
    <BaseCard>
      <BaseCard.Image
        uri={imageUrl}
        size={PLAN_SCREEN_CARD_CONST.imageSize}
      />
      <BaseCard.Content name={name}>
        <BaseCard.Content.Muscles primaryMuscles={primaryMuscles} />
      </BaseCard.Content>
    </BaseCard>
  );
};
const PLAN_SCREEN_CARD_CONST = {
  height: 95,
  imageSize: 90
};
export { PlanScreenCard, PLAN_SCREEN_CARD_CONST };
Awesome — we have now embraced composable component architecture here! 💪. We are usingBaseCard as a Lego set with useful bricks (Image, Content, Content.Muscles), and PlanScreenCard as a specific Lego model, we built with it.
Instead of building it from scratch, we are assembling it by composing smaller parts from a reusable base — the BaseCard.
We can optionally house all the variants in one object, like the following, in a file ExerciseCard.tsx
import {
  PLAN_SCREEN_CARD_CONST,
  PlanScreenCard,
} from "./variants/PlanScreenCard";
export const ExerciseCard = {
  PlanScreen: {
    FC: PlanScreenCard,
    Const: PLAN_SCREEN_CARD_CONST,
  },
};
We can now use this variant (let’s say in my PlanScreen) like —
<ExerciseCard.PlanScreen.FC
  name={"Barbell bench press"}
  imageUrl={'./path/to/image.jpg'}
  primaryMuscles={['muscle-1', 'muscle-2']}
/>
Advantages
Flexibility
Clean Separation of Concerns
Reusability
Developer Sanity
Composition > Conditions
Disadvantage
You now have the power to create a Botchling 👾 instead of an Optimus Prime 🤖
In other words, with great flexibility comes great responsibility
Don’t misuse layout freedom
Understand UX logic when placing elements
For example, we definitely don’t want a checkbox sitting between the image and the name. That just doesn’t make sense, at least not to me.
Building React Components: Turning UI Designs into React Components
When you’ve probably seen User Interface Designs, especially if you’re not working alone.
When creating a new page or screen in large companies or organizations, we first receive mockups or wireframes outlining the desired look and feel.
As Senior React Engineers, it’s crucial to translate these mockups into feasible React components and pages so the UI designers and stakeholders are happy.
If you do it right, you increase your impact, and you are seen as the reliable engineer who can get the job done.
The importance of translating UI Designs into React components
You can save your and your team’s time by reusing React components in multiple places.
You will get a more flexible codebase because of the granularity of the components.
Consistent look and feel across different pages
Good reusable components mean a manageable and understandable codebase.
Create a positive impact on the team and on the company
Divide and Conquer
In my experience, I have found the Divide and Conquer technique to work pretty well for breaking down a complex design into reusable React components.
This idea is to divide a large problem, page, or design into smaller parts that are easier to handle.
When it comes to React components, this means creating multiple smaller, self-contained components, each doing one thing well, so you can combine them to create bigger components and pages.
Let’s get more practical and see what this means in the real world and projects.
Translating Component Design into React Components
Let’s begin with the easier job - turning a design of a UI element into a React component.
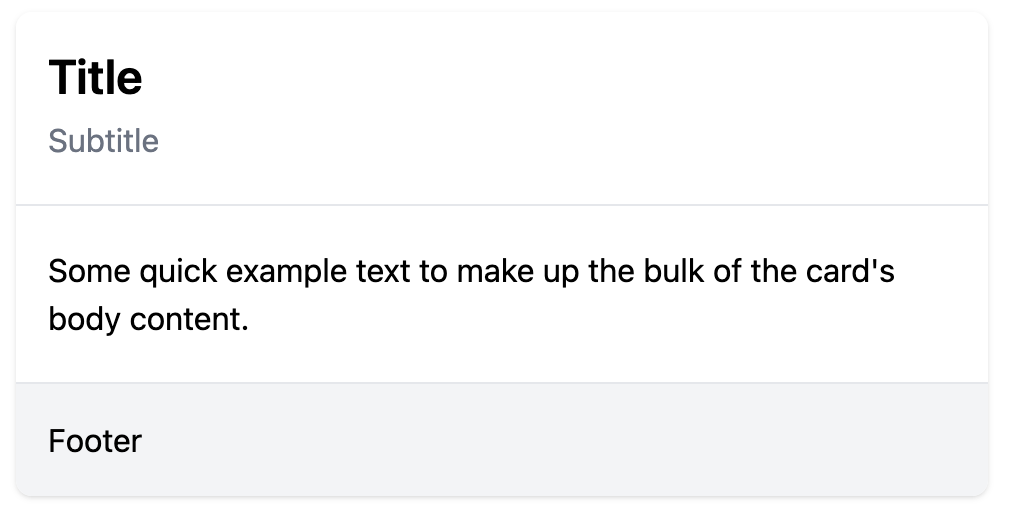
That is an example of a real project I have worked on in the past.
The screenshot illustrates a <Card /> component.
Let’s break it down.
<Card />, <CardHeader />, <CardBody />, and <CardFooter />
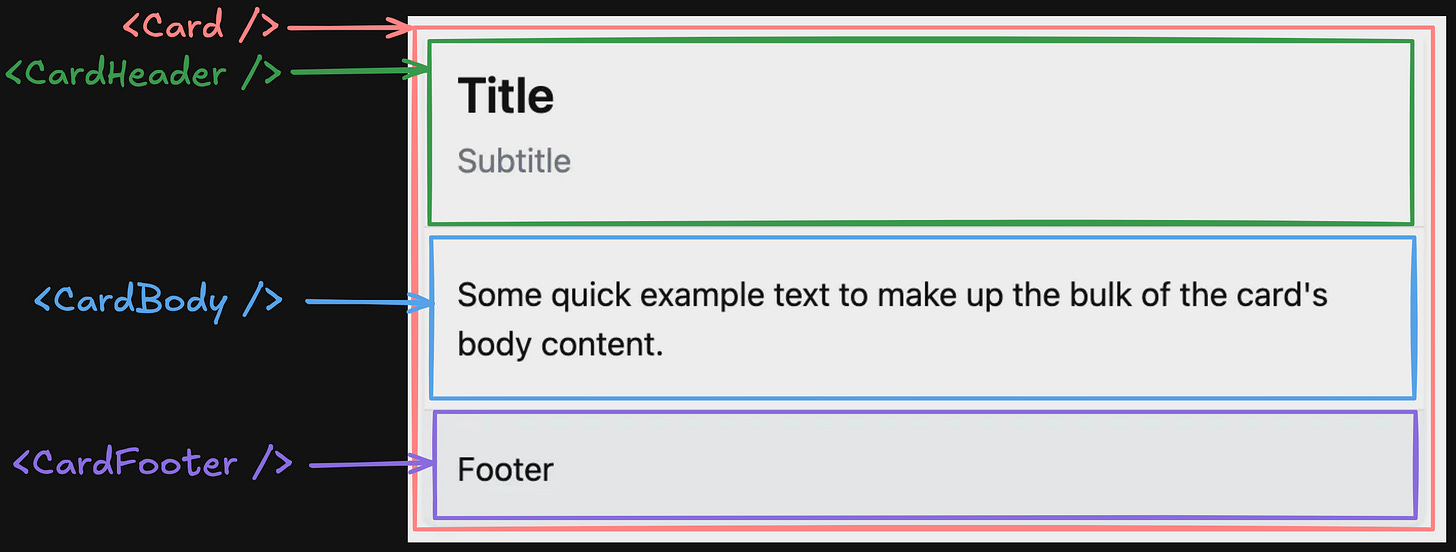
By following the divide and conquer algorithm, we can break down the design into at least 3 main parts - Header, Body, and Footer.
The <Card /> component will contain the other three components and the main styles.
How do I know?
We can’t break it any further, except the Header. So, let’s continue with it.
Breaking <CardHeader/> Into <CardTitle /> and <CardSubtitle />
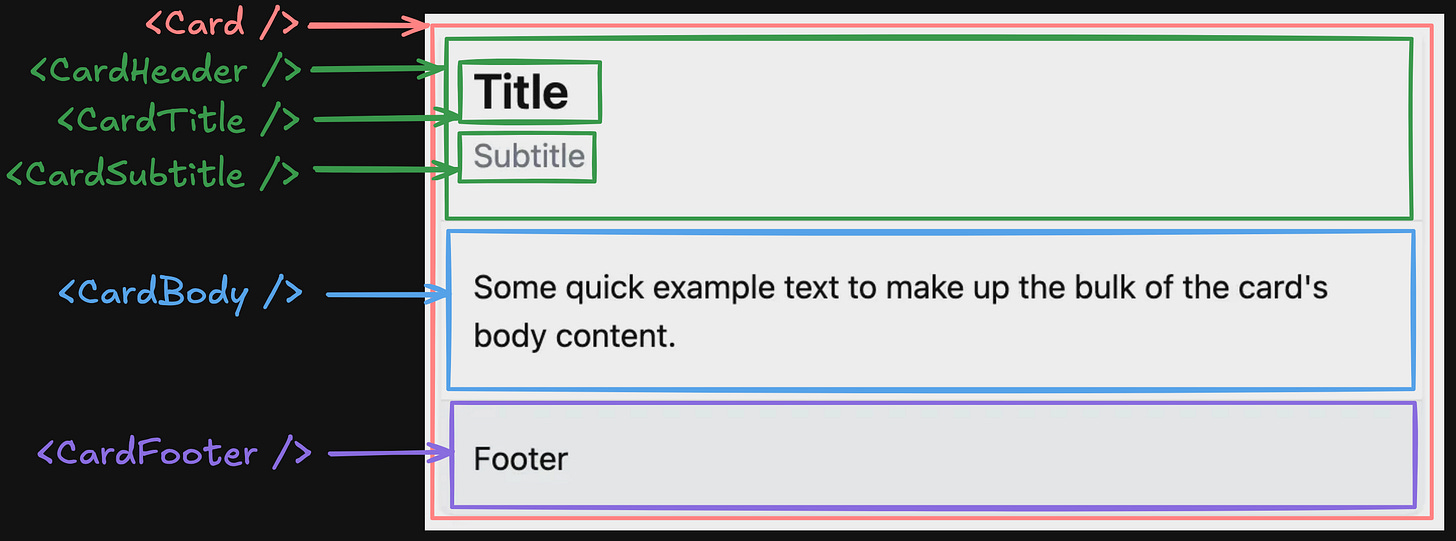
Depending on the design requirements, we might want to clarify whether the Title and Subtitle will always appear together inside the Header, or we might have only the Title.
However, sometimes designers might not be aware of the future use cases and how the design will evolve, so it all depends on our judgment and expertise.
Remember: Embrace Software Entropy
In our case, I decided to split the Title and Header into two components because the additional work of doing it is not a lot, but the benefits are higher.
I get a more flexible Card Header with/without Subtitle for the cost of a few extra lines.
Do we need all components?
The short answer is no, we don’t
However, if we put everything inside one big <Card /> component, we lose flexibility and reusability.
Our component won’t be flexible enough to fulfill other use cases like:
Card without Header
Card without Footer
Card without Subtitle
Card with only Body
etc.
It’s important not to over-engineer the components while making them flexible enough to adapt to the changing requirements.
The balance is thin, so think twice before moving one.
Now, let’s move to a more complex design - the one of a page.
Translating Page Design Into React Components
The approach is the same.
We will break down the page into multiple parts by following the Divide and Conquer principle until we can’t break it further.
The only difference is that we might end up with more reusable components.

Credits: macstadium.com
Start From The Outside to The Inside
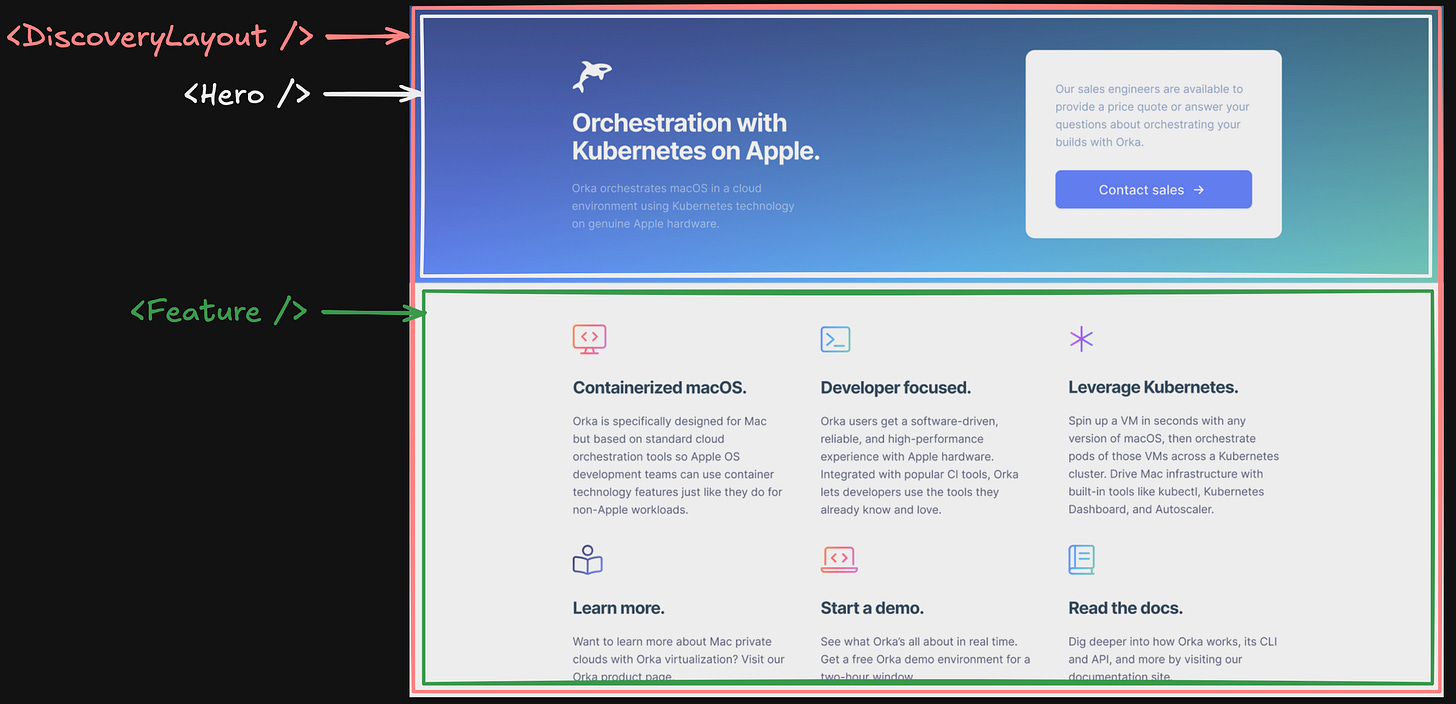
By following the divide and conquer technique, we broke down the page into 3 main parts:
<DiscoveryLayout />, representing the whole page
<Hero />, representing the hero and CTA section
<Feature />, representing the features section
Breaking Down the Hero Section
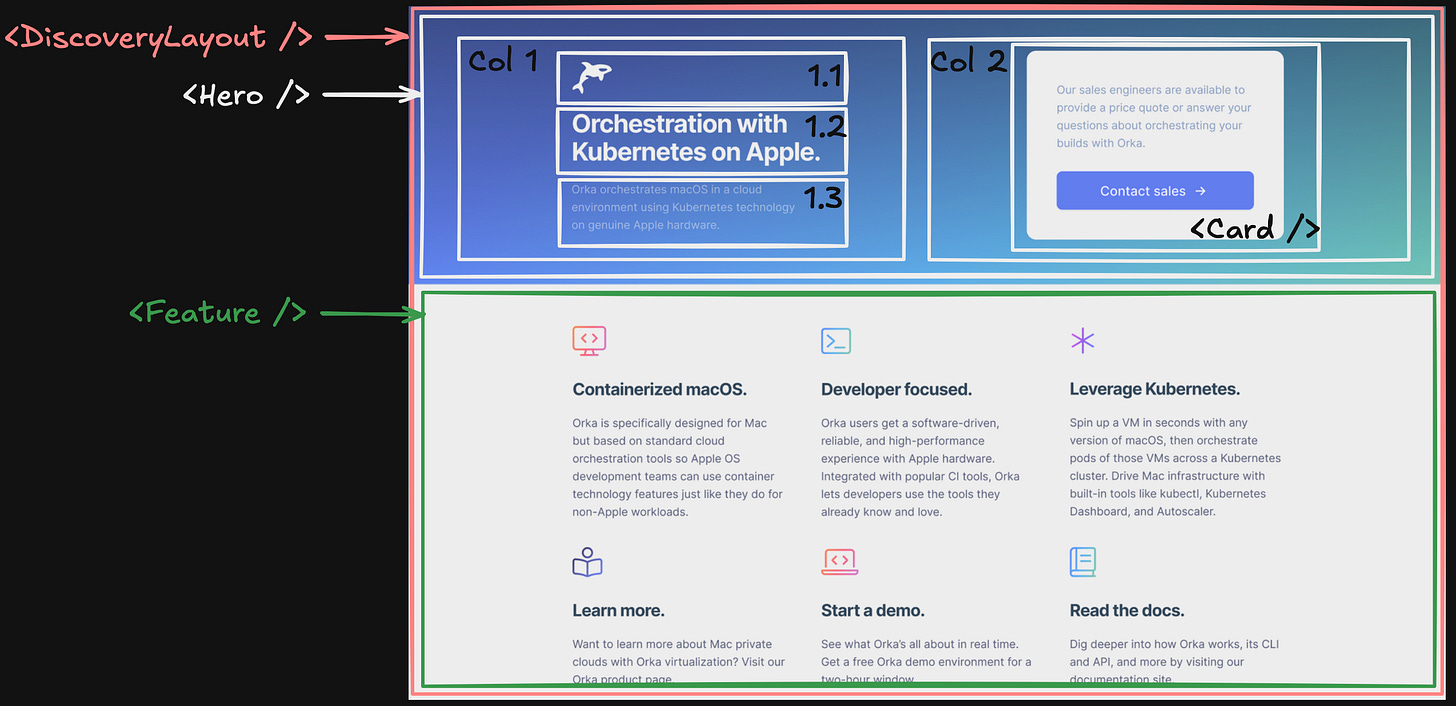
We break the <Hero /> into two columns, so we’re flexible with the responsiveness of the page.
On the left side, column 1, we can split it further into 3 sections.
It’s not necessary to create separate reusable components if they won’t be reused across other pages.
We can only split it semantically, so it’s easier to follow, navigate, and understand the bigger component (<Hero />).
On the right side, column 2, we can reuse the <Card /> component with only the Body.
That’s the beauty of creating multiple reusable components.
We’re flexible enough to tackle different use cases and requirements.
Breaking Down the Feature Section
For this section, we can follow a similar approach.
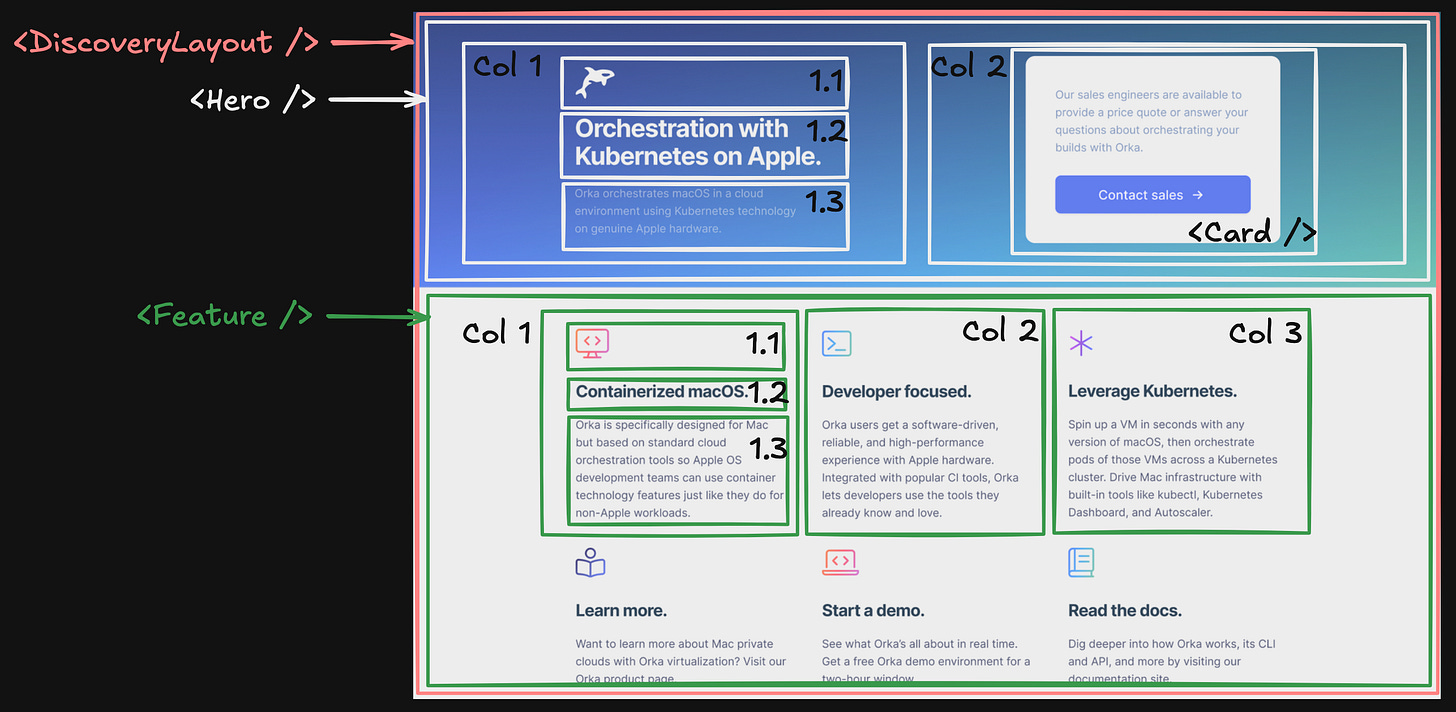
I believe you grasped the idea and the approach
Recap
Being able to translate a UI design into reusable and flexible React components can save your and your’s team time.
Use the Divide and Conquer technique to break down a complex design into smaller pieces.
Start from the outside of the design to the inside of it.
Ask questions to clarify and understand the requirements.
Keep components flexible so you can adapt to the constantly changing requirements and use cases.