🔥 AI Handbook

I am a developer creating open-source projects and writing about web development, side projects, and productivity.
AI Mindset
Tech hiring in the AI era: Why everyone’s at zero
How AI amplifies developers instead of replacing them, and why this is the React moment all over again.
Headlines scream about tech layoffs at Netflix, Amazon, and Microsoft, but what’s happening beneath the surface tells a different story. In this episode, Taylor Desseyn, VP of Global Community at Torc, joins the We Love Open Source podcast to share why tech hiring isn’t actually dead, how AI changes team composition without replacing developers, and why everyone’s on the same playing field when it comes to learning these new tools.
https://www.youtube.com/watch?v=KvflH9NMaiU
Taylor reframes the tech hiring narrative by looking beyond big tech. While FAANG companies (or MANGO, as he’s heard it called now) make layoff headlines, the startup ecosystem is thriving. AI-specific tech startup funding is through the roof. Torc and Randstad are both growing, driven largely by the AI boom. The reality beneath the headlines shows tech hiring evolving, not dying.
AI won’t replace developers, but it will change headcount dynamics. Taylor frames it simply: Think of an engineer as 1.0. With AI tools like Claude or Cursor, that engineer becomes 1.25, 1.5, or even 1.75. A team that previously needed 50 engineers might now need 25 or 20 really good engineers who know how to use AI effectively. It’s not about replacement, it’s about amplification.
For developers worried about AI taking their jobs, Taylor draws a parallel to earlier shifts. He’s been recruiting since 2011, through .NET MVC replacing VB.NET and React’s emergence. AI is the same kind of inflection point. The key insight: Everyone’s at zero right now. Senior, staff, and principal engineers are just getting started with Claude alongside junior developers. It’s a level playing field, but only if you engage.
Key takeaways
Tech hiring is evolving, not dying: Startup ecosystem and AI-specific funding are thriving while big tech layoffs make headlines. Look beneath the surface to see where growth is actually happening.
AI amplifies engineers rather than replacing them: Teams will hire fewer developers but those developers become 1.5x or 1.75x more productive with AI tools. The focus shifts to hiring engineers who know how to use Claude and Cursor effectively.
Everyone’s at zero with AI right now: Senior and junior developers alike are just getting started. Find a mentor, document your learning publicly, and be known for how you’re using AI.
Taylor’s message is clear: This is the React moment for AI. You can ignore it or you can learn it, but everyone who’s learning is starting from the same place. The opportunity is there for developers who take it seriously.
https://allthingsopen.org/articles/tech-hiring-ai-era-everyone-at-zero?ref=dailydev
https://leadershipinchange.com/p/stop-learning-ai-tools
https://substack.com/home/post/p-188178090?source=queue
Most Important AI Concepts
LLMs
https://substack.com/home/post/p-188649002
What is Generative AI?
While today’s generative models are built upon a decade of progress, 2022 was the year when they triggered an “Aha!” moment for most. Generative AI is a subfield of machine learning. It involves training artificial intelligence models on large volumes of real-world data to generate new content (text, images, code, etc.) that resembles human creation.
This may have been a mouthful. Let’s clarify these terms first before we jump into LLMs. Here’s a plain-English map of those first words you’ll see.
AI is the big umbrella: getting computers to do things that look intelligent.
Machine learning (ML) lives inside AI: systems learn from data instead of hard-coded rules.
Deep learning (DL) is a way for computers to learn patterns by practicing on a huge number of examples.
NLP (natural language processing) is the part of AI that works with human language. As simple as that.
Generative AI is the branch that creates new content (text, images, audio, code). Whatever it is, it just means it generates things rather than predicts things, as done with more classical AI systems.
LLMs (Large Language Models) are deep learning models within the generative AI family that specialize in text generation.
That’s all you need for now: AI → ML → DL → (NLP) → LLMs. With the labels straight, we can understand what an LLM actually does.
What is an LLM?
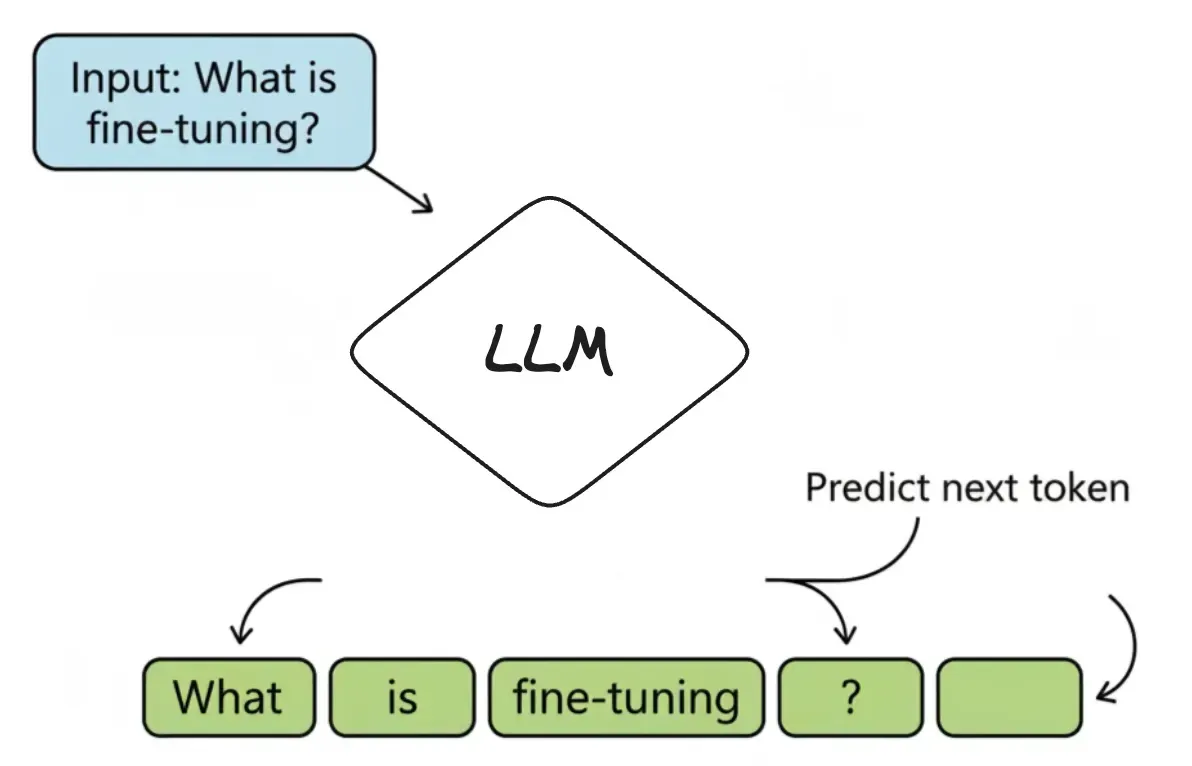
An LLM is a powerful autocomplete system. It’s a machine built to answer one simple question over and over again: “Given this sequence of text, what is the most probable next token?” That “piece of text” is called a token—it can be a word, a part of a word (like runn and ing), or punctuation.
For example, if a user asks ChatGPT, “What is fine-tuning?”, it doesn’t “know” the answer. It just predicts the next token, one at a time:
The most probable first token is “Fine-tuning”.
Given that, the next most probable token is “is”.
Next is “the”, and so on...
Until it generates a full sentence: “Fine-tuning is the process of training a pre-trained model further on a smaller, specific dataset.”
It’s called a Large Language Model for three simple reasons:
Large: It has billions of internal variables (called parameters) and was trained on a massive amount of text.
Language: It’s specialized for understanding and generating human language.
Model: It’s a mathematical representation of the patterns it learned.
So, at its heart, an LLM is just a very advanced guessing machine: predicting the next token again and again until a full answer appears. So, how does it get good at making those guesses in the first place?
To get there, the model undergoes a long study session of its own—a process called pre-training. For example, if a student is asked to read every book in a giant library (a huge slice of the internet, in the case of LLMs). They’re not trying to memorize pages word-for-word. Instead, they learn patterns—how words, sentences, and ideas fit together—well enough to predict the next piece of text in any sentence. This is how a base model like GPT-5 is built during pre-training.
https://newsletter.systemdesign.one/p/llm-concepts?utm_source=publication-search
AI Agents
AI Workflows
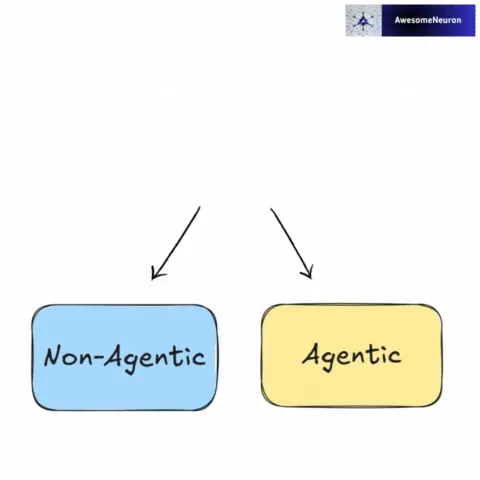
AI workflows can be either non-agentic or agentic.
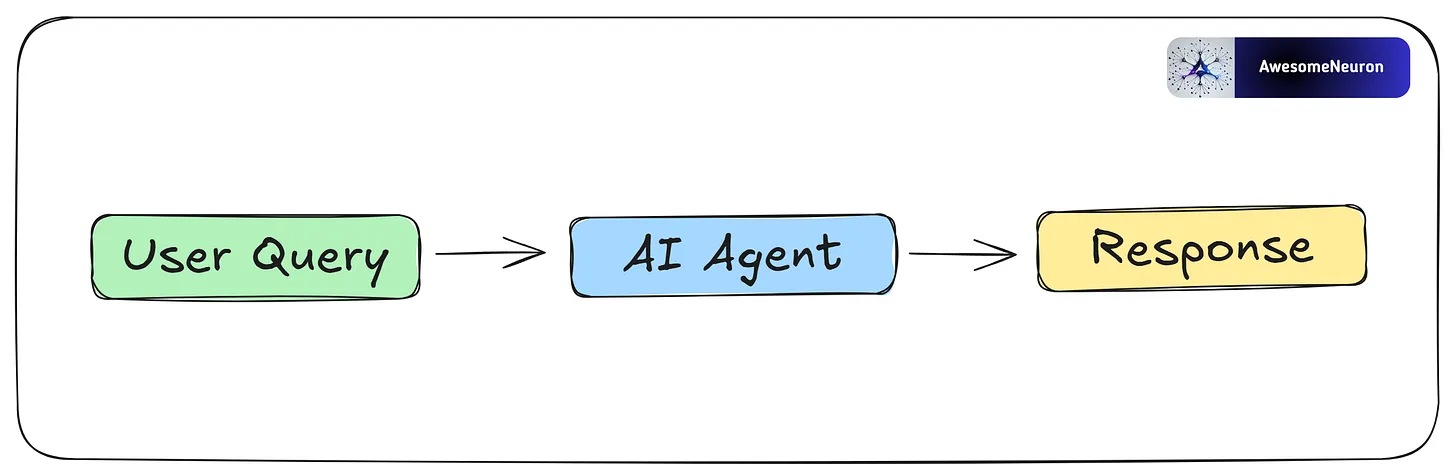
Non-Agentic Workflow: An LLM is given an instruction and produces a response. For example, in a question answering workflow, the input is a question, the LLM generates an answer, and the workflow returns that answer.
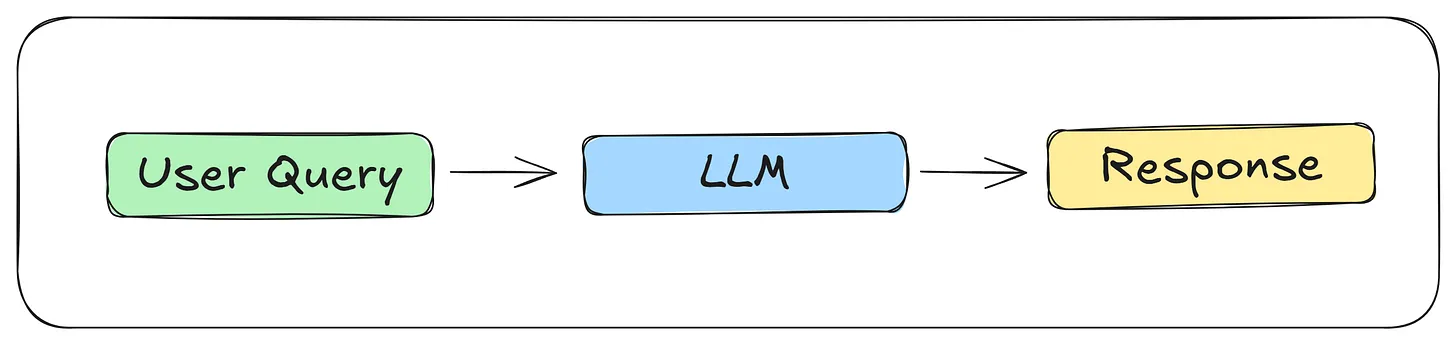
Even if you give the LLM an extra tool, the workflow is still non-agentic if it follows a fixed path and the LLM has no control over decisions or actions.
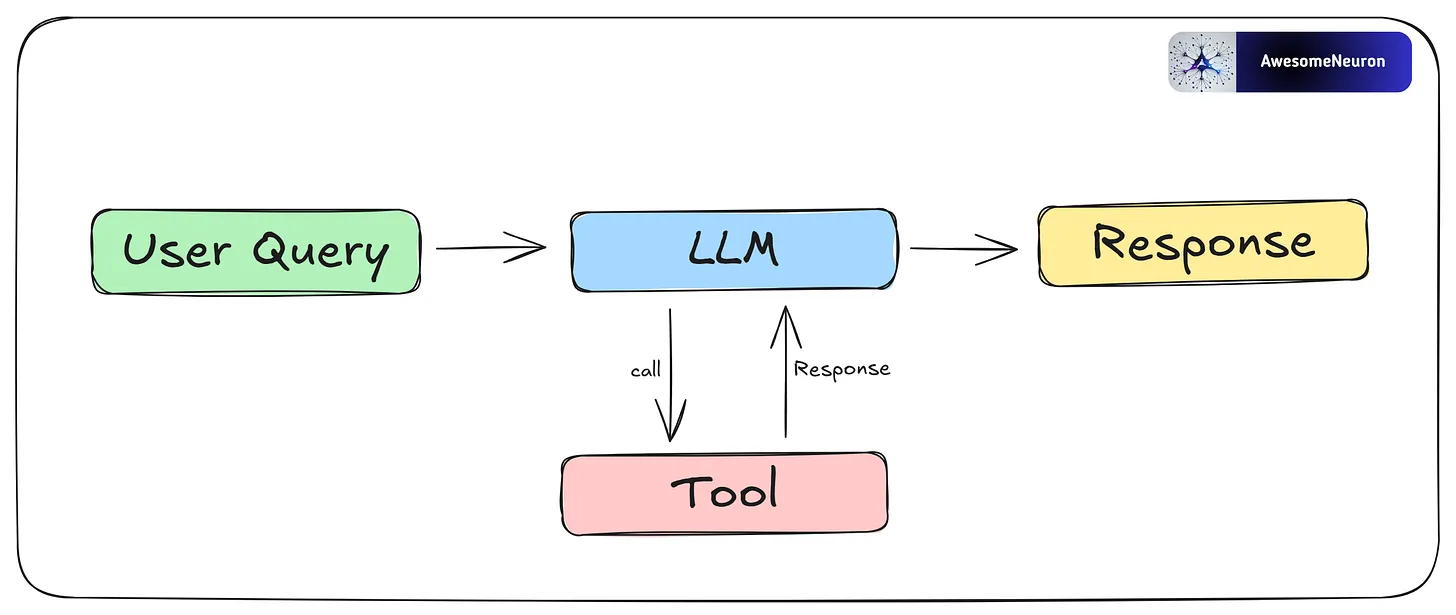
Agentic Workflow: An agentic workflow is a set of connected steps carried out by an agent or multiple agents to complete a task or goal. These workflows use key features of AI agents, such as reasoning, planning, tool use, and memory.
Now let’s take a closer look at AI agents.
AI Agents
AI agents are systems that use LLMs for reasoning and decision-making, along with tools to interact with the real world. This allows them to handle complex tasks with minimal human input. Each agent is given a specific role and a certain level of autonomy to achieve its goal. They also have memory, which helps them learn from past actions and improve over time.
https://newsletter.systemdesign.one/p/ai-agents-explained
https://substack.com/home/post/p-181466313
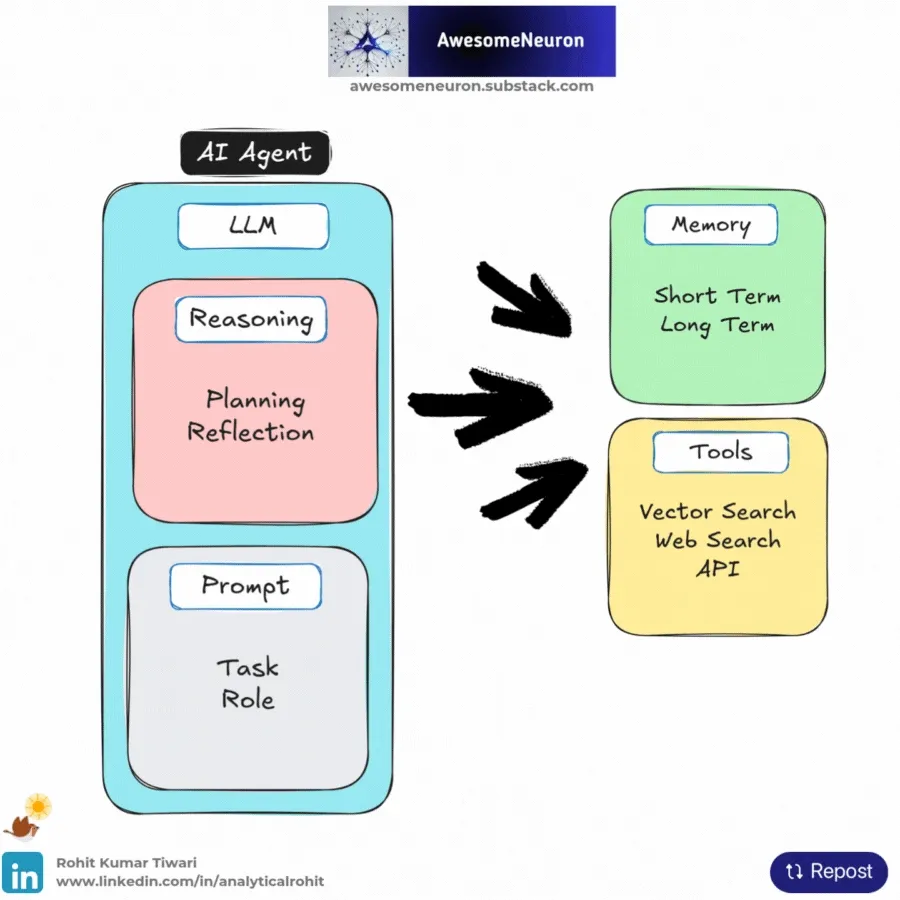
Components of an AI Agent
Reasoning: AI agents work well because they can reason step by step. This ability comes from the LLM (with a defined role and task) and supports two main functions: Planning and reflecting.
Memory: Stores context and relevant information. Short-Term memory tracks the current interaction, while Long-Term memory holds past knowledge and experiences.
Tools (vector search, web search, APIs, etc.): Extends the agent’s abilities beyond text generation, giving it access to external data, real-time information, or APIs.
Agentic Patterns
These patterns enable agents to dynamically adapt, plan, and collaborate, ensuring that the system can handle complex, real-world tasks with precision and scalability.
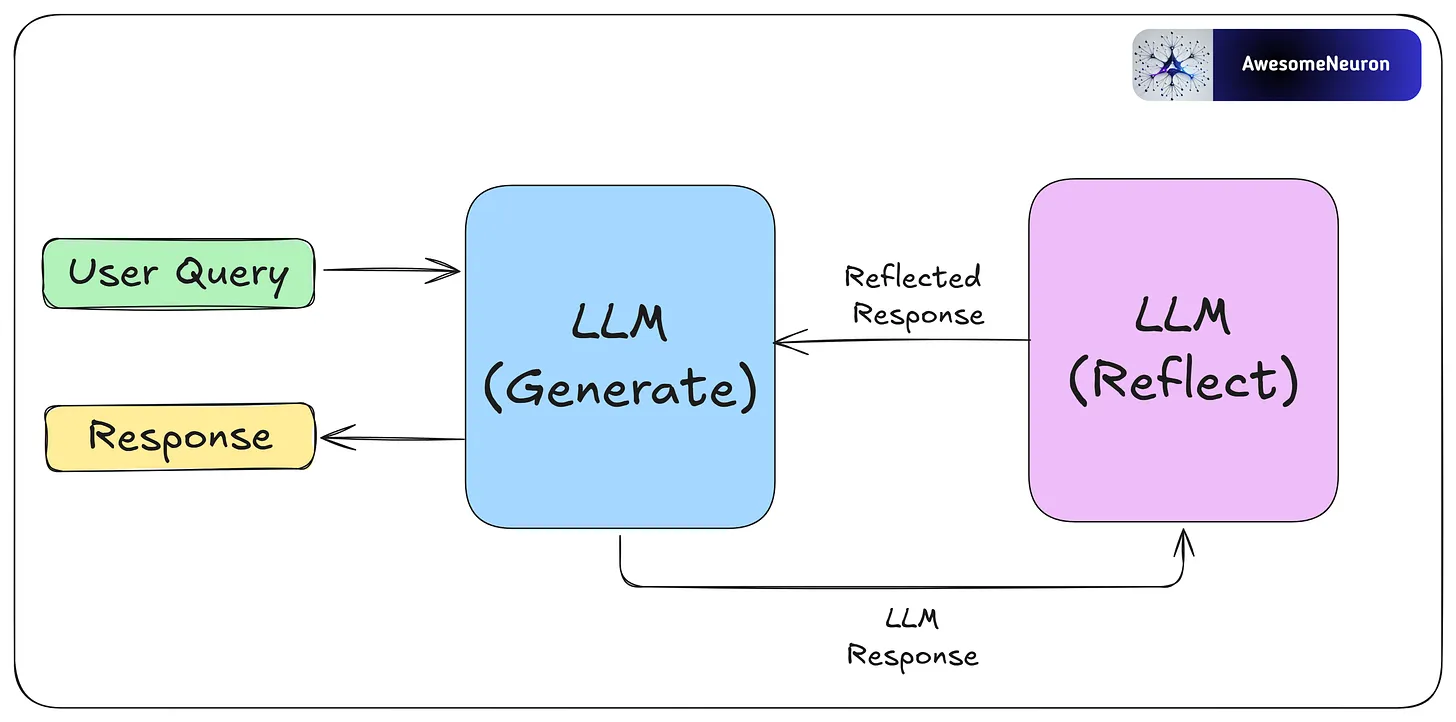
- Reflection
The reflection pattern is a self-feedback mechanism, enabling agents to iteratively evaluate and refine their outputs.
Reflection is especially useful for tasks like coding, where the agent may not succeed right away. For example, it can write code, test it, analyze any errors, and use that feedback to fix and improve the code until it works.
By critiquing its own work and learning from each step, the agent can improve without human help. These reflections can be saved in memory so the agent solves future problems faster and adapts to user needs over time.
- Tool Use
Agents interact with external tools like vector search, APIs, or web search to expand their capabilities.
This pattern allows agents to gather information, perform computations, and manipulate data beyond their pre-trained knowledge. By dynamically integrating tools into workflows, agents can adapt to complex tasks and provide more accurate and contextually relevant outputs.

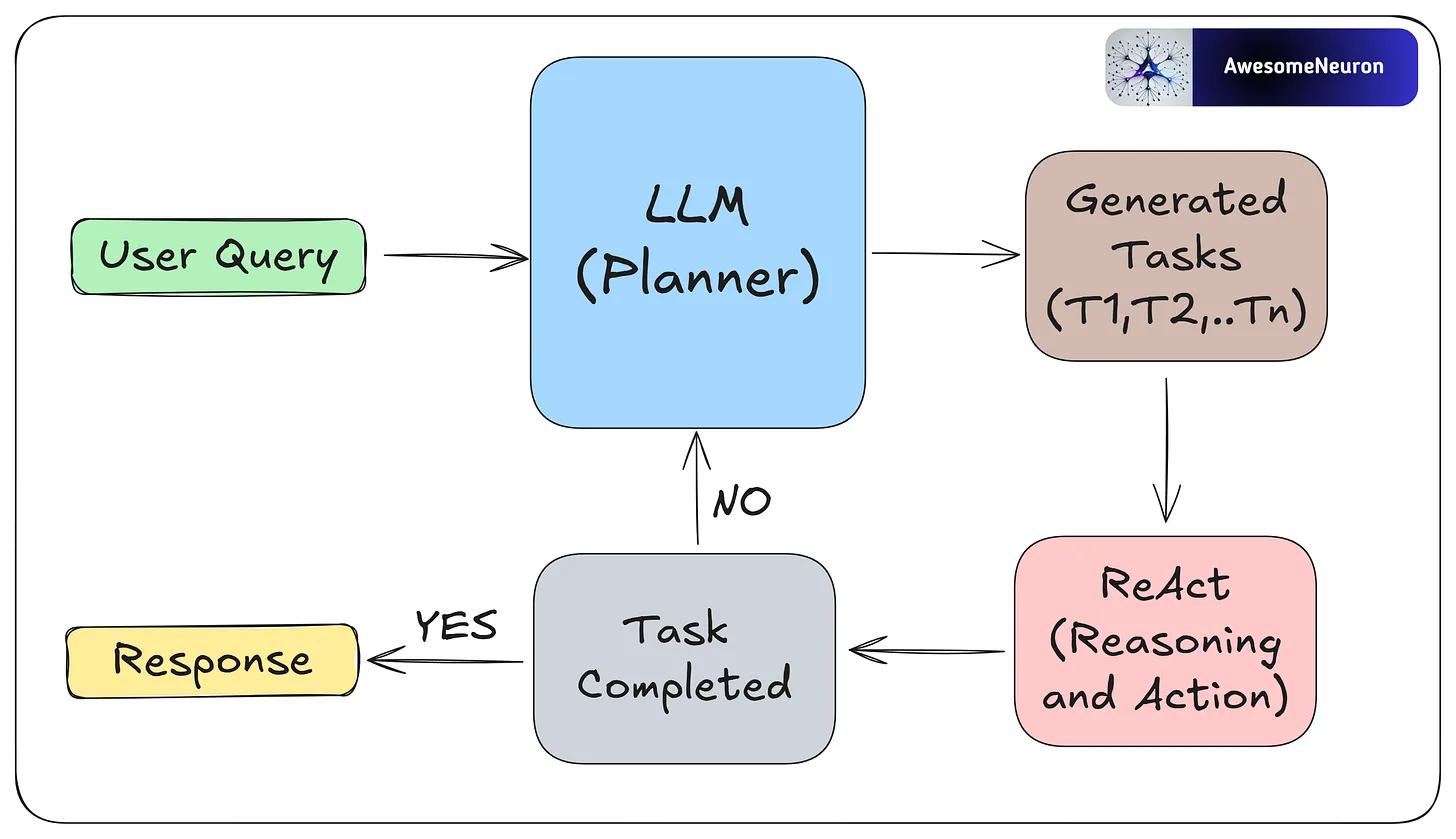
- ReAct
Reflection’s good. Tools are good. But when you let your agent think and act in loops, it gets even better.
That’s what the ReAct pattern is all about: Reasoning + Acting.
Instead of answering everything in one go, the model reasons step-by-step and adjusts its actions as it learns more.
Example:
Goal: “Find the user’s recent invoices.”
Step 1: “Query payments database.”
Step 2: “Hmm, results are outdated. Better ask the user to confirm.”
Step 3: Adjust query, repeat.
It’s not just responding — it’s navigating.
To make ReAct work, you’ll need three things:
Tools (for taking action)
Memory (for keeping context)
A reasoning loop (to track progress)
ReAct makes your agents flexible. Instead of sticking to a rigid script, they think through each step, adapt in real-time, and course-correct as new information comes in.
If you want to build anything beyond a quick one-off answer, this is the pattern you need.
- Planning
Planning is a key agentic pattern that enables agents to autonomously decompose complex tasks into smaller, manageable subtasks.
Planning works best when the path to the goal is unclear and flexibility is important. For example, to fix a software bug, an agent might first read the bug report, find the relevant code, list possible causes, and then choose a debugging method. If the first fix fails, it can adjust based on the new error.
This is useful for solving complex problems that require flexibility and multiple steps.
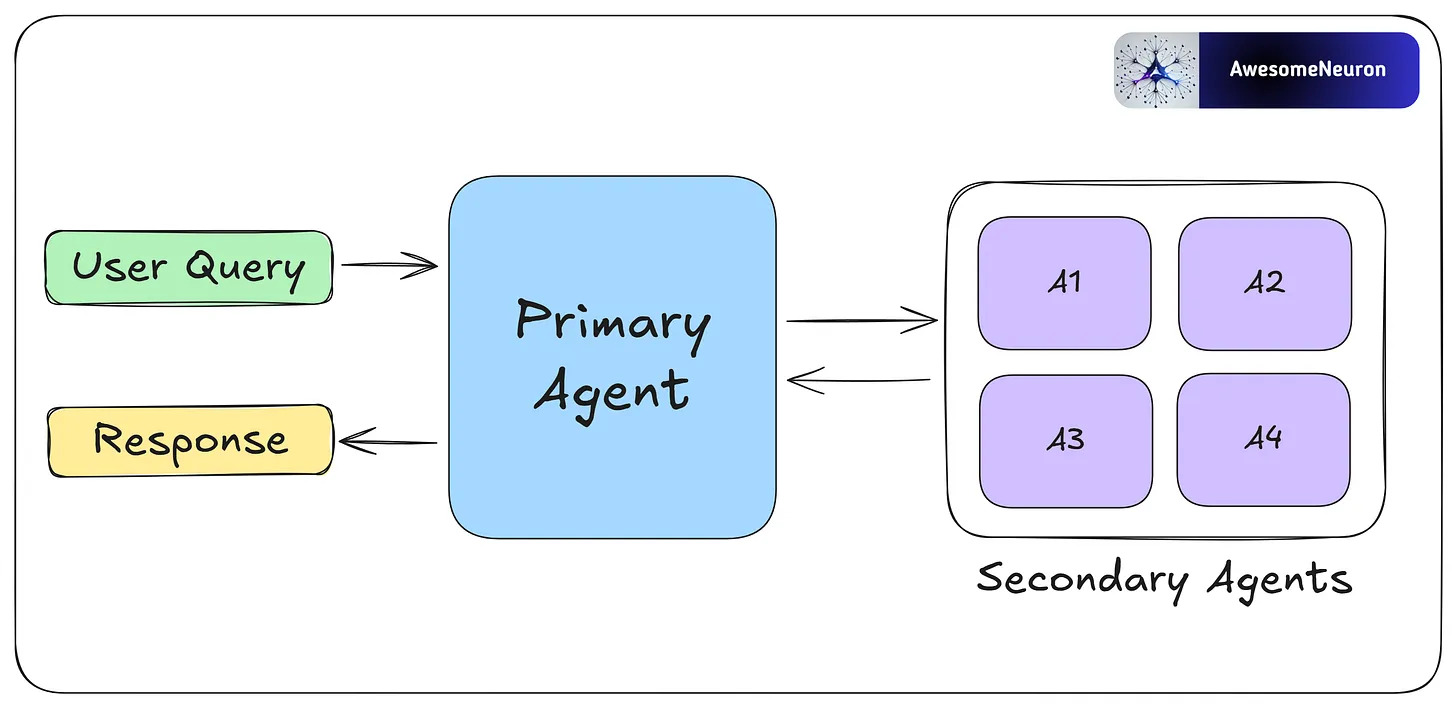
- Multi-Agent
Multi-agent collaboration allows agents to specialize in different tasks and work in parallel. Agents share progress and results to keep the overall workflow efficient and consistent.
By breaking complex tasks into smaller parts and assigning them to different agents, this approach makes workflows more scalable and flexible. Each agent can use its own memory, tools, reflection, or planning, which supports dynamic and collaborative problem-solving.
Benefits of Agentic Workflows
Flexible and adaptable: Agentic workflows adjust to changing tasks and challenges. Unlike rule-based systems, they evolve based on task complexity and can be customized using different patterns.
Efficiency Gains: Agentic workflows can automate repetitive tasks with high accuracy.
Self-correcting and learning: Using feedback and memory, agents refine their actions over time. This leads to better performance with each use.
Better at complex tasks: By breaking complex problems into smaller steps, agents handle complex tasks more effectively.
Challenges of Agentic Workflows
Overkill for simple tasks: AI agents can create extra overhead when used for simple tasks, leading to unnecessary complexity and higher costs.
Less predictable: More autonomy means more unpredictability. Without proper guardrails, agent outputs can become unreliable or hard to control.
Ethical concerns: Not all decisions should be left to AI. Sensitive tasks need human oversight to avoid mistakes or harm.
Agentic workflows are powerful, but they come with extra complexity and computation. Use them only when needed.
Context Engineering vs Prompt Engineering
Prompt Engineering
The “Static Script”.
If you’ve been working with LLMs, you already know Prompt Engineering. It’s the craft of writing effective instructions for a model, and for the past two years, it’s been the primary way developers have tried to improve AI output.
Think of an LLM as a talented improv actor:
Prompt Engineering is the script you hand them before the curtain rises. It defines their character, the scene's tone, and the rules of engagement. A good script can make a significant difference in performance.

The standard developer toolkit for prompt engineering includes:
Role Assignment – Setting the persona with instructions like “You are an expert travel agent.” This primes the model to use vocabulary and behaviors associated with that role.
Few-Shot Examples – Providing input/output pairs demonstrating the exact format you want. For example, showing the model three examples of properly formatted JSON responses before asking it to generate one.
Chain of Thought (CoT) – Instructions like “Let’s think step by step” that encourage the model to show its reasoning. This dramatically reduces errors in logic and math problems by forcing the model to “work through” the problem rather than jumping to an answer.
Constraint Setting – Hard limits on output, like “Limit your response to 50 words,” or “Respond only with valid JSON.”
These techniques are valuable and worth mastering.
But they share a fundamental limitation that becomes apparent when you move from demos to production.
The “Paris, Kentucky” Failure
The limitation of Prompt Engineering is that it is static.
Let’s return to our travel agent. The user says: “Book me a hotel in Paris for the DevOps conference.”
An agent relying only on prompt engineering sees the words “Paris” and “DevOps.” It has no access to external data, so it does what LLMs do when they lack information: it makes a probabilistic guess. There’s a Paris in France, sure, but there’s also a Paris in Kentucky, Texas, Tennessee, and several other states. Without additional context, the model has no way of knowing which one you mean.
The result?
Your user gets booked into the Best Western in Paris, Kentucky.
No amount of clever prompt phrasing can fix this. You could write “Always book hotels in major international cities”—but what about the user who actually wants Paris, Texas? The problem isn’t the prompt. The problem is that the model lacks three critical pieces of information:
User lives in London (suggesting international travel is more likely)
DevOps conference this year is actually in Paris, France
The user’s company policy requires booking Marriott properties under €200/night
This is where the paradigm shifts.
We need to move from optimizing static scripts to dynamically assembling the right information at runtime. We need Context Engineering.
https://andrewships.substack.com/p/prompt-driven-development
https://newsletter.systemdesign.one/p/context-engineering-vs-prompt-engineering
https://addyo.substack.com/p/the-prompt-engineering-playbook-for
https://blog.bytebytego.com/p/a-guide-to-effective-prompt-engineering
What is Context?
https://newsletter.systemdesign.one/p/what-is-context-engineering
https://blog.bytebytego.com/p/a-guide-to-context-engineering-for
Before getting into techniques or frameworks, it helps to be clear about what “context” actually means.
When you send a message to an AI assistant, it doesn’t just see your latest question. It sees the information included with your message, such as system instructions that guide its behavior, relevant parts of the conversation so far, any examples you provide, and sometimes documents or tool outputs.
All of that together is the context.
This matters because the model lacks long-term memory as humans do. It cannot recall past conversations unless that information is included again. Each response is generated solely from the current context.
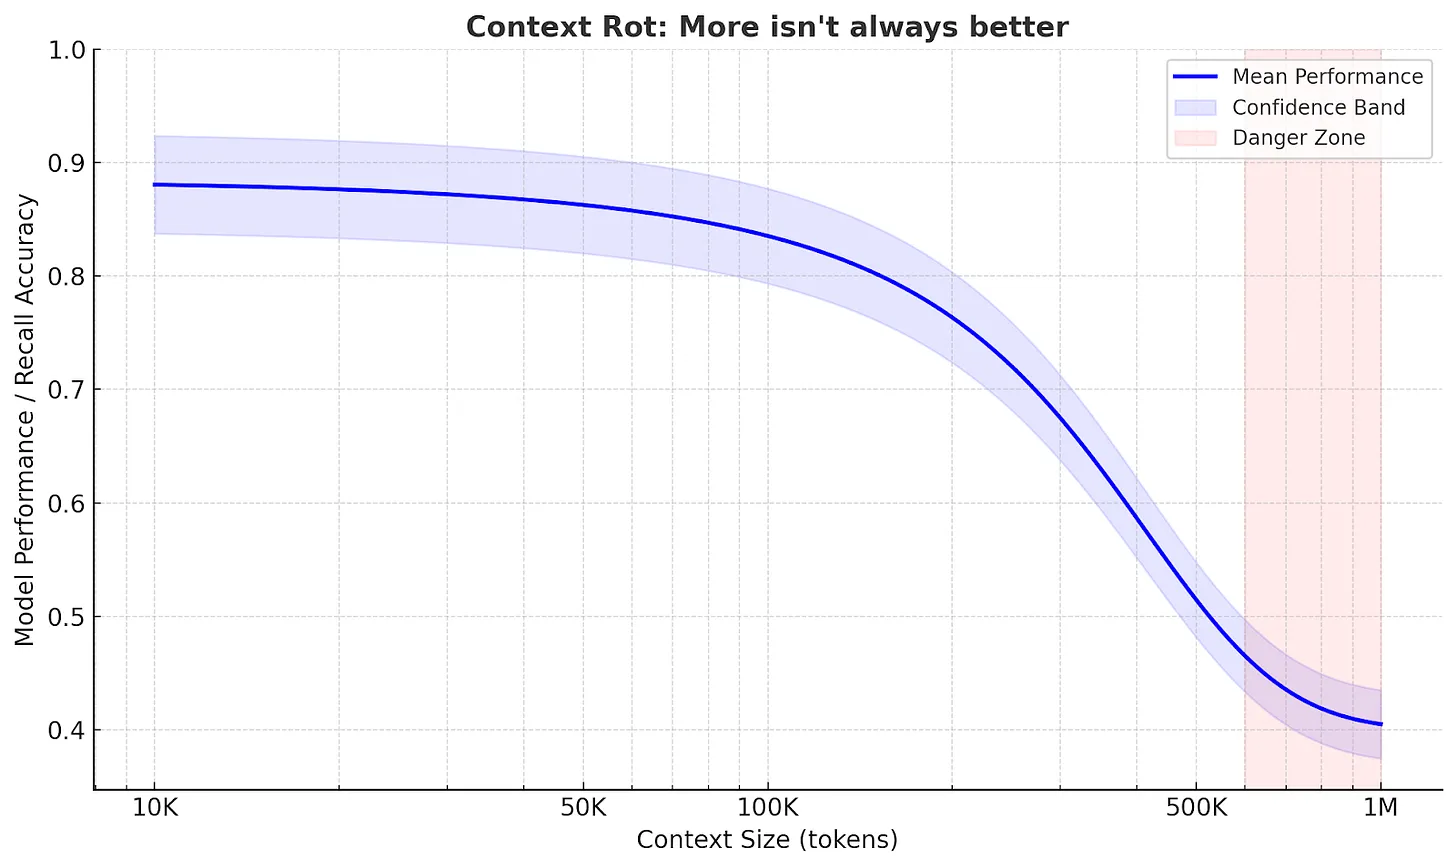
The model can pay attention to only a limited amount of text at once. This limit is often called the context window. Dumping more into that space often makes answers worse, not better.
Context engineering is about managing that working space.
The goal is not to give the model as much information as possible, but to give it the right information at the moment it needs to respond.
Why does this matter for agents?
This becomes more important when the AI is doing more than answering a single question.
A simple chatbot takes your question, replies, and stops. But more advanced AI systems, often called agents, work on tasks that unfold over many steps. They might search for information, read results, summarize what matters, and then decide what to do next.
Each step generates new information that is added to what the model sees next, such as search results, summaries, and intermediate notes. Over time, the context grows, and much of it becomes no longer relevant to the current step. This is called context rot, where useful information gets buried under outdated details.
Agents often work well on focused tasks.
But when a task is broad and requires many steps, the quality can vary. As the context gets heavier, important details from earlier can get lost.
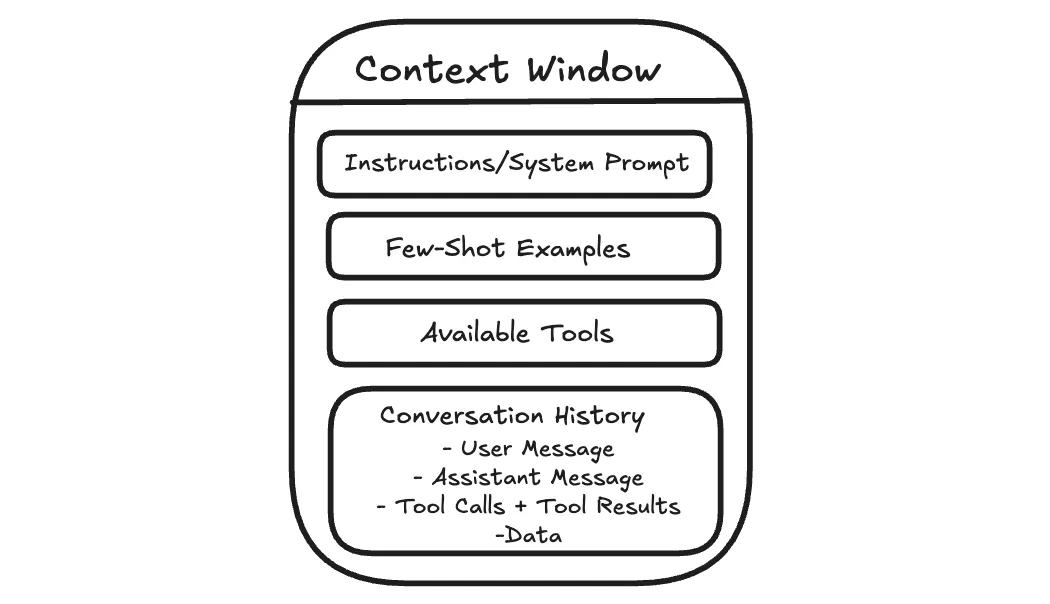
The Anatomy of Context
Understanding what causes context rot is the first step.
The next is knowing exactly what goes into the context window so you can control it.
When an AI generates a response, it is not just reacting to your last message. It is responding to a structured bundle of inputs. Each part plays a different role, but they all compete for the same limited space.
- System Prompt and User Prompt
The system prompt determines the model's overall behavior.
It describes how the assistant should act, the rules it should follow, and the kinds of responses expected.
Most of the time, you do not see the system prompt directly. It’s defined by the product or application you are using. This is why two assistants built on the same underlying model can behave very differently.
For example, ChatGPT tends to answer politely, refuse certain requests, and format responses in predictable ways, even if you never explicitly asked it to do so.
The user prompt is your message.
This includes your current question and, in a chat setting, earlier messages that are still included.
Both are sent to the model together. The system prompt guides behavior, and the user prompt describes what to do right now.
If you are building an AI feature and you control the system prompt, the hard part is balance. If the instructions are too strict, the assistant can become brittle when something unexpected occurs. If they are too vague, responses become inconsistent.
A practical approach is to start minimal, test with real use cases, and add rules only when you see specific failures.
- Examples
Sometimes the clearest way to guide an AI is to show it what you want.
Instead of writing a long list of rules, you can include one or two example inputs and the exact outputs you expect. This is often called few-shot prompting.
You have probably done this in ChatGPT without realizing it. If you say, “Format it like this,” and paste a sample answer, the model will usually follow the pattern.
Examples work because they remove ambiguity. They show tone, structure, and level of detail in a way that instructions often cannot.
The tradeoff is space. Examples take up room in the context window, so they need to earn their spot. A few well-chosen examples are usually better than a long list.
- Message History
In a chat, the model can respond to follow-up questions because earlier messages remain in context.
For example, if you ask ChatGPT, “What is the capital of France?” and then ask, “What is the population?”, it can usually infer you still mean the capital you just discussed.
This works because the conversation so far acts like shared scratch paper. The model does not truly remember the earlier exchange. It is simply reading it again as part of the input.
The problem is that the message history grows over time. As more turns accumulate, older messages take up space even when they are no longer relevant. That can make the model less focused. It may repeat itself, follow outdated assumptions, or miss a detail that matters now.
Managing message history usually means keeping what is still relevant, summarizing what is settled, and letting the rest drop out of the active context.
- Tools
On its own, an LLM can only generate text. Tools let it do more than that.
Tools allow an agent to search the web, read documents, run code, query databases, or interact with external systems. When a tool is used, the result is usually fed back into the context so the model can use it in the next step.
You have seen this in ChatGPT when it searches the web or analyzes a file you uploaded. The output becomes part of what the model sees before it responds.
Tools are powerful, but every tool call adds more text that competes for attention. If a tool returns too much information or in an unclear format, it can overwhelm the model rather than help it.
Good tool design keeps results focused and predictable. Clear names, narrow responsibilities, and concise outputs make it easier for the model to use tools effectively.
- Data
Beyond messages and tools, agents often work with external data.
This can be a document you upload, an article you paste into the chat, or files the system can access. When that information is included, it becomes part of the context.
Large documents do not always behave the way you expect. The model may focus on the wrong section or miss details. This is often a context management problem, not carelessness.
Managing documents usually means breaking them into smaller pieces, pulling in what is relevant to the current step, and leaving the rest out of the active context until needed.
Context Retrieval Strategies
System instructions, examples, tools, and message history are the context in which you can write directly.
But often the most important information is not known in advance. It has to be retrieved during the task.
For example, if you ask ChatGPT a question about a PDF you uploaded, it needs to find the relevant section. If you ask it to search the web, it has to decide what to search for and which results matter.
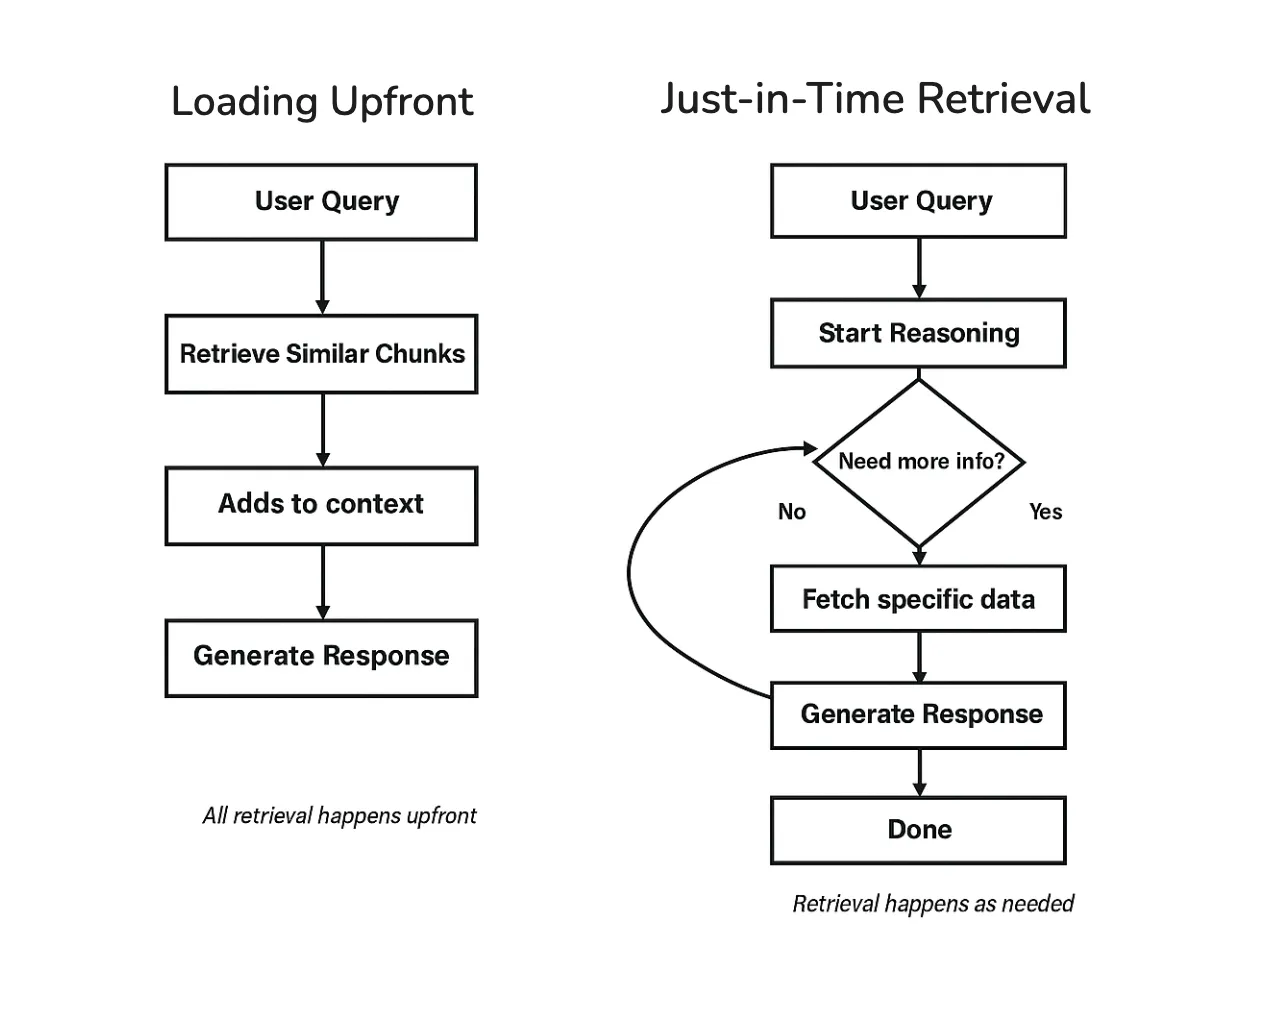
How an agent retrieves and injects information is a major part of context engineering. There are two main approaches: loading everything upfront, or retrieving as you go.
- Loading Upfront
The simplest approach is to retrieve relevant information before the model starts responding, then include it in the context all at once.
This is what happens when ChatGPT searches the web and then writes an answer using the results it just found. The model is not answering from memory. It is answering based on the information that was retrieved and added to its context.
This pattern is commonly called retrieval augmented generation (RAG).
https://newsletter.systemdesign.one/p/how-rag-works
Loading upfront works well when the question is clear, and the agent can predict what information will be useful. The downside is that the agent makes an early retrieval decision and may stick with it.
If something important is missing or the task changes direction, it can be harder to correct course.
- Just-in-Time Retrieval
Another approach is to retrieve information as the task unfolds.
Instead of loading everything at the start, the agent takes a step, looks at what it has learned so far, and retrieves more information only when needed. You can sometimes see this in ChatGPT when it searches, reads, refines the query, and searches again during longer tasks.
This keeps the context cleaner because only the information actually needed gets pulled in. The tradeoff is that it takes more steps and requires the agent to decide when to retrieve and when to stop.
A useful pattern within just-in-time retrieval is to start broad and then drill down. This specification is called Progressive Disclosure.
Rather than loading full documents immediately, the agent may start with short snippets or summaries, identify what looks relevant, and pull in more detail only then.
This is how humans tackle research, too.
You do not read every article in a database. You scan titles, read abstracts of promising ones, and dive deep only into the sources that matter.
- Hybrid Strategy
Fortunately, you don’t have to pick one or the other.
Many agents combine both approaches. They load a small amount of baseline information upfront, then retrieve more as needed.
You can see this in tools like ChatGPT. Some instructions and conversation history are already present, and additional information, such as search results or document excerpts, is pulled in based on what you ask.
For simpler use cases, loading upfront is often enough. As tasks get more complex and span multiple steps, retrieving as you go becomes more important.
The right choice depends on how predictable your agent’s information needs are.
Techniques for Long-Horizon Tasks
Retrieval helps an agent pull in the right information.
But some tasks create a different problem. They run long enough that the agent produces more text than can fit in the context window.
You may have seen this in ChatGPT during long conversations or research tasks. Early responses are clear, but after many steps, the answers can drift or repeat themselves, especially when you send very long instructions, like asking for help with entire code bases. Over a long task, the agent can encounter far more information than it can keep in working memory at once.
Larger context windows are not a complete solution. They can be slower and more expensive, and they still accumulate irrelevant information over time. A better approach is to actively manage what stays in context and preserve the important parts as the task grows.
Three techniques help with this:
compressing the context when it gets full,
keeping external notes,
splitting work across multiple agents.
- Compaction
When the context approaches its limit, one option is to compress what’s there.
The agent summarizes the conversation so far, keeping the essential information and discarding the rest. This compressed summary becomes the new starting point, and the conversation continues from there.
You may have noticed something like this in long ChatGPT conversations. After many messages, earlier details can fade. This often happens because older parts of the conversation are shortened or dropped to make room for new input.
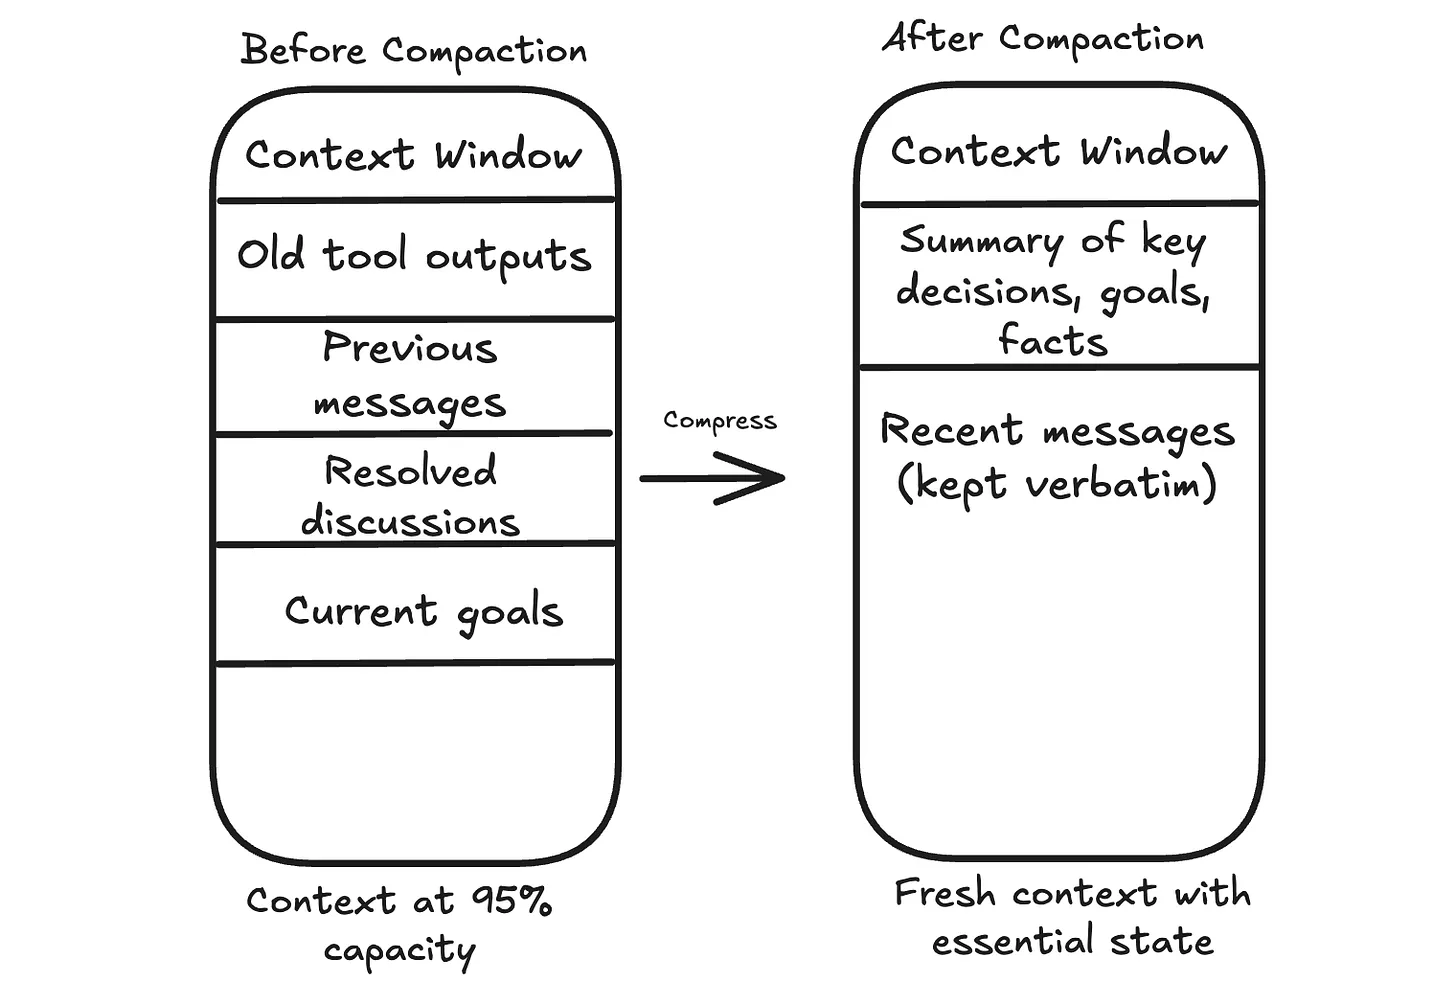
The hard part is deciding what to keep.
The goal, key constraints, open questions, and decisions that affect future steps should stay. Raw tool outputs that have already been used can usually go. Repeated back and forth that does not change the plan can go too.
There is always a risk of losing something that matters later. A common safeguard is to store important details outside the context before discarding them, so the agent can retrieve them if needed.
- Structured Note Taking
Compaction occurs when you’re running out of space. Structured note-taking happens continuously.
As the agent works, it keeps a small set of notes outside the context window. These notes capture stable information, such as the goal, constraints, decisions made so far, and a short list of what remains.
You can see a user-level version of this idea in features like ChatGPT’s memory. If you tell it to remember something, that information can persist beyond a single conversation and be brought back when relevant.
This works well for tasks with checkpoints or tasks that span multiple sessions.
A coding agent might keep a checklist of completed steps. A support assistant might store user preferences so that it does not have to ask the same questions again.
- Sub-Agent Architectures
Sometimes the best approach is to break a large task into pieces and assign each piece to a separate agent with its own context window.
In many research-style agent designs, a main agent coordinates the overall task, while sub-agents handle focused subtasks. A sub-agent explores one area in depth, then returns a short summary. The main agent keeps the summary and moves on without carrying all the raw details forward.
You can think of research features in tools like ChatGPT as an example of the kind of workflow where this pattern is useful.

This works well when subtasks can run independently or require deep exploration.
The tradeoff is complexity. Coordinating multiple agents is harder than managing a single one, so it is usually best to start with simpler techniques and add sub-agents when a single agent becomes overwhelmed.
Choosing the Right Technique
There’s no one-size-fits-all solution. The right approach depends on your “agent and your use case”. These rules of thumb can help:
Compaction works best for long, continuous conversations where context gradually accumulates.
Structured notes work best for tasks with natural checkpoints or when information needs to persist across sessions.
Sub-agents work best when subtasks can run in parallel or require deep, independent exploration.
These techniques can be combined. Start with the simplest approach and add complexity as needed.
Putting It All Together
Context engineering is not a single technique.
It’s an approach to designing AI systems. At each step, you decide what goes into the model’s context, what stays out, and what gets compressed.
The components we covered work together.
System prompts and examples shape behavior. Message history maintains continuity. Tools let the agent take actions. Data gives it information to work with. Retrieval strategies determine how and when that information gets loaded. For long-running tasks, compaction, external notes, and sub-agents help manage context that would otherwise overflow.
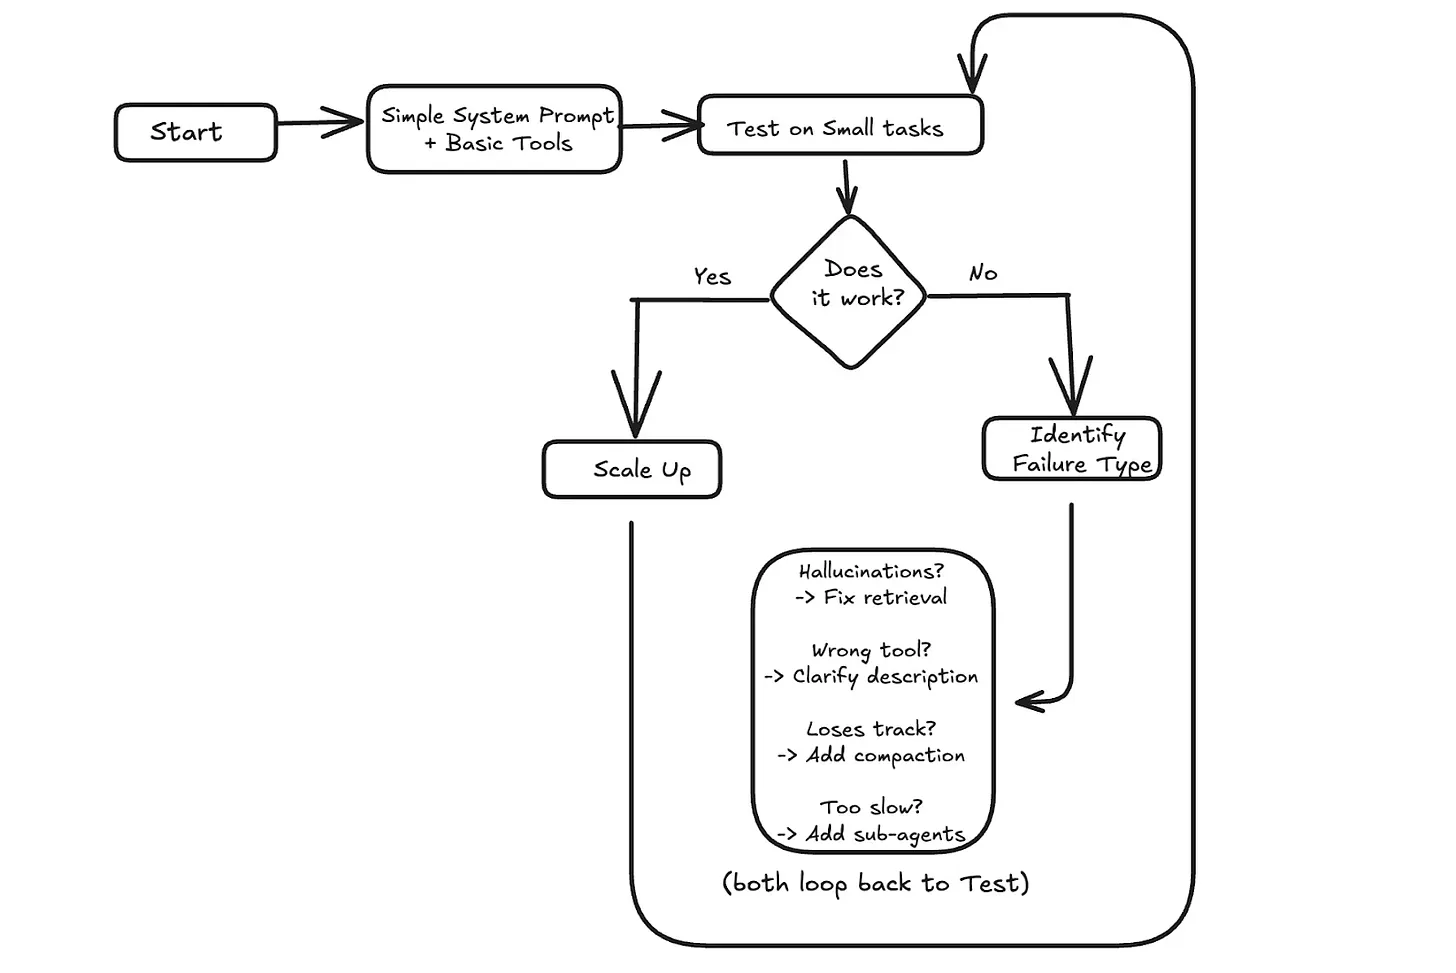
When something goes wrong, context is often the place to look. If the agent hallucinates, it might need better retrieval to ground its answers. If it picks the wrong tool, the tool descriptions might be unclear. If it loses track after many turns, the message history might need summarization.
A practical approach is to start simple.
Test with small tasks first. If it works, scale up. If it fails, identify what went wrong and address the specific issue.
How Does Memory For AI Agents Work?
https://www.decodingai.com/p/how-does-memory-for-ai-agents-work
AI Agent's Memory
One year ago at ZTRON, we faced a challenge that many AI builders encounter: how do we give our agent access to the right information at the right time? Like most teams, we jumped straight into building a complex multimodal Retrieval-Augmented Generation (RAG) system. We built the whole suite: embeddings for text, embeddings for images, OCR, summarization, chunking, and multiple indexes.
Our ingestion pipeline became incredibly heavy. It introduced unnecessary complexity around scaling, monitoring, and maintenance. At query time, instead of a straight line from question to answer, our agent would zigzag through 10 to 20 retrieval steps, trying to gather the right context. The latency was terrible, costs were high, and debugging was a nightmare.
Then we realized something essential. Because we were building a vertical AI agent for a specific use case, our data wasn’t actually that big. Through virtual multi-tenancy and smart data siloing, we could retrieve relevant data with simple SQL queries and fit everything comfortably within modern context windows—around 65,000 tokens maximum, well within Gemini’s 1 million token input capacity.
We dropped the entire RAG layer in favor of Context-Augmented Generation (CAG) with smart context window engineering. Everything became faster, cheaper, and more reliable. This experience taught me that the fundamental challenge in building AI agents isn’t just about retrieval. It is about understanding how to architect memory systems that match your actual use case.
The core problem we are solving is the fundamental limitation of LLMs: their knowledge is vast but frozen in time. They are unable to learn by updating their weights after training, a problem known as “continual learning”. An LLM without memory is like an intern with amnesia. They might be brilliant, but they cannot recall previous conversations or learn from experience.
To overcome this, we use the context window as a form of “working memory.” However, keeping an entire conversation thread plus additional information in the context window is often unrealistic. Rising costs per turn and the “lost in the middle” problem—where models struggle to use information buried in the center of a long prompt limit this approach. While context windows are increasing, relying solely on them introduces noise and overhead.
Memory tools act as the solution. They provide agents with continuity, adaptability, and the ability to “learn” without retraining. When we first started building agents, working with 8k or 16k token limits forced us to engineer complex compression systems. Today, we have more breathing room, but the principles of organizing memory remain essential for performance.
In this article, we will explore:
The four fundamental types of memory for AI agents.
A detailed look at long-term memory: Semantic, Episodic, and Procedural.
The trade-offs between storing memories as strings, entities, or knowledge graphs.
The complete memory cycle, from ingestion to inference.
The 4 Memory Types for AI Agents
To build effective agents, we must distinguish between the different places information lives. We can borrow terms from biology and cognitive science to categorize these layers useful for engineering.
There are four distinct memory types based on their persistence and proximity to the model’s reasoning core.
Internal Knowledge: This is the static, pre-trained knowledge baked into the LLM’s weights. It is the best place to store general world knowledge—models know about whole books without needing them in the context window. However, this memory is frozen at the time of training.
Context Window: This is the slice of information we pass to the LLM during a specific call. It acts as the RAM of the LLM. It is the only “reality” the model sees during inference.
Short-Term Memory: This is the RAM of the entire agentic system. It contains the active context window plus recent interactions, conversation history, and details retrieved from long-term memory. We slice this short-term memory to create the context window for a single inference step. It is volatile and fast, simulating the feeling of “learning” during a session
Long-Term Memory: This is the external, persistent storage system (disk) where an agent saves and retrieves information. This layer provides the personalization and context that internal knowledge lacks and short-term memory cannot retain [4].
The dynamic between these layers creates the agent’s intelligence. First, part of the long-term memory is “retrieved” and brought into short-term memory. This retrieval pipeline queries different memory types in parallel. Next, we slice the short-term memory into an active context window through context engineering. Finally, during inference, the LLM uses its internal weights plus the active context window to generate output.

Another useful way to visualize this is by proximity to the LLM. Internal memory is intrinsic, while long-term memory is the furthest away, requiring specific retrieval mechanisms to become useful.

Categorizing memory this way is critical for engineering. Internal knowledge handles general reasoning. Short-term memory manages the immediate task. Long-term memory handles personalization and continuity. No single layer can perform all three functions effectively. To better understand long-term memory, we can further apply cognitive science definitions to specific data types.
MCP - A Deep Dive
https://portkey.ai/blog/understanding-mcp-authorization/?ref=dailydev
In November 2024, Anthropic launched the Model Context Protocol (MCP) to fix this problem. This wasn’t just another developer tool. It aimed to tackle a key infrastructure issue in AI engineering.
The challenge?
Every AI application needs to connect to data sources. Until now, they had to build custom integrations from scratch. This approach creates a fragmented ecosystem that does not scale.
For example, the world isn’t frozen in time, but LLMs are…
If you want an AI to “monitor server logs,” you can’t feed it a file. You would have to build a data pipeline that polls an API every few seconds. Filter out noise, then push only the relevant anomalies into the AI’s context window. If the API changes its rate limits or response format, your entire agent breaks.
A better way to think of MCP is like a USB-C port.
The Old Way (Before USB):
If you bought a mouse, it had a PS/2 plug. A printer had a massive parallel port. A camera had a proprietary cable. If you wanted to connect these to a computer, the computer needed a specific physical port for each one.

This is the “N×M” problem:
Each device maker had to figure out how to connect to each computer. So, computer makers had to create ports for every device.
The MCP Way (With USB-C):
Now, everything uses a standard port.
Computer (AI Model) needs one USB-C port. It doesn’t need to know if you are plugging in a hard drive or a microphone; it just speaks “USB.”
Device (Data Source) requires a USB-C port. It doesn’t need to know if it’s plugged into a Mac, a PC, or an iPad.

The result: you can plug anything into anything instantly.
The analogy makes sense in theory. But to understand why MCP matters, you need to see how painful the current reality actually is…
The Integration Complexity Problem
Every AI assistant needs context to be useful:
Claude needs access to your codebase. ChatGPT may require your Google Drive files. Custom agents need database connections. But how do these AI systems actually get that context?
Traditionally, each connection requires a custom integration.
If you’re building an AI coding assistant, you need to:
Write code to connect to the GitHub API.
Add authentication and security.
Create a way to change GitHub’s data format into a version that your AI can understand.
Handle rate limiting, errors, and edge cases.
Repeat this entire process for GitLab, Bitbucket, and every other source control system.
This creates the N×M problem:
‘N’ AI assistants multiplied by ‘M’ data sources equals N×M unique integrations that need to be built and maintained.
When Cursor wants to add Notion support, they build it from scratch. When GitHub Copilot wants the same thing, they build it again. The engineering effort gets duplicated across every AI platform.
The traditional approaches have fundamental limitations:
Static, build-time integration:
Integrations are hard-coded into applications. You can’t add a new data source without updating the application itself. This makes rapid experimentation impossible and forces users to wait for official support.
Application-specific security implementations:
Every integration reinvents authentication, authorization, and data protection. This leads to inconsistent security models and increases the attack surface.
No standard way to discover:
AI systems can’t find out what capabilities a data source has. Everything needs clear programming. This makes it hard to create agents that adapt. They can’t use the new tools on their own.
The result is a ‘broken’ ecosystem!
Innovation is stuck because of integration work. Users can access only the connections that application developers create. So that’s a mess.
Now let’s look at how MCP cleans it up…
How MCP Solves It
MCP’s solution is straightforward: define a single protocol that functions across all systems.
Instead of building N×M integrations, you build N clients (one per AI application) and M servers (one per data source). The total integration work drops from N×M to N+M.

When a new AI assistant wants to support all existing data sources, it just needs to implement the MCP client protocol once.
When a new data source wants to be available to all AI assistants, it just needs to implement the MCP server protocol once.

Two critical architectural features power this efficiency:
1. Dynamic Capability Discovery
In traditional integrations, the AI application must know the data source details in advance.
If the API changes, the application breaks…
MCP flips this. It uses a “handshake” model. When an AI connects to an MCP server, it asks, “What can you do?”.
The server returns a list of available resources and tools in real time.
RESULT:
You can add a new tool to your database server, like a “Refund User” function. The AI agent finds it right away the next time it connects. You won’t need to change any code in the AI application.
2. Decoupling Intelligence from Data
MCP separates the thinking system (AI model) from the knowing system (the data source).
For Data Teams: They can build robust, secure MCP servers for their internal APIs without worrying about which AI model will use them.
For AI Teams: They can swap models without having to rebuild their data integrations.
This decoupling means your infrastructure doesn’t become obsolete whenever a new AI model gets released.
You build your data layer once, and it works with whatever intelligence layer you choose to plug into it.
An AI agent using MCP doesn’t need to know in advance what tools are available. It simply connects, negotiates capabilities, and uses them as needed. This enables a level of flexibility and scale that is impossible with traditional static integrations.
The high-level concept is straightforward.
But the real elegance is in how the architecture actually works under the hood…
MCP Architecture Deep Dive
MCP’s architecture has three main layers.
These layers separate concerns and allow for easy scalability:
- The Three-Layer Model
Hosts are user-facing apps.
This includes the Claude Desktop app, IDEs like VSCode, or custom AI agents you create. Hosts are where users connect with the AI. They are also where requests begin. They do more than display the UI; they orchestrate the entire user experience.
The host application interprets the user’s prompt.
It decides whether external data or tools are needed to fulfill the request. If access is necessary, the host creates and manages several internal clients. It keeps one client for each MCP server it connects to.
The protocol layer handles the mechanics of data access.

Clients are protocol-speaking connection managers that run on hosts.
Each client maintains a dedicated 1:1 connection with a single MCP server. They serve as the translation layer.
They convert abstract AI requests from the host into clear MCP messages. These messages, like tools/call or resources/read, can be understood by the server. Clients do more than send messages. They manage the entire session lifecycle. This includes handling connection drops, reconnections, and state.
When a connection starts, the client takes charge of capability negotiation. It asks the server which tools, resources, and prompts it supports.

Servers provide context.
They act as the layer that connects real-world systems, such as PostgreSQL databases, GitHub repositories, or Slack workspaces.
A server connects the MCP protocol to the data source. It translates MCP requests into the system’s native operations. For example, it turns an MCP read request into a SQL SELECT query. They are very flexible. They can run on a user’s machine for private access or remotely as a cloud service.
Servers share their available capabilities when connected. They inform the client about the Resources, Prompts, and Tools they offer.

https://newsletter.systemdesign.one/p/how-mcp-works
AGENTS.MD
An AGENTS.md file is a markdown file you check into Git that customizes how AI coding agents behave in your repository. It sits at the top of the conversation history, right below the system prompt.
Think of it as a configuration layer between the agent's base instructions and your actual codebase. The file can contain two types of guidance:
Personal scope: Your commit style preferences, coding patterns you prefer
Project scope: What the project does, which package manager you use, your architecture decisions
The AGENTS.md file is an open standard supported by many - though not all - tools.
Why Massive AGENTS.MD Files Are a Problem
There's a natural feedback loop that causes AGENTS.md files to grow dangerously large:
The agent does something you don't like
You add a rule to prevent it
Repeat hundreds of times over months
File becomes a "ball of mud"
Different developers add conflicting opinions. Nobody does a full style pass. The result? An unmaintainable mess that actually hurts agent performance.
Another culprit: auto-generated AGENTS.md files. Never use initialization scripts to auto-generate your AGENTS.md. They flood the file with things that are "useful for most scenarios" but would be better progressively disclosed. Generated files prioritize comprehensiveness over restraint.
The Instruction Budget
Kyle from Humanlayer's article mentions the concept of an "instruction budget":
Frontier thinking LLMs can follow ~ 150-200 instructions with reasonable consistency. Smaller models can attend to fewer instructions than larger models, and non-thinking models can attend to fewer instructions than thinking models.
Every token in your AGENTS.md file gets loaded on every single request, regardless of whether it's relevant. This creates a hard budget problem:
| Scenario | Impact |
|---|---|
Small, focused AGENTS.md |
More tokens available for task-specific instructions |
Large, bloated AGENTS.md |
Fewer tokens for the actual work; agent gets confused |
| Irrelevant instructions | Token waste + agent distraction = worse performance |
Taken together, this means that the ideal AGENTS.md file should be as small as possible.
Stale Documentation Poisons Context
Another issue for large AGENTS.md files is staleness.
Documentation goes out of date quickly. For human developers, stale docs are annoying, but the human usually has enough built-in memory to be skeptical about bad docs. For AI agents that read documentation on every request, stale information actively poisons the context.
This is especially dangerous when you document file system structure. File paths change constantly. If your AGENTS.md says "authentication logic lives in src/auth/handlers.ts" and that file gets renamed or moved, the agent will confidently look in the wrong place.
Instead of documenting structure, describe capabilities. Give hints about where things might be and the overall shape of the project. Let the agent generate its own just-in-time documentation during planning.
Domain concepts (like "organization" vs "group" vs "workspace") are more stable than file paths, so they're safer to document. But even these can drift in fast-moving AI-assisted codebases. Keep a light touch.
Cutting Down Large AGENTS.md File
Be ruthless about what goes here. Consider this the absolute minimum:
One-sentence project description (acts like a role-based prompt)
Package manager (if not npm; or use
corepackfor warnings)Build/typecheck commands (if non-standard)
That's honestly it. Everything else should go elsewhere.
The One-Liner Project Description
This single sentence gives the agent context about why they're working in this repository. It anchors every decision they make.
Example: This is a React component library for accessible data visualization.
That's the foundation. The agent now understands its scope.
Package Manager Specification
If you're In a JavaScript project and using anything other than npm, tell the agent explicitly:
This project uses pnpm workspaces.
Without this, the agent might default to npm and generate incorrect commands.
Use Progressive Disclosure
Instead of cramming everything into AGENTS.md, use progressive disclosure: give the agent only what it needs right now, and point it to other resources when needed.
Agents are fast at navigating documentation hierarchies. They understand context well enough to find what they need.
Move Language-Specific Rules to Separate Files
If your AGENTS.md currently says:
Always use const instead of let.
Never use var.
Use interface instead of type when possible.
Use strict null checks.
...
Move that to a separate file instead. In your root AGENTS.md:
For TypeScript conventions, see docs/TYPESCRIPT.md
Notice the light touch, no "always," no all-caps forcing. Just a conversational reference.
The benefits:
TypeScript rules only load when the agent writes TypeScript
Other tasks (CSS debugging, dependency management) don't waste tokens
File stays focused and portable across model changes
Nest Progressive Disclosure
You can go even deeper. Your docs/TYPESCRIPT.md can reference docs/TESTING.md. Create a discoverable resource tree:
docs/
├── TYPESCRIPT.md
│   └── references TESTING.md
├── TESTING.md
│   └── references specific test runners
└── BUILD.md
    └── references esbuild configuration
You can even link to external resources, Prisma docs, Next.js docs, etc. The agent will navigate these hierarchies efficiently.
Use Agent Skills
Many tools support "agent skills" - commands or workflows the agent can invoke to learn how to do something specific. These are another form of progressive disclosure: the agent pulls in knowledge only when needed.
AGENTS.MD in Monorepos
You're not limited to a single AGENTS.md at the root. You can place AGENTS.md files in subdirectories, and they merge with the root level.
This is powerful for monorepos:
What Goes Where:
| Level | Content |
|---|---|
| Root | Monorepo purpose, how to navigate packages, shared tools (pnpm workspaces) |
| Package | Package purpose, specific tech stack, package-specific conventions |
Root AGENTS.md:
This is a monorepo containing web services and CLI tools.
Use pnpm workspaces to manage dependencies.
See each package's AGENTS.md for specific guidelines.
Package-level AGENTS.md (in packages/api/AGENTS.md):
This package is a Node.js GraphQL API using Prisma.
Follow docs/API_CONVENTIONS.md for API design patterns.
Don't overload any level. The agent sees all merged AGENTS.md files in its context. Keep each level focused on what's relevant at that scope.
Fix A Broken Agents.md with this prompt
If you're starting to get nervous about the AGENTS.md file in your repo, and you want to refactor it to use progressive disclosure, try copy-pasting this prompt into your coding agent:
I want you to refactor my AGENTS.md file to follow progressive disclosure principles.

Follow these steps:

1. **Find contradictions**: Identify any instructions that conflict with each other. For each contradiction, ask me which version I want to keep.

2. **Identify the essentials**: Extract only what belongs in the root AGENTS.md:
   - One-sentence project description
   - Package manager (if not npm)
   - Non-standard build/typecheck commands
   - Anything truly relevant to every single task

3. **Group the rest**: Organize remaining instructions into logical categories (e.g., TypeScript conventions, testing patterns, API design, Git workflow). For each group, create a separate markdown file.

4. **Create the file structure**: Output:
   - A minimal root AGENTS.md with markdown links to the separate files
   - Each separate file with its relevant instructions
   - A suggested docs/ folder structure

5. **Flag for deletion**: Identify any instructions that are:
   - Redundant (the agent already knows this)
   - Too vague to be actionable
   - Overly obvious (like "write clean code")
Don’t Build a Ball of Mud
When you're about to add something to your AGENTS.md, ask yourself where it belongs:
| Location | When to use |
|---|---|
Root AGENTS.md |
Relevant to every single task in the repo |
| Separate file | Relevant to one domain (TypeScript, testing, etc.) |
| Nested documentation tree | Can be organized hierarchically |
The ideal AGENTS.md is small, focused, and points elsewhere. It gives the agent just enough context to start working, with breadcrumbs to more detailed guidance.
Everything else lives in progressive disclosure: separate files, nested AGENTS.md files, or skills.
This keeps your instruction budget efficient, your agent focused, and your setup future-proof as tools and best practices evolve.
Agent Skills
What are the Claude Skills?
Claude Skills, officially launched as "Agent Skills" in October 2024 and significantly expanded in December 2024, are modular capabilities that teach Claude how to perform specific tasks in a repeatable, specialized way.
Think of Skills as custom training modules. Instead of explaining the same process to Claude every single time ("Here's how our company formats PRDs" or "Here's how we analyze user data"), you package those instructions once into a Skill. From then on, Claude automatically recognizes when that Skill is relevant and applies it.
The technical definition: Skills are folders containing instructions, scripts, and resources that Claude loads dynamically when needed to perform specialized tasks. They can include:
Markdown files with instructions and procedures
Executable code for complex operations
Templates and examples
Domain-specific knowledge
The practical reality: Skills turn Claude from a general-purpose AI into a specialist that knows your workflows, your brand guidelines, your data analysis methods, and your organizational processes.
https://resources.anthropic.com/hubfs/The-Complete-Guide-to-Building-Skill-for-Claude.pdf?hsLang=en
A Brief History: How Skills Evolved
Understanding when and why Anthropic introduced Skills helps explain why this matters now:
October 2024: Anthropic quietly launched Agent Skills as a beta feature. Initially, it was developer-focused—available through the API and Claude Code. The idea was simple: let developers package specialized capabilities that Claude could invoke when relevant.
December 18, 2024: The major expansion. Anthropic made Skills available across claude.ai, introduced organization-wide management for Team and Enterprise plans, launched a Skills Directory with partner-built skills from companies like Notion, Figma, Canva, and Atlassian, and most importantly, published Agent Skills as an open standard at agentskills.io.
January 2025: Skills became integrated with other Claude features like Memory, Extended Thinking, and the new Cowork agent. The Skills Directory expanded significantly, and custom skill creation became more accessible to non-technical users.
Current State (January 2026): Skills are now available to Pro, Max, Team, and Enterprise users. You can use pre-built Anthropic Skills (for Excel, PowerPoint, Word, PDFs), install partner Skills from the directory, or create custom Skills tailored to your exact workflows.
The evolution shows Anthropic's strategy: start with developers, prove the concept, then democratize it for everyone. And it's working.
What Claude Skills do?
Teach Claude ONCE, Benefit FOREVER (Zero Re-Explaining): Skills are instruction folders Claude loads automatically when relevant. Stop re-explaining your preferences, processes, and domain expertise in every single conversation. One folder = permanent memory of your workflow. Build in 15-30 minutes using the built-in skill-creator tool. Works for frontend design, research methodology, document creation, sprint planning, customer onboarding, and compliance workflows. Saves hours weekly across teams and individual users.
Progressive Disclosure = Minimal Token Usage (3-Level System): The 3-level system is genius: Level 1 (YAML frontmatter) always stays in Claude's system prompt — just enough for Claude to know WHEN to activate. Level 2 (SKILL.md body) loads only when relevant. Level 3 (linked files) loads only as needed. Result: specialized expertise without bloating every conversation. Same AI power, fraction of the token cost. An estimated 50%+ reduction in tokens per workflow session versus re-prompting every chat. Keep SKILL.md under 5,000 words, move detailed docs to references/ folder
One Skill = All Surfaces (100% Portability): Build a skill ONCE, and it works identically on Claude.ai, Claude Code, and API — no modifications needed. This is unprecedented in AI tooling. Competitors lock you into one interface. Skills follow you everywhere. Deploy to individuals, teams, or your entire organization from one central folder. Organization-wide deployment launched December 18, 2025, with automatic updates and centralized admin management for enterprise teams.
MCP + Skills = Your AI Employee (Kitchen Analogy): MCP provides the professional kitchen: real-time access to Notion, Asana, Linear, Slack, GitHub, and Figma. Skills provide the recipes: step-by-step instructions optimized for YOUR workflow. Without Skills, MCP users get tool access but no workflow guidance — resulting in support tickets and inconsistent results. With Skills, pre-built workflows activate automatically. Anthropic data shows users blame the MCP connector when the real issue is missing workflow knowledge.
5 Battle-Tested Patterns (Real-World Workflows): Anthropic released 5 proven workflow patterns from early adopters: Pattern 1 (Sequential Workflow) for multi-step processes in exact order. Pattern 2 (Multi-MCP Coordination) for workflows spanning Figma, Drive, Linear, and Slack simultaneously. Pattern 3 (Iterative Refinement) for self-validating output loops. Pattern 4 (Context-Aware Tool Selection) for smart routing to the right tool. Pattern 5 (Domain-Specific Intelligence) for compliance, finance, and legal workflows with embedded rules.
OPEN Standard = Platform-Independent (Like MCP): Anthropic published Agent Skills as an OPEN standard. Like MCP, skills work across AI platforms — not locked to Claude. Early ecosystem adoption already underway. Partners from Asana, Atlassian, Canva, Figma, Sentry, and Zapier have published skills. The GitHub repo anthropics/skills contains production-ready skills you can customize TODAY instead of building from scratch. Community-built skills are multiplying fast — early publishers gain maximum visibility and downloads.
Skill File Structure (15-Minute Setup): A skill is JUST a folder with 4 possible items: SKILL.md (required — Markdown with YAML frontmatter), scripts/ (optional Python or Bash), references/ (optional docs loaded on demand), assets/ (optional templates and icons). Folder name MUST be kebab-case (sprint-planner, NOT Sprint Planner or sprint_planner). SKILL.md must be EXACTLY that spelling — case-sensitive. No README.md inside the skill folder. Start with just SKILL.md — that is the entire minimum viable skill.
API Integration = Production-Scale Deployment (/v1/skills): For production applications, the /v1/skills endpoint lets you manage skills programmatically. Add skills to Messages API requests via the container.skills parameter. Version control through Claude Console. Works with Claude Agent SDK for custom AI agents. Requires Code Execution Tool beta access. Use the API for production deployments, automated pipelines, and agent systems. Individual users should use Claude.ai. API skills unlock enterprise-grade AI workflow automation at unlimited scale.
Trigger Optimization = 90%+ Auto-Activation Rate: The description field is EVERYTHING. Target: skill triggers on 90%+ of relevant queries automatically. Good descriptions include WHAT the skill does AND WHEN to use it with specific trigger phrases. Bad: "Helps with projects." Good: "Manages Linear sprint planning. Use when user mentions 'sprint', 'Linear tasks', or asks to 'create tickets'." Run 10-20 test queries. Ask Claude directly: "When would you use the [skill name] skill?" — Claude quotes your description back and reveals exactly what is missing.
Organization-Wide Skills Deployment (December 2025): Admins can now deploy skills workspace-wide — launched December 18, 2025. Automatic updates push to all users simultaneously. Centralized management from admin panel. One skill update standardizes EVERY team member's workflow instantly. No more inconsistent AI results between teammates who prompt differently. Companies building skills libraries NOW gain compounding efficiency advantages against competitors still re-explaining context every single chat session. This is the AI operations layer enterprises have been waiting for.
Why This Changes Everything
The End of Prompt Engineering (Finally): Prompt engineering required constant re-explanation, relied on individual memory, produced inconsistent results, and could not be shared easily. Skills are shareable, versioned, auto-activating, and organization-deployable. The shift is from art (crafting the perfect prompt) to engineering (building a reliable system). Early adopters building skills libraries NOW will have a 6-12 month workflow advantage over teams still copying prompts from Notion docs and Slack messages.
Solves the "New Chat = New Explanation" Problem: Every new Claude conversation resets context completely. Skills eliminate this permanently. Claude loads your workflow automatically based on what you say — no explicit trigger needed. Power users currently spend 10-20% of their AI time re-establishing context every session. Skills compress that to near-zero. The compounding time savings across 1,000+ sessions per year is enormous — estimated 200+ hours annually per person recovered from pure context-setting overhead.
Democratizes Expert AI Workflows: Previously, getting Claude to follow expert workflows required prompt engineering knowledge, time, and extensive trial-and-error. Skills democratize this: download a community-built skill from GitHub, upload to Claude.ai in 60 seconds, and instantly access workflows built by domain experts. A junior marketer can now operate with the same AI workflow sophistication as a senior AI engineer. The public skills marketplace is still early — first movers can publish skills that thousands of users download and benefit from.
MCP Adoption Accelerator (Critical for Developers): Without skills, MCP integrations face user abandonment: users connect the tool but don't know how to use it effectively. With skills, MCP becomes turnkey. Anthropic's research shows users blame the MCP connector when the real issue is missing workflow guidance. Skills fix this permanently. If you've built an MCP server, adding a companion skill dramatically increases user retention, reduces support tickets, and differentiates your product from the growing field of MCP-only competitors.
Compounding Efficiency = Compounding Advantage: Every skill you build is a one-time investment that pays dividends indefinitely. Build a 30-minute skill today, save 5 minutes per workflow session. At 10 sessions per day = 50 minutes saved daily = 250 minutes per week = 200+ hours per year per person. Teams of 10 = 2,000+ hours annually recovered from a single well-built skill. Organizations building skills libraries systematically gain structural productivity advantages that compound over time against competitors still working session-by-session.
When something deserves to become a Skill
The Skill doesn’t come first. What comes first is a pattern.
Every time I faced messy strategic notes, I was unconsciously applying the same mental structure:
Clarify the context → Extract key signals → Surface risks → Compare trade-offs → Present structured options → Define next steps
That repetition is what changed everything.
Because repetition is the signal that something deserves structure.
Here are the problems I had before using skills (and what they led to):
No defined role → Inconsistent responses
No rules → Shifts in tone
No boundaries → Unnecessary creative drift
No environment → Constant repetition
That shift didn’t happen because I created a Skill. It happened because I stopped improvising.
Structure came first. Automation came second.
The hidden step most people skip can be summarized like this:

The difference is massive. In the first case (left side), you automate an idea. In the second case (right side), you automate a proven framework.
A Skill is not a clever idea. It is a structure that has already proven it works multiple times.
Skills vs. Other Claude Features: What's the Difference?
Claude has several features that sound similar. Here's how they differ:
Skills vs. Projects:
Projects provide static background context that's always loaded when you're in that project
Skills provide dynamic procedures that only load when relevant
Use Projects for persistent knowledge, Skills for repeatable processes
Skills vs. Custom Instructions:
Custom Instructions apply broadly to all your conversations
Skills are task-specific and only activate when needed
Custom Instructions set general preferences; Skills provide specialized procedures
Skills vs. MCP Connectors:
MCP Connectors give Claude access to external tools and data (like Notion, Slack)
Skills teach Claude how to use those tools effectively
They work together: MCP provides access, Skills provide process
Example: An MCP connector gives Claude access to your Notion workspace. A Skill teaches Claude how to format meeting notes according to your team's specific template within Notion.
Potential Drawbacks and Limitations
Let's be honest about where Skills fall short:
1. Requires Code Execution to be Enabled
Skills use Claude's code execution capability. If you've disabled this for security reasons, Skills won't work. This is a consideration for enterprises with strict security policies.
2. Initial Setup Time
Creating good Skills takes time. You need to document processes clearly, provide examples, and iterate based on results. The ROI is there, but it's not instant.
3. Not Ideal for Highly Dynamic Processes
If your workflow changes constantly, maintaining Skills becomes overhead. They're best for processes that are reasonably stable.
4. Potential for Over-Reliance
There's a risk that teams become dependent on Skills without understanding the underlying processes. Junior PMs might use a "Feature Spec" Skill without learning what makes a good spec.
5. Quality Depends on Quality of Instructions
Garbage in, garbage out. Poorly written Skill instructions produce inconsistent results. This requires thoughtful documentation.
6. Limited to Available Plans
Skills are only available on Pro, Max, Team, and Enterprise plans. Free-tier users can't access them.
Finding & Installing Third-Party Skills
- Official Anthropic Repositories
github.com/anthropics/skills → Official skill examples + production document skills (docx, pdf, pptx, xlsx). Apache 2.0 for examples; source-available for doc skills. Functions as a Claude Code Plugin marketplace.
github.com/anthropics/claude-plugins-official → Official plugin marketplace directory. Third-party partners can submit.
github.com/anthropics/knowledge-work-plugins → 11 role-based plugins (Sales, Support, Product Management, Finance, Data, etc.) with skills, commands, and MCP connectors. Open source.
github.com/anthropics/life-sciences → Life sciences MCP servers and skills (PubMed, BioRender, etc.)
- Community Skill Directories & Marketplaces
skills.sh → Primary distribution hub. npx skills add . Leaderboard, multi-platform.
skillsmp.com → Independent directory, aggregates from GitHub. Min 2-star filter.
skillhub.club → 20K+ skills with AI-evaluated quality ratings. Has a playground.
hub.skild.sh → Another community registry
agentskill.sh → 25K+ skills directory, browseable by category/platform
- Key Community Projects
obra/superpowers → Complete software dev workflow: brainstorm → plan → TDD → implement → review. 20+ battle-tested skills. The gold standard for skill composition. Install: /plugin marketplace add obra/superpowers-marketplace then /plugin install superpowers@superpowers-marketplace
obra/superpowers-skills → Community-editable extension to Superpowers
obra/superpowers-lab → Experimental skills (tmux for interactive commands, etc.)
travisvn/awesome-claude-skills → Curated awesome-list of skills, resources, and tools
numman-ali/openskills → Universal skills loader. npx openskills install anthropics/skills. Works across Claude Code, Cursor, Windsurf, Aider, Codex, etc.
vercel-labs/agent-skills → Vercel’s official skills: React, Next.js, React Native patterns + Vercel deploy skill
qufei1993/skills-hub → Desktop app: “Install once, sync everywhere” — manages skills across multiple AI tools
inference.sh skills → 150+ cloud AI app skills (image gen, video, TTS, search) via infsh CLI
Building Your Own Skills — Best Practices
Design Principles
Single-purpose: “SEO optimization for blog posts” is good. “Content marketing helper” is too broad. “Add meta descriptions” is too narrow.
Description is king: Claude routes based on the
descriptionfield. Vague = missed triggers. Overly generic = false triggers. Be specific about when and what.Progressive disclosure: Keep SKILL.md lean. Reference files for deep details. Scripts for deterministic steps.
Imperative instructions: Write as if onboarding a smart junior engineer. Be explicit about steps, inputs, outputs.
Include examples: Show expected inputs and outputs. Show what “good” looks like.
Token budget: Metadata ~50-100 tokens. Full SKILL.md < 5000 tokens. Reference files on-demand.
The Description Field — Most Important 200 Characters You’ll Write
Bad:
yaml
description: Helps with code
Good:
yaml
description: >-
  Generate FastAPI backend with React+Vite frontend, Tailwind, shadcn/ui,
  and OpenAI integration. Use when asked to scaffold a full-stack AI app.
Claude uses semantic matching, not keyword matching — but vague descriptions still reduce accuracy.
Skill Structure Patterns
Pattern 1: Instructions-only (simplest)
my-skill/
└── SKILL.md     # All instructions in one file
Pattern 2: Instructions + References
brand-guidelines/
├── SKILL.md           # Overview + when to apply
└── references/
    ├── colors.md      # Detailed color specs
    ├── typography.md   # Font rules
    └── voice.md       # Tone of voice guide
Pattern 3: Instructions + Scripts (executable)
data-pipeline/
├── SKILL.md
├── scripts/
│   ├── validate.py
│   └── transform.sh
└── templates/
    └── output-schema.json
Pattern 4: Full production skill (like the built-in docx skill)
docx/
├── SKILL.md
├── LICENSE.txt
├── scripts/
│   ├── office/
│   │   ├── soffice.py
│   │   ├── unpack.py
│   │   └── validate.py
│   └── accept_changes.py
├── references/
│   └── REFERENCE.md
└── examples/
    └── sample-doc.docx
Creating Skills with the Skill-Creator
Claude has a built-in skill-creator skill (available in claude.ai and as a plugin). The workflow:
Tell Claude “I want to create a skill for X”
It interviews you about the workflow
Generates the SKILL.md and folder structure
Creates test prompts
Runs Claude-with-skill on them
You evaluate results
Iterate until satisfied
You can also use the eval/benchmark system for more rigorous testing:
Eval mode: Test individual prompts, compare with/without skill
Improve mode: Iterative optimization with blind A/B comparisons
Benchmark mode: Standardized measurement with variance analysis (3x runs per config)
Claude Code-Specific Features
In Claude Code, skills gain extra powers via frontmatter:
yaml
---
name: deep-research
description: Research a topic thoroughly
context: fork          # Runs in a forked subagent
agent: Explore         # Uses the Explore agent (read-only tools)
---
Options for context:
Default (omitted): Claude loads it when relevant
fork: Runs as a separate subagent task
Options for agent:
Explore: Read-only codebase explorationPlan: Planning-focusedCustom: Any subagent from
.claude/agents/
Skills can also be invoked as slash commands:
.claude/skills/review/SKILL.mdcreates/review(This replaced the older
.claude/commands/system)
Getting-Up-To-Speed - Practical Plan
Here I outline a practical approach on how to multiply your productivity by integrating agentic skills into your day-to-day workflow with Claude, Codex, or any other AI agent tool of your choice (using Claude as an example).
- Foundation (2-3 hours)
Understand the landscape
Read the Agent Skills specification (15 min)
Read Anthropic’s blog post introducing skills (10 min)
Read the how to create skills guide (15 min)
Read the Claude Code skills docs (15 min)
Read Lee Han Chung’s deep dive on skill architecture (20 min)
Explore existing skills
Browse github.com/anthropics/skills — read 3-4 example SKILL.md files to see patterns
Browse skills.sh and skillsmp.com to see what the community has built
Install Superpowers in Claude Code:
/plugin marketplace add obra/superpowers-marketplace+/plugin install superpowers@superpowers-marketplaceRead Jesse Vincent’s blog post on Superpowers — this is the best practical write-up on skill composition
Browse travisvn/awesome-claude-skills for curated resources
Try it hands-on
Ask Claude (in claude.ai or Claude Code) to “create a skill for [something you do repeatedly]” — use the skill-creator
Test the generated skill on a real task
Iterate once or twice based on results
- Build Your System (3-4 hours)
Set up your skills infrastructure
Create a GitHub repo for your personal skills (
your-username/claude-skills)Add a
marketplace.jsonto make it a Claude Code marketplaceSet up Obsidian vault with the Skills/ and Workflows/ structure described above
Install the Obsidian Git plugin and connect to your skills repo
Create a SKILL.md template in Obsidian Templater
Build your first 3 skills Start with workflows you repeat across projects:
Your project scaffolding workflow — how you set up a new project (tech stack, folder structure, CI, etc.)
Your code review checklist — your standards for reviewing code
Your product spec process — how you go from idea to spec
For each:
Document the workflow in Obsidian Workflows/
Draft the SKILL.md
Push to Git
Register your marketplace in Claude Code
Test on a real task
Iterate
Day 5: Explore the API surface
Read the Skills API docs
Try uploading a custom skill via the API
Understand the
/v1/skillsendpoints for programmatic management
- Scale & Parallelize (3-4 hours)
Build product-specific skills For each of your product ideas, create:
Domain knowledge skill (what this product does, its entities, its terminology)
Architecture skill (your preferred stack, patterns, conventions for this product)
Testing skill (how you want tests structured for this product)
Explore advanced patterns
Read the MCP builder skill — skills + MCP is a powerful combination
Try
context: forkand subagent delegation in Claude CodeExplore anthropics/knowledge-work-plugins for the plugin architecture pattern
Install
openskills(npx openskills install anthropics/skills) for cross-tool skill management
Automate and refine
Set up GitHub Actions to validate your skills on push (use
skills-refPython library)Create a “meta-skill” that helps you create new skills faster (or use the built-in skill-creator as a base)
Document your skills system in your Obsidian vault so future-you (and future-Claude) can maintain it
https://codeagentsalpha.substack.com/p/claude-agent-skills-complete-getting
https://sifuyik.substack.com/p/anthropic-dropped-the-32-page-internal
https://artificialcorner.com/p/claude-code-skills
https://www.youngleaders.tech/p/claude-skills-commands-subagents-plugins
https://aiblewmymind.substack.com/p/claude-skills-36-examples
Spec-Driven Development
Like with many emerging terms in this fast-paced space, the definition of “spec-driven development” (SDD) is still in flux. Here’s what I can gather from how I have seen it used so far: Spec-driven development means writing a “spec” before writing code with AI (“documentation first”). The spec becomes the source of truth for the human and the AI.
GitHub: “In this new world, maintaining software means evolving specifications. […] The lingua franca of development moves to a higher level, and code is the last-mile approach.”
Tessl: “A development approach where specs — not code — are the primary artifact. Specs describe intent in structured, testable language, and agents generate code to match them.”
After looking over the usages of the term, and some of the tools that claim to be implementing SDD, it seems to me that in reality, there are multiple implementation levels to it:
Spec-first: A well thought-out spec is written first, and then used in the AI-assisted development workflow for the task at hand.
Spec-anchored: The spec is kept even after the task is complete, to continue using it for evolution and maintenance of the respective feature.
Spec-as-source: The spec is the main source file over time, and only the spec is edited by the human, the human never touches the code.
All SDD approaches and definitions I’ve found are spec-first, but not all strive to be spec-anchored or spec-as-source. And often it’s left vague or totally open what the spec maintenance strategy over time is meant to be.

What Is Spec-Driven Development?
The key question in terms of definitions of course is: What is a spec? There doesn’t seem to be a general definition, the closest I’ve seen to a consistent definition is the comparison of a spec to a “Product Requirements Document”.
The term is quite overloaded at the moment, here is my attempt at defining what a spec is:
A spec is a structured, behavior-oriented artifact - or a set of related artifacts - written in natural language that expresses software functionality and serves as guidance to AI coding agents. Each variant of spec-driven development defines their approach to a spec’s structure, level of detail, and how these artifacts are organized within a project.
There is a useful difference to be made I think between specs and the more general context documents for a codebase. That general context are things like rules files, or high level descriptions of the product and the codebase. Some tools call this context a memory bank, so that’s what I will use here. These files are relevant across all AI coding sessions in the codebase, whereas specs only relevant to the tasks that actually create or change that particular functionality.

The challenge with evaluating SDD tools
It turns out to be quite time-consuming to evaluate SDD tools and approaches in a way that gets close to real usage. You would have to try them out with different sizes of problems, greenfield, brownfield, and really take the time to review and revise the intermediate artifacts with more than just a cursory glance. Because as GitHub’s blog post about spec-kit says: “Crucially, your role isn’t just to steer. It’s to verify. At each phase, you reflect and refine.”
For two of the three tools I tried it also seems to be even more work to introduce them into an existing codebase, therefore making it even harder to evaluate their usefulness for brownfield codebases. Until I hear usage reports from people using them for a period of time on a “real” codebase, I still have a lot of open questions about how this works in real life.
That being said - let’s get into three of these tools. I will share a description of how they work first (or rather how I think they work), and will keep my observations and questions for the end. Note that these tools are very fast evolving, so they might have already changed since I used them in September.
The Three Documents (and Why They’re Different)
I see people conflating PRDs, design docs, and specs constantly. They serve different purposes.
Product Requirements Document (PRD): For humans; product managers, stakeholders. Covers what we’re building and why. Business value, user stories, success metrics. This is a debate document.
Technical Design Document: For engineers. Covers how we’re building it. Architecture decisions, scalability considerations, security implications. Also debated and reviewed.
AI Spec: For agents. This is an execution document - not a debate, a plan. It translates decisions from the PRD and design doc into something an agent can act on.
In practice, you don’t always write all three. For a small feature, you might skip straight to a spec. For a large initiative, you’d have a PRD that spawns multiple design docs, each spawning multiple specs. The spec is always the final translation layer before code.
Anatomy of a Good Spec
A spec has four parts:
1. Why (Brief Context)
Keep this short. One or two sentences about the problem you’re solving. This helps the agent make intelligent decisions if it encounters ambiguity.
2. What (Scope)
Define the boundaries. What features are you building? Be specific about implementation details the agent would otherwise guess about.
Example: “JWT-based auth with one-hour access tokens and seven-day refresh tokens. Users can register, login, and refresh tokens.”
3. Constraints (Boundaries)
This is where you prevent the agent from being too eager. What libraries to use. What patterns to follow. What’s explicitly out of scope.
Example: “Use bcrypt for password hashing. Store user data in Postgres via Prisma. Must not add new dependencies. Must not store tokens in the database. Out of scope: password reset, OAuth, email verification.”
4. Tasks (Discrete Work Units)
Break the work into small, verifiable chunks. Each task should specify what to build, which files to touch, and how to verify completion.
Example:
Task 1: Add user model to Prisma schema. Verify: npx prisma generate succeeds.
Task 2: Create registration endpoint. Verify: Test with curl, user appears in database.
Task 3: Create login endpoint. Verify: Returns valid JWT on correct credentials.
When Specs Go Wrong
Specs fail in two directions.
Over-specified: You’ve constrained the agent so tightly it can’t solve the problem. Signs: the agent keeps asking for permission, or produces convoluted code to satisfy contradictory constraints. Fix: loosen constraints, focus on outcomes rather than implementation details.
Under-specified: The agent still has to guess. Signs: you review the code and find unexpected decisions - new files, different patterns, surprise dependencies. Fix: add the missing constraints. Each surprise is a constraint you forgot to write down.
The goal is a spec tight enough that the agent can’t make decisions you’d disagree with, but loose enough that it can solve problems you didn’t anticipate.
My Workflow
It’s important to point out that this level of planning isn’t always needed. If you’re fixing a simple bug, you likely don’t need extensive planning. Just do it. If you’re working on something large that might split into many tasks or run over multiple sessions - write a spec.
Here’s how I actually use specs day to day:
Step 1: Generate. I describe what I want to build to the agent and ask it to write a spec—not implement the feature. I use a /spec command for this.
Step 2: Iterate. I review the spec carefully. The agent will make assumptions. I correct them, add constraints I forgot, remove scope creep. This is where I catch problems before they become code.
Step 3: Execute. I open a fresh session. I ask the agent to read the spec and implement Task 1. Review the code. Commit. Move to Task 2.
“Read and implement T1”
Step 4: Adapt. Review the code. Could it be improved? Maybe Task 3 reveals a flaw in the spec. I go back and update it. This isn’t waterfall, it’s iterative. The spec is a living document.
The key insight: don’t ask the same agent to plan the work and do the work. Planning and execution are different modes. An agent that’s planning will think through edge cases. An agent that’s executing will rush to ship.
Skip the Frameworks?
There are a lot of spec-driven development frameworks out there. OpenSpec. Kiro. GitHub Spec Kit. I’ve tried them.
To me, they felt like overkill.
They generate tons of files. They want you to define user stories in markdown. They add ceremony that slows you down without adding value.
Here’s what you actually need: one slash command that acts as a meta-prompt to generate a spec.
> “/spec implement rate limiting in the API.
The power of spec-driven development isn’t in the tooling. It’s in the practice of thinking before prompting. A fancy framework won’t fix sloppy thinking. A simple markdown file that forces you to articulate constraints is probably enough.
If you want a comparison of these tools, I recommend the excellent article Understanding Spec-Driven-Development: Kiro, spec-kit, and Tessl by Birgitta Böckeler.
Why This Creates Leverage
Spec-driven development isn’t new. Software teams have always worked this way. PRD > Design doc > Task breakdown > Implementation. The only difference is we’re handing tasks to agents instead of other developers.
But here’s what changes: an agent that executes well-defined specs can move faster than any human. The bottleneck shifts from implementation to specification. Your job becomes defining work clearly enough that an agent can execute it autonomously.
https://newsletter.owainlewis.com/p/how-i-code-with-ai-agents-spec-driven
https://martinfowler.com/articles/exploring-gen-ai/sdd-3-tools.html
https://heeki.medium.com/using-spec-driven-development-with-claude-code-4a1ebe5d9f29
Claude Code Ralph Loop
Every Claude Code session has the same hidden flaw; Claude stops when it thinks the job is done.
Tests broken
API half-implemented,
Edge cases untouched
But it declares complete and exits. And the longer and more complex the task, the worse it gets.
There is a technique designed to fix this problem. You have probably heard the word “Ralph” thrown around.
It’s a simple idea that forces Claude to keep iterating until the work is genuinely completed.
Surprisingly, this technique has been used to ship entire projects overnight at a fraction of the actual cost.
In this newsletter, I’ll take you from understanding why Claude fails on complex tasks to building the full Ralph Loop system and running it on real projects.
We’ll cover the Ralph core mechanism, the PRD and memory architecture, and everything you need to put Ralph Loop to work.
Let’s start with the basics.
What is Ralph Loop?
Let me start with something that might surprise you.
Ralph Loop isn’t a framework, and it is not a sophisticated AI orchestration system. At the core, it’s a Bash while loop.
while true; do
  cat prompt.md | claude
done
The technique was created by Jeffrey Huntley
The name comes from Ralph Wiggum, arguably the dumbest character in The Simpsons. Ralph fails constantly, making silly mistakes. But stubbornly continues in an endless loop until he eventually succeeds.
This childlike persistence is the philosophy behind the technique.
With Ralph Loop, Claude is no longer allowed to exit when it thinks it’s done. It’s forced to keep working until the task is truly finished.

The key insight is that Ralph Loop treats failure as expected, not exceptional.
Each iteration builds on the last. The AI sees what it did before, recognizes what’s still broken, and improves.
Why Claude Code Needs Ralph
Claude Code has a limitation that most developers don’t recognize until they’ve hit it repeatedly.
It operates in single-pass mode.
Even though Claude reasons extremely well, it stops as soon as it believes the output is “good enough.”
The model has what you might call an implicit execution budget. Once it feels like it’s done reasonable work, it wraps up and exits.
The problem is that “ good enough”, according to Claude, often isn’t good enough.
I’ve seen this pattern dozens of times:
Claude builds a feature, declares it complete, but the edge cases are broken
Claude writes tests, says they pass, but they don’t actually run
Claude implements an API, marks it done, but forgot error handling
It believes it’s finished, but it’s making that judgment based on what the code looks like, not whether it works.

Another problem that makes this worse is the context rot.
As the conversation with Claude gets longer, the context window fills up. The model’s reasoning quality degrades as it has to juggle more information.
Jeffrey Huntley calls this “compaction” — when the context gets summarized and loses important details. The model starts forgetting things it knew earlier in the conversation. It makes mistakes it wouldn’t have made with a fresh context.
This is why the single-pass approach fails for complex tasks.
By the time Claude reaches the end of a big feature, its context is bloated with attempts, errors, and fixes. The quality of its reasoning has degraded.
Ralph Loop solves both problems:
Forces verification — Claude can’t exit until it proves the work is done
Fresh context — Each iteration starts clean, avoiding context rot
https://newsletter.claudecodemasterclass.com/p/claude-code-ralph-loop-from-basic
Conductors to Orchestrators: The Future of Agentic Coding
AI coding assistants have quickly moved from novelty to necessity where up to 90% of software engineers use some kind of AI for coding. But a new paradigm is emerging in software development - one where engineers leverage fleets of autonomous coding agents. In this agentic future, the role of the software engineer is evolving from implementer to manager, or in other words, from coder to conductor and ultimately orchestrator.
Over time, developers will increasingly guide AI agents to build the right code and coordinate multiple agents working in concert. This write-up explores the distinction between Conductors and Orchestrators in AI-assisted coding, defines these roles, and examines how today’s cutting-edge tools embody each approach. Senior engineers may start to see the writing on the wall: our jobs are shifting from “How do I code this?” to “How do I get the right code built?” - a subtle but profound change.
What’s the tl;dr of an orchestrator tool? It supports multi-agent workflows where you can run many agents in parallel without them interfering with each another. But let’s talk terminology more first.
https://addyo.substack.com/p/conductors-to-orchestrators-the-future
Critical Thinking during the age of AI
In a time where AI can generate code, design ideas, and occasionally plausible answers on demand, the need for human critical thinking is greater than ever. Even the smartest automation can’t replace the ability to ask the right questions, challenge assumptions, and think independently at this time.
This essay explores the importance of critical thinking skills for software engineers and technical teams using the classic “Who, what, where, when, why, how” framework to structure pragmatic guidance.

Critical thinking checklist for AI-augmented teams
Who: Don’t rely on AI as an oracle. Verify its output.
What: Define the real problem before rushing to a solution.
Where: Context is king. A fix that works in a sandbox might break in production.
When: Know when to use a quick heuristic (triage) vs. deep analysis (root cause).
Why: Use the “5 Whys” technique to uncover underlying causes.
How: Communicate with evidence and data, not just opinions.
We’ll dive into how each of these question categories applies to decision-making in an AI-augmented world, with concrete examples and common pitfalls. The goal is to show how humble curiosity and evidence-based reasoning can keep projects on track and avoid downstream issues.
https://addyo.substack.com/p/critical-thinking-during-the-age
Harness Engineering
Why AI Agents Fail on Large Files
Most engineers today interact with AI coding tools the same way: open Cursor, Claude Code, or Codex, type a prompt, review the output, repeat. For small files and isolated tasks, this works beautifully. But the moment the problem involves a large amount of files, the whole approach falls apart.

Large Language Models are probabilistic engines. They predict the next token based on patterns in their context window. When the context window is filled with thousands of lines of structured data, the model’s attention gets diluted. It correctly identifies the node you want to modify, but it loses track of sibling keys, nested brackets, and structural integrity. The result is a file that looks right at the point of change but is broken somewhere else.
We have to understand that Context Window isn’t the same as Context Attention. As a human, I can store hundreds of items in a storage unit, but I will remember about a fraction of the items I have there.
Same with LLMs. Performance degrades as the context window gets filled (and costs).
Did you know that every message you send is sending all the previous conversation in an API call? Yes, you’re billed also for those past messages. The servers in the cloud don’t keep any state, they only have a cache.

When the model fails to make an update, the instinct is to write a better prompt.
Add more constraints.
Tell the model to “preserve the surrounding structure.”
“Make no mistakes.”
But that is like asking someone to juggle while blindfolded and then giving them more detailed instructions about hand positioning. The problem is not the instructions. The problem is the blindfold.
The context window itself becomes a liability when it’s packed with thousands of lines of repetitive structure. No prompt can fix that.
I covered in this post how to scale AI, setting up guardrails
What Is Harness Engineering?
Harness engineering is the discipline of designing the systems, architectural constraints, execution environments, and automated feedback loops that wrap around AI agents to make them reliable in production.
The term was first coined by Mitchell Hashimoto, the founder of HashiCorp. The metaphor comes from horse riding. Think of the LLM as a powerful horse. It has raw energy, speed, and strength. But without reins, a saddle, and a bridle, that energy is undirected and potentially destructive (the horse kicks you, the LLM runs a rm -rf, and I don’t know which is worse). The harness allows the rider to direct the horse’s power productively.
To understand where harness engineering fits, here’s how it relates to the other disciplines you’ve probably heard about:
Prompt Engineering → Single interaction to craft the best input to the model (single request-response interaction).
Context Engineering → Control what the model sees during a whole session (multiple interactions until clearing).
Harness Engineering → Designs the environment, tools, guardrails, and feedback loops (multiple sessions).
Agent Engineering → Design the agent’s internal reasoning loop (define specialized agents).
Platform Engineering → Infrastructure to manage deployment, scaling, and cloud operations (where agents can run).

Prompt engineering is about what you say to the model.
Context engineering is about what the model sees.
Harness engineering is about the entire world the model operates in. It includes the tools the agent can call, the constraints it cannot violate, the documentation structure it reads, and the automated feedback loops that catch its mistakes before they reach production.
https://strategizeyourcareer.com/p/harness-engineering-ai-agents
https://addyosmani.com/blog/agent-harness-engineering/
Figma Design to Code, Code to Design
Turning a design into working code is one of the most common tasks in frontend development, and one of the hardest to automate. The design lives in Figma. The code lives in a repository. Bridging the two has traditionally required a developer to manually interpret layouts, colors, spacing, and component structure from a visual reference. AI coding agents promise to close that gap, but the naive approaches fall short in important ways.
Figma launched its MCP server in June 2025 to bring design context into code. This year, they released two new workflows: the ability to generate designs from coding tools like Claude Code and Codex, and the ability for agents to write directly to Figma design.

The Gap Between Design and Code
Before diving into how Figma’s MCP server works, it helps to understand the approaches that came before it, and why each one hits a wall. There are two natural ways to give an LLM access to a design: show it a picture, or hand it the raw data. Both have fundamental limitations that motivated a different approach.
Approach 1: Screenshot the design
The most obvious way to turn a design into code with an LLM is to take a screenshot of your Figma file and paste it into a coding agent. The LLM sees the image, interprets the layout, and generates code.
This works for simple UIs. But it breaks down for anything complex. The LLM has to guess values based on pixels. It doesn’t know the exact color or that the spacing between cards is 24px, not 20px. The output may look close, but not identical.

So screenshots give the LLM a visual reference but no precise values. The next natural step is to go in the opposite direction: give it all the data.
Approach 2: Get Design JSON via Figma’s API
Figma exposes a REST API that returns a file’s entire structure as JSON. Every node, property, and style is included. Now the LLM has real data instead of pixels.

But having all the data introduces its own problem: there is far too much of it. A single Figma page can produce thousands of lines of JSON, filled with pixel coordinates, visual effects, internal layout rules, and other metadata that are not useful for code generation. Dumping all of this into a prompt can exceed the context window. Even when it fits, the LLM has to wade through pixel coordinates, blend modes, export settings, and other visual metadata that have nothing to do with building a UI, which degrades the output quality.

Neither approach works on its own. Screenshots lack precision. Raw API data has precision but drowns the LLM in noise. What you actually need is something in between: structured design data that preserves exact values like colors, spacing, and component names, but strips out the noise that is not needed for code generation.
The middle ground: Figma’s MCP server
That is what Figma’s MCP server does. MCP stands for Model Context Protocol, a standard that defines how AI agents discover and call external tools. Figma’s MCP server takes the raw design data from Figma’s REST API, filters out the noise, and transforms what remains into a clean, structured representation. Pixel positions become layout relationships like “centered inside its parent.” Raw hex colors become design token references. Deeply nested layers get flattened to match what a developer would actually build. The result is a compact, token-efficient context that an LLM can act on directly.
With that context, let’s look at how the two main workflows, design to code and code to design, actually work under the hood.
https://blog.bytebytego.com/p/figma-design-to-code-code-to-design
AI Best Practices
LLM Coding Workflow
https://addyo.substack.com/p/my-llm-coding-workflow-going-into
https://newsletter.systemdesign.one/p/ai-coding-workflow?ref=dailydev
https://escobyte.substack.com/p/writing-high-quality-production-code
AI coding assistants became game-changers this year, but harnessing them effectively takes skill and structure. These tools dramatically increased what LLMs can do for real-world coding, and many developers (myself included) embraced them.
At Anthropic, for example, engineers adopted Claude Code so heavily that today ~90% of the code for Claude Code is written by Claude Code itself. Yet, using LLMs for programming is not a push-button magic experience - it’s “difficult and unintuitive” and getting great results requires learning new patterns. Critical thinking remains key. Over a year of projects, I’ve converged on a workflow similar to what many experienced devs are discovering: treat the LLM as a powerful pair programmer that requires clear direction, context and oversight rather than autonomous judgment.
Start with a clear plan (specs before code)
https://addyo.substack.com/p/how-to-write-a-good-spec-for-ai-agents
Don’t just throw wishes at the LLM - begin by defining the problem and planning a solution.
One common mistake is diving straight into code generation with a vague prompt. In my workflow, and in many others’, the first step is brainstorming a detailed specification with the AI, then outlining a step-by-step plan, before writing any actual code. For a new project, I’ll describe the idea and ask the LLM to iteratively ask me questions until we’ve fleshed out requirements and edge cases. By the end, we compile this into a comprehensive spec.md - containing requirements, architecture decisions, data models, and even a testing strategy. This spec forms the foundation for development.
Next, I feed the spec into a reasoning-capable model and prompt it to generate a project plan: break the implementation into logical, bite-sized tasks or milestones. The AI essentially helps me do a mini “design doc” or project plan. I often iterate on this plan - editing and asking the AI to critique or refine it - until it’s coherent and complete. Only then do I proceed to coding. This upfront investment might feel slow, but it pays off enormously. As Les Orchard put it, it’s like doing a “waterfall in 15 minutes” - a rapid structured planning phase that makes the subsequent coding much smoother.v
Having a clear spec and plan means when we unleash the codegen, both the human and the LLM know exactly what we’re building and why. In short, planning first forces you and the AI onto the same page and prevents wasted cycles. It’s a step many people are tempted to skip, but experienced LLM developers now treat a robust spec/plan as the cornerstone of the workflow.

Scope management is everything - feed the LLM manageable tasks, not the whole codebase at once.
A crucial lesson I’ve learned is to avoid asking the AI for large, monolithic outputs. Instead, we break the project into iterative steps or tickets and tackle them one by one. LLMs do best when given focused prompts: implement one function, fix one bug, add one feature at a time. For example, after planning, I will prompt the codegen model: “Okay, let’s implement Step 1 from the plan”. We code that, test it, then move to Step 2, and so on. Each chunk is small enough that the AI can handle it within context and you can understand the code it produces.
This approach guards against the model going off the rails. If you ask for too much in one go, it’s likely to get confused or produce a “jumbled mess” that’s hard to untangle. Developers report that when they tried to have an LLM generate huge swaths of an app, they ended up with inconsistency and duplication - “like 10 devs worked on it without talking to each other,” one said. I’ve felt that pain; the fix is to stop, back up, and split the problem into smaller pieces. Each iteration, we carry forward the context of what’s been built and incrementally add to it. This also fits nicely with a test-driven development (TDD) approach - we can write or generate tests for each piece as we go (more on testing soon).
Several coding-agent tools now explicitly support this chunked workflow. For instance, I often generate a structured “prompt plan” file that contains a sequence of prompts for each task, so that tools like Cursor can execute them one by one. The key point is to avoid huge leaps. By iterating in small loops, we greatly reduce the chance of catastrophic errors and we can course-correct quickly. LLMs excel at quick, contained tasks - use that to your advantage.
Provide extensive context and guidance
LLMs are only as good as the context you provide - show them the relevant code, docs, and constraints.
When working on a codebase, I make sure to feed the AI all the information it needs to perform well. That includes the code it should modify or refer to, the project’s technical constraints, and any known pitfalls or preferred approaches. Modern tools help with this: for example, Anthropic’s Claude can import an entire GitHub repo into its context in “Projects” mode, and IDE assistants like Cursor or Copilot auto-include open files in the prompt. But I often go further - I will either use an MCP like Context7 or manually copy important pieces of the codebase or API docs into the conversation if I suspect the model doesn’t have them.
Expert LLM users emphasize this “context packing” step. For example, doing a “brain dump” of everything the model should know before coding, including: high-level goals and invariants, examples of good solutions, and warnings about approaches to avoid. If I’m asking an AI to implement a tricky solution, I might tell it which naive solutions are too slow, or provide a reference implementation from elsewhere. If I’m using a niche library or a brand-new API, I’ll paste in the official docs or README so the AI isn’t flying blind. All of this upfront context dramatically improves the quality of its output, because the model isn’t guessing - it has the facts and constraints in front of it.
There are now utilities to automate context packaging. I’ve experimented with tools like gitingest or repo2txt, which essentially “dump” the relevant parts of your codebase into a text file for the LLM to read. These can be a lifesaver when dealing with a large project - you generate an output.txt bundle of key source files and let the model ingest that. The principle is: don’t make the AI operate on partial information. If a bug fix requires understanding four different modules, show it those four modules. Yes, we must watch token limits, but current frontier models have pretty huge context windows (tens of thousands of tokens). Use them wisely. I often selectively include just the portions of code relevant to the task at hand, and explicitly tell the AI what not to focus on if something is out of scope (to save tokens).
I think Claude Skills have potential because they turn what used to be fragile repeated prompting into something durable and reusable by packaging instructions, scripts, and domain-specific expertise into modular capabilities that tools can automatically apply when a request matches the Skill. This means you get more reliable and context aware results than a generic prompt ever could and you move away from one off interactions toward workflows that encode repeatable procedures and team knowledge for tasks in a consistent way. A number of community-curated Skill Collections exist, but one of my favorite examples is the but one of my favorite examples is the frontend-design skill which can “end” the purple design aesthetic prevalent in LLM generated UIs. Until more tools support Skills officially, workarounds exist.
Finally, guide the AI with comments and rules inside the prompt. I might precede a code snippet with: “Here is the current implementation of X. We need to extend it to do Y, but be careful not to break Z.” These little hints go a long way. LLMs are literalists - they’ll follow instructions, so give them detailed, contextual instructions. By proactively providing context and guidance, we minimize hallucinations and off-base suggestions and get code that fits our project’s needs.

Choose the right model (and use multiple when needed)
Not all coding LLMs are equal - pick your tool with intention, and don’t be afraid to swap models mid-stream.
In 2025 we’ve been spoiled with a variety of capable code-focused LLMs. Part of my workflow is choosing the model or service best suited to each task. Sometimes it can be valuable to even try two or more LLMs in parallel to cross-check how they might approach the same problem differently.
Each model has its own “personality”. The key is: if one model gets stuck or gives mediocre outputs, try another. I’ve literally copied the same prompt from one chat into another service to see if it can handle it better. This “model musical chairs” can rescue you when you hit a model’s blind spot.
Also, make sure you’re using the best version available. If you can, use the newest “pro” tier models - because quality matters. And yes, it often means paying for access, but the productivity gains can justify it. Ultimately, pick the AI pair programmer whose “vibe” meshes with you. I know folks who prefer one model simply because they like how its responses feel. That’s valid - when you’re essentially in a constant dialogue with an AI, the UX and tone make a difference.
Personally I gravitate towards Gemini for a lot of coding work these days because the interaction feels more natural and it often understands my requests on the first try. But I will not hesitate to switch to another model if needed; sometimes a second opinion helps the solution emerge. In summary: use the best tool for the job, and remember you have an arsenal of AIs at your disposal.
Leverage AI coding across the lifecycle
Supercharge your workflow with coding-specific AI help across the SDLC.
On the command-line, new AI agents emerged. Claude Code, OpenAI’s Codex CLI and Google’s Gemini CLI are CLI tools where you can chat with them directly in your project directory - they can read files, run tests, and even multi-step fix issues. I’ve used Google’s Jules and GitHub’s Copilot Agent as well - these are asynchronous coding agents that actually clone your repo into a cloud VM and work on tasks in the background (writing tests, fixing bugs, then opening a PR for you). It’s a bit eerie to witness: you issue a command like “refactor the payment module for X” and a little while later you get a pull request with code changes and passing tests. We are truly living in the future. You can read more about this in conductors to orchestrators.
That said, these tools are not infallible, and you must understand their limits. They accelerate the mechanical parts of coding - generating boilerplate, applying repetitive changes, running tests automatically - but they still benefit greatly from your guidance. For instance, when I use an agent like Claude or Copilot to implement something, I often supply it with the plan or to-do list from earlier steps so it knows the exact sequence of tasks. If the agent supports it, I’ll load up my spec.md or plan.md in the context before telling it to execute. This keeps it on track.
We’re not at the stage of letting an AI agent code an entire feature unattended and expecting perfect results. Instead, I use these tools in a supervised way: I’ll let them generate and even run code, but I keep an eye on each step, ready to step in when something looks off. There are also orchestration tools like Conductor that let you run multiple agents in parallel on different tasks (essentially a way to scale up AI help) - some engineers are experimenting with running 3-4 agents at once on separate features. I’ve dabbled in this “massively parallel” approach; it’s surprisingly effective at getting a lot done quickly, but it’s also mentally taxing to monitor multiple AI threads! For most cases, I stick to one main agent at a time and maybe a secondary one for reviews (discussed below).
Just remember these are power tools - you still control the trigger and guide the outcome.

Keep a human in the loop - verify, test, and review everything
AI will happily produce plausible-looking code, but you are responsible for quality - always review and test thoroughly. One of my cardinal rules is never to blindly trust an LLM’s output. As Simon Willison aptly says, think of an LLM pair programmer as “over-confident and prone to mistakes”. It writes code with complete conviction - including bugs or nonsense - and won’t tell you something is wrong unless you catch it. So I treat every AI-generated snippet as if it came from a junior developer: I read through the code, run it, and test it as needed. You absolutely have to test what it writes - run those unit tests, or manually exercise the feature, to ensure it does what it claims. Read more about this in vibe coding is not an excuse for low-quality work.
In fact, I weave testing into the workflow itself. My earlier planning stage often includes generating a list of tests or a testing plan for each step. If I’m using a tool like Claude Code, I’ll instruct it to run the test suite after implementing a task, and have it debug failures if any occur. This kind of tight feedback loop (write code → run tests → fix) is something AI excels at as long as the tests exist. It’s no surprise that those who get the most out of coding agents tend to be those with strong testing practices. An agent like Claude can “fly” through a project with a good test suite as safety net. Without tests, the agent might blithely assume everything is fine (“sure, all good!”) when in reality it’s broken several things. So, invest in tests - it amplifies the AI’s usefulness and confidence in the result.
Even beyond automated tests, do code reviews - both manual and AI-assisted. I routinely pause and review the code that’s been generated so far, line by line. Sometimes I’ll spawn a second AI session (or a different model) and ask it to critique or review code produced by the first. For example, I might have Claude write the code and then ask Gemini, “Can you review this function for any errors or improvements?” This can catch subtle issues. The key is to not skip the review just because an AI wrote the code. If anything, AI-written code needs extra scrutiny, because it can sometimes be superficially convincing while hiding flaws that a human might not immediately notice.
I also use Chrome DevTools MCP, built with my last team, for my debugging and quality loop to bridge the gap between static code analysis and live browser execution. It “gives your agent eyes”. It lets me grant my AI tools direct access to see what the browser can, inspect the DOM, get rich performance traces, console logs or network traces. This integration eliminates the friction of manual context switching, allowing for automated UI testing directly through the LLM. It means bugs can be diagnosed and fixed with high precision based on actual runtime data.
The dire consequences of skipping human oversight have been documented. One developer who leaned heavily on AI generation for a rush project described the result as an inconsistent mess - duplicate logic, mismatched method names, no coherent architecture. He realized he’d been “building, building, building” without stepping back to really see what the AI had woven together. The fix was a painful refactor and a vow to never let things get that far out of hand again. I’ve taken that to heart. No matter how much AI I use, I remain the accountable engineer.
In practical terms, that means I only merge or ship code after I’ve understood it. If the AI generates something convoluted, I’ll ask it to add comments explaining it, or I’ll rewrite it in simpler terms. If something doesn’t feel right, I dig in - just as I would if a human colleague contributed code that raised red flags.
It’s all about mindset: the LLM is an assistant, not an autonomously reliable coder. I am the senior dev; the LLM is there to accelerate me, not replace my judgment. Maintaining this stance not only results in better code, it also protects your own growth as a developer. (I’ve heard some express concern that relying too much on AI might dull their skills - I think as long as you stay in the loop, actively reviewing and understanding everything, you’re still sharpening your instincts, just at a higher velocity.) In short: stay alert, test often, review always. It’s still your codebase at the end of the day.

Commit often and use version control as a safety net. Never commit code you can’t explain.
Frequent commits are your save points - they let you undo AI missteps and understand changes.
When working with an AI that can generate a lot of code quickly, it’s easy for things to veer off course. I mitigate this by adopting ultra-granular version control habits. I commit early and often, even more than I would in normal hand-coding. After each small task or each successful automated edit, I’ll make a git commit with a clear message. This way, if the AI’s next suggestion introduces a bug or a messy change, I have a recent checkpoint to revert to (or cherry-pick from) without losing hours of work. One practitioner likened it to treating commits as “save points in a game” - if an LLM session goes sideways, you can always roll back to the last stable commit. I’ve found that advice incredibly useful. It’s much less stressful to experiment with a bold AI refactor when you know you can undo it with a git reset if needed.
Proper version control also helps when collaborating with the AI. Since I can’t rely on the AI to remember everything it’s done (context window limitations, etc.), the git history becomes a valuable log. I often scan my recent commits to brief the AI (or myself) on what changed. In fact, LLMs themselves can leverage your commit history if you provide it - I’ve pasted git diffs or commit logs into the prompt so the AI knows what code is new or what the previous state was. Amusingly, LLMs are really good at parsing diffs and using tools like git bisect to find where a bug was introduced. They have infinite patience to traverse commit histories, which can augment your debugging. But this only works if you have a tidy commit history to begin with.
Another benefit: small commits with good messages essentially document the development process, which helps when doing code review (AI or human). If an AI agent made five changes in one go and something broke, having those changes in separate commits makes it easier to pinpoint which commit caused the issue. If everything is in one giant commit titled “AI changes”, good luck! So I discipline myself: finish task, run tests, commit. This also meshes well with the earlier tip about breaking work into small chunks - each chunk ends up as its own commit or PR.
Finally, don’t be afraid to use branches or worktrees to isolate AI experiments. One advanced workflow I’ve adopted (inspired by folks like Jesse Vincent) is to spin up a fresh git worktree for a new feature or sub-project. This lets me run multiple AI coding sessions in parallel on the same repo without them interfering, and I can later merge the changes. It’s a bit like having each AI task in its own sandbox branch. If one experiment fails, I throw away that worktree and nothing is lost in main. If it succeeds, I merge it in. This approach has been crucial when I’m, say, letting an AI implement Feature A while I (or another AI) work on Feature B simultaneously. Version control is what makes this coordination possible. In short: commit often, organize your work with branches, and embrace git as the control mechanism to keep AI-generated changes manageable and reversible.

Customize the AI’s behavior with rules and examples
Steer your AI assistant by providing style guides, examples, and even “rules files” - a little upfront tuning yields much better outputs.
One thing I learned is that you don’t have to accept the AI’s default style or approach - you can influence it heavily by giving it guidelines. For instance, I have a CLAUDE.md file that I update periodically, which contains process rules and preferences for Claude (Anthropic’s model) to follow (and similarly a GEMINI.md when using Gemini CLI). This includes things like “write code in our project’s style, follow our lint rules, don’t use certain functions, prefer functional style over OOP,” etc. When I start a session, I feed this file to Claude to align it with our conventions. It’s surprising how well this works to keep the model “on track” as Jesse Vincent noted - it reduces the tendency of the AI to go off-script or introduce patterns we don’t want.
Even without a fancy rules file, you can set the tone with custom instructions or system prompts. GitHub Copilot and Cursor both introduced features to let you configure the AI’s behavior globally for your project. I’ve taken advantage of that by writing a short paragraph about our coding style, e.g. “Use 4 spaces indent, avoid arrow functions in React, prefer descriptive variable names, code should pass ESLint.” With those instructions in place, the AI’s suggestions adhere much more closely to what a human teammate might write. Ben Congdon mentioned how shocked he was that few people use Copilot’s custom instructions, given how effective they are - he could guide the AI to output code matching his team’s idioms by providing some examples and preferences upfront. I echo that: take the time to teach the AI your expectations.
Another powerful technique is providing in-line examples of the output format or approach you want. If I want the AI to write a function in a very specific way, I might first show it a similar function already in the codebase: “Here’s how we implemented X, use a similar approach for Y.” If I want a certain commenting style, I might write a comment myself and ask the AI to continue in that style. Essentially, prime the model with the pattern to follow. LLMs are great at mimicry - show them one or two examples and they’ll continue in that vein.
The community has also come up with creative “rulesets” to tame LLM behavior. You might have heard of the “Big Daddy” rule or adding a “no hallucination/no deception” clause to prompts. These are basically tricks to remind the AI to be truthful and not overly fabricate code that doesn’t exist. For example, I sometimes prepend a prompt with: “If you are unsure about something or the codebase context is missing, ask for clarification rather than making up an answer.” This reduces hallucinations. Another rule I use is: “Always explain your reasoning briefly in comments when fixing a bug.” This way, when the AI generates a fix, it will also leave a comment like “// Fixed: Changed X to Y to prevent Z (as per spec).” That’s super useful for later review.
In summary, don’t treat the AI as a black box - tune it. By configuring system instructions, sharing project docs, or writing down explicit rules, you turn the AI into a more specialized developer on your team. It’s akin to onboarding a new hire: you’d give them the style guide and some starter tips, right? Do the same for your AI pair programmer. The return on investment is huge: you get outputs that need less tweaking and integrate more smoothly with your codebase.
Embrace testing and automation as force multipliers
Use your CI/CD, linters, and code review bots - AI will work best in an environment that catches mistakes automatically.
This is a corollary to staying in the loop and providing context: a well-oiled development pipeline enhances AI productivity. I ensure that any repository where I use heavy AI coding has a robust continuous integration setup. That means automated tests run on every commit or PR, code style checks (like ESLint, Prettier, etc.) are enforced, and ideally a staging deployment is available for any new branch. Why? Because I can let the AI trigger these and evaluate the results. For instance, if the AI opens a pull request via a tool like Jules or GitHub Copilot Agent, our CI will run tests and report failures. I can feed those failure logs back to the AI: “The integration tests failed with XYZ, let’s debug this.” It turns bug-fixing into a collaborative loop with quick feedback, which AIs handle quite well (they’ll suggest a fix, we run CI again, and iterate).
Automated code quality checks (linters, type checkers) also guide the AI. I actually include linter output in the prompt sometimes. If the AI writes code that doesn’t pass our linter, I’ll copy the linter errors into the chat and say “please address these issues.” The model then knows exactly what to do. It’s like having a strict teacher looking over the AI’s shoulder. In my experience, once the AI is aware of a tool’s output (like a failing test or a lint warning), it will try very hard to correct it - after all, it “wants” to produce the right answer. This ties back to providing context: give the AI the results of its actions in the environment (test failures, etc.) and it will learn from them.
AI coding agents themselves are increasingly incorporating automation hooks. Some agents will refuse to say a code task is “done” until all tests pass, which is exactly the diligence you want. Code review bots (AI or otherwise) act as another filter - I treat their feedback as additional prompts for improvement. For example, if CodeRabbit or another reviewer comments “This function is doing X which is not ideal” I will ask the AI, “Can you refactor based on this feedback?”
By combining AI with automation, you start to get a virtuous cycle. The AI writes code, the automated tools catch issues, the AI fixes them, and so forth, with you overseeing the high-level direction. It feels like having an extremely fast junior dev whose work is instantly checked by a tireless QA engineer. But remember, you set up that environment. If your project lacks tests or any automated checks, the AI’s work may slip through with subtle bugs or poor quality until much later.
So as we head into 2026, one of my goals is to bolster the quality gates around AI code contribution: more tests, more monitoring, perhaps even AI-on-AI code reviews. It might sound paradoxical (AIs reviewing AIs), but I’ve seen it catch things one model missed. Bottom line: an AI-friendly workflow is one with strong automation - use those tools to keep the AI honest.
Continuously learn and adapt (AI amplifies your skills)
Treat every AI coding session as a learning opportunity - the more you know, the more the AI can help you, creating a virtuous cycle.
One of the most exciting aspects of using LLMs in development is how much I have learned in the process. Rather than replacing my need to know things, AIs have actually exposed me to new languages, frameworks, and techniques I might not have tried on my own.
This pattern holds generally: if you come to the table with solid software engineering fundamentals, the AI will amplify your productivity multifold. If you lack that foundation, the AI might just amplify confusion. Seasoned devs have observed that LLMs “reward existing best practices” - things like writing clear specs, having good tests, doing code reviews, etc., all become even more powerful when an AI is involved. In my experience, the AI lets me operate at a higher level of abstraction (focusing on design, interface, architecture) while it churns out the boilerplate, but I need to have those high-level skills first. As Simon Willison notes, almost everything that makes someone a senior engineer (designing systems, managing complexity, knowing what to automate vs hand-code) is what now yields the best outcomes with AI. So using AIs has actually pushed me to up my engineering game - I’m more rigorous about planning and more conscious of architecture, because I’m effectively “managing” a very fast but somewhat naïve coder (the AI).
For those worried that using AI might degrade their abilities: I’d argue the opposite, if done right. By reviewing AI code, I’ve been exposed to new idioms and solutions. By debugging AI mistakes, I’ve deepened my understanding of the language and problem domain. I often ask the AI to explain its code or the rationale behind a fix - kind of like constantly interviewing a candidate about their code - and I pick up insights from its answers. I also use AI as a research assistant: if I’m not sure about a library or approach, I’ll ask it to enumerate options or compare trade-offs. It’s like having an encyclopedic mentor on call. All of this has made me a more knowledgeable programmer.
The big picture is that AI tools amplify your expertise. Going into 2026, I’m not afraid of them “taking my job” - I’m excited that they free me from drudgery and allow me to spend more time on creative and complex aspects of software engineering. But I’m also aware that for those without a solid base, AI can lead to Dunning-Kruger on steroids (it may seem like you built something great, until it falls apart). So my advice: continue honing your craft, and use the AI to accelerate that process. Be intentional about periodically coding without AI too, to keep your raw skills sharp. In the end, the developer + AI duo is far more powerful than either alone, and the developer half of that duo has to hold up their end.
Real-Case Workflows
https://blog.algomaster.io/p/using-ai-effectively-in-large-codebases
https://boristane.com/blog/how-i-use-claude-code/?utm_source=substack&utm_medium=email
Noted Things
Some Key Notes
Use llms.txt pages: https://llmstxt.org/
MCPs: https://mcpmarket.com/server, https://github.com/upstash/context7#installation, https://github.com/vercel/next-devtools-mcp, https://github.com/ChromeDevTools/chrome-devtools-mcp, https://docs.sentry.io/ai/mcp/, https://github.com/GLips/Figma-Context-MCP
Claude prompting best practices: https://platform.claude.com/docs/en/build-with-claude/prompt-engineering/claude-4-best-practices
Open AI prompting best practices: https://help.openai.com/en/articles/6654000-best-practices-for-prompt-engineering-with-the-openai-api
Vercel Skills: https://skills.sh/anthropics/skills/pptx, https://github.com/vercel-labs/agent-skills/blob/main/skills/react-best-practices/SKILL.md
AI agent real UI component knowledge — best practices, layout patterns, and design-system conventions for 60+ interface components: https://github.com/carmahhawwari/ui-design-brain/tree/main
If GitHub Copilot can't fix a bug after 3 tries, stop. You're making it worse.
Here's what most devs do - they paste the error message back into the chat. Agent tries something. Doesn't work. Paste the new error. Agent tries again. Doesn't work. You're now 10 messages deep and your code is more broken than when you started.
This happens because the context window is poisoned. The agent is so fixated on its previous failed attempts that it's basically guessing at this point.
Here's what you do instead. When the agent gets stuck, don't give it another error message. Give it a job
Say exactly this: "Add whatever logging we need to reproduce this bug."
The agent knows your codebase. It'll drop console statements in exactly the right places - the ones it actually needs to understand what's happening.
Not random logging. Strategic logging.
The agent can't fix what it can't see. Give it visibility first, then ask for the fix. Works every single time.
References
https://craftbettersoftware.com/p/the-vibe-coding-stack-for-2026
https://blog.bytebytego.com/p/how-cursor-shipped-its-coding-agent
https://medium.com/vibe-coding/the-concept-every-ai-coder-learns-too-late-c63dd872f923
https://addyo.substack.com/p/how-to-write-a-good-spec-for-ai-agents
https://www.aihero.dev/a-complete-guide-to-agents-md#what-goes-where
https://substack.com/home/post/p-188588325?source=queue
https://awesomeneuron.substack.com/p/a-visual-guide-to-ai-agents