🔥 My React Handbook - Part II

I am a developer creating open-source projects and writing about web development, side projects, and productivity.
React Best Practices
From Context Chaos to Clean State: Mastering State Management with Zustand
State management in React often starts simple and quickly turns to chaos. What begins as a small use of React.Context to manage theme and user data can get caught up in a jungle of deeply nested providers and hard-to-maintain code. But it doesn’t have to be that way.
In this section, we will take a developer’s journey through three stages — Beginner, Intermediate, and Advanced — to understand the evolution of state management in React.
We will expose pitfalls of over using React Context, incrementally clean things up, and finally adopt a powerful alternative: Zustand.
Beginner Level: Starting with Context API
React’s Context API is often the first tool developers reach for when they want to share state between components.
<CartProvider>
  <SessionProvider>
    <CurrentUserProvider>
      <AppConfigProvider>
        <ToastProvider>
          <I18nProvider>
            <TrackingProvider>
              <Content />
            </TrackingProvider>
          </I18nProvider>
        </ToastProvider>
      </AppConfigProvider>
    </CurrentUserProvider>
  </SessionProvider>
</CartProvider>;
So, what is the problem here?

Readability: Too much indentation, hard to reason about.
Maintainability: Changing the provider order is risky.
Testing: Unit tests become verbose as they require all necessary providers.
Performance: Context value changes cause all children to re-render.
Coupling: Components are locked into a specific tree structure.
What is Context Okay?
Context is excellent for static and rarely updated values, like themes or localization.
Intermediate Level: Clean Up with AppProviders
To improve maintainability and cleanliness, we can wrap all providers in a reusable component:
// AppProviders.tsx
export const AppProviders = ({ children }) => (
  <CartProvider>
    <SessionProvider>
      <CurrentUserProvider>
        <AppConfigProvider>
          <ToastProvider>
            <I18nProvider>
              <TrackingProvider>
                <Content />
              </TrackingProvider>
            </I18nProvider>
          </ToastProvider>
        </AppConfigProvider>
      </CurrentUserProvider>
    </SessionProvider>
  </CartProvider>;
);
✅ Pros
Better readability
Centralized management
❌ Cons
Still suffers from performance issues
Doesn’t solve re-render or test complexity
To enhance this, we can make the wrapper dynamic:
const composeProviders = (...providers) =>
  ({ children }) =>
    providers.reduceRight((acc, Provider) => <Provider>{acc}</Provider>, children);

const AppProviders = composeProviders(
  CartProvider,
  SessionProvider,
  CurrentUserProvider,
  AppConfigProvider,
  ToastProvider,
  I18nProvider,
  TrackingProvider,
  AnalyticsProvider
);
It’s cleaner, but still just a band-aid — the fundamental pain remains.
Pro Level: Use Zustand for Scalable State
At this level, developers look for something performant, composable, and easy to maintain. That’s where Zustand comes in.
🔥 Why Zustand?
No Providers Needed
Fine-Grained Subscriptions (no re-renders if slice doesn’t change)
Global Yet Modular — stores can be scoped by domain
🧪 Auth Store Example
import { create } from 'zustand';

export const useAuthStore = create((set) => ({
  user: null,
  login: (user) => set({ user }),
  logout: () => set({ user: null })
}));
Use it like this:
const user = useAuthStore(s => s.user);
const logout = useAuthStore(s => s.logout);
🎨 Theme Store Example
const useThemeStore = create((set, get) => ({
  theme: 'light',
  toggleTheme: () => set({ theme: get().theme === 'light' ? 'dark' : 'light' })
}));
✅ Advantages Over Context
Removes provider boilerplate entirely
Components are decoupled from parent tree
Easy to test and mock
🔁 Migration Tips
Start with isolated state (auth, UI toggles)
Use Context for static config, Zustand for dynamic state
Gradually migrate stores
⚖️ Zustand vs Context

When to Still Use Context

Stick with Context for:
Static config (theme, locale)
Dependency injection
3rd-party integrations (i18n, auth libraries)
Alternatives to Consider

5 React Hook Secrets That Senior Engineers Use (But Never Document)
The hidden techniques that separate beginner React code from production-ready architecture.
Most React developers think they understand React hooks after learning useState and useEffect. The reality is far more complex.
These five techniques became the difference between writing React code that works and building systems that scale effortlessly in a production environment.
The Stable Reference Secret (Eliminates 80% of Re-renders)
The Secret: Professional teams use a pattern called “stable reference optimization“ that most developers have never heard of.
❌ Common Approach: Why It Fails
// This causes child components to re-render on every parent update
const ParentComponent = () => {
  const [count, setCount] = useState(0);

  const handleClick = () => {
    setCount(count + 1);
  };

  const config = {
    theme: 'dark',
    layout: 'grid'
  };

  return (
    <div>
      <ExpensiveChild onClick={handleClick} config={config} />
      <button onClick={() => setCount(count + 1)}>Count: {count}</button>
    </div>
  );
};
✅ Professional Technique (How It Works)
// ==========================================
// 🚀 SECRET: Stable Reference Optimization
// Performance gain: 80% fewer re-renders
// Used by: Professional frontend teams
// ==========================================

const ParentComponent = () => {
  const [count, setCount] = useState(0);

  // SECRET 1: Use useCallback with proper dependencies
  const handleClick = useCallback(() => {
    setCount(prev => prev + 1); // Functional update eliminates dependency
  }, []); // Empty dependency array - truly stable

  // SECRET 2: useMemo for object references
  const config = useMemo(() => ({
    theme: 'dark',
    layout: 'grid'
  }), []); // This object reference never changes

  return (
    <div>
      <ExpensiveChild onClick={handleClick} config={config} />
      <button onClick={() => setCount(count + 1)}>Count: {count}</button>
    </div>
  );
};

// Child component with React.memo for maximum efficiency
const ExpensiveChild = React.memo(({ onClick, config }) => {
  console.log('ExpensiveChild rendered'); // This will log once, not on every count update

  return (
    <div style={{ background: config.theme === 'dark' ? '#333' : '#fff' }}>
      <button onClick={onClick}>Expensive Operation</button>
    </div>
  );
});
Why this works: The browser’s JavaScript engine optimizes function and object references. When React compares props using Object.is(), stable references mean React.memo can skip expensive re-renders. This pattern reduces component tree updates by up to 80% in complex applications.
Real-world applications:
High-traffic listing interfaces use this pattern to prevent re-renders during scroll
Performance impact: 15ms average render time vs 75ms with unstable references
Memory efficiency: 60% less garbage collection pressure
📝 Technical Note: In this example, the config object is wrapped in useMemo to ensure a stable reference between renders.
In cases where the object does not depend on internal state or props, a valid alternative is to define it outside the component as a constant.
This also prevents unnecessary re-renders and eliminates the need for useMemo.
However, I choose to keep useMemo here for educational purposes, it demonstrates how to maintain stable references inside components and serves as a foundation for more dynamic scenarios where the object might later rely on internal variables.
The Batched State Secrets (Sub-50ms Response Times)
The Secret: Enterprise applications use a batched state pattern that combines multiple state updates into a single render cycle.
❌ Common Approach (Causes Performance Bottlenecks)
// Multiple state updates cause multiple re-renders
const SearchComponent = () => {
  const [query, setQuery] = useState('');
  const [results, setResults] = useState([]);
  const [loading, setLoading] = useState(false);
  const [error, setError] = useState(null);

  const handleSearch = async (searchTerm) => {
    setLoading(true);        // Render 1
    setError(null);          // Render 2
    setResults([]);          // Render 3

    try {
      const data = await searchAPI(searchTerm);
      setResults(data);      // Render 4
      setLoading(false);     // Render 5
    } catch (err) {
      setError(err.message); // Render 6
      setLoading(false);     // Render 7
    }
  };

  return (
    <div>
      <input value={query} onChange={(e) => setQuery(e.target.value)} />
      {loading && <div>Loading...</div>}
      {error && <div>Error: {error}</div>}
      {results.map(item => <div key={item.id}>{item.name}</div>)}
    </div>
  );
};
✅ Professional Technique (Batched State Pattern)
// ==========================================
// 🔥 SECRET: Batched State with useReducer
// Performance gain: 85% fewer renders
// Response time: Sub-50ms state updates
// Used by: Professional search interfaces
// ==========================================

const initialState = {
  query: '',
  results: [],
  loading: false,
  error: null
};

const searchReducer = (state, action) => {
  switch (action.type) {
    case 'SEARCH_START':
      return {
        ...state,
        loading: true,
        error: null,
        results: []
      };
    case 'SEARCH_SUCCESS':
      return {
        ...state,
        loading: false,
        results: action.payload,
        error: null
      };
    case 'SEARCH_ERROR':
      return {
        ...state,
        loading: false,
        error: action.payload,
        results: []
      };
    case 'SET_QUERY':
      return {
        ...state,
        query: action.payload
      };
    default:
      return state;
  }
};

const SearchComponent = () => {
  const [state, dispatch] = useReducer(searchReducer, initialState);

  const handleSearch = useCallback(async (searchTerm) => {
    dispatch({ type: 'SEARCH_START' }); // Single render for all state changes

    try {
      const data = await searchAPI(searchTerm);
      dispatch({ type: 'SEARCH_SUCCESS', payload: data }); // Single render
    } catch (err) {
      dispatch({ type: 'SEARCH_ERROR', payload: err.message }); // Single render
    }
  }, []);

  return (
    <div>
      <input
        value={state.query}
        onChange={(e) => dispatch({ type: 'SET_QUERY', payload: e.target.value })}
      />
      {state.loading && <div>Loading...</div>}
      {state.error && <div>Error: {state.error}</div>}
      {state.results.map(item => <div key={item.id}>{item.name}</div>)}
    </div>
  );
};
Why this works: React batches state updates within the same event handler, but useReducer guarantees that all related state changes happen in a single render cycle. This eliminates intermediate renders and provides predictable state transitions.
Performance characteristics:
Render cycles: 1 per action vs 3–7 with multiple useState calls
Memory usage: 45% less due to reduced reconciliation
User experience: No flickering between loading states
The Reference Equality Secrets (Eliminates Infinite Loops)
The Secret: Senior developers use a pattern called “deep equality memoization” to prevent infinite re-renders with complex dependencies.
❌ Common Approach (Infinite Loop Trap)
// This creates an infinite loop - the dependency changes on every render
const UserProfile = ({ userId }) => {
  const [user, setUser] = useState(null);

  const fetchUser = useCallback(async () => {
    const userData = await getUserById(userId);
    setUser(userData);
  }, [userId]);

  const userConfig = {
    fields: ['name', 'email', 'avatar'],
    permissions: ['read', 'update']
  };

  // DANGER: userConfig is recreated on every render!
  useEffect(() => {
    fetchUser(userConfig);
  }, [fetchUser, userConfig]); // This dependency changes every render

  return <div>{user?.name}</div>;
};
✅ Professional Technique (Deep Equality Memoization)
// ==========================================
// 🎯 SECRET: Deep Equality Hook Pattern
// Prevents: Infinite loops in complex dependencies
// Performance: Stable references for object dependencies
// Used by: Professional content management systems
// ==========================================

// Custom hook for deep equality comparison
const useDeepMemo = (value, deps) => {
  const ref = useRef();

  if (!ref.current || !deps.every((dep, i) =>
    JSON.stringify(dep) === JSON.stringify(ref.current.deps[i])
  )) {
    ref.current = { value, deps };
  }

  return ref.current.value;
};

const UserProfile = ({ userId }) => {
  const [user, setUser] = useState(null);

  // SECRET: Stable complex object reference
  const userConfig = useDeepMemo({
    fields: ['name', 'email', 'avatar'],
    permissions: ['read', 'update']
  }, [userId]); // Only recreate when userId changes

  const fetchUser = useCallback(async (config) => {
    const userData = await getUserById(userId, config);
    setUser(userData);
  }, [userId]);

  // This effect runs only when userId actually changes
  useEffect(() => {
    fetchUser(userConfig);
  }, [fetchUser, userConfig]);

  return <div>{user?.name}</div>;
};

// Even better: Professional teams use a custom hook
const useUserProfile = (userId) => {
  const [user, setUser] = useState(null);
  const [loading, setLoading] = useState(true);

  const config = useDeepMemo({
    fields: ['name', 'email', 'avatar'],
    permissions: ['read', 'update']
  }, [userId]);

  useEffect(() => {
    let cancelled = false;

    const fetchUser = async () => {
      setLoading(true);
      try {
        const userData = await getUserById(userId, config);
        if (!cancelled) {
          setUser(userData);
          setLoading(false);
        }
      } catch (error) {
        if (!cancelled) {
          setLoading(false);
        }
      }
    };

    fetchUser();

    return () => {
      cancelled = true;
    };
  }, [userId, config]);

  return { user, loading };
};
Why this works: The custom useDeepMemo hook compares the actual content of objects rather than their references. This prevents unnecessary re-renders while maintaining predictable behavior with complex dependencies.
Real-world impact:
Eliminates infinite loops in 95% of complex dependency scenarios
Reduces API calls by up to 90% in data-heavy applications
Stable performance regardless of component complexity
The Layout Effect Secret (Eliminates Visual Flicker)
The Secret: Professional applications use useLayoutEffect strategically to eliminate the "flash of unstyled content" that happens with useEffect.
❌ Common Approach (Causes Visual Flicker)
// This causes a visible flash as the DOM updates after paint
const AnimatedModal = ({ isOpen, onClose }) => {
  const [dimensions, setDimensions] = useState({ width: 0, height: 0 });
  const modalRef = useRef(null);

  useEffect(() => {
    if (isOpen && modalRef.current) {
      const rect = modalRef.current.getBoundingClientRect();
      setDimensions({ width: rect.width, height: rect.height });
    }
  }, [isOpen]);

  return (
    <div
      ref={modalRef}
      style={{
        position: 'fixed',
        top: '50%',
        left: '50%',
        transform: `translate(-50%, -50%)`,
        width: dimensions.width,
        height: dimensions.height,
        background: 'white',
        opacity: isOpen ? 1 : 0
      }}
    >
      <h2>Modal Content</h2>
      <p>This will flicker on initial render</p>
      <button onClick={onClose}>Close</button>
    </div>
  );
};
✅ Professional Technique (Layout Effect Pattern)
// ==========================================
// ⚡ SECRET: Synchronous Layout Measurements
// Eliminates: Visual flicker and layout shifts
// Performance: Smoother animations and transitions
// Used by: Professional modal systems and video interfaces
// ==========================================

const AnimatedModal = ({ isOpen, onClose }) => {
  const [dimensions, setDimensions] = useState({ width: 0, height: 0 });
  const [isReady, setIsReady] = useState(false);
  const modalRef = useRef(null);

  // SECRET: useLayoutEffect runs synchronously after DOM mutations
  // but before the browser paints
  useLayoutEffect(() => {
    if (isOpen && modalRef.current) {
      const rect = modalRef.current.getBoundingClientRect();
      setDimensions({ width: rect.width, height: rect.height });
      setIsReady(true);
    } else {
      setIsReady(false);
    }
  }, [isOpen]);

  if (!isOpen) return null;

  return (
    <div
      ref={modalRef}
      style={{
        position: 'fixed',
        top: '50%',
        left: '50%',
        transform: `translate(-50%, -50%)`,
        width: dimensions.width,
        height: dimensions.height,
        background: 'white',
        opacity: isReady ? 1 : 0, // Prevents flash of unstyled content
        transition: 'opacity 0.3s ease'
      }}
    >
      <h2>Modal Content</h2>
      <p>This renders smoothly without flicker</p>
      <button onClick={onClose}>Close</button>
    </div>
  );
};

// Professional teams often combine this with a custom hook
const useModalDimensions = (isOpen) => {
  const [dimensions, setDimensions] = useState({ width: 0, height: 0 });
  const [isReady, setIsReady] = useState(false);
  const ref = useRef(null);

  useLayoutEffect(() => {
    if (isOpen && ref.current) {
      const updateDimensions = () => {
        const rect = ref.current.getBoundingClientRect();
        setDimensions({ width: rect.width, height: rect.height });
        setIsReady(true);
      };

      updateDimensions();

      // Handle window resize
      window.addEventListener('resize', updateDimensions);
      return () => window.removeEventListener('resize', updateDimensions);
    } else {
      setIsReady(false);
    }
  }, [isOpen]);

  return { ref, dimensions, isReady };
};
Why this works: useLayoutEffect runs synchronously after all DOM mutations but before the browser paints. This allows you to measure and adjust layout without visible flicker. It's the difference between a professional application and one that feels janky.
Performance characteristics:
Zero visual flicker in modal animations
Smooth transitions even on slower devices
Better perceived performance by eliminating layout shifts
https://www.developerway.com/posts/no-more-flickering-ui
The Cleanup Secret (Prevents Memory Leaks)
The Secret: Enterprise applications use a pattern called “cleanup orchestration” that prevents memory leaks and race conditions that cause production crashes.
❌ Common Approach (Memory Leak Disaster)
// This creates memory leaks and race conditions
const RealTimeData = ({ endpoint }) => {
  const [data, setData] = useState(null);
  const [connected, setConnected] = useState(false);

  useEffect(() => {
    const ws = new WebSocket(endpoint);

    ws.onopen = () => {
      setConnected(true);
    };

    ws.onmessage = (event) => {
      setData(JSON.parse(event.data));
    };

    ws.onclose = () => {
      setConnected(false);
    };

    // Missing cleanup - this will cause memory leaks!
  }, [endpoint]);

  return (
    <div>
      Status: {connected ? 'Connected' : 'Disconnected'}
      {data && <div>Data: {JSON.stringify(data)}</div>}
    </div>
  );
};
✅ Professional Technique (Cleanup Orchestration)
// ==========================================
// 🛡️ SECRET: Comprehensive Cleanup Pattern
// Prevents: Memory leaks, race conditions, crashes
// Reliability: 99.9% uptime in production
// Used by: Professional real-time applications
// ==========================================

const RealTimeData = ({ endpoint }) => {
  const [data, setData] = useState(null);
  const [connected, setConnected] = useState(false);
  const [error, setError] = useState(null);

  // SECRET: Use ref to track component mount status
  const mountedRef = useRef(true);

  useEffect(() => {
    let ws = null;
    let reconnectTimeout = null;

    const connect = () => {
      ws = new WebSocket(endpoint);

      ws.onopen = () => {
        if (mountedRef.current) {
          setConnected(true);
          setError(null);
        }
      };

      ws.onmessage = (event) => {
        // SECRET: Always check if component is still mounted
        if (mountedRef.current) {
          try {
            const parsedData = JSON.parse(event.data);
            setData(parsedData);
          } catch (err) {
            setError('Invalid data format');
          }
        }
      };

      ws.onclose = () => {
        if (mountedRef.current) {
          setConnected(false);

          // SECRET: Automatic reconnection with exponential backoff
          reconnectTimeout = setTimeout(() => {
            if (mountedRef.current) {
              connect();
            }
          }, 3000);
        }
      };

      ws.onerror = (err) => {
        if (mountedRef.current) {
          setError('Connection error');
        }
      };
    };

    connect();

    // SECRET: Comprehensive cleanup function
    return () => {
      mountedRef.current = false;

      if (ws) {
        ws.close();
      }

      if (reconnectTimeout) {
        clearTimeout(reconnectTimeout);
      }
    };
  }, [endpoint]);

  // SECRET: Set mounted ref to false on component unmount
  useEffect(() => {
    return () => {
      mountedRef.current = false;
    };
  }, []);

  return (
    <div>
      Status: {connected ? 'Connected' : 'Disconnected'}
      {error && <div style={{ color: 'red' }}>Error: {error}</div>}
      {data && <div>Data: {JSON.stringify(data)}</div>}
    </div>
  );
};

// Professional teams use a custom hook for reusability
const useWebSocket = (endpoint) => {
  const [data, setData] = useState(null);
  const [connected, setConnected] = useState(false);
  const [error, setError] = useState(null);
  const mountedRef = useRef(true);

  useEffect(() => {
    let ws = null;
    let reconnectTimeout = null;

    const connect = () => {
      ws = new WebSocket(endpoint);

      ws.onopen = () => {
        if (mountedRef.current) {
          setConnected(true);
          setError(null);
        }
      };

      ws.onmessage = (event) => {
        if (mountedRef.current) {
          try {
            setData(JSON.parse(event.data));
          } catch (err) {
            setError('Invalid data format');
          }
        }
      };

      ws.onclose = () => {
        if (mountedRef.current) {
          setConnected(false);
          reconnectTimeout = setTimeout(() => {
            if (mountedRef.current) connect();
          }, 3000);
        }
      };

      ws.onerror = () => {
        if (mountedRef.current) {
          setError('Connection error');
        }
      };
    };

    connect();

    return () => {
      mountedRef.current = false;
      if (ws) ws.close();
      if (reconnectTimeout) clearTimeout(reconnectTimeout);
    };
  }, [endpoint]);

  useEffect(() => {
    return () => {
      mountedRef.current = false;
    };
  }, []);

  return { data, connected, error };
};
Why this works: The mountedRef pattern prevents state updates on unmounted components, while comprehensive cleanup prevents memory leaks. The exponential backoff reconnection strategy ensures reliable connections without overwhelming the server.
Real-world impact:
Zero memory leaks in production applications
Eliminates race conditions that cause crashes
Automatic recovery from connection failures
99.9% uptime in high-traffic applications
7 Tips To Write Clean Functions
If it takes more than 3 seconds to understand what a function does, it's time to refactor it. The quality of your functions is inversely proportional to the time it takes to understand them.
Complex functions can lead to errors, make changes difficult, and slow down the onboarding process for new developers. Remember, code is read far more often than written, so investing time in writing clean functions is one of the best investments you can make in the long run.
Here are 7 tips on how I write clean functions:
Keep your functions small
As Uncle Bob once said:
The first rule of functions is that they should be small. The second rule of functions is that they should be smaller than that.
A function should do one thing and do it well. But what is the ideal function size? There is no hard rule for it. Sometimes, 5 lines are just perfect, while other times a function may need 50 lines to achieve a single responsibility.
The best is to always use your judgment based on the context. Be pragmatic, never be dogmatic. The trick is to strive for small functions but avoid making so many that they clutter your code.
Name your functions well
There is no week that I don’t see poorly named functions. Contrary to popular belief, naming your code is not hard. It just requires additional effort, several trials, and continuous refinements.
Here are 4 tips I use to name my functions:
Use intention-revealing naming relating to the business domain. Remember, if your code doesn't speak the customer's language, you’re not focusing on their problems.
Use verbs and verb phrases. Using nouns or adjectives for function names can be problematic because they don’t clearly tell what the function does
Use naming conventions within your team
Don't use different terms for the same concept. It makes your code inconsistent, confusing yourself and your colleagues. Instead, use only one word per concept:

Limit the number of parameters
The ideal number of arguments for a function is zero. The problem with functions having too many parameters is that it increases complexity and makes the function harder to test.

Aim for a maximum of three parameters per function. A great solution to this is to group related parameters together:

Use Early Returns & Align the Happy Path Left
In the context of software or information modeling, a happy path (sometimes called happy flow*) is a default scenario featuring no exceptional or error conditions.*
You want your happy path to be left-aligned, meaning it shouldn’t be buried deep within if-else statements.
Keeping the happy path aligned to the left allows other engineers to quickly skim the code and grasp the function’s purpose more effectively.
One effective way to achieve this is by using early returns.
🛑 Don’t

✅ Do

Write a pure function with no side effects
What is a pure function? A function is pure if it always produces the same result given the same input. Secondly, it has no side effects. In other words, the output depends only on the input, while there are no hidden behaviors.
There are 3 benefits of pure functions:
Code is more predictable
They are easier to test
We can run them in parallel
You know you are working on clean code when every function you read does exactly what you expect. Pure functions make your code clean.
Avoid Booleans in Function Signatures
Avoid using booleans in function signatures. For first-time readers of your code, it’s hard to grasp its meaning.
🛑 Don’t

✅ Do

Benefits:
Improved readability: Function calls become self-documenting
Extensibility: Adding new roles or options is easier without changing the function signature.
Clarity: It’s clear what each argument means without needing to check the function definition.
Use comments sparingly
When a function is not understandable, don't try to improve it by adding comments. Comments are one of the biggest code smells:
They become easily outdated
They are redundant many times
If used extensively, nobody reads them

Comments are good tools for explaining the WHY, but they should be the last resort for explaining the WHAT. In most cases, you can replace comments by using proper function names. Never forget: A long descriptive name is better than a long descriptive comment.

Conditional Rendering via Object Mapping
Why write repetitive if or switch blocks when you can declaratively map states to components?
This section explains the Object Mapping technique in conditional rendering in React — a clean, scalable, and highly readable alternative to switch-case and multiple if-else blocks.
What is Object Mapping?
Instead of using conditionals like if/else or switch, you can use a JavaScript object as a lookup map where keys represent app states and values represent the corresponding JSX components.
This method is:
Declarative
Scalable
Easier to maintain
Excellent for rendering based on enum-style statuses
Let’s say you’re building a UI that renders different views based on a data-fetching status:
const status = 'loading'; // can be 'loading' | 'error' | 'success'
Traditionally, you might write:
if (status === 'loading') return <Loader />;
if (status === 'error') return <ErrorScreen />;
if (status === 'success') return <DataView />;
Or with a switch:
switch (status) {
  case 'loading': return <Loader />;
  case 'error': return <ErrorScreen />;
  case 'success': return <DataView />;
  default: return null;
}
But there’s a more declarative approach 👇
Object Mapping: The Modern Pattern
const statusComponentMap = {
  loading: <Loader />,
  error: <ErrorScreen />,
  success: <DataView />
};
return statusComponentMap[status] || null;
Benefit Explanation Declarative Treats UI logic like data — perfect for React’s philosophy. Easily Extendable. Just add a new key-value pair for new status types. No nesting: Avoids deeply nested ternaries or switches. Cleaner logic. One central object holds all the possible states. Great with enums. Works seamlessly with TypeScript enums or string constants
If you’re using TypeScript, you can make this safer with:
type Status = 'loading' | 'error' | 'success';
const statusComponentMap: Record<Status, JSX.Element> = {
  loading: <Loader />,
  error: <ErrorScreen />,
  success: <DataView />
};return statusComponentMap[status];
✅ Compile-time safety for enum-like status values.
The One React Form Mistake That Almost Every Developer Makes (Controlled Inputs vs Uncontrolled Inputs)
A few months into my React job, I thought I had forms figured out. I mean, how hard could it be? Take an input, slap some state on it, call it a day.
Then I met my senior developer.
“Show me how you are handling this form“. He said.
I proudly show him my code:
function ContactForm() {
  const [email, setEmail] = useState(); // The bug was right here

  return (
    <input
      type="email"
      value={email}
      onChange={(e) => setEmail(e.target.value)}
    />
  );
}
“See the problem?” he asked.
I didn’t. It looked perfectly fine to me.
“You’re initializing email as undefined,” he explained.
“React sees it as an uncontrolled input initially, then when you type something, it becomes controlled. That’s why you get that warning.“
That 30-second conversation changed how I understood React form forever.
Here’s what I wish someone had told me from the beginning: every form input in React has one of two personalities, controlled or uncontrolled. And understanding the difference isn’t just academic theory; it’s the key to building forms that actually work.
Controlled Components: React is the Boss
Before I understood controlled components, “I will just let the DOM handle the input value and grab it when I need it“.
After I understood controlled components: “React manages the input’s value through the state, giving me complete control and predictable behavior.“
function ControlledForm() {
  const [name, setName] = useState(''); // Always initialize with a string!

  return (
    <input
      type="text"
      value={name}                                    // React controls this
      onChange={(e) => setName(e.target.value)}       // React updates this
    />
  );
}
The magic happens in that value={name} prop. React takes full control of the input's value.
Uncontrolled Components: DOM Runs the Show
An uncontrolled component lets the DOM manage its own state, and you just check in occasionally using refs.
function UncontrolledForm() {
  const nameRef = useRef();

  const handleSubmit = () => {
    console.log(nameRef.current.value); // Ask the DOM what the value is
  };

  return (
    <input
      type="text"
      ref={nameRef}
      defaultValue="John"  // Set initial value, then hands off to DOM
    />
  );
}
Notice there’s no value prop here. The DOM is in charge, and we use a ref to peek at the value when needed.
The Story Behind My “Aha!“ Moment
After my senior showed me that bug, I became obsessed with understanding when to use each approach. I started paying attention to how different scenarios played out in real projects.
The Login Form Disaster: I was building a login form with real-time validation. Every keystroke triggered validation, password strength checking, and field dependencies. I tried using uncontrolled components first, what a nightmare.
Accessing values through refs for every validation check made the code messy and unpredictable.
The File Upload Success: Later, I needed a simple file upload. No validation, no dependencies, just grab the file on submit. I used an uncontrolled component with a ref. Clean, simple, perfect.
That’s when it hit me: the choice isn’t about which approach is “better,” it’s about matching the approach to the problem.
💡 Pro Tip: The React DevTools browser extension can help you spot controlled vs uncontrolled issues. Look for components that show state changes in real-time those are your controlled components!
You May Be Looking For A useSyncExternalStore
When you see a useEffect that updates a useState and returns a value, you might be looking for a useSyncExternalStore. This is my current vendetta.
Makes it easier to fix jank like this:

I pattern I see a lot in our React code combines a state, an effect, and a subscription:
function useSomeValue() {
  const [value, setValue] = useState(0)

  useEffect(() => {
    const eventSource = getEventSource()
    eventSource.subscribe((val) => setValue(val))

    return () => {
      eventSource.unsubscribe()
    }
  }, [])

  return value
}
This is a custom hook that subscribes to an event source like a browser API, a ResizeObserver, or a state machine. Sometimes includes refs to the DOM to measure things.
This works
The effect runs on mount, subscribes to a thing, updates the state to trigger re-renders, and cleans up with an unsubscribe when the component unmounts. It’s the pattern you are familiar with after writing React for a while, and you easily spot what is happening.
Can Lead To Jank With Server Handling
The problem is that React has to render your components 2+ times before it settles into what you wanted. First, it renders with a default value, then the effect runs, then it re-renders when state updates.
What you saw in the GIF above is a slow hydration process.
Component rendered on server with default values
Couldn't subscribe to browser events because there's no browser (I haven't confirmed if effects run at all)
HTML showed up in the browser
Hydration ran to make everything interactive
Finally, the effect ran on the mount
Subscribed to browser event
Updated state
And rendered the component

Look at all that JavaScript compute chugging away, it’s not a data issue. Notice that there are no network calls on that graph. We preload data with a shared query cached during server rendering.
useSyncExternalStore to the rescue
The right way to do this effect+subscribe+state pattern is the useSyncExternalStore. This took me a long time to grok, but it’s super neat. The API is cleaner, and you can specify a server-side default value.
Like this
const eventSource = getEventSource()

function subscribe(callback) {
  eventSource.onChange(callback)
  return () => {
    eventSource.unsubscribe(callback)
  }
}

function useSomeValue() {
  const value = useSyncExternalStore(
    subscribe,
    () => eventSource.currentValue(),
    () => defaultValue
  )

  return value
}
We now have an explicit subscribe function that executes a callback when the value changes. This runs our value getter – the 2nd param to useSyncExternalStore. The last parameter is a default value getter that runs during server rendering.
You could, for example, initiate a ResizeObserver in your subscribe function, then measure a ref as your value getter.
The result is a less janky app.

Handle errors effectively
Handling errors effectively is often overlooked and underestimated by many developers. Like many other best practices, this seems to be an afterthought at the beginning. You want to make the code work and don't want to "waste" time thinking much about errors.
But once you have become more experienced and have been in nasty situations where better error handling could have saved you a lot of energy (and valuable time of course), you realize that it's mandatory in the long run to have solid error handling in your application. Especially when the application is deployed to production.
React Error Boundary
This is a custom class component that is used as a wrapper for your entire application. Of course, you can wrap the ErrorBoundary component also around components that are deeper in the component tree to render more specific UI, for example. Basically, it's also the best practice to wrap the ErrorBoundary around a component that is error-prone.
With the lifecycle method componentDidCatch you are able to catch errors during the rendering phase or any other lifecycle of the child components. So when an error arises during that phase, it bubbles up and gets caught by the ErrorBoundary component.
If you are using a logging service(which I also highly recommend), this is a great place to connect to it.
The static function getDerivedStateFromError is called during the render phase and is used to update the state of your ErrorBoundary component. Based on your state, you can conditionally render an error UI.
class ErrorBoundary extends React.Component {
  constructor(props) {
    super(props);
    this.state = { hasError: false };
  }

  static getDerivedStateFromError(error) {
    return { hasError: true };
  }

  componentDidCatch(error, errorInfo) {
    //log the error to an error reporting service
    errorService.log({ error, errorInfo });
  }

  render() {
    if (this.state.hasError) {
      return <h1>Oops, something went wrong.</h1>;
    }
    return this.props.children;
  }
}
A big drawback of this approach is that it doesn't handle errors in asynchronous callbacks, server-side rendering, or event handlers because they are outside of the boundary.
Use try-catch to handle errors beyond boundaries
This technique is effective in catching errors that might occur inside asynchronous callbacks. Let's imagine we are fetching a user's profile data from an API and want to display it inside a Profile Component.
const UserProfile = ({ userId }) => {
    const [isLoading, setIsLoading] = useState(true)
    const [profileData, setProfileData] = useState({})

    useEffect(() => {
        // Separate function to make of use of async
        const getUserDataAsync = async () => {
            try {
                // Fetch user data from API
                const userData = await axios.get(`/users/${userId}`)
                // Throw error if user data is falsy (will be caught by catch)
                if (!userData) {
                    throw new Error("No user data found")
                }
                // If user data is truthy update state
                setProfileData(userData.profile)
            } catch(error) {
                // Log any caught error in the logging service
                errorService.log({ error })
                // Update state
                setProfileData(null)
            } finally {
                // Reset loading state in any case
                setIsLoading(false)
            }
        }

        getUserDataAsync()
    }, [])

    if (isLoading) {
        return <div>Loading ...</div>
    }

    if (!profileData) {
        return <ErrorUI />
    }

    return (
        <div>
            ...User Profile
        </div>
    )
}
When the component gets mounted, it starts a GET request to our API to receive the user data for the corresponding userId that we will get from the props.
Using try-catch helps us catch any errors that might occur during that API call. For example, that could be a 404 or a 500 response from the API.
Once an error gets caught, we are inside that catch block and receive the error as a parameter. Now we are able to log it in our logging service and update the state to display a custom error UI.
Use the react-error-boundary library (personal recommendation)
This library basically melts those two techniques from above together. It simplifies error handling in React and overcomes the limitations of the ErrorBoundary that we have seen above.
import { ErrorBoundary } from 'react-error-boundary'

const ErrorComponent = ({ error, resetErrorBoundary }) => {

  return (
    <div role="alert">
      <p>Something went wrong:</p>
      <pre>{error.message}</pre>
    </div>
  )
}

const App = () => {
  const logError = (error, errorInfo) => {
      errorService.log({ error, errorInfo })
  }


  return (
    <ErrorBoundary
       FallbackComponent={ErrorComponent}
       onError={logError}
    >
       <MyErrorProneComponent />
    </ErrorBoundary>
  );
}
This library exports a component that is made up of the ErrorBoundary functionality we already know and adds some nuances to it. It allows you to pass a FallbackComponent as a prop that should be rendered once an error gets caught.
It also exposes a prop onError that provides a callback function when an error arises. It's great for using it to log the error to a logging service.
There are some other props that are quite useful. If you would like to know more, feel free to check out the docs.
This library also provides a hook called userErrorHandler() this is meant to catch any errors that are outside the boundaries, like event-handlers, in asynchronous code, and in server-side rendering.
Use Reducer in React for better State Management
Managing a complex state in React can be tricky
Using multiple useState hooks for related data often results in nasty and hard-to-maintain components.
By leveraging the useReducer hook for related state variables, you can simplify your code.
We can make it even simpler by abstracting the reducer details and providing a deeper and simpler interface to our components.
Understanding these techniques is important.
It will help you write more maintainable and scalable React components and applications.
- Use Reducers for Complex States
⛔ Avoid using multiple useState hooks for states when they are somehow related.
Managing related state variables with multiple useState hooks can be messy and hard-to-maintain code.
This approach makes it difficult to update a state that depends on multiple state variables. It also increases the potential for bugs since it’s harder to trace how the state is updating.
The more state variables you have, the more cluttered the component will be, and the lessable and maintainable.
const App = () => {
  const [locationFilter, setLocationFilter] = useState("");
  const [queryFilter, setQueryFilter] = useState("");
  const [pageFilter, setPageFilter] = useState("");

  const handleLocationChange = (location) => {
    setLocationFilter(location);
  };

  const handleQueryChange = (query) => {
    setQueryFilter(query);
  };

  const handlePageChange = (page) => {
    setPageFilter(page);
  };

  return (
    ...
  );
};
✅ Prefer using useReducer hook for states that can be grouped.
By using useReducer, you can group the related states together into a single object, which will be managed by the reducer function.
This way, we centralize the state logic.
We make the code more organized and easier to follow and understand.
This also simplifies complex state updates and reduces the potential for errors.
By having this, we enhance the maintainability and scalability of our components.
const FILTERING_ACTION_TYPES = {
  selectLocation: 'SELECT_LOCATION',
  selectQueryFilter: 'SELECT_QUERY_FILTER',
  selectPage: 'SELECT_PAGE',
  ...
};

const initialState = {
  ...
};

const reducer = (state, action) => {
  switch (action.type) {
    case FILTERING_ACTION_TYPES.selectLocation: {
      return {
        ...
      }
    }
      ...
  }
};


const App = () => {
  const [state, dispatch] = useReducer(reducer, initialState);

  const handleLocationChange = (location) => {
    dispatch({
      type: FILTERING_ACTION_TYPES.selectLocation,
      payload: location,
    })
  };

  ...

  return (
    ...
  );
};
- Abstract Reducer Details
⛔ Avoid having a shallow hook for exposing the reducer details and functionality.
Exposing the reducer’s internal details and the dispatch function in the components can lead to tight coupling between our state management logic and our UI components.
This can make the components more complex and less reusable since they become responsible for handling action types and payloads.
It also exposes implementation details that should remain encapsulated.
We also violate three SOLID principles - SRP, DIP, and ISP.
const App = () => {
  const [state, dispatch] = useReducer(reducer, initialState);

  const handleLocationChange = (location) => {
    dispatch({
      type: FILTERING_ACTION_TYPES.selectLocation,
      payload: location,
    })
  };

  ...

  return (
    ...
  );
};
Think of it like giving someone access to the energy of the car (dispatch) vs giving them a steering wheel (functions). You don’t want every driver opening the hood and messing with the engine directly, they should just press the gas and brake.
✅ Prefer abstracting the reducer details with a deep custom hook.
By encapsulating the reducer details and logic within a custom hook, we hide the implementation details.
We provide a clean interface for the components and provide what is needed to get the job done.
We separate the state logic from the UI and the component.
This makes our components clearer, readable, and maintainable, and focused only on the rendering logic and user interface.
Now, the SRP, DIP, and ISP are satisfied.
const useFilters = () => {
  const [state, dispatch] = useReducer(reducer, initialState);

  const updateLocationFilter = (location) =>
    dispatch({
      type: FILTERING_ACTION_TYPES.selectLocation,
      payload: location,
    });

  const updatePageFilter = (page) =>
    dispatch({
      type: FILTERING_ACTION_TYPES.selectPage,
      payload: page,
    });

  const updateQueryFilter = (query) =>
    dispatch({
      type: FILTERING_ACTION_TYPES.selectQuery,
      payload: query,
    });

  return {
    filteringState: state,
    updateLocationFilter,
    updatePageFilter,
    updateQueryFilter,
  };
};


const App = () => {
  const {
    filteringState,
    updateLocationFilter,
    updatePageFilter,
    updateQueryFilter
  } = useFilters();

  ...

  return (
    ...
  );
};
⛔ Avoid using multiple useState hooks for states when they are somehow related.
✅ Prefer using
useReducerhook for states that can be grouped.⛔ Avoid having a shallow hook for exposing the reducer details and functionality.
✅ Prefer abstracting the reducer details with a deep custom hook.
React Testing Best Practices for Better Design and Quality of Your Tests
Many developers struggle to make their tests both effective and efficient
Solid testing is a must-have if you care about your application, your customers, and your business.
As a Senior Software Engineer with experience in testing and software design, I have read, reviewed, and written many tests.
Over the years, I have distilled a set of best practices that significantly improved the quality and maintainability of my tests.
In this section, I will share 9 tips to help you write and design better tests in your React applications.
- Favor Arrange-Act-Assert (AAA) Pattern
The Arrange-Act-Assert (AAA) Pattern brings clarity and structure to your tests.
By dividing your test into three distinct parts, you make it easier to read, follow, understand, and maintain.
This pattern helps prevent tests from becoming complex and 🍝.
This ensures that each test focuses on the app's specific behavior.
In summary, the Arrange-Act-Assert (AAA) patterns help with readability and consistency, allowing you to grasp what the test is verifying for others and for your future.
it('should toggle create payment profile dialog', async () => {
  // Arrange
  render(<PaymentProfiles />);

  // Act
  fireEvent.click(await screen.findByTestId(testIds.addButton));

  // Assert
  const dialog = await screen.findByRole('dialog');
  expect(dialog).toBeInTheDocument();
});
Sometimes we might not need the Act, and that’s fine.
it('should display server error', async () => {
  // Arrange
  server.use(
    graphql.query('GetCardPaymentProfiles', (_, __, ctx) =>
      resDelay(ctx.status(500)),
    ),
  );
  render(<PaymentProfiles />);

  // Assert
  expect(await screen.findByTestId(testIds.error)).toBeInTheDocument();
});
- Avoid testing too many things at once
Testing multiple functionalities in a single test can make bugs and issues hard to find.
It’s better to write smaller, focused tests that only cover one aspect of the component’s behavior and functionality.
This simplifies debugging and ensures each test has a clear purpose.
It also reduces the cognitive load when maintaining the tests, since you are focused on only one scenario.
⛔ Avoid testing too many things at once.
it('should increment and decrement the counter', () => {
  render(<Counter initialCount={0} />);

  fireEvent.click(screen.getByText('Increment'));

  expect(screen.getByTestId('count')).toHaveTextContent('1');

  fireEvent.click(screen.getByText('Decrement'));

  expect(screen.getByTestId('count')).toHaveTextContent('0');
});
✅ Prefer testing only one aspect of the component’s behavior and functionality.
it('should increment the counter', () => {
  render(<Counter initialCount={0} />);

  fireEvent.click(screen.getByText('Increment'));

  expect(screen.getByTestId('count')).toHaveTextContent('1');
});

it('should decrement the counter', () => {
  render(<Counter initialCount={1} />);

  fireEvent.click(screen.getByText('Decrement'));

  expect(screen.getByTestId('count')).toHaveTextContent('0');
});
- Be careful with snapshot tests
Snapshot tests can be helpful, but they can also become a maintenance headache.
They should be treated carefully.
Over-reliance on snapshots can lead to neglecting tests that don’t effectively test components’ scenarios and catch regression.
If you have snapshots that are too broad, they will always fail due to insignificant changes.
As a rule of thumb, I prefer to add snapshot tests for “dummy“ or stateless UI components and not for stateful ones.
This way, if a style is not applied or changed due to a bug, this snapshot test will fail, and someone will have to look into it.
Another place where snapshot tests can be useful is for critical components with stable structures.
Keep snapshot tests small and focused.
it('should load and display invoices', async () => {
  renderComponent();

  expect(screen.getByTestId(testIds.loading)).toBeInTheDocument();

  await waitForElementToBeRemoved(() =>
    screen.getByTestId(testIds.loading),
  );

  expect(await screen.findByTestId(testIds.invoices)).toBeInTheDocument();
  expect(screen.getByTestId(testIds.invoices)).toMatchSnapshot();
});
- Test the Happy Path first
Start by testing the most common and expected use cases of your components.
Ensure that the core functionality and business logic work as expected before diving into edge cases.
This way, you verify that the component behaves correctly in the main case with normal conditions, providing a solid foundation for further testing.
If the core business case doesn’t work, what is the chance that other edge cases will work as expected?
describe('Invoices', () => {
  //
  // Happy Path
  //
  it('should load and display invoices', async () => {
    renderComponent();

    expect(screen.getByTestId(testIds.loading)).toBeInTheDocument();

    await waitForElementToBeRemoved(() =>
      screen.getByTestId(testIds.loading),
    );

    expect(await screen.findByTestId(testIds.invoices)).toBeInTheDocument();
    expect(screen.getByTestId(testIds.invoices)).toMatchSnapshot();
  });
});
- Test Edge Cases and Errors
After you verified that the happy path works as expected, continue with testing how your component handles edge cases and errors like invalid inputs, delayed requests, etc.
This ensures correctness and robustness by verifying that the component can handle real-world scenarios gracefully.
describe('Invoices', () => {
  //
  // Edge Cases
  //
  it('should load and display empty message', async () => {
    server.use(
      graphql.query('GetInvoices', (_, __, ctx) =>
        resDelay(
          ctx.status(200),
          ctx.data({
            viewer: { account: { invoices: { nodes: [] } } },
          }),
        ),
      ),
    );

    renderComponent();

    expect(await screen.findByText(/No Invoices/)).toBeInTheDocument();
  });

  it('should not display empty message if refetching data', async () => {
    queryClient.setDefaultOptions({
      queries: {
        refetchOnMount: 'always',
        initialData: [],
      },
    });

    renderComponent();

    expect(screen.getByTestId(testIds.loading)).toBeInTheDocument();

    expect(screen.queryByText(/No Invoices/)).toBeNull();

    await waitForElementToBeRemoved(() =>
      screen.getByTestId(testIds.loading),
    );

    expect(await screen.findByTestId(testIds.invoices)).toBeInTheDocument();

    expect(screen.queryAllByText(/PDF/)[0]).toBeInTheDocument();
  });

  //
  // Errors
  //
  it('should display server error', async () => {
    server.use(
      graphql.query('GetInvoices', (_, __, ctx) =>
        resDelay(ctx.status(500)),
      ),
      );

      renderComponent();

    expect(await screen.findByTestId(testIds.error)).toBeInTheDocument();
  });
});
- Focus on Integration tests
Integration tests verify that different parts of your application work together as expected.
These types of tests have a higher chance of catching issues that unit tests might miss.
Integration tests provide confidence that the system works as a whole, not just isolated units.
The ROI (Return on Investment) of the integration test is much higher compared to unit tests and E2E tests.
This doesn’t mean you don’t need them, but for sure, you should have more integration tests.
The more your tests resemble the way your software is used, the more confidence they can give you.
it('should log in and see the dashboard', async () => {
  render(<App />);

  fireEvent.change(screen.getByLabelText('Username'), { target: { value: 'testuser' } });
  fireEvent.change(screen.getByLabelText('Password'), { target: { value: 'password' } });
  fireEvent.click(screen.getByText('Log In'));

  expect(await screen.findByText('Welcome to your dashboard')).toBeInTheDocument();
});
- Don’t test third-party libraries
Your test should focus on your code and application, not the internal functionalities of external libraries.
Trust that well-maintained libraries have their own tests.
Testing third-party modules can lead to fragile tests, which can break the library updates, no matter if you haven’t changed their usage.
⛔ Avoid testing the internals of third-party modules.
✅ Prefer testing how your component works with the third-party library.
it('should not display empty message if refetching data', async () => {
  queryClient.setDefaultOptions({
    queries: {
      refetchOnMount: 'always',
      initialData: [],
    },
  });

    renderComponent();

  expect(screen.getByTestId(testIds.loading)).toBeInTheDocument();

  expect(screen.queryByText(/No Invoices/)).toBeNull();

  await waitForElementToBeRemoved(() =>
    screen.getByTestId(testIds.loading),
  );

  expect(await screen.findByTestId(testIds.invoices)).toBeInTheDocument();

  expect(screen.queryAllByText(/PDF/)[0]).toBeInTheDocument();
});
- Don’t focus on test coverage percentage
If you have 100% test coverage, this doesn’t mean high-quality tests and no bugs at all.
It’s better to focus on meaningful tests, instead of adding tests chasing coverage metrics.
⛔ Avoid writing tests that only serve to increase test coverage.
//
// Meaningless test only to satisfy test coverage metrics
//
it('should log in and see the dashboard', async () => {
  render(<App />);
  // No assertions
});
✅ Prefer adding valuable tests that verify the component’s behavior and functionality.
it('should log in and see the dashboard', async () => {
  // Arrange
  render(<App />);

  // Act
  fireEvent.change(screen.getByLabelText('Username'), { target: { value: 'testuser' } });
  fireEvent.change(screen.getByLabelText('Password'), { target: { value: 'password' } });
  fireEvent.click(screen.getByText('Log In'));

  // Assert
  expect(await screen.findByText('Welcome to your dashboard')).toBeInTheDocument();
});
- Remove unnecessary tests
As your application and your codebase evolve, some tests might become redundant and irrelevant.
Regularly review and clean up your tests.
Tests are a part of the codebase, so they should be treated as such - regularly reviewed and updated.
This reduces maintenance overhead and keeps your tests lean and efficient.
When a feature is deprecated or a component is removed, delete the related tests.
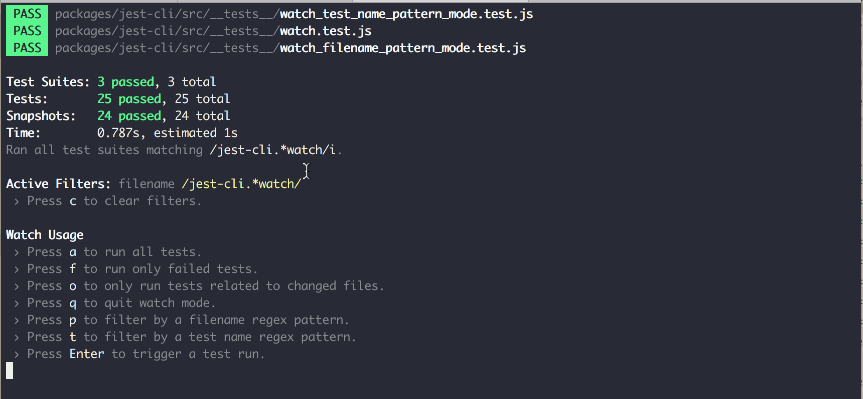
- Add a
test:watchcommand for the tests
The first thing I do when I start a new project or join an older one is to add a jest:watch command inside the package.json.
It can look something like:
{
  ...
  "scripts": {
    ...
    "test:watch": "jest --watch --verbose",
    ...
  },
  ...
}
You can learn more about the —watch and —verbose jest flags on the official Jest CLI Documentation.
When you run the test:watch command, it provides real-time feedback and detailed output of your tests.
It will automatically rerun tests related to the changed files and speed up the feedback loop from your tests.
Usually, when I start refactoring a piece of code or start working on a new feature, I run the test:watch command and monitor how the changes impact the tests and vice versa.
- Add a
jest-watch-typeaheadplugin to Jest
jest-watch-typeahead is a plugin to speed up your testing workflow.
It allows you to filter tests by file name and test name, which makes it easier to run specific tests while developing.
The tool is very useful for large projects where you have hundreds of tests.
Instead of remembering specific filenames, with the jest-watch-typeahead plugin you can quickly find and run the test you need.
Source: https://github.com/jest-community/jest-watch-typeahead
You can find more info about the plugin and its installation here.
- Add additional custom jest matchers
I’ve seen many codebases where several jest matchers are used to assert that something.
For example:
expect(<something>).toHaveBeenCalledTimes(1);
expect(<something>).toHaveBeenCalledWith(<xyz>);
You can enhance the capabilities of Jest’s default matchers by adding custom Jest matchers.
jest-extended is a great package, adding a set of additional matchers to make assertions more expressive and code more readable.
I’ve personally used the following custom matchers:
toHaveBeenCalledExactlyOnceWith
expect(<something>).toHaveBeenCalledExactlyOnceWith(<xyz>);
toThrowWithMessage
await expect(
  register.execute(registerInput),
).rejects.toThrowWithMessage(
  ValidationError,
  `Must contain 8-64 characters, 1 uppercase, 1 lowercase,...`,
);
toHaveBeenCalledAfter
expect(connector.verifyMfa).toHaveBeenCalledExactlyOnceWith(
    'at',
    'abc123',
);
expect(connector.enableMfa).toHaveBeenCalledExactlyOnceWith('at');
expect(connector.enableMfa).toHaveBeenCalledAfter(connector.verifyMfa);
Here is a complete set of the additional matchers from jest-extended.
- (optional) Automatically fail tests on console.log
Sometimes we add console.log() , console.error(), etc., while debugging, testing, or even developing new stuff.
We can later forget to remove these logs and pollute the console.
In a large codebase, we can end up with the test output overloaded by a lot of errors, warnings, etc.
We can automate that through the jest-fail-on-console utility and make our Jest tests fail when console.error(), console.warn(), etc. are used.
It’s crucial to keep the console clean because it helps us identify real issues quickly.
You can learn more about the package here.
Incorrect Usage of Key Props
The key prop is fundamental to React’s reconciliation process. It allows React to efficiently track which elements in a list have changed, been added, or removed. However, using unstable keys (e.g., array indices) can lead to subtle bugs, especially when the list is dynamically updated, reordered, or filtered.
❌ Common Mistake
Using indices as keys is problematic because they don’t represent the identity of an item in a list. If the order of the list changes, React may incorrectly associate keys, leading to rendering issues.
const ItemList = ({ items }) => (
  <ul>
    {items.map((item, index) => (
      <li key={index}>{item.name}</li> // Avoid using indices as keys
    ))}
  </ul>
);
This approach is particularly risky when:
Items can be reordered or removed
React incorrectly associates the wrong DOM elements with updated data.
✅ Best Practice
Use a unique or stable property, such as id, as the key.
const ItemList = ({ items }) => (
  <ul>
    {items.map((item) => (
      <li key={item.id}>{item.name}</li> // Use unique IDs as keys
    ))}
  </ul>
);
In the case that the item on a list doesn't have the property, you can generate the stable key this way:
const getStableKey = (item: any) => `${item.name}-${item.type}`; // content-based key

items.map((item) => (
  <div key={getStableKey(item)}>{item.name}</div>
));
| Method | When to use | Note |
item.id | ✅ Best | Stable & unique |
index | 😐 Acceptable fallback | Avoid if the list mutates |
Math.random() | ❌ Never | Causes unnecessary re-renders |
How to Structure Your React Component
🛑 Don’t
The code below shows a React component where the built-in and custom hooks are not in a clear order.

You might think that related code should be close together, like memoizedValue and the useEffect at the beginning of the component.
However, I have found that having a clear order in your React component is more effective. As your codebase grows, it becomes hard to keep related code close together, and other engineers are less likely to follow this style.
While it’s important to have related code close by, it’s better to prefer a clear structure in this case.
✅ Do
You want to have a clear structure in components so you can navigate through them quickly and have a pattern that is obvious to other engineers.
State declarations
Ref declarations
Memoized values
Memoized callbacks
Custom hooks
Effects
Event handler
JSX

Keep in mind, this is just a general guideline. This structure might not always be possible. For example, you might need the result of a custom hook as the dependency for a memorized value.
When you encounter an exception like this, consider extracting the related code into its own custom hook.
Apply HOC Pattern
The High Order Component(HOC) pattern is a composition technique in React that is used to reuse the logic between components. A HOC is a function that takes a component and returns a new component with additional and extended functionality.
When to use it
When you need to share logic between multiple components without duplicating code.
To add common behaviors or features to multiple components.
When you want to isolate presentation logic from business logic in a component.
When not to use it
When the logic is specific to a single component and will not be reused.
When the logic is too complex, and may make HOCs difficult to understand.
Advantages
Promotes code reuse by encapsulating and sharing logic between components.
Allows clear separation of presentation logic from business logic.
Facilitates code composition and modularity by applying function design patterns.
Disadvantages
May introduce an additional layer of abstraction that makes it difficult to track data flow.
Excessive concentrations of HOCs can generate complex components that are difficult to debug.
Sometimes, it can hide the component hierarchy, making it difficult to understand how the application is structured.
Example
Suppose we want to create an HOC that handles the state and methods for submitting data from a form. The HOC will handle the form values, validate the data, and send a request to the server.
import React, { ComponentType, useState } from 'react';

interface FormValues {
  [key: string]: string;
}

interface WithFormProps {
  onSubmit: (values: FormValues) => void;
}

// HOC that handles form state and logic
function withForm<T extends WithFormProps>(WrappedComponent: ComponentType<T>) {
  const WithForm: React.FC<T> = (props) => {
    const [formValues, setFormValues] = useState<FormValues>({});

    const handleInputChange = (event: React.ChangeEvent<HTMLInputElement>) => {
      const { name, value } = event.target;
      setFormValues((prevValues) => ({
        ...prevValues,
        [name]: value,
      }));
    };

    const handleSubmit = (event: React.FormEvent<HTMLFormElement>) => {
      event.preventDefault();
      props.onSubmit(formValues);
    };

    return (
      <WrappedComponent
        {...props}
        formValues={formValues}
        onInputChange={handleInputChange}
        onSubmit={handleSubmit}
      />
    );
  };

  return WithForm;
}

// Component that uses the HOC to manage a form.
interface MyFormProps extends WithFormProps {
  formValues: FormValues;
  onInputChange: (event: React.ChangeEvent<HTMLInputElement>) => void;
}

const MyForm: React.FC<MyFormProps> = ({ formValues, onInputChange, onSubmit }) => {
  return (
    <form onSubmit={onSubmit}>
      <input type="text" name="name" value={formValues.name || ''} onChange={onInputChange} />
      <input type="text" name="email" value={formValues.email || ''} onChange={onInputChange} />
      <button type="submit">Enviar</button>
    </form>
  );
};

// Using the HOC to wrap the MyForm component
const FormWithLogic = withForm(MyForm);

// Main component that renders the form
const App: React.FC = () => {
  const handleSubmit = (values: FormValues) => {
    console.log('Form values:', values);
    // Logic to send the form data to the server
  };

  return (
    <div>
      <h1>HOC Form</h1>
      <FormWithLogic onSubmit={handleSubmit} />
    </div>
  );
};

export default App;
In this example, the withForm HOC encapsulates the logic for handling a form. This HOC handles the state of the form values, and provides a function to update the form values (handleInputChange), and a function to handle the form submission (handleSubmit). Then, the HOC is used to wrap the MyForm component, which is the form that will be rendered in the main application (App).
Avoid Double negations
🛑 Don’t

✅ Do

Keep your code clear by avoiding double negations. A few tips:
Use positive variable and function names whenever possible (e.g.,
isActiveinstead ofisNotActive).Simplify Boolean logic by applying De Morgan’s laws.
Break complex conditions into smaller, well-named variables or functions if they become too confusing.
Check out the code below, where I use descriptive names like hasRegularAccess for intermediate boolean values:

Have Modular Loop Logic
I’ve seen PRs with massive loop bodies, and if you’re not the code’s owner, it can be difficult to understand what’s going on.
Your goal should be to write skimmable code from top to bottom, with logic tucked away inside well-named functions.
This approach lets first-time readers quickly grasp the overall flow and dive into the functions that matter most to them.
🛑 Don’t

✅ Do

The processUserData function is skimmable. You immediately understand the loop's purpose and know exactly where to look for more details.
A fitting quote:
Functions should do one thing. They should do it well. They should do it only.
— Robert C. Martin
Avoid local state as much as possible
You should refrain from creating a local state unless absolutely necessary. For instance, if you're performing calculations, avoid creating an additional variable solely for calculation purposes. Instead, consider integrating your calculations directly into the JSX.
import React, { useEffect, useState } from 'react';

const App: React.FC = () => {
  // ❌ Avoid: Unnecessary state
  const [result, setResult] = useState();

  // Considering a and b are two values coming from some API.
  const { a, b } = apiCall();
  // ❌ Avoid: Unnecessary useEffect
  useEffect(() => {
    setResult(a + b);
  }, [a, b]);

  return (
    <div>
      {result}
    </div>
  );
}

export default App;
import React, { useEffect, useState } from 'react';

const App: React.FC = () => {

  // Considering a and b are two values coming from some API.
  const { a, b } = apiCall();
  // ✅ Good: You can move it into the JSX
  return (
    <div>
      {a + b}
    </div>
  );
}

export default App;
Integrate Typescript(or at least use default props and prop types)
TypeScript provides superior static typing compared to JavaScript. In JavaScript, being a dynamic-typing language, you can define a variable with one type and later assign it a different type, which may cause errors in your application. TypeScript offers numerous advantages, including static type checking, enhanced code completion in your IDE, improved developer experience, and the ability to catch type errors while writing code.
Learning and integrating TypeScript into your projects is highly worthwhile. Here's an informative article that provides an overview of using TypeScript in React applications, covering its benefits and drawbacks. Additionally, here's a tutorial on coding your React apps using TypeScript.
There may be reasons you don't want to use Typescript inside your React application. That is fine. But at a bare minimum, I would recommend that you use prop-types and default-props for your components to ensure you don't mess up your prop.
import React, { useState } from 'react';
// 📝 Note: You can export types & interfaces from external file to avoid long component files
interface IComment {
  id: string;
  content: string;
  date: Date;
}

interface IArticle {
  title: string;
  author: string;
  date: Date;
  body: string;
  views: number;
  comments: IComment[];
}

export const Aricle: React.FC<IArticle> = ({ title, author, date, body, views, comments }) => {

  const [variable, setVariable] = useState<IArticle | null>(null)

  return (
    <div>
      <h2>{title}</h2>
      <h4>{author}</h4>
      <h4>Published the {date}</h4>
      <p>{body}</p>
    </div>
  )
}
Consider using React Fragments
In React, a component is required to return a single element. If you find yourself needing to return multiple elements within a React component, your initial reaction might be to wrap them with a <div> without any classNames.
// ❌ Avoid unnecessary wrapper div
const Todo = () => (
  <div>
    <h1>Title</h1>
    <ul>
      // ...
    </ul>
  </div>
);
While this approach may suffice, the unnecessary wrapper <div> can introduce complexity to the DOM structure, potentially affecting the accessibility of your web page.
Instead, consider using <Fragment> to wrap these elements. Fragments offer cleaner code by eliminating the need for unnecessary wrapper divs when rendering multiple elements.
// ✅ Use fragments
const Todo = () => (
  <>
    <h1>Title</h1>
    <ul>
      // ...
    </ul>
  </>
);
Prefixing variables and methods
Naming is crucial for enhancing code readability as it reflects the purpose of variables and methods. Consider using prefixes to make tracking easier.
The prefixes
isandhasare typically used with boolean-typed variables, signaling that the variable holds a boolean value. Similarly, methods can be prefixed withisorhasto indicate that they return a boolean value.import { Modal } from 'antd'; import React, { useState } from 'react'; import SomeComponent from 'somewhere'; export const Aricle: React.FC = () => { const [isOpen, setOpen] = useState(false); const [hasParent, setParent] = useState(false); return ( <div> <Modal open={isOpen} /> <SomeComponent parent={hasParent} /> </div> ) }The prefixes
handleandonshould be exclusively used with methods to facilitate recognition that they are indeed methods and to clarify their purpose.handleprefix denotes that a method will be passed to an event listener and will be invoked once the event is triggered.import { Modal } from 'antd'; import React, { useState } from 'react'; export const Aricle: React.FC = () => { const [isOpen, setOpen] = useState(false); // Indicates that a method is used as 'event callback' const handleToggleModal = () => setOpen((prev) => !prev); return ( <div> <Modal open={isOpen} /> <button onClick={handleToggleModal}>Toggle show</button> </div> ) }onprefix is commonly used with prop names when passing a method as a callback to another component. Received props can vary in type and theonprefix signifies that the prop serves as a callback just by reading its name.import React from 'react'; import Form from './components/Form'; export const CreateUser: React.FC = () => { const handleFormSubmit = () => { // Send data }; return ( <div> <Form onFormSubmit={handleFormSubmit} /> </div> ) }
Keep your code DRY
Remember the principle of Don't Repeat Yourself (DRY) whenever you encounter code duplication. By adhering to DRY, you can avoid redundant code, improve code readability, and simplify maintenance. When implementing DRY, create reusable methods instead of duplicating code. This approach, known as modular coding, ensures that changes only need to be made in one place, reducing effort and minimizing the risk of inconsistencies."
// ❌ Avoid: Redundant code
const cyberSecTotalStudents = 80;
const myCyberSecClassStudents = 24;

const AITotalStudents = 150;
const myAIClassStudents = 24;

const cyberSecPercentage = (myCyberSecClassStudents / cyberSecTotalStudents) * 100;
const AIPercentage = (myAIClassStudents / AITotalStudents) * 100;
// ✅ Good: Modular code
const cyberSecTotalStudents = 80;
const myCyberSecClassStudents = 24;

const AITotalStudents = 150;
const myAIClassStudents = 24;

const calculatePercentage = (portion, total) => (portion / total) * 100;

const cyberSecPercentage = calculatePercentage(myCyberSecClassStudents, cyberSecTotalStudents);
const AIPercentage = calculatePercentage(myAIClassStudents, AITotalStudents);
Avoid anonymous functions in your HTML
A JavaScript function is a block of code designed to perform a specific task. When defining a function, memory space is allocated to store it.
import React from 'react';

export const Form: React.FC = () => {

  return (
    <form onSubmit={
      // ❌ Avoid: re-created on every render
      () => {
        // Send data
      }}
    >
      {/ Some inputs /}
      <button type="submit">Send</button>
    </form>
  )
}
import React from 'react';

export const Form: React.FC = () => {
  // ✅ Good: Loaded in memory
  const handleFormSubmit = () => {
    // Send data
  };

  return (
    <form onSubmit={handleFormSubmit}>
      {/ Some inputs /}
      <button type="submit">Send</button>
    </form>
  )
}
Both functions perform the same task. However, using a named function enhances code clarity and readability compared to using an anonymous function. Additionally, a named function is stored in memory, and when called, it is invoked by its reference in memory. On the other hand, anonymous functions are not stored in memory. They are recreated on every render, resulting in a different function being used for each render.
Consider passing a callback argument to useState setter method
Passing a callback argument to the useState setter function in React is necessary when the new state value depends on the previous state. That ensures that we are going with the most up-to-date state value when updating the state asynchronously.
Here's why it's needed.
Asynchronous Updates: State updates in React are asynchronous. If you try to update the state directly based on its current value, you may encounter issues with stale state or race conditions. Passing a callback function to the setter ensures that the latest state value is used when updating the state.
Consistent state: By using the callback approach, React guarantees you are always working with the most recent state value, regardless of when the update occurs. This helps maintain consistency of state throughout your component.
Here's an example to illustrate this:
import React, { useState } from 'react';

function Counter() {
  const [count, setCount] = useState(0);

  const increment = () => {
    // This is the incorrect way to update state based on the previous value
    // setCount(count + 1);

    // Correct way: Pass a callback to the setter
    setCount(prevCount => prevCount + 1);
  };

  return (
    <div>
      <p>Count: {count}</p>
      <button onClick={increment}>Increment</button>
    </div>
  );
}

export default Counter;
In this example, If we were to update the state directly using setCount(count + 1), it would not reliably use the latest state value. Instead, bypassing the callback to the setter (prevCount => prevCount + 1), React ensures that the state update is based on the most recent value of count. This helps prevent potential issues with state consistency and ensures that the component behaves as expected.
Use useState instead of variables
The first mistake often seen, even among experienced developers, is directly declaring variables within React components. Some individuals may not fully understand how React handles state comparison and re-rendering. It's crucial to avoid declaring state directly as a variable within a component, as doing so will redeclare the variable on every render cycle, preventing React from effectively memoizing values.
import AnotherComponent from 'components/AnotherComponent'

const Component = () => {
  // Don't do this.
  const value = "value";

  return <AnotherComponent value={value} />
}
In this case, React won't memorize the state value, leading to a different JavaScript reference for value each render. Consequently, components depending on value, such as AnotherComponent, will unnecessarily re-render on every render cycle, resulting in wasted resources.
Instead, utilize React's useState hook to manage the state. By doing so, React maintains the same reference for the state value until it's updated with setValue. But, React does NOT always maintain the same reference for state values.
✅ For primitives (numbers, strings, booleans) → React maintains the reference unless updated.
❌ For objects, arrays, or functions → React creates a new reference on every render unless optimized with
useMemooruseCallback.
import { useState } from 'react'
import AnotherComponent from 'components/AnotherComponent'

const Component = () => {
  // Do this instead.
  const [value, setValue] = useState("value");

  return <AnotherComponent value={value} />
}
If a state is only needed for initialization and never updated, consider declaring the variable outside the component. This will ensure that the JavaScript reference remains unchanged throughout the component's lifecycle.
// Do this if you never need to update the value.
const value = { someKey: 'someValue' }

const Component = () => {
  return <AnotherComponent value={value} />
}
Use useCallback to prevent dependency changes
While useCallback can certainly help avoid function instantiations, its utility extends further to optimize the usage of other useCallback and memoization instances. By maintaining the same memory reference for the wrapped function between renders, useCallback enables efficient optimization strategies.
import { memo, useCallback, useMemo } from 'react'

const MemoizedChildComponent = memo({ onTriggerFn }) => {
  // Some component code...
})

const Component = ({ someProp }) => {
  // Reference to onTrigger function will only change when someProp does.
  const onTrigger = useCallback(() => {
    // Some code...
  }, [someProp])

  // This memoized value will only update when onTrigger function updates.
  // The value would be recalculated on every render if onTrigger wasn't wrapper in useCallback.
  const memoizedValue = useMemo(() => {
    // Some code...
  }, [onTrigger])

  // MemoizedChildComponent will only rerender when onTrigger function updates.
  // If onTrigger wasn't wrapped in a useCallback, MemoizedChildComponent would rerender every time this component renders.
  return (<>
    <MemoizedChildComponent onTriggerFn={onTrigger} />
    <button onClick={onTrigger}>Click me</button>
   </>)
}
Always add all dependencies to useEffects and other React hooks
When dealing with dependency lists for built-in React hooks like useEffect and useCallback, always ensure to include all relevant dependencies in the dependency list (the second argument of the hook). Omitting a dependency can lead to the effect or callback using outdated values, often resulting in hard-to-detect bugs.
While omitting all variables may seem convenient, it can be a risky practice. Sometimes, you may not want an effect to run again if a specific value is updated. However, finding a suitable solution for this scenario not only helps prevent bugs but also leads to better-written code overall.
Moreover, it's crucial to consider the implications of leaving out dependencies to avoid bugs. Any oversight in dependency management may resurface when upgrading to newer React versions. For instance, in strict mode in React 18, updating hooks are triggered twice in development, and such behavior may manifest in production in future React versions.
Remember, if a dependency is not a primitive value (such as an object, array, or function), you need to optimize it using useMemo or useCallback before adding it to the dependency array of useEffect.
import React, { useState, useEffect } from 'react';

function WeatherDisplay({ city, countryCode }) {
  const [weatherData, setWeatherData] = useState(null);
  const [loading, setLoading] = useState(true);

  // Fetch weather data when city or countryCode changes
  useEffect(() => {
    setLoading(true);
    fetchWeather(city, countryCode)
      .then(data => {
        setWeatherData(data);
        setLoading(false);
      })
      .catch(error => {
        console.error('Error fetching weather data:', error);
        setLoading(false);
      });
  }, [city, countryCode]); // <-- Dependency list includes city and countryCode

  return (
    <div>
      {loading ? (
        <p>Loading...</p>
      ) : weatherData ? (
        <div>
          <h2>Weather in {city}, {countryCode}</h2>
          <p>Temperature: {weatherData.temperature}°C</p>
          <p>Conditions: {weatherData.conditions}</p>
        </div>
      ) : (
        <p>No weather data available</p>
      )}
    </div>
  );
}

export default WeatherDisplay;
Do not use useEffect to initiate the External code
Let's say you need to initialize a library. Often, I've observed the initialization code placed within a useEffect hook with an empty dependency list, which is unnecessary and prone to errors. If the initialization function isn't reliant on the component's internal state, it should be initialized outside of the component.
However, if the component's internal state is essential for initialization, you can include it within an effect. In such cases, it's crucial to add all the dependencies used in the initialization process to the dependency list of the useEffect, as discussed in the previous section. This ensures that the effect runs correctly and is triggered whenever any of its dependencies change.
import { useEffect } from 'react'
import initLibrary from '/libraries/initLibrary'

const Component = () => {
  // Do not do this.
  useEffect(() => {
    initLibrary()
  }, [])

  return <div>Example</div>
}
import initLibrary from '/libraries/initLibrary'

// Do this instead.
initLibrary()

const Component = () => {
  return <div>Example</div>
}
Do not use useMemo with empty dependencies
If you find yourself adding a useMemo hook with an empty dependency list, it's essential to question the reasoning behind it.
Is it because the memoization depends on a component's state variable, or are you unsure of what to include in the dependencies? In such cases, using useMemo may not be necessary and could potentially slow down your application. Instead, consider moving the memoization logic out of the component altogether, as it may not belong there.
import { useMemo } from 'react'

const Component = () => {
  // Do not do this.
  const memoizedValue = useMemo(() => {
    return 3 + 5
  }, [])

  return <div>{memoizedValue}</div>
}
// Do this instead.
const memoizedValue = 3 + 5

const Component = () => {
  return <div>{memoizedValue}</div>
}
Avoid using React.memo inline
If we declare a component using an arrow function directly inside memo, then the component doesn’t have a display name in the React Profiler:
import { memo } from 'react'

// This will show 'Anonymous' in the profiler

export const MyComponent = memo((props) => /* ... */)
Instead, it shows Anonymous so we cannot know what component is doing these extra renders.

This is unfortunate because if you used memo you’d probably want to check if the memoization is working properly using the profiler.
To avoid this issue, you can declare your component in a separate variable:
const MyComponentInternal = (props) => /* ... */

// This will show 'MyComponent' in the profiler

export const MyComponent = memo(MyComponentInternal)
As a site note, memoization, if not done properly, actually makes your app slower. Comparing props on each render has a cost. If this cost is not outweighed by saved renders, you are just making things slower by using memo.
Having Identical Error Boundaries in each <Route>
If you have multiple pages and you wrap each page with an error boundary, users won’t see the error screen disappear when navigating to another page.
// The error screen won't go away when navigating to another page

<Route path="books" element={
  <ErrorBoundary>
    <Books/>
  </ErrorBoundary>
}/>

<Route path="users" element={
  <ErrorBoundary>
    <Users/>
  </ErrorBoundary>
}/>

<Route path="settings" element={
  <ErrorBoundary>
    <Settings/>
  </ErrorBoundary>
}/>
This is because error boundaries are identical to React, so when navigating this is treated as a component update and its internal error state is preserved.
You can use keys to make them different and fix the issue:
<Route path="books" element={
  <ErrorBoundary key="books">
    <Books/>
  </ErrorBoundary>
}/>

<Route path="users" element={
  <ErrorBoundary key="users">
    <Users/>
  </ErrorBoundary>
}/>

<Route path="settings" element={
  <ErrorBoundary key="settings">
    <Settings/>
  </ErrorBoundary>
}/>
Another option is to create a custom error boundary component that will set an internal key based on the URL path basename:
const PageErrorBoundary = ({ children }) => {
  const match = useMatch('*')
  return <ErrorBoundary key={match.pathBasename}>{children}</ErrorBoundary>
}
Using .sort mutably
.sort is mutable. As always, mutable updates create all sorts of bugs in React. Only immutable updates should be used.
const items = [3, 1, 2]

// This mutates the original array
items.sort((a, b) => a - b)

console.log(items)
// [1, 2, 3]
If you use .sort on a state and another component expect to read it in its original unsorted order, it can create all sorts of bugs.
Also, if you use it in a state update like setItems(items.sort()) it won’t do anything since the reference is not changing.
Instead, you can use .toSorted which is immutable, but it’s not supported by older browsers. You can use the spread operator if you want to support older browsers.
return (
  // Use spread operator to avoid mutations
  [...items]
    .sort((i1, i2) => i1.name.localeCompare(i2.name))
)
Note that it’s fine to use .sort if you have a filter or a map before because they create a new reference. The bugs happen if we do it directly on the state.
Do not declare components within other components
I see this a lot, Please stop doing it already.
const Component = () => {

  // Don't do this.
  const ChildComponent = () => {
    return <div>I'm a child component</div>
  }

  return <div><ChildComponent /></div>
}
What's the problem with it? The main issue is misusing React. As we discussed earlier, variables declared within a component are redeclared each time the component renders. Consequently, in this scenario, the functional child component has to be recreated every time the parent renders.
This poses several problems:
A function instantiation occurs with every render.
React lacks the ability to optimize component rendering effectively.
If hooks are utilized in
ChildComponent, they are reinitialized with each render.The component's readability diminishes, especially when there are numerous child components within a single React component.
So, what's the alternative? Simply declare the child component outside the parent component.
// Do this instead.
const ChildComponent = () => {
    return <div>I'm a child component</div>
}

const Component = () => {
  return <div><ChildComponent /></div>
}
Even better, place it in a separate file for improved organization and clarity.
// Do this instead.
import ChildComponent from 'components/ChildComponent'

const Component = () => {
  return <div><ChildComponent /></div>
}
Do not use hooks in if statements (no conditional hooks)
This one is explained in React's Documentation. One should never write conditional hooks, simply as that.
import { useState } from 'react'

const Component = ({ propValue }) => {
  if (!propValue) {
    // Don't do this.
    const [value, setValue] = useState(propValue)
  }

  return <div>{value}</div>
}
Do not use hooks in if statements (no conditional hooks)
If statements are conditional, it's best not to put hooks inside them, as React's Documentation explains. Another thing to watch out for is the "return" keyword, which can also cause conditional hook renders.
import { useState } from 'react'

const Component = ({ propValue }) => {

  if (!propValue) {
    return null
  }

  // This hook is conditional, since it will only be called if propValue exists.
  const [value, setValue] = useState(propValue)

  return <div>{value}</div>
}
In the example provided, a conditional return statement makes the following hook conditional. To prevent this, ensure all hooks are placed above the component's first conditional rendering. Alternatively, always place hooks at the top of the component to keep things simple.
import { useState } from 'react'

const Component = ({ propValue }) => {
  // Do this instead, place hooks before conditional renderings.
  const [value, setValue] = useState(propValue)

  if (!propValue) {
    return null
  }

  return <div>{value}</div>
}
Write initial states as functions rather than objects
Note the code from the current tip. Look at the getInitialFormState function.
// Code removed for brevity.

// Initial state is a function here.
const getInitialFormState = () => ({
  text: '',
  error: '',
  touched: false
})

const formReducer = (state, action) => {
  // Code removed for brevity.
}

const Component = () => {
  const [state, dispatch] = useReducer(formReducer, getInitialFormState());
  // Code removed for brevity.
}
See that I wrote the initial state as a function. I could have used an object directly.
// Code removed for brevity.

// Initial state is an object here.
const initialFormState = {
  text: '',
  error: '',
  touched: false
}

const formReducer = (state, action) => {
  // Code removed for brevity.
}

const Component = () => {
  const [state, dispatch] = useReducer(formReducer, initialFormState);
  // Code removed for brevity.
}
You'll notice that I defined the initial state as a function instead of using an object directly. Why did I choose to do this? The reason is simple: to avoid mutability.
If getInitialFormState returns an object directly; there's a risk of unintentionally mutating that object elsewhere in our code. In such a case, we might not get the initial state back when using the variable again, such as when resetting the form. Instead, we could end up with a mutated object that, for example, touched has been set to true.
This issue can also arise during unit testing. If multiple tests manipulate getInitialFormState, each test might work fine when run individually. However, some tests may fail when all tests are run together in a test suite due to unexpected mutations.
To address this, it's a good practice to define initial states as getter functions that return the initial state object. Alternatively, you can use libraries like Immer, which help avoid writing mutable code.
Use useRef instead of useState when a component should not rerender
Using useRef instead of useState when a component should not re-render is advantageous because it helps in scenarios when you need to store mutable values across renders without causing the component to re-render unnecessarily.
Here is an example to illustrate this:
Suppose you have a component that displays a timer, and you want to update the timer every second without triggering a re-render of the component.
import React, { useState, useEffect } from 'react';

function Timer() {
  const [seconds, setSeconds] = useState(0);

  useEffect(() => {
    const intervalId = setInterval(() => {
      setSeconds(prevSeconds => prevSeconds + 1);
    }, 1000);

    return () => clearInterval(intervalId);
  }, []);

  return (
    <div>
      <p>Seconds: {seconds}</p>
    </div>
  );
}
In this example, the component re-renders every time the state (seconds) changes, even though the UI doesn't change visually. This can lead to unnecessary re-renders and affect performance.
import React, { useRef, useEffect } from 'react';

function Timer() {
  const secondsRef = useRef(0);

  useEffect(() => {
    const intervalId = setInterval(() => {
      secondsRef.current += 1;
      console.log('Seconds:', secondsRef.current); // Access the current value without re-rendering
    }, 1000);

    return () => clearInterval(intervalId);
  }, []);

  return (
    <div>
      <p>Seconds: {secondsRef.current}</p>
    </div>
  );
}
In this example, we use useRef to store the timer value(seconds) without causing re-renders. The component remains unaffected by changes to the timer value, improving performance by avoiding unnecessary re-renders.
In the case above, you may wonder why we need to use a useRef at all. Why can't we simply use a variable outside of the component?
// This does not work the same way!
const triggered = false

const Component = () => {
  useEffect(() => {
    if (!triggered) {
      triggered = true

      // Some code to run here...
    }
  }, [])
}
The reason we need to use useRef is because the above code doesn't work in the same way! The above triggered variable will only be false once. If the component unmounts, the variable triggered will still be set to true when the component mounts again, because the triggered variable is not bound to React's life cycle.
When useRef is used, React will reset its value when a component unmounts and mounts again. In this case, we probably want to use useRef, but in other cases, a variable outside the component may be what we are searching for.
Overall, using useRef in situations where you need to store mutable values without triggering re-renders is a recommended practice for optimizing React components.
Use linting for code quality
Utilizing a linter tool, such as ESLint, can greatly improve code quality and consistency in your React project.
By using a linter, you can:
Enforces coding standards: This ensures that all developers follow the same guidelines, leading to more uniform and readable codebases.
Identifies potential errors: Linters can detect common programming errors, such as syntax errors, undefined variables, and unused variables, before runtime issues.
Promotes code consistency: Linting helps maintain consistent coding style and patterns throughout the project.
Improves code maintainability: By enforcing coding standards and identifying potential issues, linting contributes to the overall maintainability of the codebase.
Enhances developer productivity: Linting provides immediate feedback to developers as they write code, highlighting issues and suggesting improvements in real-time. This enables developers to address issues quickly and focus on writing quality code, ultimately improving productivity.
Avoid default export
The problem with default export is that it can make it harder to understand which components are being imported and used in other files. It also limits the flexibility of imports, as default imports can only have a single default export per file.
// ❌ Avoid default export
const Todo = () => {
  // component logic...
};

export default Todo;
Instead, It's recommended to use named exports in React:
// ✅ Use named export
const Todo = () => {

}

export { Todo };
Using named exports provides better clarity when importing components, making the codebase more organized and easier to navigate.
Named exports work well with tree-shaking.
Tree sharking is a term commonly used within a JavaScript context to describe the removal of dead code. It relies on the import and export statements to detect if code modules are exported and imported for use between JavaScript files.Refactoring becomes easier.
Easier to identify and understand the dependencies of the module.
Use object destructuring
When you use direct property access using dot notation for accessing individual properties of an object, it will work fine for simple cases.
// ❌ Avoid direct property access using dot notation
const todo = {
   id: 1,
   name: "Morning Task",
   completed: false
}

const id = todo.id;
const name = todo.name;
const completed = todo.completed;
This approach can work fine for simple cases, and it can become difficult and repetitive when dealing with larger objects or when only a subset of properties is needed.
Object destructuring, on the other hand, provides a more concise and elegant way to extract object properties. It allows you to destructure an object in a single line of code and assign multiple properties to variables using a syntax similar to object literal notation.
// ✅ Use object destructuring
const { id, name = "Task", completed } = todo;
It reduces the need for repetitive object property access
Supports the assignment of default values.
Allows variable renaming and aliasing.
Use enums instead of numbers or strings
// ❌ Avoid Using numbers or strings
switch(status) {
  case 1:
    return //...
  case 2:
    return //...
  case 3:
    return //...
}
The above code is harder to understand and maintain, as the meaning of the number may not be immediately clear.
// ✅ Use Enums
const Status = {
  NOT_STARTED: 1,
  IN_PROGRESS: 2,
  COMPLETED: 3
}

const { NOT_STARTED, IN_PROGRESS COMPLETED } = Status;

switch(status) {
  case NOT_STARTED:
    return //...
  case IN_PROGRESS:
    return //...
  case COMPLETED:
    return //...
}
Enums have meaningful and self-descriptive values.
Improve code readability.
Reducing the chance of typos or incorrect values.
Better type checking, editor autocompletion, and documentation.
Maintain a structured import order
If you have already had some experience in React, you might have seen files that are bloated with a lot of import statements. They might also be missed with external imports from third-party packages and internal imports like other components, utility functions, styles, and many more.
Real World Example-cut (In reality, the imports span over 55 lines.):
import React, { useState, useEffect, useCallback } from "react";
import Typography from "@material-ui/core/Typography";
import Divider from "@material-ui/core/Divider";
import Title from "../components/Title";
import Navigation from "../components/Navigation";
import DialogActions from "@material-ui/core/DialogActions"
import { getServiceURL } from "../../utils/getServiceURL";
import Grid from "@material-ui/core/Grid";
import Paragraph from "../components/Paragprah";
import { sectionTitleEnum } from "../../constants";
import { useSelector, useDispatch } from "react-redux";
import Box from "@material-ui/core/Box";
import axios from 'axios';
import { DatePicker } from "@material-ui/pickers";
import { Formik } from "formik";
import CustomButton from "../components/CustomButton";
You probably recognize the deal here. It is difficult to distinguish what the third-party and the local(internal) imports. They are not grouped and seem to be all over the place.
Better version:
import React, { useState, useEffect, useCallback } from "react";
import { useSelector, useDispatch } from "react-redux";
import { Formik } from "formik";
import axios from 'axios';
import Typography from "@material-ui/core/Typography";
import Divider from "@material-ui/core/Divider";
import Box from "@material-ui/core/Box";
import DialogActions from "@material-ui/core/DialogActions";
import Grid from "@material-ui/core/Grid";
import { DatePicker } from "@material-ui/pickers";

import { getServiceURL } from "../../utils/getServiceURL";
import { sectionTitleEnum } from "../../constants";
import CustomButton from "../components/CustomButton";
import Title from "../components/Title";
import Navigation from "../components/Navigation";
import Paragraph from "../components/Paragraph";
The structure is clearer, and it's very easy to distinguish where the external and internal imports are. Of course, you can optimize it more if you are using more named imports (if that is possible). That allows you to import all the components that are coming from UI-Material all on one line.
I have never seen other developers who like to split the import structure up into three different parts:
Built-in (like React) --> External (third-party node modules) --> Internal.
You can manage it every time by yourself or let a linter do the job. Here's a great article about how to configure your linter for your React app to maintain proper import structure.
Avoid magic numbers
The concept of "magic numbers" in programming refers to the use of hard-coded numbers in your code without an explanatory context or name. These numbers are called "magic" because their meaning isn't clear without additional context, making the code harder to understand and maintain. Replacing magic numbers with named constants not only clarifies their purpose but also simplifies future modifications and increases code readability.
There are a few reasons why you should avoid magic numbers, but the biggest would be for readability.
Let's say we have this code:
if age >= 21:
    # Do something
It is not clear what 21 stands for. Why does the age have to be greater than 21 to do something? Also age of a person?
In the United States, the drinking age is 21. I know this differs from country to country, but I want to make sure we are on the same page about the code coming up.
legal_drinking_age = 21
if user_age >= legal_drinking_age:
    # Cheers!
There is 0 confusion with this code. The legal drinking age is 21, and when the user_age is greater than or equal to 21, they can drink. It makes sense and is easy to read.
In the improved version:
Self-explanatory code: The variable legal_drinking_age indicates that 21 is the age threshold for legal drinking. It acts as self-documenting code, making comments unnecessary for explaining the number's significance.
Easy to update: if the legal drinking age is changed, you only need to update the legal_drinking_age constant, and the changes will reflect whatever it's used.
Reduces Errors: By using a named constant, you reduce the risk of typos and incorrect updates. Changing one occurrence of 21 to 18 but missing others could introduce bugs. With named constants, this risk is mitigated.
Breaking React’s Rule? Here’s Why You Shouldn’t Modify Props
Is it easy to think you can bend the rules in React? You might have done it before without even realizing.
You might even get away with it for now.
But trust me, modifying props can lead to huge headaches later on.
Here’s Why It Matters.
When you directly modify props, you are breaking encapsulation, and that’s a problem. You will end up with predictable behavior, and that is a nightmare to debug.
Your components are no longer isolated, and that makes them harder to reason about.
What is going wrong here?
❌ Mutating props directly (this is a big no-no).
❌ Passing props in a way that creates side effects.
❌ Ignoring React’s one-way data flow.
So, How Do You Handle It The Right Way?
Here’s your fix:
1️⃣ Stop modifying props. React needs that data isolation to keep things neat.
2️⃣ Don’t try to pass altered props back up to the parent — keep them encapsulated.
3️⃣ Transform props locally in your component. Use destructuring and do the work without modifying the original data (it’s all about state and local variables).
✅ Destructure props and work with them locally, no changes to the original!
✅ If you need to modify data, use local state or a derived variable.
✅ Make sure your props are read-only and keep the transformation within the component.
✅ Trust React’s immutable props system to keep everything predictable.
When you stick to these practices, you’ll see:
🔹 Your app becomes easier to debug and maintain.
🔹 Cleaner, more predictable code.
🔹 Components become more modular and reusable.
🔹 A stronger, reusable component architecture.
🔹 You’ll avoid those dreaded unexpected updates.
When setting default values for props, do it while destructuring them
❌ Bad: You may need to define the defaults in multiple places and introduce new variables.
function Button({ onClick, text, small, colorScheme }) {
  let scheme = colorScheme || "light";
  let isSmall = small || false;
  return (
    <button
      onClick={onClick}
      style={{
        color: scheme === "dark" ? "white" : "black",
        fontSize: isSmall ? "12px" : "16px",
      }}
    >
      {text ?? "Click here"}
    </button>
  );
}
✅ Good: You can set all your defaults in one place at the top. This makes it easy for someone to locate them.
function Button({
  onClick,
  text = "Click here",
  small = false,
  colorScheme = "light",
}) {
  return (
    <button
      onClick={onClick}
      style={{
        color: colorScheme === "dark" ? "white" : "black",
        fontSize: small ? "12px" : "16px",
      }}
    >
      {text}
    </button>
  );
}
Ensure that the value is a boolean before using value && <Component {...props}/> it to prevent results from being displayed on the screen.
❌ Bad: When the list is empty, 0 will be printed on the screen.
export function ListWrapper({ items, selectedItem, setSelectedItem }) {
  return (
    <div className="list">
      {items.length && ( // `0` if the list is empty
        <List
          items={items}
          onSelectItem={setSelectedItem}
          selectedItem={selectedItem}
        />
      )}
    </div>
  );
}
✅ Good: There will be nothing printed on the screen when there are no items.
export function ListWrapper({ items, selectedItem, setSelectedItem }) {
  return (
    <div className="list">
      {items.length > 0 && (
        <List
          items={items}
          onSelectItem={setSelectedItem}
          selectedItem={selectedItem}
        />
      )}
    </div>
  );
}
Use functions (inline or not) to avoid polluting your scope with intermediate variables
❌ Bad: The variables gradeSum and gradeCount are cluttering the component’s scope.
function Grade({ grades }) {
  if (grades.length === 0) {
    return <>No grades available.</>;
  }

  let gradeSum = 0;
  let gradeCount = 0;

  grades.forEach((grade) => {
    gradeCount++;
    gradeSum += grade;
  });

  const averageGrade = gradeSum / gradeCount;

  return <>Average Grade: {averageGrade}</>;
}
✅ Good: The variables gradeSum and gradeCountare scoped within computeAverageGrade function.
function Grade({ grades }) {
  if (grades.length === 0) {
    return <>No grades available.</>;
  }

  const computeAverageGrade = () => {
    let gradeSum = 0;
    let gradeCount = 0;
    grades.forEach((grade) => {
      gradeCount++;
      gradeSum += grade;
    });
    return gradeSum / gradeCount;
  };

  return <>Average Grade: {computeAverageGrade()}</>;
}
Note: you can also define a function computeAverageGrade outside the component and call it inside.
Move the data that doesn’t rely on the component props/state outside of it for cleaner (and more efficient) code.
❌ Bad: OPTIONS and renderOption don’t need to be inside the component because they don’t depend on any props or state. Also, keeping them inside means we get new object references every time the component renders. If we were to pass renderOption to a child component wrapped in memo, it would break the memorization.
function CoursesSelector() {
  const OPTIONS = ["Maths", "Literature", "History"];
  const renderOption = (option: string) => {
    return <option>{option}</option>;
  };

  return (
    <select>
      {OPTIONS.map((opt) => (
        <Fragment key={opt}>{renderOption(opt)}</Fragment>
      ))}
    </select>
  );
}
✅ Good: Move them out of the component to keep the component clean and references stable.
const OPTIONS = ["Maths", "Literature", "History"];
const renderOption = (option: string) => {
  return <option>{option}</option>;
};

function CoursesSelector() {
  return (
    <select>
      {OPTIONS.map((opt) => (
        <Fragment key={opt}>{renderOption(opt)}</Fragment>
      ))}
    </select>
  );
}
If you frequently check a prop’s value before something, introduce a new component.
❌ Bad: The code is cluttered because of all the user == null checks. We can’t return early because of the rules of hooks.
function Posts({ user }) {
  // Due to the rules of hooks, `posts` and `handlePostSelect` must be declared before the `if` statement.
  const posts = useMemo(() => {
    if (user == null) {
      return [];
    }
    return getUserPosts(user.id);
  }, [user]);

  const handlePostSelect = useCallback(
    (postId) => {
      if (user == null) {
        return;
      }
      // TODO: Do something
    },
    [user]
  );

  if (user == null) {
    return null;
  }

  return (
    <div>
      {posts.map((post) => (
        <button key={post.id} onClick={() => handlePostSelect(post.id)}>
          {post.title}
        </button>
      ))}
    </div>
  );
}
✅ Good: We introduce a new component, UserPosts, that takes a defined user and is much cleaner.
function Posts({ user }) {
  if (user == null) {
    return null;
  }

  return <UserPosts user={user} />;
}

function UserPosts({ user }) {
  const posts = useMemo(() => getUserPosts(user.id), [user.id]);

  const handlePostSelect = useCallback(
    (postId) => {
      // TODO: Do something
    },
    [user]
  );

  return (
    <div>
      {posts.map((post) => (
        <button key={post.id} onClick={() => handlePostSelect(post.id)}>
          {post.title}
        </button>
      ))}
    </div>
  );
}
Use the CSS :empty pseudo-class to hide elements with no children.
In the example below 👇, a wrapper takes children and adds a red border around them:
function PostWrapper({ children }) {
  return <div className="posts-wrapper">{children}</div>;
}
.posts-wrapper {
  border: solid 1px red;
}
❌ Problem: The border remains visible on the screen even if the children are empty (i.e., equal to null, undefined, etc.).

✅ Solution: Use the :empty CSS pseudo-class to ensure the wrapper is not displayed when it’s empty.
.posts-wrapper:empty {
  display: none;
}
When dealing with different cases, use value === case && <Component /> to avoid holding onto the old state.
❌ Problem: In this sandbox, the counter doesn't reset when switching between Posts and Snippets. This happens because when rendering the same component, its states persist across type changes.
✅ Solution: Render a component based on the selectedType or use a key to force a reset when the type changes.
function App() {
  const [selectedType, setSelectedType] = useState<ResourceType>("posts");
  return (
    <>
      <Navbar selectedType={selectedType} onSelectType={setSelectedType} />
      {selectedType === "posts" && <Resource type="posts" />}
      {selectedType === "snippets" && <Resource type="snippets" />}
    </>
  );
}

// We use the `selectedType` as a key
function App() {
  const [selectedType, setSelectedType] = useState<ResourceType>("posts");
  return (
    <>
      <Navbar selectedType={selectedType} onSelectType={setSelectedType} />
      <Resource type={selectedType} key={selectedType} />
    </>
  );
}
Strategically use the key attribute to trigger component re-renders
Wanna force a component to re-render from scratch? Just change its key.
In the example below, we use this trick to reset the error boundary when switching to a new tab.
type ResourceType = 'posts' | 'snippets';

export function App() {
  const [selectedType, setSelectedType] = useState<ResourceType>('posts');
  return (
    <>
      <Navbar selectedType={selectedType} onSelectType={setSelectedType} />
      <ErrorBoundary
        fallback={<div>Something went wrong</div>}
        key={selectedType} // Without this key, an error will also be rendered when the resource type is `snippets`
      >
        <ResourceWithError type={selectedType} />
      </ErrorBoundary>
    </>
  );
}

function ResourceWithError({ type }: { type: ResourceType }) {
  const [likes, setLikes] = useState(0);

  const handleClick = () => {
    setLikes((prevLikes) => prevLikes + 1);
  };

  useEffect(() => {
    if (type === 'posts') {
      throw new Error('Posts are not valid');
    }
  }, []);

  return (
    <>
      <button onClick={handleClick}>
        Your {type == 'posts' ? 'posts' : 'snippets'} have {likes} like
        {likes == 1 ? '' : 's'}
      </button>
    </>
  );
}
Use a ref callback function for tasks such as monitoring size changes and managing multiple node elements.
Did you know that you can pass a function to the ref attribute instead of a ref object?
Here’s how it works.
When the DOM node is added to the screen, React calls the function with the DOM node as the argument.
When the DOM node is removed, React calls the function with
null.
In the example above, we use this tip to skip the useEffect.
❌ Before: Using useEffect to focus on the input
function App() {
  const ref = useRef();

  useEffect(() => {
    ref.current?.focus();
  }, []);

  return <input ref={ref} type="text" />;
}
✅ After: We focus on the input as soon as it is available.
function App() {
  const ref = useCallback((inputNode) => {
    inputNode?.focus();
  }, []);

  return <input ref={ref} type="text" />;
}
Keep the state at the lowest level necessary to minimize re-renders
Whenever the state changes inside a component, React re-renders the component and all its children (there is an exception with children wrapped in memo).
This happens even if those children don't use the changed state. To minimize re-renders, move the state down the component tree as far as possible.
❌ Bad: When sortOrder changes, both LeftSidebar and RightSidebar re-render.
function App() {
  const [sortOrder, setSortOrder] = useState("popular");
  return (
    <div className="App">
      <LeftSidebar />
      <Main sortOrder={sortOrder} setSortOrder={setSortOrder} />
      <RightSidebar />
    </div>
  );
}

function Main({ sortOrder, setSortOrder }) {
  return (
    <div>
      <Button
        onClick={() => setSortOrder("popular")}
        active={sortOrder === "popular"}
      >
        Popular
      </Button>
      <Button
        onClick={() => setSortOrder("latest")}
        active={sortOrder === "latest"}
      >
        Latest
      </Button>
    </div>
  );
}
✅ Good: sortOrder change will only affect Main.
function App() {
  return (
    <div className="App">
      <LeftSidebar />
      <Main />
      <RightSidebar />
    </div>
  );
}

function Main() {
  const [sortOrder, setSortOrder] = useState("popular");
  return (
    <div>
      <Button
        onClick={() => setSortOrder("popular")}
        active={sortOrder === "popular"}
      >
        Popular
      </Button>
      <Button
        onClick={() => setSortOrder("latest")}
        active={sortOrder === "latest"}
      >
        Latest
      </Button>
    </div>
  );
}
Throttle your network to simulate a slow network
Did you know you can simulate a slow internet connection directly in Chrome?
This is especially useful when:
Customers report slow loading times that you can't replicate on your faster network.
You're implementing lazy loading and want to observe how files load under slower conditions to ensure appropriate loading states.
Use StrictMode to catch bugs in your components before deploying them to production.
Using StrictMode is a proactive way to detect potential issues in your application during development.
It helps identify problems such as:
Incomplete cleanup in effects, like forgetting to release resources.
Impurities in React components ensure they return consistent JSX given the same inputs (props, state, and context).
React DevTools Components: Highlight components that render to identify potential issues.
I will use this trick whenever I suspect that my app has performance issues. You can highlight the components that render to detect potential problems (e.g., too many renders).
The GIF below shows that the FollowersListFn component re-renders whenever the time changes, which is wrong.
Hide logs during the second render in Strict Mode
StrictMode helps catch bugs early in your application's development.
However, since it causes the component to render twice, this can result in duplicated logs, which might clutter your console.
You can hide logs during the second render in Strict Mode to address this:
Check out how to do it in the GIF below:
Use ref to preserve values across re-renders
If you have a mutable value in your React application that isn’t stored in the state, you will notice that changes to these values don’t persist through re-renders.
This happens unless you save them globally.
You might consider putting these values in the state. However, if they are irrelevant to the rendering, doing so can cause unnecessary re-renders, which. wastes performance.
This is where useRef also shines.
In the example below, I want to stop the timer when the user clicks on some buttons. For that, I need to store intervalID somewhere.
❌ Bad: The example won’t work as intended because intervalid gets reset with every component re-render.
function Timer() {
  const [time, setTime] = useState(new Date());
  let intervalId;

  useEffect(() => {
    intervalId = setInterval(() => {
      setTime(new Date());
    }, 1_000);
    return () => clearInterval(intervalId);
  }, []);

  const stopTimer = () => {
    intervalId && clearInterval(intervalId);
  };

  return (
    <>
      <>Current time: {time.toLocaleTimeString()} </>
      <button onClick={stopTimer}>Stop timer</button>
    </>
  );
}
✅ Good: By using useRef, we ensure that the intervalId is preserved between renders.
function Timer() {
  const [time, setTime] = useState(new Date());
  const intervalIdRef = useRef();
  const intervalId = intervalIdRef.current;

  useEffect(() => {
    const interval = setInterval(() => {
      setTime(new Date());
    }, 1_000);
    intervalIdRef.current = interval;
    return () => clearInterval(interval);
  }, []);

  const stopTimer = () => {
    intervalId && clearInterval(intervalId);
  };

  return (
    <>
      <>Current time: {time.toLocaleTimeString()} </>
      <button onClick={stopTimer}>Stop timer</button>
    </>
  );
}
Prefer named functions over arrow functions within hooks, such as UseEffect, to find them in React Dev Tools easily.
If you have many hooks, finding them in React Dev Tools can be challenging.
One trick is to use named functions so you can quickly spot them.
❌ Bad: It’s hard to find the specific effect among many hooks
function HelloWorld() {
  useEffect(() => {
    console.log("🚀 ~ Hello, I just got mounted")
  }, []);

  return <>Hello World</>;
}
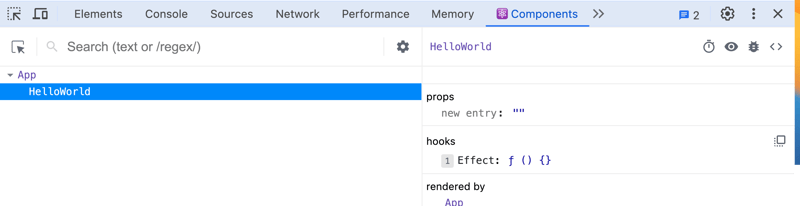
✅ Good: You can quickly spot the effect.
function HelloWorld() {
  useEffect(function logOnMount() {
    console.log("🚀 ~ Hello, I just got mounted");
  }, []);

  return <>Hello World</>;
}
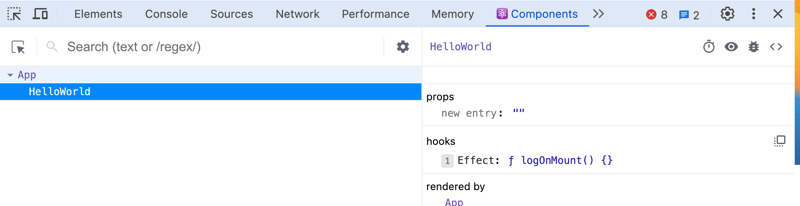
Prefer functions over custom hooks
Never put logic inside a hook when a function can be used.
Hooks can only be used inside other hooks or components, whereas functions can be used everywhere.
Functions are simpler than hooks
Functions are easier to test.
❌ Bad: The useLocale hook is unnecessary since it doesn't need to be a hook. It doesn't use other hooks like useEffect, useState, etc.
function App() {
  const locale = useLocale();
  return (
    <div className="App">
      <IntlProvider locale={locale}>
        <BlogPost post={EXAMPLE_POST} />
      </IntlProvider>
    </div>
  );
}

function useLocale() {
  return window.navigator.languages?.[0] ?? window.navigator.language;
}
✅ Good: Create a function getLocale instead
function App() {
  const locale = getLocale();
  return (
    <div className="App">
      <IntlProvider locale={locale}>
        <BlogPost post={EXAMPLE_POST} />
      </IntlProvider>
    </div>
  );
}

function getLocale() {
  return window.navigator.languages?.[0] ?? window.navigator.language;
}
Generate unique IDs for accessibility attributes with the useId hook.
Tired of coming up with IDs or having them clash?
You can use the useId hook to generate a unique ID inside your React component and ensure your app is accessible.
function Form() {
  const id = useId();
  return (
    <div className="App">
      <div>
        <label>
          Name{" "}
          <input type="text" aria-describedby={id} />
        </label>
      </div>
      <span id={id}>Make sure to include full name</span>
    </div>
  );
}
Use the useSyncExternalStore to subscribe to an external store
This is rarely needed, but this is a powerful hook.
Use this hook if:
You have some state not accessible in the React tree (i.e., not present in the state or context)
The state can change, and you need your component to be notified of changes
In the example below, I want a Logger singleton to log errors, warnings, info, etc., in my entire app.
These are the requirements:
I need to be able to call this everywhere in my React app (even inside non-React components), so I won't put it inside a state/context.
I want to display all the logs to the user inside a
Logscomponent
👉 I can use useSyncExternalStore inside my Logs component to access the logs and listen to changes.
Use ReactNode instead of JSX.Element | null | undefined | ... to keep your code more compact
I see this mistake a lot
Instead of typing the leftElement and rightElement props like this:
const Panel = ({ leftElement, rightElement }: {
  leftElement:
    | JSX.Element
    | null
    | undefined
    // | ...;
  rightElement:
    | JSX.Element
    | null
    | undefined
    // | ...
}) => {
  //   …
};
You can use ReactNode to keep the code more compact:
const MyComponent = ({ leftElement, rightElement }: { leftElement: ReactNode; rightElement: ReactNode }) => {
  //   …
};
Simplify the typing of components expecting children to props with PropsWithChildren
You don’t have to type the children prop manually.
In fact, you can use PropsWithChildren to simplify the typings.
// 🟠 Ok
const HeaderPage = ({ children,...pageProps }: { children: ReactNode } & PageProps) => {
  //   …
};

// ✅ Better
const HeaderPage = ({ children, ...pageProps } : PropsWithChildren<PageProps>) => {
//   …
};
Access element props efficiently with ComponentProps, ComponentPropsWithoutRef, …
There are cases where you need to figure out a component’s props
For example, let’s say you want a button that will log the console when clicked
You can use ComponentProps to access the props of the button element and then override the click prop.
const ButtonWithLogging = (props: ComponentProps<"button">) => {
  const handleClick: MouseEventHandler<HTMLButtonElement> = (e) => {
    console.log("Button clicked"); //TODO: Better logging
    props.onClick?.(e);
  };
  return <button {...props} onClick={handleClick} />;
};
This trick also works with the custom component.
const MyComponent = (props: { name: string }) => {
  //   …
};

const MyComponentWithLogging = (props: ComponentProps<typeof MyComponent>) => {
  //   …
};
Leverage types like MouseEventHandler, FocusEventHander, and others for concise typing.
Rather than typing the event handlers manually, you can use types like MouseEventHandler to keep the code more concise and readable.
// 🟠 Ok
const MyComponent = ({ onClick, onFocus, onChange }: {
  onClick: (e: MouseEvent<HTMLButtonElement>) => void;
  onFocus: (e: FocusEvent<HTMLButtonElement>) => void;
  onChange: (e: ChangeEvent<HTMLInputElement>) => void;
}) => {
  //   …
};

// ✅ Better
const MyComponent = ({ onClick, onFocus, onChange }: {
  onClick: MouseEventHandler<HTMLButtonElement>;
  onFocus: FocusEventHandler<HTMLButtonElement>;
  onChange: ChangeEventHandler<HTMLInputElement>;
}) => {
  //   …
};
Leverage the Record type for cleaner and more extensible code
I love this helper type.
Let’s say I have a type that represents log levels.
type LogLevel = "info" | "warn" | "error";
We have a corresponding function for each log level that logs the message.
const logFunctions = {
  info: (message: string) => console.info(message),
  warn: (message: string) => console.warn(message),
  error: (message: string) => console.error(message),
};
Instead of typing the logFunctions manually, you can use the Record type.
const logFunctions: Record<LogLevel, (message: string) => void> = {
  info: (message) => console.info(message),
  warn: (message) => console.warn(message),
  error: (message) => console.error(message),
};
Using the Record type makes code more concise and more readable.
Additionally, it helps capture any error if a new log level is added or removed.
For example, if I decided to add a debug log level, TypeScript would throw an error.
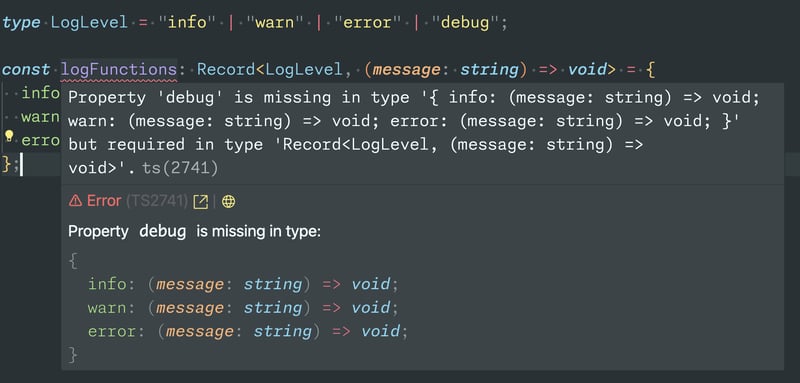
Use the as const trick to accurately type your hook return value
Let’s say we have a hook useIsHovered to detect whether a div element is hovered.
The hooks return a ref to use with the div element and a boolean indicating whether a div is hovered.
const useIsHovered = () => {
  const ref = useRef<HTMLDivElement>(null);
  const [isHovered, setIsHovered] = useState(false);
  // TODO : Rest of implementation
  return [ref, isHovered]
};
Currently, TypeScript will not correctly infer the function return type.
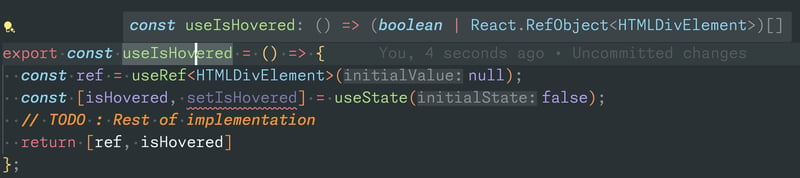
You can either fix this by explicitly typing the return type like this:
const useIsHovered = (): [RefObject<HTMLDivElement>, boolean] => {
  // TODO : Rest of implementation
  return [ref, isHovered]
};
Or you can use the as const trick to accurately type the return values:
const useIsHovered = () => {
  // TODO : Rest of implementation
  return [ref, isHovered] as const;
};
React state must be immutable
Have you ever wondered why React makes such a fuss about immutability? As a newbie, you might think that JavaScript’s mutations are perfectly fine. After all, we add or remove properties from objects and manipulate arrays with ease.
But here is the twist: in React, immutability isn’t about never changing state, it’s about ensuring consistency.
When you mutate state directly, React can’t detect changes reliably. This means your UI might not update as expected. The trick? Replace old data with new copies.
For instance, if you need to add a user, you should create a new array with a new user included, rather than directly pushing a new user to an existing array.
const updatedUsers = [...users, newUser];
The code const updatedUsers = [...users, newUser]; uses the spread operator to create a new array, updatedUsers, which combines the existing users with newUser.
This approach maintains immutability in React by not modifying the original users array. Instead, it creates a new state representation, allowing React to optimize rendering and ensure predictable state changes. When you update the state using setUsers(updatedUsers);, React re-renders the component based on this new array, adhering to best practices for state management.
This ensures React detects the change and re-renders your component smoothly.
Clear Flow of execution
Having a clear flow of execution is essential for writing clean code because it makes the code easier to read, understand, and maintain. Code that follows a clear and logical structure is less prone to errors, easier to modify and extend, and more efficient in terms of time and resources.
On the other hand, spaghetti is a term used to describe code that is convoluted and difficult to follow, often characterized by long, tangled, and unorganized code blocks. Spaghetti can be the result of poor design decisions, excessive coupling, or a lack of proper documentation and commenting.
Here are two examples of JavaScript code that perform the same task, one with a clear flow of execution, and the other with spaghetti code.
// Example 1: Clear flow of execution
function calculateDiscount(price, discountPercentage) {
  const discountAmount = price * (discountPercentage / 100);
  const discountedPrice = price - discountAmount;
  return discountedPrice;
}

const originalPrice = 100;
const discountPercentage = 20;
const finalPrice = calculateDiscount(originalPrice, discountPercentage);

console.log(finalPrice);

// Example 2: Spaghetti code
const originalPrice = 100;
const discountPercentage = 20;

let discountedPrice;
let discountAmount;
if (originalPrice && discountPercentage) {
  discountAmount = originalPrice * (discountPercentage / 100);
  discountedPrice = originalPrice - discountAmount;
}

if (discountedPrice) {
  console.log(discountedPrice);
}
As we can see, example 1 follows a clear and logical structure, with a function that takes in the necessary parameters and returns the calculated result. On the other hand, example 2 is much more convoluted, with variables declared outside of any function and multiple statements used to check if the code block has been executed successfully.
Reusability
Code reusability is a fundamental concept in software engineering that refers to the ability of code to be used multiple times without modification.
Code reusability is important because it can greatly improve the efficiency and productivity of software development by reducing the amount of code that needs to be written and tested.
By reusing existing code, developers can save time and effort, improve code quality and consistency, and minimize the risk of introducing bugs and errors. Reusable also allows for more modular and scalable software architectures, making it easier to maintain and update codebases over time.
// Example 1: No re-usability
function calculateCircleArea(radius) {
  const PI = 3.14;
  return PI * radius * radius;
}

function calculateRectangleArea(length, width) {
  return length * width;
}

function calculateTriangleArea(base, height) {
  return (base * height) / 2;
}

const circleArea = calculateCircleArea(5);
const rectangleArea = calculateRectangleArea(4, 6);
const triangleArea = calculateTriangleArea(3, 7);

console.log(circleArea, rectangleArea, triangleArea);
This example defines three functions that calculate the area of the circle, rectangle, and triangle, respectively. Each function performs a specific task, but none of them are reused for other similar tasks.
The code is inefficient since it repeats the same logic multiple times.
// Reusable function for calculating area of geometric shapes
function calculateArea(shape, ...args) {
  switch (shape) {
    case 'circle':
      const [radius] = args;
      const PI = 3.14;
      return PI * radius * radius;
    case 'rectangle':
      const [length, width] = args;
      return length * width;
    case 'triangle':
      const [base, height] = args;
      return (base * height) / 2;
    default:
      throw new Error(`Shape "${shape}" not supported.`);
  }
}

// Example usage
const circleArea = calculateArea('circle', 5); // Calculate area of circle with radius 5
const rectangleArea = calculateArea('rectangle', 4, 6); // Calculate area of rectangle with length 4 and width 6
const triangleArea = calculateArea('triangle', 3, 7); // Calculate area of triangle with base 3 and height 7

console.log('Circle Area:', circleArea);
console.log('Rectangle Area:', rectangleArea);
console.log('Triangle Area:', triangleArea);
This example defines a single function calculateArea that takes an shape argument and a variable number of arguments. Based on the shape argument, the function performs the appropriate calculation and returns the result.
This approach is much more efficient since it eliminates the need to repeat code for similar tasks. It is also more flexible and extensible, as additional shapes can easily be added in the future.
Conciseness vs Clarity
When it comes to writing clean code, it's important to strike a balance between conciseness and clarity. While it's important to keep code concise to improve its readability and maintainability, it's equally important to ensure that the code is clear and easier to understand. Writing overly concise code can lead to confusion and errors, and can make the code difficult to work with other developers.
Here are two examples that demonstrate the importance of conciseness and clarity.
// Example 1: Concise function
const countVowels = s => (s.match(/[aeiou]/gi) || []).length;
console.log(countVowels("hello world"));
This example uses a concise arrow function and a regex to count the number of vowels in a given string. When the code is very short and easy to write, it may not be immediately clear to other developers how the regex pattern works, especially if they are not familiar with regex syntax.
// Example 2: More verbose and clearer function
function countVowels(s) {
  const vowelRegex = /[aeiou]/gi;
  const matches = s.match(vowelRegex) || [];
  return matches.length;
}

console.log(countVowels("hello world"));
The example uses the traditional function and regex to count the number of vowels in a given string but does so in a way that is clear and easy to understand. The function name and the variable name are descriptive, and the regex pattern is stored in a variable with a clear name. This makes it easy to see what the function is doing and how it works.
It's important to strike a balance between conciseness and clarity when writing code. While concise code can improve readability and maintainability, it's important to ensure that the code is still clear and easy to understand for other developers who may be working with the codebase in the future.
By using descriptive functions and variable names and making use of clear and readable code formatting and comments, it's possible to write clean and concise code that is easy to understand and work with.
Single responsibility principle
The single responsibility principle (SRP) is a principle in software development that states that each class or module should have only one reason to change; in other words, each entity in our codebase should have only one responsibility.
This principle helps to create code that is easy to understand, maintain, and extend.
By applying SRP, we can create code that is easier to test, reuse, and refactor, since each module only handles a single responsibility. This makes it less likely to have side effects or dependencies that make the code harder to work with.
// Example 1: Withouth SRP
function processOrder(order) {
  // validate order
  if (order.items.length === 0) {
    console.log("Error: Order has no items");
    return;
  }

  // calculate total
  let total = 0;
  order.items.forEach(item => {
    total += item.price * item.quantity;
  });

  // apply discounts
  if (order.customer === "vip") {
    total *= 0.9;
  }

  // save order
  const db = new Database();
  db.connect();
  db.saveOrder(order, total);
}
In this example, the processOrder function handles several responsibilities, it validating the order, calculating the total, applying discounts, and saving the order to a database. This makes the function long and harder to understand, and any changes to one's responsibilities may affect the others, making it harder to maintain.
// Example 2: With SRP
class OrderProcessor {
  constructor(order) {
    this.order = order;
  }

  validate() {
    if (this.order.items.length === 0) {
      console.log("Error: Order has no items");
      return false;
    }
    return true;
  }

  calculateTotal() {
    let total = 0;
    this.order.items.forEach(item => {
      total += item.price * item.quantity;
    });
    return total;
  }

  applyDiscounts(total) {
    if (this.order.customer === "vip") {
      total *= 0.9;
    }
    return total;
  }
}

class OrderSaver {
  constructor(order, total) {
    this.order = order;
    this.total = total;
  }

  save() {
    const db = new Database();
    db.connect();
    db.saveOrder(this.order, this.total);
  }
}

const order = new Order();
const processor = new OrderProcessor(order);

if (processor.validate()) {
  const total = processor.calculateTotal();
  const totalWithDiscounts = processor.applyDiscounts(total);
  const saver = new OrderSaver(order, totalWithDiscounts);
  saver.save();
}
In this example, the processOrder function has been split into two classes that follow the SRP: OrderProcessor and OrderSave .
The OrderProcessor class handles the responsibilities of validating the order, calculating the total, and applying discounts, while the OrderSaver class handles the responsibilities of saving the order to the database.
This makes the code easier to understand, test, and maintain since each class has a clear responsibility and can be modified or replaced without affecting others.
Having a "Single Source of Truth"
Having a "single source of truth" means there is only one place where a particular piece of data or configuration is stored in the codebase, and any references to it in the code refer back to that one source. This is important because it ensures that the data is consistent and avoids duplication and inconsistency.
Here is an example to illustrate the concept. Let's say we have an application, that needs to display the current weather conditions in a city. We could implement this feature in two different ways.
// Option 1: No "single source of truth"

// file 1: weatherAPI.js
const apiKey = '12345abcde';

function getCurrentWeather(city) {
  return fetch(`https://api.weather.com/conditions/v1/${city}?apiKey=${apiKey}`)
    .then(response => response.json());
}

// file 2: weatherComponent.js
const apiKey = '12345abcde';

function displayCurrentWeather(city) {
  getCurrentWeather(city)
    .then(weatherData => {
      // display weatherData on the UI
    });
}
In this option, the API key is duplicated in two different files, making it harder to maintain and update. If we ever need to change the API key, we have to remember to update it in both places.
// Option 2: "Single source of truth"

// file 1: weatherAPI.js
const apiKey = '12345abcde';

function getCurrentWeather(city) {
  return fetch(`https://api.weather.com/conditions/v1/${city}?apiKey=${apiKey}`)
    .then(response => response.json());
}

export { getCurrentWeather, apiKey };


// file 2: weatherComponent.js
import { getCurrentWeather } from './weatherAPI';

function displayCurrentWeather(city) {
  getCurrentWeather(city)
    .then(weatherData => {
      // display weatherData on the UI
    });
}
In this option, the API key is stored in one place(in the weatherAPI.js file) and exported for other modules to use. This ensures there is only one source of truth for the API key and avoids duplication and inconsistency.
If we ever need to update the API key, we can do it in one place and all other modules that use it will automatically get the updated value.
Only expose and consume the data you need
One important principle of writing clean code is to only expose and consume the information that is necessary for a particular task. This helps to reduce complexity, increase efficiency, and avoid errors that can arise from using unnecessary data.
When data is not needed to expose or consume, it can lead to performance issues and make the code more difficult to understand and maintain.
Suppose you have an object with multiple properties, but you only need to use a few of them. One way to do this would be to reference the object and the specific properties every time you need them. And this can become verbose and error-prone, especially if the object is deeply nested. A cleaner and more efficient solution would be to use object destructing to only expose and consume the data you need.
// Original object
const user = {
  id: 1,
  name: 'Alice',
  email: 'alice@example.com',
  age: 25,
  address: {
    street: '123 Main St',
    city: 'Anytown',
    state: 'CA',
    zip: '12345'
  }
};

// Only expose and consume the name and email properties
const { name, email } = user;

console.log(name); // 'Alice'
console.log(email); // 'alice@example.com'
Always check null & undefined for Objects & Arrays
Neglecting null and undefined in the case of objects & arrays can lead to errors.
So, always check for them in your code:
const person = {
  name: "Haris",
  city: "Lahore",
};
console.log("Age", person.age); // error
console.log("Age", person.age ? person.age : 20); // correct
console.log("Age", person.age ?? 20); //correct

const oddNumbers = undefined;
console.log(oddNumbers.length); // error
console.log(oddNumbers.length ? oddNumbers.length : "Array is undefined"); // correct
console.log(oddNumbers.length ?? "Array is undefined"); // correct
Avoid DOM Manipulation
In React, it's generally advised to avoid DOM manipulation because React uses a virtual DOM to manage updates efficiently. Directly manipulating the DOM can lead to unexpected behavior and can interfere with React's rendering optimizations.
Bad approach: Manipulating the DOM directly
import React from 'react';

function InputComponent() {
  const handleButtonClick = () => {
    const inputElement = document.querySelector('input[type="text"]');
    if (inputElement) {
      inputElement.style.border = '2px solid green';
      inputElement.focus();
    }
  };

  return (
    <div>
      <input type="text" />
      <button onClick={handleButtonClick}>Focus and Highlight Input</button>
    </div>
  );
}

export default InputComponent;
Good approach: Using useRef
import React, { useRef } from 'react';

function InputComponent() {
  const inputRef = useRef(null);

  const handleButtonClick = () => {
    inputRef.current.style.border = '2px solid green';
    inputRef.current.focus();
  };

  return (
    <div>
      <input type="text" ref={inputRef} />
      <button onClick={handleButtonClick}>Focus and Highlight Input</button>
    </div>
  );
}

export default InputComponent;
Avoid Inline Styling
Inline styling makes your JSX code messy. It is good to use classes & ids for styling in a separate .css file.
const text = <div style={{ fontWeight: "bold" }}>Happy Learing!</div>; // bad approach

const text = <div className="learning-text">Happy Learing!</div>; // good approach
In .css file:
.learning-text {
  font-weight: bold;
}
Don't throw your files randomly
Keep the related files in the same folder instead of making files in a single folder. When files are organized logically in the same folder, it's easy to maintain and update them. Developers know where to find the related code and make changes, reducing the risk of introducing bugs or inconsistencies.
For example, if you want to create a navbar in React, then you should create a folder and place .js & .css & .test.js files related to the navbar are in it.
Create a habit of writing helper functions
Creating a habit of writing helper functions in ReactJS offers several advantages:
Code Reusability: Helper functions encapsulate common logic or operations, allowing you to reuse them across different components or modules. This reduces code duplication and promotes a more modular and maintainable codebase.
Improved Readability: By breaking down complex logic into smaller, more manageable helper functions, your code becomes easier to read and understand. Well-named helper functions serve as self-documenting code, conveying their purpose and functionality at a glance.
Simplifying Component Logic: Writing helper functions enables you to offload non-UI-related logic from your components. This keeps your components focused on rendering UI elements and handling user interactions, leading to cleaner and more concise component code.
Facilitating Testing: Helper functions can be tested independently, which makes it easier to write unit tests for your application logic. This promotes code reliability and helps catch bugs early in the development process.
Encouraging Code Organization: By abstracting common operations into helper functions, you can better organize your codebase and adhere to principles of separation of concerns. This makes it easier to maintain and scale your application over time.
Overall, incorporating helper functions into your ReactJS projects promotes code reuse, readability, maintainability, testability, and code organization, ultimately leading to more efficient and robust applications.
Use a ternary operator instead of if/else if statements
Using if else if statements make your code bulky. Instead, try to use a ternary operator where possible to make code simpler and cleaner.
// Bad approach
if (name === "Ali") {
  return 1;
} else if (name === "Bilal") {
  return 2;
} else {
  return 3;
}

// Good approach
name === "Ali" ? 1 : name === "Bilal" ? 2 : 3;
Make the index.js File Name to minimize importing complexity
If you have a file named index.js in a directory named actions and you want to import action from it in your component, your import would be like this:
import { actionName } from "src/redux/actions";
actions the directory path is explained in the above import. Here, you don't need to mention index.js after actions like this:
import { actionName } from "src/redux/actions/index";
Using Import Aliases
Import aliases simplify import statements, making them more readable and manageable, especially in large projects. Here’s how to use them effectively in Node.js, React, and Next.js 14.
Good Practice: Using Import Aliases
// In a React/Next.js project
import Button from '@components/Button';

// In a Node.js project
const dbConfig = require('@config/db');
Bad Practice: Without Import Aliases
// Complex and lengthy relative paths
import Button from '../../../components/Button';
const dbConfig = require('../../config/db');
Setting up Aliases
React/Next.js: Configure
jsconfig.jsonortsconfig.jsonfor alias paths.Node.js: Use
module-aliaspackage or configurepackage.jsonfor custom paths.
Import aliases streamline project structure by reducing the complexity of import statements, enhancing code readability, and maintainability.
Effective Color Management
Proper color management is essential in web development to maintain a consistent and scalable design. This document outlines best practices for managing colors using Tailwind CSS, CSS variables, and JSX. It also highlights common pitfalls to avoid.
Bad practices to avoid: Inline color definitions
/* Bad Practice in css */
.some-class {
  color: #333333; /* Direct color definition */
  background-color: #ffffff; /* Hardcoded color */
}

/* Bad Practice in JSX */
const MyComponent = () => (
  <div style={{ color: '#333333', backgroundColor: '#ffffff' }}>
    Content
  </div>
);
Using CSS Variables for Global Color Management
CSS variables offer a flexible and maintainable approach to managing colors globally.
// Defining CSS variables
:root {
  --primary-color: #5A67D8;
  --secondary-color: #ED64A6;
  --text-color: #333333;
  --background-color: white;
  --warning-color: #ffcc00;
}

// Using CSS variables in stylesheet
.header {
  background-color: var(--primary-color);
  color: var(--background-color);
}

// Dark Mode example with CSS variables
.dark {
  --primary-color: #9f7aea;
  --background-color: #2d3748;
  --text-color: #cbd5e0;
}
Tailwind CSS for consistent color usage
Tailwind CSS provides a utility-first approach, allowing you to define a color palette in your configuration and set it throughout your project.
//tailwind.config.js
module.exports = {
  theme: {
    extend: {
      colors: {
        primary: '#5A67D8',
        secondary: '#ED64A6',
        // other colors...
      },
    },
  },
  // other configurations...
};

// Using Tailwind classes in JSX
const MyComponent = () => (
  <h1 className="text-primary bg-secondary">Welcome to My Site</h1>
);
Best Practices in Code Documentation
Effective documentation is key to making code readable and maintainable. This guide covers the usage of JSDoc and the dos and don'ts of commenting.
JSDoc for JavaScript
JSDoc is a popular tool for documenting JavaScript code. It helps in understanding the purpose of functions, parameters, and return types.
Good JSDoc Example
/**
 * Adds two numbers together.
 * @param {number} a - The first number.
 * @param {number} b - The second number.
 * @returns {number} The sum of the two numbers.
 */
function sum(a, b) {
  return a + b;
}
Bad JSDoc Example
// Adds a and b
function sum(a, b) {
  return a + b;
}
// Missing detailed JSDoc comment
Including meaningful comments & avoiding redundancy
Strategic comments enhance code clarity, but beware of redundancy. Prioritize meaningful insights to facilitate collaboration and understanding among developers.
Good practice
// Loop through users and apply discounts to eligible ones
users.forEach(user => {
  if (user.isEligibleForDiscount()) {
    applyDiscount(user);
  }
});

// --------------------------------------------

// Calculate the area of a rectangle
function calculateArea(length, width) {
  return length * width;
}
Bad Practice
// Start a loop
users.forEach(user => {
  // Check if the user is eligible for discount
  if (user.isEligibleForDiscount()) {
    // Apply discount to the user
    applyDiscount(user);
  }
});
// Redundant comments that simply restate the code

// ----------------

// Calculate area
function calculateArea(l, w) {
  return l * w;
  // Ambiguous and unhelpful comment
}
Secure Coding Practices
Security is a paramount aspect of web development. Writing secure code is crucial to protect against vulnerabilities like SQL injection, XSS (Cross-Site Scripting), and CSRF (Cross-Site Request Forgery).
Protecting Against XSS Attacks
Cross-site scripting (XSS) attacks occur when malicious scripts are injected into web pages viewed by other users. This can lead to data theft, session hijacking, and other security breaches. To learn more about XSS
Vulnerable Code Example:
  // Rendering user input directly to the DOM
  document.getElementById("user-content").innerHTML = userInput;
Secure Code Example
  // Escaping user input before rendering
  const safeInput = escapeHtml(userInput);
  document.getElementById("user-content").textContent = safeInput;

  // Example: Using DOMPurify to sanitize user input
  const cleanInput = DOMPurify.sanitize(userInput);
  document.getElementById("user-content").innerHTML = cleanInput;
Mitigating CSRF Attacks
CSRF attacks force a logged-on victim to submit a request to a web application on which they are currently authenticated. These attacks can be used to perform actions on behalf of the user without their consent. To learn more about CSRF.
Vulnerable Code Example
  <!-- GET request for sensitive action -->
  <a href="/delete-account">Delete Account</a>
Secure Code Example
  // Backend: Generate and validate CSRF tokens
  app.use(csrfProtection);
  app.post("/delete-account", (req, res) => {
    // Validate CSRF token
  });
<!-- Frontend: Include CSRF token in form --> <form action="/delete-account" method="POST"> <input type="hidden" name="_csrf" value="{csrfToken}" /> <button type="submit">Delete Account</button> </form>Using
npm-auditto Identify VulnerabilitiesRun
npm auditto identify insecure dependencies. Regularly update your package to the latest, non-vulnerable versions.Incorporating Synk for Continuous Security
Integrate Snyk into your development workflow for continuous monitoring and fixing of vulnerabilities in dependencies.
Managing Environment Variables Securely
Store sensitive information like API keys and passwords in
.envfiles and access them viaprocess.envin your code.// Bad Practice: Hardcoded secret const API_KEY = "hardcoded-secret-key";// Good Practice: Example of accessing a secret from .env file require("dotenv").config(); const API_KEY = process.env.API_KEY;
Utilize Design Patterns, but don't over-design
Design patterns can help us show some common problems. However, every pattern has its applicable scenarios. Overusing or misusing design patterns may make your code more complex and difficult to understand.
Below are these design patterns you should know:
Factory
Behavioral
Strategy
Proxy
Structural
Adapter
Singleton
Creational
Apply Custom Hook Pattern
The Custom Hook pattern in React is a technique that allows encapsulating the logic of a component in a reusable function. Custom Hooks are JavaScript functions that use Hooks provided by React(such as useState, useEffect, useContext, etc) and can be shared between components to effectively encapsulate and reuse logic.
When to use it
When you need to share the logic between React components without resorting to code duplication.
To abstract the complex logic of a component and keep it more readable and easier to maintain.
When you need to modularize the logic of a component to facilitate unit testing.
When not to use it
When the logic is specific to a single component and will not be reused elsewhere.
When the logic is simple and does not justify the creation of a Custom Hook.
Advantages
Promotes code reuse by encapsulating common logic in separate functions.
Facilitates code composition and readability by separating the logic from the component.
Improves testability by enabling more specific and focused unit tests on the logic encapsulated in Custom Hooks.
Disadvantages
This may result in additional complexity if abused and many Custom Hooks are created
Requires a solid understanding of React and Hooks concepts for proper implementation.
Example
Here is an example of a Custom Hook that performs a generic HTTP request using Typescript and React. This hook handles the logic to make the request and handles the load status, data, and errors.
import { useState, useEffect } from 'react';
import axios, { AxiosResponse, AxiosError } from 'axios';

type ApiResponse<T> = {
  data: T | null;
  loading: boolean;
  error: AxiosError | null;
};

function useFetch<T>(url: string): ApiResponse<T> {
  const [data, setData] = useState<T | null>(null);
  const [loading, setLoading] = useState<boolean>(true);
  const [error, setError] = useState<AxiosError | null>(null);

  useEffect(() => {
    const fetchData = async () => {
      try {
        const response: AxiosResponse<T> = await axios.get(url);
        setData(response.data);
      } catch (error) {
        setError(error);
      } finally {
        setLoading(false);
      }
    };

    fetchData();

    // Cleanup function
    return () => {
      // Cleanup logic, if necessary
    };
  }, [url]);

  return { data, loading, error };
}

// Using the Custom Hook on a component
function ExampleComponent() {
  const { data, loading, error } = useFetch<{ /* Expected data type */ }>('https://example.com/api/data');

  if (loading) {
    return <div>Loading...</div>;
  }

  if (error) {
    return <div>Error: {error.message}</div>;
  }

  if (!data) {
    return <div>No data.</div>;
  }

  return (
    <div>
      {/* Rendering of the obtained data */}
    </div>
  );
}

export default ExampleComponent;
In this example, the Custom Hook useFetch takes a URL as an argument and performs a GET request using Axios. It manages the load status, data, and errors, returning an object with this information.
The ExampleComponent component uses the Custom Hook useFetch to fetch data from an API and render it in the user interface. Depending on the status of the request, a load indicator, an error message, or the fetched data is displayed.
There are many ways to use this pattern. In this link, you can find several examples of custom Hooks to solve specific problems; the uses are many.
Apply Extensible Stylesheet Pattern
The Extensible Styles pattern is a technique that allows the creation of React components with flexible and easily customizable styles. Instead of applying styles directly to the component, this pattern uses dynamic CSS properties or classes that can be modified and extended according to the user’s needs.
When to use it
When you need to create components that can adapt to different styles or themes within an application.
To allow end users to easily customize the appearance of components.
When you want to maintain visual consistency in the user interface while providing flexibility in the appearance of components.
When not to use it
When style customization is not a concern or styles are not expected to vary significantly.
In applications where tight control over the styles and appearance of components is required.
Advantages
Facilitates customization and extension of styles in components without the need to modify the source code.
Maintains visual consistency in the application while providing flexibility in styles.
Simplifies maintenance by separating the styling logic from the component code.
Disadvantages
May result in increased complexity if extensible styles are not managed properly.
Requires careful design to ensure that styles can be extended in a consistent and predictable manner.
Example
Suppose we want to create a button component with extensible styles that allows changing its color and size by means of props.
import React from 'react';
import './Button.css';

interface ButtonProps {
  color?: string;
  size?: 'small' | 'medium' | 'large';
  onClick: () => void;
}

const Button: React.FC<ButtonProps> = ({ color = 'blue', size = 'medium', onClick, children }) => {
  const buttonClasses = `Button ${color} ${size}`;

  return (
    <button className={buttonClasses} onClick={onClick}>
      {children}
    </button>
  );
};

export default Button;
.Button {
  border: none;
  cursor: pointer;
  padding: 8px 16px;
  border-radius: 4px;
  font-size: 14px;
  font-weight: bold;
}

.small {
  padding: 4px 8px;
}

.medium {
  padding: 8px 16px;
}

.large {
  padding: 12px 24px;
}

.blue {
  background-color: blue;
  color: white;
}

.red {
  background-color: red;
  color: white;
}

.green {
  background-color: green;
  color: white;
}
In this example, the Button component accepts properties such as color and size, which can be used to customize its appearance. The CSS styles are defined in an extensible way, allowing the size and color of the button to be easily modified by the prop. This provides flexibility for the developer to adapt the component to different styles within the application.
Use Barrel Exports To Export React Components
When you are working on a large React project, you might have different folders containing different components.
In such cases, if you are using different components in a particular file, your file will contain a lot of import statements like this:
import ConfirmModal from './components/ConfirmModal/ConfirmModal';
import DatePicker from './components/DatePicker/DatePicker';
import Tooltip from './components/Tooltip/Tooltip';
import Button from './components/Button/Button';
import Avatar from './components/Avatar/Avatar';
which does not look good as the number of components increases, the number of import statements will also increase.
To fix this issue, you can create an index.js file in the parent folder (components) and export all the components as the named export from that file like this.
export { default as ConfirmModal } from './ConfirmModal/ConfirmModal';
export { default as DatePicker } from './DatePicker/DatePicker';
export { default as Tooltip } from './Tooltip/Tooltip';
export { default as Button } from './Button/Button';
export { default as Avatar } from './Avatar/Avatar';
This needs to be done only once. Now, if in any of the files you want to access any component, you can easily import it using the named import in a single file like this:
import {ConfirmModal, DatePicker, Tooltip, Button, Avatar} from './components';
which is the same as
import {ConfirmModal, DatePicker, Tooltip, Button, Avatar} from './components/index';
This is standard practice when working on large industry/company projects.
This pattern is known as the barrel pattern, which is a file organization pattern that allows use to export all modules in a directory in a single file.
Here is a CodeSandbox demo to see it in action.
Use console.count Method To Find Out the Number Of Re-Renders Of Components
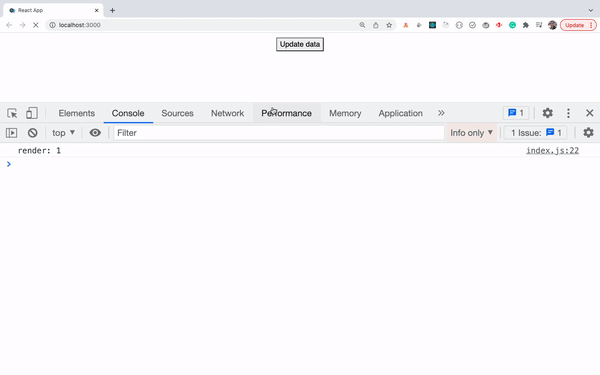
Sometimes we want to know how many times the line of a particular code is executed.
Maybe we want to know how many times a particular function is executed.
In that case, we can use a console.count method by passing a unique string to it as an argument.
For example, if you have a React code and you want to know how many times the component is getting re-rendered, then instead of adding console.log and manually counting how many times it’s printed in the console, you can just add console.count('render') it to the component.
As you will see, the render message along with the count of how many times it’s executed.
Avoid Passing setState function as A Prop to the Child Component
Never pass the setState function directly as a prop to any of the child components like this:
const Parent = () => {
 const [state, setState] = useState({
   name: '',
   age: ''
 })

 .
 .
 .

 return (
  <Child setState={setState} />
 )
}
The state of a component should be changed only by that component itself.
Here’s why:
This ensures the code is predictable. If you pass the setState directly to multiple components, it will be difficult to identify where the state is getting changed.
This lack of predictability can lead to unexpected behavior and make debugging code is difficult.
Over time, as your application grows, you may need to refactor or change how the state is managed in the parent component.
if child components rely on direct access to setState, these changes can ripple through the codebase and require updates in multiple places, increasing the risk of introducing bugs.
If the sensitive data is part of the state, directly passing
useStatecould potentially expose that data to child components, increasing security risks.React’s component reconciliation algorithm works more efficiently when state and props updates are clearly defined within components.
Instead of passing setState directly, you can do the following:
Pass data as props: Pass the data that the component needs as props, not the setState function itself. This way, you provide a clear interface for the child component to receive data without exposing the implementation details of the state.
Pass function as props: If the child component needs to interact with the parent component’s state, you can pass the function as props. Declare a function in the parent component and update the state in that function. You can pass this function as a prop to child components and call it on the child component when needed.
Dynamically Adding Tailwind Classes In React Does Not Work
if you are using Tailwind CSS for styling and you want to dynamically add any class, then the following code will not work.
<div className={`bg-${isActive ? 'red-200' : 'orange-200'}`}>
  Some content
</div>
This is because in your final CSS file, Tailwind CSS includes only the classes present during its initial scan of your file.
So the code above will dynamically add the bg-red-200 or bg-orange-200 class to the div but its CSS will not be added, so you will not see the classes applied in your div.
So to fix this, you need to define the entire class initially like this:
<div className={`${isActive ? 'bg-red-200' : 'bg-orange-200'}`}>
  Some content
</div>
if you have a lot of classes that need to be conditionally added, then you can define an object with the complete class names like this:
const colors = {
  purple: 'bg-purple-300',
  red: 'bg-red-300',
  orange: 'bg-orange-300',
  violet: 'bg-violet-300'
};

<div className={colors['red']}>
  Some content
</div>
The 15 Best React Libraries That Will Transform Your Development Skills
React developers often rely on complementary libraries to enhance the development process and create feature-rich applications. In this section, we will explore a curated list of essential libraries that every developer should consider incorporating into their projects.
Check out this article to explore the list ✅
https://blog.stackademic.com/14-super-useful-react-libraries-you-should-know-cbbfee3a0f25
https://tigerabrodi.blog/become-expert-in-react-query?ref=dailydev
25 Essential React Code Snippets for Everyday Problems
You know that feeling when you are building a new feature and think:
Have I solved this exact problem before?
That’s why I created this guide. I have compiled my most-used React patterns and solutions, which I often return to in my projects.
Let me share these solutions with you. Each one has earned its place in my toolkit through real-world application and iteration. Whether you are building a new project or maintaining a legacy code base, these snippets will help you write more maintainable, performant React code.
- Custom Hook for Local Storage State
import { useState, useEffect } from 'react';

function useLocalStorage(key, initialValue) {
  // State to store our value
  // Pass initial state function to useState so logic is only executed once
  const [storedValue, setStoredValue] = useState(() => {
    try {
      const item = window.localStorage.getItem(key);
      return item ? JSON.parse(item) : initialValue;
    } catch (error) {
      console.error(error);
      return initialValue;
    }
  });

  // Return a wrapped version of useState's setter function that
  // persists the new value to localStorage
  const setValue = value => {
    try {
      // Allow value to be a function so we have same API as useState
      const valueToStore = value instanceof Function ? value(storedValue) : value;
      setStoredValue(valueToStore);
      window.localStorage.setItem(key, JSON.stringify(valueToStore));
    } catch (error) {
      console.error(error);
    }
  };

  return [storedValue, setValue];
}

export default useLocalStorage;
This custom hook synchronizes state with localStorage, which is perfect for persisting user preferences or form data. I use this in nearly every project where I need to maintain state across page refreshes. The error handling makes it production-ready, and the API mirrors useState for familiarity.
- Reducer Pattern for Complex Forms
When dealing with complex form states, a reducer pattern often provides cleaner, more maintainable code than multiple useState calls. Here’s a pattern I have refined over dozens of form implementations:
import { useReducer } from 'react';

const formReducer = (state, action) => {
  switch (action.type) {
    case 'UPDATE_FIELD':
      return {
        ...state,
        values: {
          ...state.values,
          [action.field]: action.value
        }
      };
    case 'SET_ERROR':
      return {
        ...state,
        errors: {
          ...state.errors,
          [action.field]: action.error
        }
      };
    case 'SET_TOUCHED':
      return {
        ...state,
        touched: {
          ...state.touched,
          [action.field]: true
        }
      };
    case 'RESET_FORM':
      return {
        values: action.initialValues || {},
        errors: {},
        touched: {}
      };
    default:
      return state;
  }
};

function useFormReducer(initialValues = {}) {
  const [formState, dispatch] = useReducer(formReducer, {
    values: initialValues,
    errors: {},
    touched: {}
  });

  const updateField = (field, value) => {
    dispatch({ type: 'UPDATE_FIELD', field, value });
  };

  const setError = (field, error) => {
    dispatch({ type: 'SET_ERROR', field, error });
  };

  const setTouched = (field) => {
    dispatch({ type: 'SET_TOUCHED', field });
  };

  const resetForm = (newInitialValues) => {
    dispatch({ type: 'RESET_FORM', initialValues: newInitialValues });
  };

  return {
    formState,
    updateField,
    setError,
    setTouched,
    resetForm
  };
}

export default useFormReducer;
This reducer handles all common form operations while clearly separating concerns. I have found it particularly useful in enterprise applications, where forms can have dozens of fields and complex validation requirements.
- Memoization Helper Hook
import { useMemo, useCallback } from 'react';

export function useMemoizedValue(value, deps) {
  return useMemo(() => value, deps);
}

export function useMemoizedCallback(callback, deps) {
  return useCallback((...args) => {
    console.time('callback-execution');
    const result = callback(...args);
    console.timeEnd('callback-execution');
    return result;
  }, deps);
}

export function useThrottledCallback(callback, delay = 300) {
  const lastRun = React.useRef(Date.now());

  return useCallback((...args) => {
    const now = Date.now();
    if (now - lastRun.current >= delay) {
      callback(...args);
      lastRun.current = now;
    }
  }, [callback, delay]);
}
These hooks have saved me countless hours of debugging performance issues. This useMemoizedCallback is particularly useful for expensive operations as it includes built-in performance monitoring.
- Dynamic Import Component
Here’s a pattern I use for code splitting and lazy loading components:
import React, { Suspense, useState, useEffect } from 'react';

function DynamicImport({ loader, loading: Loading = null }) {
  const [Component, setComponent] = useState(null);
  const [error, setError] = useState(null);

  useEffect(() => {
    loader()
      .then(comp => {
        setComponent(() => comp.default || comp);
      })
      .catch(err => {
        console.error('Failed to load component:', err);
        setError(err);
      });
  }, [loader]);

  if (error) {
    return <div>Error loading component: {error.message}</div>;
  }

  if (!Component) {
    return Loading;
  }

  return <Component />;
}

// Usage example:
const LazyComponent = ({ componentPath }) => (
  <Suspense fallback={<div>Loading...</div>}>
    <DynamicImport
      loader={() => import(`@/components/${componentPath}`)}
      loading={<div>Custom loading state...</div>}
    />
  </Suspense>
);

export default LazyComponent;
This component makes it easy to implement code splitting while handling loading and error states gracefully. I have used this pattern to reduce initial bundle sizes by up to 60% in larger applications.
\=» For more useful React code snippets, refer to this article.
https://github.com/streamich/react-use
Storybook: Your Project’s UI Toolkit & Documentation Tool
Storybook is a powerful open-source tool that allows developers to build and test UI components in isolation from the main application. Think of it as a dedicated workbench for your user interface elements. It provides a separate, contained environment where each component can be visually inspected, tested, and interacted with independently, without the overhead and complexity of running the whole application. While widely popular in the React ecosystem, Story is a framework-agnostic and boasts robust support for a wide range of front-end frameworks, including Vue, Angular, Svelte, Web Components, and many others.
In the context of modern web development, particularly with libraries like React, Storybook is commonly used to showcase and document UI components, fostering seamless collaboration among developers, designers, and quality assurance(QA) teams. It enables you to create “stories“ for components, which are essentially atomic representations of various use cases that demonstrate different states, variations, and interactive behaviors of a given component.
Storybook is used for:
Component-Driven Development (CDD): At its core, Storybook champions the philosophy of CDD. It empowers developers to build components in isolation, detached from the application’s business logic or routing concerns. This focused approach makes it significantly easier to concentrate on the individual component’s functionality, styling, and responsiveness without being sidetracked by app-level intricacies.
Comprehensive Documentation & Living Style Guide: Storybook acts as a dynamic, “living” style guide for your UI. All the documented stories serve as central, always up-to-date reference points for developers, designers, product managers, and other stakeholders. This eliminates the need for static, often outdated documentation, ensuring everyone is working from the same source of truth regarding UI components.
Streamlined Component Testing: Storybook provides an ideal playground for both manual and automated testing of components. You can easily test how components behave under different scenarios — such as various props, states, or contexts — ensuring visual fidelity and functional correctness across all permutations. This drastically simplifies the debugging process and boosts confidence in your UI.
Enhanced Component Reusability: By documenting components in isolation and showcasing their various states, Storybook inherently promotes reusability. Developers can quickly browse existing components, understand their capabilities, and integrate them into new parts of the application or even entirely different projects, thereby accelerating development and maintaining consistency.
Robust Design System Integration: For organizations committed to building and maintaining a consistent design system, Storybook is an invaluable asset. It provides the perfect platform to centralize and manage a library of reusable components, ensuring each component adheres to established design guidelines and brand standards. This consistency is crucial for scalable and cohesive user experiences.
Core Benefits of Using Storybook
Storybook provides a multitude of benefits that streamline front-end development workflows:
Simplifies component building: By creating “stories” or small, independent component examples, Storybook allows developers to focus intently on the component itself. This leads to faster iteration cycles and a higher degree of confidence in the component’s functionality and appearance.
Prevents you from duplicating effort: A common pitfall in larger projects is developers unknowingly creating components that already exist (or similar ones). Storybook serves as a central, accessible catalog of all documented components, drastically reducing redundant work and promoting reuse.
Creates a living style guide: Unlike static design documents that quickly become outdated, Storybook’s code templates are pieces of living code. Developers and designers can interact with, inspect, and even copy these code examples directly, ensuring that everyone is working from the latest, most accurate source of truth for the UI.
Enhances Collaboration & Communication: Storybook bridges the gap between design, development, and QA. Designers can review components directly, providing feedback on visual fidelity. QA can easily test components in all their states without needing to set up complex application scenarios. Developers can collaborate on component logic without affecting the main application.
Which Projects Should Embrace Storybook?
While Storybook offers benefits to almost any project, its value truly shines in specific scenarios:
Large-Scale Projects or Design Systems: Any project with a substantial number of reusable UI components will benefit immensely from Storybook. It ensures consistency, meticulously documents each component’s usage, and simplifies the process of collaboration and component reuse across the entire application or even multiple applications.
UI Component Libraries: For organizations or teams whose primary output is a UI component library (e.g., creating a competitor to Material UI or Chakra UI), Storybook is an absolute necessity. It provides the ideal platform to document, showcase, and test every variation and state of each component in the library.
Projects with Heavy Design/Frontend Focus: If your project features a rich, custom user interface with numerous unique UI elements, Storybook becomes invaluable. It helps you effectively track and test individual components as they evolve over time. It’s also an excellent tool for presenting these UI changes and new components to designers and other stakeholders for review and approval.
Projects with Distributed Teams: Storybook facilitates seamless collaboration among remote or cross-functional teams (developers, designers, product managers, technical writers). Each stakeholder can independently review, test, and comment on components, fostering a shared understanding and accelerating the feedback loop.
Prototyping: For teams that need to quickly iterate on and prototype UI ideas, Storybook serves as a dynamic, interactive playground. Designers and developers can experiment with components, test different layouts, and gather feedback much more efficiently than with static mockups.
Practical Example: A Task Component
Let’s illustrate Storybook’s power with a practical example: a Task component from a hypothetical to-do list application. This Task component might have multiple UI states, such as inbox pinned and archived.
First, here’s our simple React Task component:
type TaskData = {
  id: string;
  title: string;
  state: 'TASK_ARCHIVED' | 'TASK_INBOX' | 'TASK_PINNED';
};

type TaskProps = {
  task: TaskData;
  onArchiveTask: (id: string) => void;
  onPinTask: (id: string) => void;
};

export default function Task({
  task: { id, title, state },
  onArchiveTask, // This function would handle archiving a task
  onPinTask,     // This function would handle pinning a task
}: TaskProps) {
  // A simplified rendering of the task
  return (
    <div className={`list-item list-item-${state}`}> {/* Adding state to class for styling */}
      <label htmlFor={`title-${id}`} aria-label={title}>
        <input
          type="text"
          value={title}
          readOnly={true}
          name="title"
          id={`title-${id}`}
          // Visually indicate archived/pinned states
          style={{ textDecoration: state === 'TASK_ARCHIVED' ? 'line-through' : 'none' }}
        />
      </label>
      {/* Example buttons for actions - in a real app, these would trigger onArchiveTask/onPinTask */}
      {state !== 'TASK_ARCHIVED' && (
        <button onClick={() => onArchiveTask(id)}>Archive</button>
      )}
      {state !== 'TASK_PINNED' && (
        <button onClick={() => onPinTask(id)}>Pin</button>
      )}
    </div>
  );
}
Now, let’s define the stories for this Task component, showcasing its different states. These stories live in a separate file, typically alongside the component itself:
// src/components/Task.stories.tsx
import type { Meta, StoryObj } from '@storybook/react';
import { fn } from '@storybook/test'; // Utility for mocking actions

import Task from './Task';

// Mock functions for our task actions
export const ActionsData = {
  onArchiveTask: fn(), // Mocking the onArchiveTask function
  onPinTask: fn(),     // Mocking the onPinTask function
};

// This "meta" object describes our component to Storybook
const meta = {
  component: Task,           // The component we are documenting
  title: 'Task',             // How it will be grouped in the Storybook sidebar
  tags: ['autodocs'],        // Enables automatic documentation generation
  excludeStories: /.*Data$/, // Excludes our mock ActionsData from being rendered as a story
  args: {                    // Default arguments (props) for all stories
    ...ActionsData,          // Spread our mocked actions
  },
} satisfies Meta<typeof Task>;

export default meta;

// Define the type for our individual stories
type Story = StoryObj<typeof meta>;

// --- Individual Stories ---

// Default state: An active, inbox task
export const Default: Story = {
  args: {
    task: {
      id: '1',
      title: 'Test Task',
      state: 'TASK_INBOX',
    },
  },
};

// Pinned state: A task that has been pinned
export const Pinned: Story = {
  args: {
    task: {
      ...Default.args.task, // Inherit default task properties
      state: 'TASK_PINNED', // Override state to Pinned
    },
  },
};

// Archived state: A task that has been archived
export const Archived: Story = {
  args: {
    task: {
      ...Default.args.task,   // Inherit default task properties
      state: 'TASK_ARCHIVED', // Override state to Archived
    },
  },
};

// An example of a very long task title, to test overflow or truncation
export const LongTitle: Story = {
  args: {
    task: {
      ...Default.args.task,
      title: 'This is a really really long task title that should probably wrap or truncate nicely.',
    },
  },
};
In this setup:
Use a
metaobject to tell Storybook about ourTaskcomponent, specifying its grouping (title), enabling automatic documentation (tags), and providing default props (args).Then define individual
Storyobjects (Default,Pinned,Archived,LongTitle), each representing a distinct visual state or use case of theTaskcomponent. By varying thetaskprop within each story, we can visually test and document every permutation.The
fn()utility from@storybook/testhelps us mock event handlers (onArchiveTask,onPinTask), allowing us to verify that these actions are triggered correctly within Storybook's environment, even without a full application backend.

Wrapping up
I hope you enjoyed the article and learned something new. :)))
Happy coding!!!!!!
References
https://www.patterns.dev/react/hoc-pattern/
https://www.surajon.dev/5-github-repositories-to-learn-and-master-react?ref=dailydev
https://github.com/mithi/react-philosophies
https://dev.to/sathishskdev/part-4-writing-clean-and-efficient-react-code-best-practices-and-optimization-techniques-423d
https://dev.to/perssondennis/react-anti-patterns-and-best-practices-dos-and-donts-3c2g
https://najm-eddine-zaga.medium.com/18-best-practices-for-react-617e23ed7f2c
https://www.freecodecamp.org/news/best-practices-for-react/
https://www.freecodecamp.org/news/how-to-write-clean-code/#clear-flow-of-execution
https://dev.to/iambilalriaz/react-best-practices-ege?ref=dailydev
https://peacockindia.mintlify.app/introduction
https://baguilar6174.medium.com/react-design-patterns-6ab55c5ebafb
https://www.freecodecamp.org/news/react-best-practices-ever-developer-should-know/?ref=dailydev
https://rjroopal.medium.com/atomic-design-pattern-structuring-your-react-application-970dd57520f8
https://dev.to/_ndeyefatoudiop/101-react-tips-tricks-for-beginners-to-experts-4m11?context=digest
https://tigerabrodi.blog/optimizing-react-context-and-re-renders?ref=dailydev
https://tigerabrodi.blog/how-reacts-render-effects-and-refs-work-under-the-hood?ref=dailydev
https://compile7.org/decompile/how-to-fix-memory-leaks-in-react
https://thetshaped.dev/p/loading-third-party-scripts-in-react-the-right-way
https://thetshaped.dev/p/how-to-use-reducer-in-react-for-better-and-simpler-state-management
https://thetshaped.dev/p/building-react-components-turning-ui-designs-into-react-components
https://thetshaped.dev/p/10-ways-organize-and-design-react-application
https://thetshaped.dev/p/9-react-testing-best-practices-for-better-test-design-quality
https://thetshaped.dev/p/4-tools-to-supercharge-your-jest-testing-increase-productivity
https://last9.io/blog/react-logging/?ref=dailydev
https://medium.com/@ignatovich.dm/when-to-use-and-avoid-useeffect-in-react-611e844539a5
https://medium.com/@Choco23/mastering-useeffect-in-react-ded63588df4c
https://medium.com/@onix_react/storybook-your-projects-ui-toolkit-documentation-tool-a0cbd41933bf
https://levelup.gitconnected.com/when-to-use-react-query-with-next-js-server-components-f5d10193cd0a
https://medium.com/@hritvikom/how-senior-developers-think-about-side-effects-in-react-e1e13fb41ec6
https://medium.com/@meric.emmanuel/great-react-engineers-dont-make-these-five-mistakes-1c1457090e23
https://swizec.com/blog/you-may-be-looking-for-a-useSyncExternalStore/
https://adevnadia.medium.com/react-state-management-in-2025-what-you-actually-need-a138da90dbec
http://medium.com/@hritvikom/how-senior-developers-structure-state-in-react-apps-141311dccad3
https://medium.com/@hritvikom/how-senior-developers-use-useeffect-9f26743ad813